
Popular categories
Looking for a yarn?


Comments / Questions (7)
![]() Virginie wrote:
Virginie wrote:
Bonjour J’ai tricoté la première manche et sa forme semble être adaptée pour une emmanchure raglan. Hors le modèle n’est pas en raglan du coup ma manche ne s’adapte pas à la veste.
03.10.2021 - 12:09DROPS Design answered:
Bonjour Virginie, le haut de la manche ne correspond pas exactement à une manche raglan, mais vous devez diminuer comme indiqué pour que le haut de la manche s'ajuste avec les emmanchures - épinglez si besoin votre manche pour que le milieu soit tout en haut et que le milieu sous la manche se trouver en bas de l'emmanchure. Si vos mesures sont justes, alors la tête de la manche va s'ajuster impeccablement dans le trou formé pour l'emmanchure. Bon tricot!
04.10.2021 - 08:25
![]() Camilla Lenita wrote:
Camilla Lenita wrote:
Hur utläser jag måttskissen på cirkelstickade plagg? Var kan jag se bystmåttet t.ex.? Är det siffrorna 96, 102, 108 och 112 på denna skiss?
12.05.2020 - 19:28DROPS Design answered:
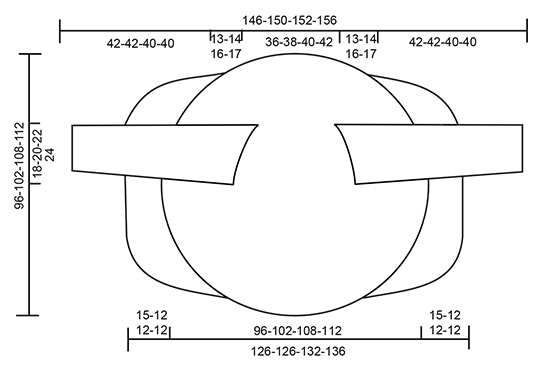
Hej Camilla, siffrorna 96-102-108-112 är diametern på cirklen och 15-12-12-12 är kanterna mot mitt fram, så det mäter på det bredaste 126-126-132-136 cm. Lycka till :)
15.05.2020 - 09:03
![]() Yvonne wrote:
Yvonne wrote:
Hallo, Ik begrijp de beschrijving van het afkanten voor de mouw niet goed. Is het de bedoeling dat er 3 steken aan het begin van de naald worden afgekant, dus bij de naald heen en bij de naald terug. En dat er 14 keer aan beide kanten op de pen ( dus in 1 naald) 1 steek wordt afgekant. En tot slot nog 7 keer aan het begin van de naald, dus bij de naald heen en terug. Anders kom ik niet op 12 steken over en de 13 cm aan hoogte erbij. Graag uw opheldering.
21.02.2019 - 14:29DROPS Design answered:
Dag Yvonne,
Het klopt precies zoals je het begrijpt. Je kant de heengaande en de teruggaande naald af, zodat je aan beide kanten van de mouw afkant.
26.02.2019 - 09:43
![]() Joke Van Ees wrote:
Joke Van Ees wrote:
Is het patroon over 1 of 2 pennen per hokje.en hoe ga je veder met A2ik begrijp er niks van , zal u mijn dat willen uit leggen .
19.02.2019 - 17:03DROPS Design answered:
Dag Joke,
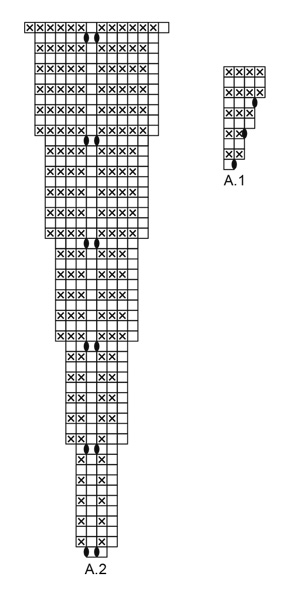
Een hokje is een steek en je begint het telpatroon onderaan en werkt naar boven toe. Je leest de steken in het telpatroon van rechts naar links. Als je 1 rij klaar hebt, lees je de volgende rij weer van rechts naar links, totdat je alle rijen (= naalden) gebreid hebt.
21.02.2019 - 11:11
![]() Yvonne wrote:
Yvonne wrote:
Bij het breien van het voorpand staat: brei verder in patroon. Mijn vraag is: moet er na elke 10e naald ook gemeerderd worden? Of hoeft dat niet meer?
31.01.2019 - 16:34DROPS Design answered:
Dag Yvonne,
Nee, je hoeft dan inderdaad niet meer te meerderen.
03.02.2019 - 11:52
![]() Jantina Strangmann wrote:
Jantina Strangmann wrote:
Graag zou ik willen weten of het aantal gr. klopt met het patroon, lijkt mij dat er meer in gaat dan 250 gr.
04.10.2018 - 13:29
![]() Lizeth wrote:
Lizeth wrote:
Weten jullie al hoeveel garen erin gaat? Ik heb nog 125 gram BrushedAlpacaSilk en zoek een leuk patroon
25.01.2018 - 13:13
|
||||||||||
Marea#mareajacket |
||||||||||
 |
 |
|||||||||
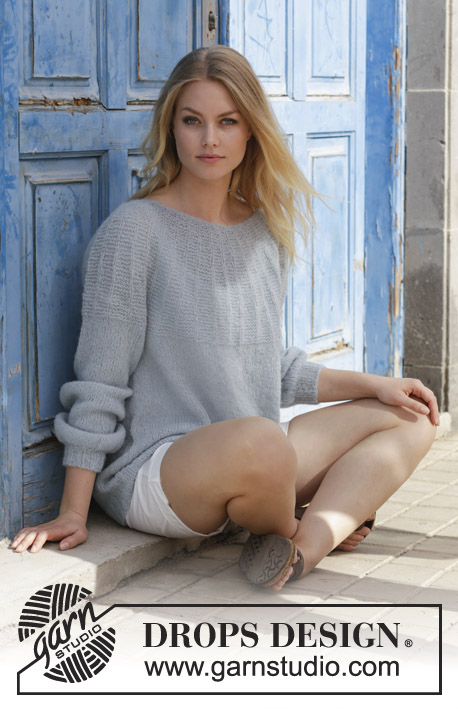
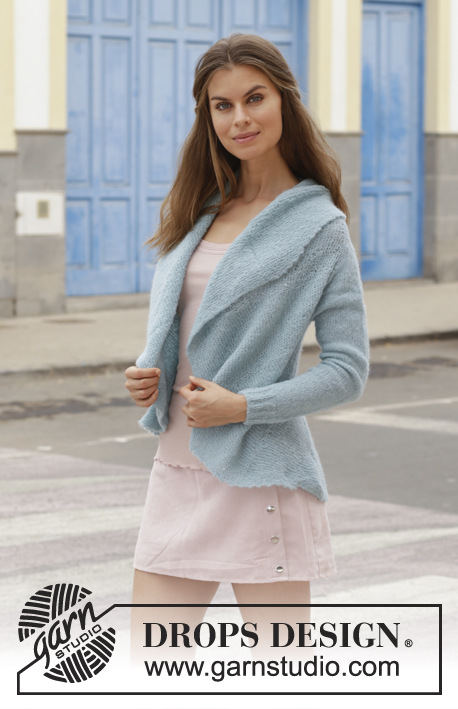
Knitted jacket worked in a circle with garter stitch. Size: S - XXXL Piece is knitted in DROPS Brushed Alpaca Silk.
DROPS 188-35 |
||||||||||
|
INFORMATION FOR PATTERN: GARTER STITCH (worked in the round): 1 ridge = 2 rounds. Knit 1 round and purl 1 round. GARTER STITCH (back and forth): 1 ridge = knit 2 rows. PATTERN: See diagrams A.1 and A.2. INCREASE TIP: All increases are done on 1 round with knit. Work until the knit stitch, make 1 yarn over, knit 1 (= the knit stitch), make 1 yarn over (= 2 stitches increased). Repeat at every knit stitch (= 32 stitches increased on round). Purl the increased stitches twisted on next round to avoid holes. Then work them in garter stitch until finished measurements. ---------------------------------------------------------- JACKET WORKED IN A CIRCLE: Piece is worked from the centre and outwards, first work back and forth and then in the round. Divide the piece, cast off stitches and work back and forth on each front piece. Work sleeves back and forth separately and sew them on when finished. CIRCLE: First work back and forth on 2 double pointed needles, then work in the round on 5 double pointed needles. Switch to circular needle when there are enough stitches. Cast on 8 stitches with Brushed Alpaca Silk on double pointed needles size 5.5 mm. Work according to A.1 (= 8 repetitions of 1 stitch) back and forth. When A.1 has been worked 1 time vertically, there are 32 stitches on row. Piece measures approx. 6 cm in diameter. REMEMBER THE KNITTING TENSION! Then work pattern according to diagram A.2 (= 16 repetitions of 2 stitches). Round begins mid back of neck. Continue this pattern, i.e. increase 2 stitches in every repetition every 10th round. Work until piece measures 36-38-40-42 cm in diameter = approx. 192-224-224-256 stitches (= 32 knit stitches with approx. 5-6-6-7 stitches in garter stitch between each). Make armholes as follows (adjust so that the next 2 rounds are not increase rounds): Work the first 31-33-35-37 stitches as before, cast off the next 28-32-36-38 stitches (make sure to avoid a tight cast-off edge, use a larger needle if needed), work as before until 59-65-71-75 stitches remain (= approx. 74-94-82-106 stitches), cast off the next 28-32-36-38 stitches, work the last 31-33-35-37 stitches as before. On next round cast on 28-32-36-38 new stitches over the cast off stitches in each side (make sure to avoid a tight cast-on edge) = approx. 192-224-224-256 stitches. Now work pattern over A.2 as follows: * work in GARTER STITCH – see explanation above, until 2nd knit stitch in first /next repetition of A.2 (= approx. 6-7-7-8 stitches in garter stitch, i.e. work in garter stitch over first knit stitch), knit 1 as before (= the knit stitch), garter stitch over the last stitches in A.2 (= 5-6-6-7 stitches, i.e. there is only 1 knit stitch in every repetition) *, work from *-* the entire round (= 16 knit stitches in total on round with approx. 11-13-13-15 stitches in garter stitch between each). Continue pattern until finished measurements AT THE SAME TIME increase 1 stitch on each side of every knit stitch every 10th round as before – read INCREASE TIP. Continue like this until piece measures 96-102-108-112 cm in diameter, adjust so that last round is purled over stitches in garter stitch = approx. 480-544-576-608 stitches. Now divide the piece for front pieces as follows: Cast of the first 40-45-48-51 stitches, knit over the next 120-135-144-153 stitches (= left front piece), cast off stitches until 160-180-192-204 stitches remain (= approx. 160-184-192-200 stitches cast off), knit over the next 120-135-144-153 stitches (= right front piece), then slip them on a stitch holder, cast off the last 40-45-48-51 stitches. Cut and fasten the thread. LEFT FRONT PIECE: Continue pattern back and forth over the 120-135-144-153 stitches (1st row = from wrong side) AT THE SAME TIME cast off the first 2-3-3-3 stitches at beginning over every row (i.e. cast off 2-3-3-3 stitches in each side). Continue pattern and cast off like this until piece measures 63-63-66-68 cm in total from centre of circle (i.e. front piece measures approx. 15-12-12-12 cm) = approx. 20-15-24-33 stitches remain. Cast off the remaining stitches. RIGHT FRONT PIECE: Work as left front piece. SLEEVE: Work sleeve back and forth on needle/circular needle. Cast on 38-42-42-46 stitches (including 1 edge stitch in each side) on needle size 4.5 mm with Brushed Alpaca Silk. Work rib (= knit 1/purl 3) with 1 edge stitch in GARTER STITCH - see explanation above, in each side of piece. When piece measures 5 cm, switch to circular needle size 5.5 mm and work in stocking stitch with 1 edge stitch in garter stitch in each side of piece. When piece measures 10 cm, adjust so that next row is from right side, increase 1 stitch, by making a yarn over inside 2 stitches in each side of piece = 2 stitches increased. Purl yarn over twisted on next row (= from wrong side), it should not make holes. Increase like this every 3-2½-2-1½ cm 11-12-15-17 times in total = 60-66-72-80 stitches. When piece measures 42-42-40-40 cm, cast off stitches for sleeve cap at beginning of every row (i.e. in each side of piece) as follows: Cast off 3 stitches 1 time, then 1 stitch 14-18-20-26 times in total, then cast off 1 stitch at beginning of every other row (i.e. in each side of piece) 7-6-7-5 times in total = 12 stitches. Piece measures approx. 55-56-56-57 cm. Cast off the remaining stitches. Knit another sleeve the same way. ASSEMBLY: Sew in sleeves and sew underarm seam inside 1 edge stitch. Sew the inner circle together in outermost loop of edge stitch (= approx. 3 cm seam). |
||||||||||
Diagram explanations |
||||||||||
|
||||||||||
|
||||||||||
|
||||||||||
Have you finished this pattern?Tag your pictures with #dropspattern #mareajacket or submit them to the #dropsfan gallery. Do you need help with this pattern?You'll find 20 tutorial videos, a Comments/Questions area and more by visiting the pattern on garnstudio.com. © 1982-2025 DROPS Design A/S. We reserve all rights. This document, including all its sub-sections, has copyrights. Read more about what you can do with our patterns at the bottom of each pattern on our site. |
||||||||||


With over 40 years in knitting and crochet design, DROPS Design offers one of the most extensive collections of free patterns on the internet - translated to 17 languages. As of today we count 314 catalogues and 11822 patterns translated into English (UK/cm).
We work hard to bring you the best knitting and crochet have to offer, inspiration and advice as well as great quality yarns at incredible prices! Would you like to use our patterns for other than personal use? You can read what you are allowed to do in the Copyright text at the bottom of all our patterns. Happy crafting!
Post a comment to pattern DROPS 188-35
We would love to hear what you have to say about this pattern!
If you want to leave a question, please make sure you select the correct category in the form below, to speed up the answering process. Required fields are marked *.