DROPS Karisma
DROPS Karisma
100% Wool
from 3.00 $ /50g
Get the yarn to make this pattern from 48.00$.

The yarn cost is calculated from the pattern’s smallest size and the yarn’s cheapest product type. Looking for an even better price? You might find it on the DROPS Deals!

DROPS SS24

Narvik

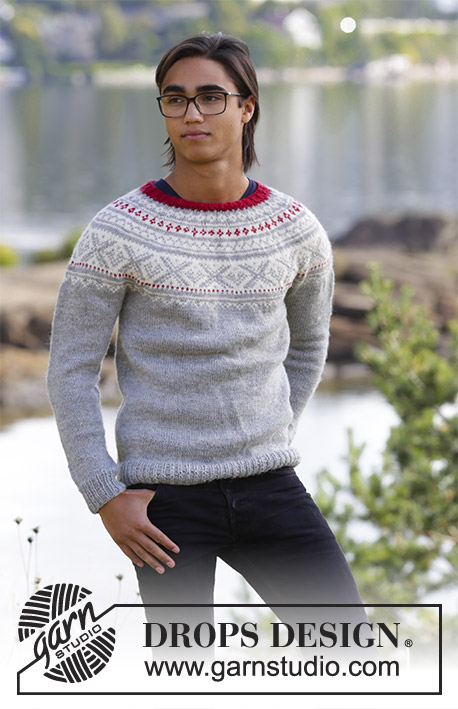
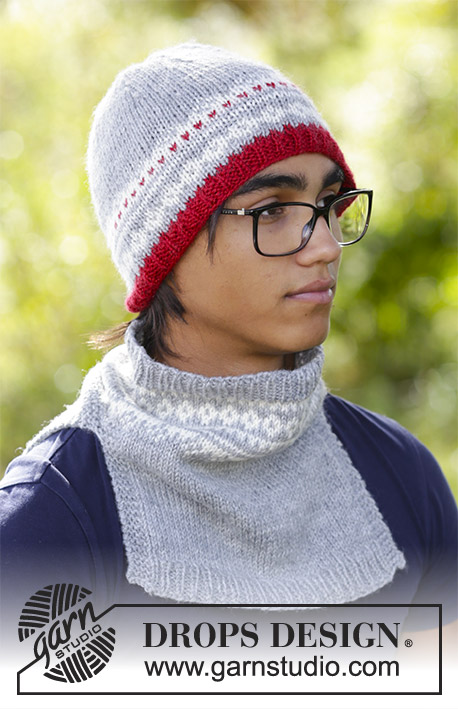
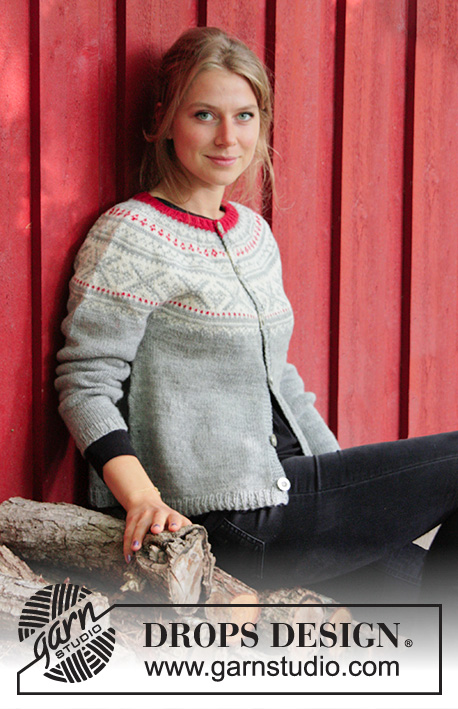
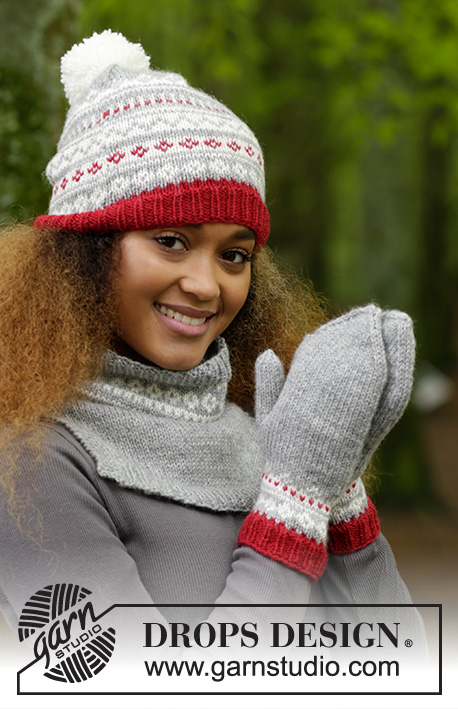
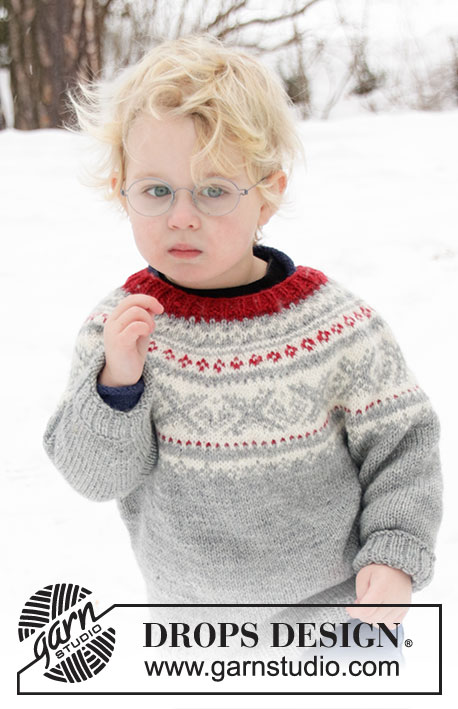
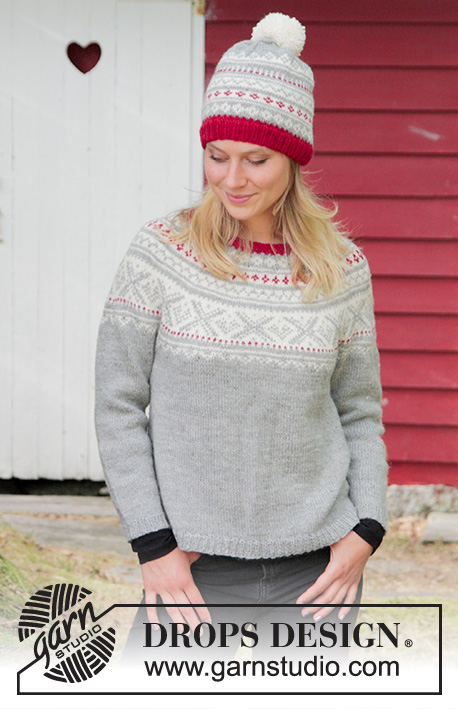
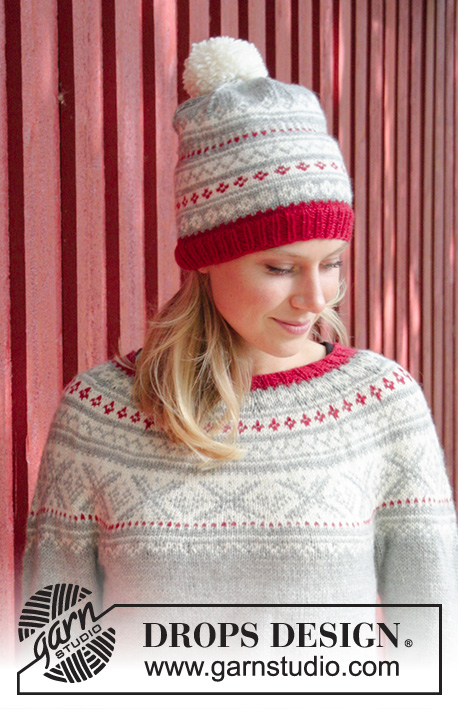
The set consists of: Knitted sweater with round yoke, multi-colored Nordic pattern and A-shape, worked top down. Sizes S - XXXL. Hat with multi-colored Nordic pattern and pom pom. The set is worked in DROPS Karisma.

DROPS 183-2
DROPS Design: Pattern no u-834
Yarn group B
-----------------------------------------------------------
For the complete set there will be enough with approx.:
450-500-550-600-650-700 g color 44, light gray
150-150-150-150-200-200 g color 01, off white
50-50-50-100-100-100 g color 48, wine red
-----------------------------------------------------------

SWEATER:
Sizes: S - M - L - XL - XXL - XXXL
Materials:
DROPS KARISMA from Garnstudio (belongs to yarn group B)
450-450-500-550-600-700 g color 44, light gray
100-100-150-150-150-150 g color 01, off white
50-50-50-50-50-50 g color 48, wine red

The piece can also be knitted with yarn from:
"Alternative yarn (Yarn Group B)" – see link below.

DROPS DOUBLE POINTED NEEDLES AND CIRCULAR NEEDLE (40 + 60 or 80 cm / 16" + 24" or 32") SIZE 4 mm/US 6 – or the size needed to get 21 stitches and 28 rows stockinette stitch on 10 cm / 4" in width and 10 cm / 4" in height.

DROPS DOUBLE POINTED NEEDLES AND CIRCULAR NEEDLE (40 + 80 cm / 16" + 32") SIZE 3 mm/US 2.5 for rib - or the size needed to get 23 stitches and 32 rows stockinette stitch on 10 cm / 4" in width and 10 cm / 4" in height.
-----------------------------------------------------------

HAT:
Sizes: S/M - M/L - L/XL
Fits head size: approx. 54/56 - 56/58 - 58/60 cm / 21½"-22½"-23¼"
Materials:
DROPS KARISMA from Garnstudio (belongs to yarn group B)
50 g for all sizes in following colors:
color 44, light gray
color 01, off white
color 48, wine red

The piece can also be knitted with yarn from:
"Alternative yarn (Yarn Group B)" – see link below.

DROPS DOUBLE POINTED NEEDLES AND CIRCULAR NEEDLE (40 cm / 16") SIZE 3.5 mm/US 4 – or the size needed to get 22 stitches and 30 rows stockinette stitch on 10 cm / 4" in width and 10 cm / 4" in height.

DROPS CIRCULAR NEEDLE (40 cm / 16") SIZE 3 mm/US 2.5 - for rib.

-------------------------------------------------------

Alternative Yarn – See how to change yarns here
Yarn Groups A to F – Use the same pattern and change the yarn here
Yarn usage using an alternative yarn – Use our yarn converter here

-------------------------------------------------------

DROPS Karisma
DROPS Karisma
100% Wool
from 3.00 $ /50g
Get the yarn to make this pattern from 48.00$.

The yarn cost is calculated from the pattern’s smallest size and the yarn’s cheapest product type. Looking for an even better price? You might find it on the DROPS Deals!

Pattern instructions

NOTE: This pattern is written in American English. All measurements in charts are in cm. For conversion from inches to cm - click here. There are different terms for crocheting in American and British English. If this pattern includes crochet, click for "crochet terms" here. For this pattern in British English, please click here.
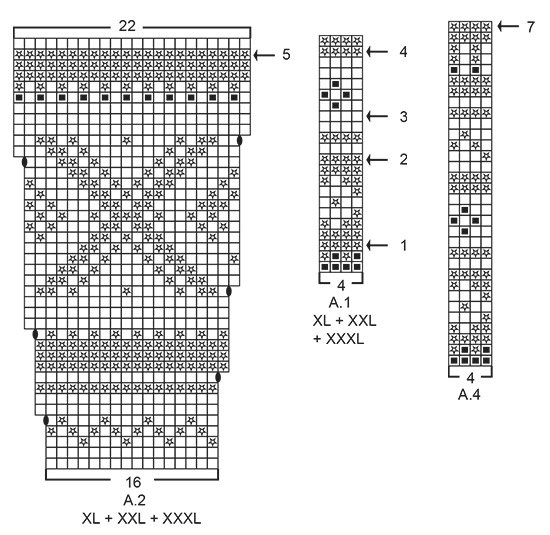
INFORMATION FOR THE PATTERN:

INCREASE/DECREASE TIP:
To work out how to increase or decrease evenly, count the total number of stitches on the needle (e.g. 96 stitches) and divide by the number of increases/decreases to be made (e.g. 28) = 3.4.
In this example, increase by making 1 yarn over alternately after each 3rd and 4th stitch. On the next round knit the yarn overs twisted to prevent holes. If you are decreasing, knit alternately approx. every 3rd and 4th stitch and every 4th and 5th stitch together.

ELEVATION (for back of neck on sweater):
Insert 1 marker at the beginning of the round = mid back. Start from the right side with wine red and knit 12-13-14-15-16-17 stitches past the marker, turn, tighten the strand and purl 24-26-28-30-32-34 stitches. Turn, tighten the strand and knit 36-39-42-45-48-51 stitches, turn, tighten the strand and purl 48-52-56-60-64-68 stitches. Turn, tighten the strand and knit 60-65-70-75-80-85 stitches, turn, tighten the strand and purl 72-78-84-90-96-102 stitches. Turn, tighten the strand and knit back to mid back.

PATTERN:
Sweater: See diagrams A.1 to A.3. Choose diagram for your size.
Hat: See diagrams A.3 and A.4.
The whole pattern is worked in stockinette stitch.

KNITTING TIP:
To avoid the knitting gauge becoming tighter when working pattern, it is important that the strands do not pull at the back of the piece. You can increase a needle size when working pattern if this is a problem.

INCREASE TIP (for sides of body):
Start 2 stitches before the marker thread, make 1 yarn over, knit 4 (the marker thread sits in the middle of these 4 stitches), make 1 yarn over (= 2 stitches increased). On the next round knit the yarn overs twisted to prevent holes.

DECREASE TIP (for mid under sleeve):
Start 3 stitches before the marker thread, knit 2 together, knit 2 (the marker thread sits in the middle of these 2 stitches), slip 1 stitch as if to knit, knit 1, pass the slipped stitch over the knitted stitch (= 2 stitches decreased).
----------------------------------------------------------

SWEATER:
The piece is worked in the round with circular needle from mid back and top down. The sleeves are worked in the round with short circular needle top down, change to double pointed needles when necessary.

NECKLINE:
Cast on 96-99-105-108-111-117 stitches with circular needle size 3 mm / US 2.5 and wine red. Knit 1 round. Then work rib (knit 1 / purl 2). When the rib measures 3 cm / 1" knit 1 round where you increase 28-33-39-40-41-43 stitches evenly on round – read INCREASE/DECREASE TIP = 124-132-144-148-152-160 stitches.
Continue by working yoke as described below.

YOKE:
Read KNITTING TIP! Change to circular needle size 4 mm / US 6 and knit 1 round. For a better fit, you can now work an ELEVATION in the back of the neck – see description above. When the elevation has been completed, work A.1 in the round (= 31-33-36-37-38-40 repeats of 4 stitches). Continue the pattern in this way and at the same time increase on every round marked with an arrow in A.1 as described below – read INCREASE/DECREASE TIP and REMEMBER THE GAUGE!
On round with arrow-1 increase 28-32-36-36-36-40 stitches evenly on round = 152-164-180-184-188-200 stitches.
On round with arrow-2 increase 24-28-36-32-36-36 stitches evenly on round = 176-192-216-216-224-236 stitches.
On round with arrow-3 increase 24-24-28-28-32-36 stitches evenly on round = 200-216-244-244-256-272 stitches.
On round with arrow-4 increase 24-24-28-28-32-32 stitches evenly on round = 224-240-272-272-288-304 stitches.
When A.1 has been completed, work A.2 in the round (= 14-15-17-17-18-19 repeats of 16 stitches). Continue pattern in this way and increase as shown in the diagram. After the last increase in A.2 there are 280-300-340-374-396-418 stitches on the round. Continue A.2 and at the same time increase 2-6-2-4-0-2 stitches evenly on round with arrow-5 in A.2 = 282-306-342-378-396-420 stitches.
When A.2 has been completed, work A.3 in the round (= 47-51-57-63-66-70 repeats of 6 stitches). Continue pattern in this way. AT THE SAME TIME on the round with arrow-6 in A.3 increase 6-14-6-2-4-4 stitches evenly on round = 288-320-348-380-400-424 stitches. When A.3 has been completed the piece measures approx. 23-23-23-27-27-27 cm / 9"-9"-9"-10½"-10½"-10½" from the cast-on edge mid front.
Continue working stockinette stitch with light gray until the piece measures 23-25-27-29-31-33 cm / 9"-9¾"-10½"-11½"-12¼"-13" from the cast-on edge mid front (if your knitting gauge is right in height, you will reach this length in size S when A.3 has been completed).
The next round is worked as follows: Knit 42-46-50-56-60-65 stitches (= ½ back piece), place the next 60-68-74-78-80-82 stitches on a thread for sleeve, cast on 8-8-10-10-12-14 new stitches on the needle (= in side under sleeve), knit 84-92-100-112-120-130 stitches (= front piece), place the next 60-68-74-78-80-82 stitches on a thread for sleeve, cast on 8-8-10-10-12-14 new stitches on needle (= in side under sleeve) and knit the remaining 42-46-50-56-60-65 stitches (= ½ back piece). Body and sleeves are finished separately. THE PIECE IS NOW MEASURED FROM HERE!

BODY:
= 184-200-220-244-264-288 stitches. Insert 1 marker thread in the middle of the 8-8-10-10-12-14 stitches cast on under the sleeve in each side. Start the round by one of the marker threads and continue with stockinette stitch and light gray. When the piece measures 2 cm / ¾" from the separation increase 1 stitch on each side of both marker threads – read INCREASE TIP (= 4 stitches increased). Increase in this way every 8th round (approx. every 3 cm / 1") a total of 9 times in each side = 220-236-256-280-300-324 stitches.
Knit 1 round where you increase 44-46-50-56-60-66 stitches evenly on round = 264-282-306-336-360-390 stitches.
Change to circular needle size 3 mm / US 2.5 and work rib in the round (= knit 1 / purl 2) for 3 cm / 1". Bind off with knit over knit and purl over purl, but to avoid the bind-off edge being tight you can make 1 yarn over after every 6th stitch AT THE SAME TIME as you bind off (yarn overs bind off as normal stitches). The sweater measures approx. 54-56-58-60-62-64 cm / 21¼"-22"-22¾"-23⅝"-24⅜"-25¼" from the shoulder down.

SLEEVE:
Place the 60-68-74-78-80-82 stitches from the thread in the one side of the piece on short circular needle size 4 mm / US 6. In addition knit up 1 stitch in each of the 8-8-10-10-12-14 stitches cast on under the sleeve = 68-76-84-88-92-96 stitches on the needle. Insert 1 marker thread in the middle of the 8-8-10-10-12-14 stitches (= mid under the sleeve). Work stockinette stitch in the round with light gray. When the piece measures 3-2-2-3-2-2 cm / 1"-¾"-¾"-1"-¾"-¾" from the separation decrease 2 stitches mid under sleeve – read DECREASE TIP. Decrease in this way every 3-2½-2-1½-1½-1½ cm / 1⅛"-⅞"-¾"-½"-½"-½" a total of 12-15-18-19-20-21 times = 44-46-48-50-52-54 stitches. When the sleeve measures 40-39-37-36-35-33 cm / 15¾"-15¼"-14½"-14¼"-13¾"-13" from the separation (shorter measurements in the larger sizes due to longer yoke), knit 1 round where you increase 7-8-6-7-8-6 stitches evenly on round = 51-54-54-57-60-60 stitches. Change to double pointed needles size 3 mm / US 2.5. Work rib in the round (= knit 1 /purl 2) for 3 cm / 1". Bind off with knit over knit and purl over purl, but to avoid the bind-off edge being tight you can make 1 yarn over after every 6th stitch at the same time as you bind off (yarn overs bind off as normal stitches). The sleeve measures approx. 43-42-40-39-38-36 cm / 17"-16½"-15¾"-15¼"-15"-14¼" from the separation and down. Work the other sleeve in the same way.
----------------------------------------------------------

HAT:
The piece is worked in the round with circular needle, bottom up. Change to double pointed needles when necessary.
Cast on 111-117-123 stitches with circular needle size 3 mm / US 2.5 and wine red. Knit 1 round. Then work rib (= knit 1 / purl 2) for 3-4-4 cm / 1"-1½"-1½". Knit 1 round where you decrease 3-5-7 stitches evenly on round – read INCREASE/DECREASE TIP = 108-112-116 stitches. Change to circular needle size 3.5 mm / US 4 and work A.4 (= 27-28-29 repeats of 4 stitches). REMEMBER THE GAUGE! On the last round in A.4 decrease 0-4-2 stitches evenly on round = 108-108-114 stitches. Continue by working A.3 in the round (= 18-18-19 repeats of 6 stitches). When A.3 has been completed, the piece measures approx. 16-17-17 cm / 6¼"-6¾"-6¾". Continue with stockinette stitch and light gray. When the piece measures 18-19-20 cm / 7"-7½"-8" insert 6 marker threads in the piece with 18-18-19 stitches between each one. On the next round decrease 1 stitch after each marker thread by knitting 2 stitches together (= 6 stitches decreased). Decrease in this way every 2nd round a total of 6-6-7 times and then every round a total of 10 times in all sizes = 12 stitches left in all sizes. Cut the strand, pull it through the remaining stitches, tighten and fasten well. The hat measures approx. 25-26-28 cm / 9¾"-10¼"-11" top down.

POM POM:
Make a pom pom of approx. 8 cm / 3⅛" in diameter with off white. Sew the pom pom to the top of the hat.

Diagram

All measurements in charts are in cm.

symbols = wine red
symbols = light grey
symbols = off white
symbols = between 2 stitches make 1 yarn over, on next round knit yarn over twisted to prevent a hole
symbols = increase round
diagram
diagram
diagram

Each of our patterns has specific tutorial videos to help you.

Do you have a question? See a list of frequently asked questions (FAQ)

Knitting tension is what determines the final measurements of your work, and is usually measured per 10 x 10 cm. It is provided like so: number of stitches in width x number of rows in height - eg: 19 stitches x 26 rows = 10 x 10 cm.

The knitting tension is very individual; some people knit/crochet loosely while others work tightly. You adjust the knitting tension with the needle size, which is why the suggested needle size only serve as a guide! You need to adjust this (up or down) to ensure that YOUR knitting tension matches the knitting tension provided in the pattern. If you work with a different knitting tension than provided you will have a different yarn consumption, and your work will have different measurements than what the pattern suggests.

The knitting tension also determines which yarns can replace each other. As long as you achieve the same knitting tension you can replace one yarn with another.

See DROPS lesson: How to measure your tension/gauge

See DROPS video: How to make a gauge tension swatch

The required amount of yarn is provided in grams, eg: 450 g. To calculate how many balls you’ll need you first need to know how many grams are in 1 ball (25g, 50g or 100g). This information is available if you click on the individual yarn quality on our pages. Divide the amount required with the amount of each ball. For example, if each ball is 50g (the most common amount), the calculation will be as follows: 450 / 50 = 9 balls.

The important thing when changing from one yarn to another is that the knitting/crochet tension remains the same. This is so that the measurements of the finished piece will be the same as on the sketch provided. It is easier to achieve the same knitting tension using yarns from the same yarn group. It is also possible to work with multiple strands of a thinner yarn to achieve the knitting tension of a thicker one. Please try our yarn converter. We recommend you to always work a test swatch.

Please NOTE: when changing yarn the garment might have a different look and feel to the garment in the photo, due to individual properties and qualities of each yarn.

See DROPS lesson: Can I use a different yarn than the one mentioned in the pattern?

All our yarns are categorised into yarn groups (from A to F) according to thickness and knitting tension – group A contains the thinnest yarns and group F the thickest. This makes it easier for you to find alternative yarns to our patterns, should you wish to switch yarn. All yarns within the same group have a similar knitting tension and can easily replace each other. However, different yarn qualities have different structures and properties which will give the finished work a unique look and feel.

Click here for an overview of the yarns in each yarn group

At the top of all our patterns you’ll find a link to our yarn converter, which is a helpful tool should you wish to use a different yarn than suggested. By filling in the yarn quality you wish to replace, the amount (in your size) and number of strands, the converter will present good alternative yarns with the same knitting tension. Additionally it will tell you how much you’ll require in the new qualities and whether you’ll need to work with multiple strands. Most skeins are 50g (some are 25g or 100g).

If the pattern is worked with multiple colours, every colour will have to be converted separately. Similarly, if the pattern is worked with several strands of different yarns (for example 1 strand Alpaca and 1 strand Kid-Silk) you will have to find alternatives for each, individually.

Click here to see our yarn converter

Since different yarns have different qualities and textures we have chosen to keep the original yarn in our patterns. However, you can easily find options among our available qualities by using our yarn converter, or simply pick a yarn from the same yarn group.

It is possible that some retailers still have discontinued yarns in stock, or that someone has a few skeins at home that they would like to find patterns for.

The yarn converter will provide both alternative yarn as well as required amount in the new quality.

If you think it's hard to decide what size to make, it can be a good idea to measure a garment you own already and like the size of. Then you can pick the size by comparing those measures with the ones available in the pattern's size chart.

You'll find the size chart at the bottom of the pattern.

See DROPS lesson: How to read size chart

The needle size provided in the pattern serves only as a guide, the important thing is to follow the knitting tension. And since knitting tension is very individual, you will have to adjust the needle size to ensure that YOUR tension is the same as in the pattern – maybe you’ll have to adjust 1, or even 2 needle sizes, up or down to achieve the correct tension. For this, we recommend that you work test swatches.

Should you work with a different knitting tension than the one provided, the measurements of the finished garment might deviate from the measurement sketch.

See DROPS lesson: How to measure your tension/gauge

See DROPS video: How to make a gauge tension swatch

Working a garment top-down provides more flexibility and room for personal adjustment. For example it is easier to try the garment on while working, as well as making adjustments to length of yoke and shoulder caps.

The instructions are carefully explaining every step, in the correct order. Diagrams are adjusted to the knitting direction and are worked as usual.

The diagram depicts all rows/rounds, and every stitch seen from the right side. It is read from bottom to top, from right to left. 1 square = 1 stitch.

When working back and forth, every other row is worked from the right side and every other row is worked from the wrong side. When working from the wrong side, the diagram will have to be worked reversed: from left to right, knit stitches are purled, purl stitches are knit etc.

When working in the round every round is worked from the right side and the diagram are worked from right to left on all rounds.

See DROPS lesson: How to read knitting diagrams

The diagram depicts all rows/rounds, and every stitch seen from the right side. It is worked from bottom to top, from right to left.

When working back and forth every other row is worked from the right side: from right to left and every other row is worked from the wrong side: from left to right.

When working in the round, every row in the diagram are worked from the right side, from right to left.

When working a circular diagram you start in the middle and work your way outwards, counter clockwise, row by row.

The rows usually start with a given number of chain stitches (equivalent to the height of the following stitch), this will either be depicted in the diagram or explained in the pattern.

See DROPS lesson: How to read crochet diagrams

Instructions for working several diagrams after each other on the same row/round, will often be written like so: “work A.1, A.2, A.3 a total of 0-0-2-3-4 times". This means you work A.1 once, then A.2 is worked once, and A.3 is repeated (in width) the number of times provided for your size – in this case like so: S = 0 times, M = 0 times, L=2 times, XL= 3 times and XXL = 4 times.

The diagrams are worked as usual: begin with the first row in A.1, then work the first row in A.2 etc.

See DROPS lesson: How to read knitting diagrams

See DROPS lesson: How to read crochet diagrams

The total width of the garment (from wrist-to-wrist) will be larger in the larger sizes, despite the actual sleeves being shorter. The larger sizes have longer sleeve caps and wider shoulders, so there will be a good fit in all sizes.

The measurement sketch/schematic drawing provides information regarding the full length of the garment. If it’s a jumper or a jacket the length is measured from the highest point on the shoulder (usually closest to the neckline), and straight down to the bottom of the garment. It is NOT measured from the tip of shoulder. Similarly, the length of yoke is measured from the highest point on the shoulder and down to where yoke is split into body and sleeves.

See DROPS lesson: How to read a schematic drawing

Diagrams are often repeated on the round or in height. 1 repeat is the diagram the way it appears in the pattern. If it says to work 5 repeats of A.1 in the round, then you work A.1 a total of 5 times after/next to each other in the round. If it says to work 2 repeats of A.1 vertically/in height you work the entire diagram once, then begin again at the start and work the entire diagram one more time.

Chain stitches are slightly narrower than other stitches and to avoid working the cast-on edge too tight, we simply chain more stitches to begin with. The stitch count will be adjusted on the following row to fit the pattern and measurement sketch.

The rib edge is more elastic and will contract slightly compared to, for example, stocking stitch. By increasing before the rib edge, you avoid a visible difference in width between the rib edge and the rest of the body.

It’s very easy to cast off too tightly, and by making yarn overs while casting off (and simultaneously casting these off) you avoid a too tight cast off edge.

See DROPS video: How to bind off with yarn overs (yo)

To achieve an even increase (or decrease) you can increase on, for example: every 3rd and 4th row alternately, like so: work 2 rows and increase on the 3rd row, work 3 rows and increase on the 4th. Repeat this until the increase is complete.

See DROPS lesson: Increase or decrease 1 st on every 3rd and 4th row alternately

Should you prefer to work in the round instead of back and forth, you may of course adjust the pattern. You’ll need to add steeks mid-front (usually 5 stitches), and follow the instructions. When you would normally turn and work from the wrong side, simply work across the steek and continue in the round. At the end you’ll cut the piece open, pick up stitches to work bands, and cover the cut edges.

See DROPS video: How to knit steeks and cut open

Should you prefer to work back and forth instead of in the round, you may of course adjust the pattern so you work the pieces separately and then assemble them at the end. Divide the stitches for the body in 2, add 1 edge stitch in each side (for sewing) and work the front and back pieces separately.

See DROPS lesson: Can I adapt a pattern for circular needles into straight needles?

Pattern repeats can vary slightly in the different sizes, in order to get the correct proportions. If you’re not working the exact same size as the garment in the photo, yours might deviate slightly. This has been carefully developed and adjusted so that the complete impression of the garment is the same in all sizes.

Make sure to follow instructions and diagrams for your size!

If you have found a pattern you like which is available in women’s size it’s not very difficult to convert it to men’s size. The biggest difference will be the length of sleeves and body. Start working on the women size that you think would fit across the chest. The additional length will be worked right before you cast off for the armhole/sleeve cap. If the pattern is worked top-down you can add the length right after the armhole or before the first decrease on sleeve.

Regarding additional yarn amount, this will depend on how much length you add, but it is better with a skein too many than too few.

All yarns will have excess fibres (from production) that might come off as lint or shedding. Brushed yarns (ie hairier yarns) have more of these loose, excess fibres, causing more shedding.

Shedding also depends on what is worn under or over the garment, and whether this pulls at the yarn fibres. It’s therefore not possible to guarantee that there will be no shedding

Below are some tips on how to get the best result when working with hairier yarns:

1. When the garment is finished (before you wash it) shake it vigorously so the looser hairs come off. NOTE: do NOT use a lint roller, brush or any method that pulls at the yarn.

2. Place the garment in a plastic bag and put it in your freezer - the temperature will cause the fibres to become less attached to each other, and excess fibres will come off easier.

3. Leave in the freezer for a few hours before taking it out and shaking it again.

4. Wash the garment according to the instructions on the yarn label.

Pilling is a natural process that happens to even the most exclusive of fibers. It's a natural sign of wear and tear that is hard to avoid, and that is most visible in high friction areas of your garment like a sweater's arms and cuffs.

You can make your garment look as new by removing the pilling, using a fabric comb or a pill/lint remover.

Still can't find the answer you need? Then scroll down and leave your question so one of our experts can try to help you. This will be done normally within 5 to 10 working days.
In the meantime, you can read the questions and answers that others have left to this pattern or join the DROPS Workshop on Facebook to get help from fellow knitters/crocheters!

You might also like...

Narvik

Marie, Germany

Narvik and Narvik Woof

Laura M Levesque, United States

Narvik

Pam, United Kingdom

Narvik

Runa, Norway

Narvik

Olivia, Sweden

The Narvik jumper

@oliviaenroth, Sweden

Post a comment to pattern DROPS 183-2

We would love to hear what you have to say about this pattern!

If you want to leave a question, please make sure you select the correct category in the form below, to speed up the answering process. Required fields are marked *.

Comments / Questions (21)

Anna wrote:

Hej! Jag funderar om mönstret facktist stämmer med en L storlek på tröjan ? Det blir 4 maskor för mycket som inte passar ihop från varv 12 på mönstret 2.A.

19.10.2017 - 19:14

DROPS Design answered:

Hej, jo det stämmer, om du ökar enligt diagrammet kommer det att se ut som på bilden. Sätt gärna en markör för varje gång du börjar på diagrammet, så är du säker på at du inte råkar förskjuta diagrammet. Lycka till!

31.10.2017 - 08:35