Annely by DROPS Design

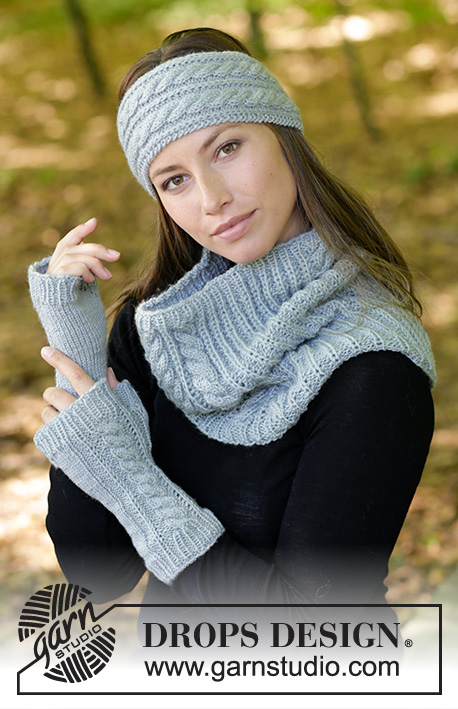
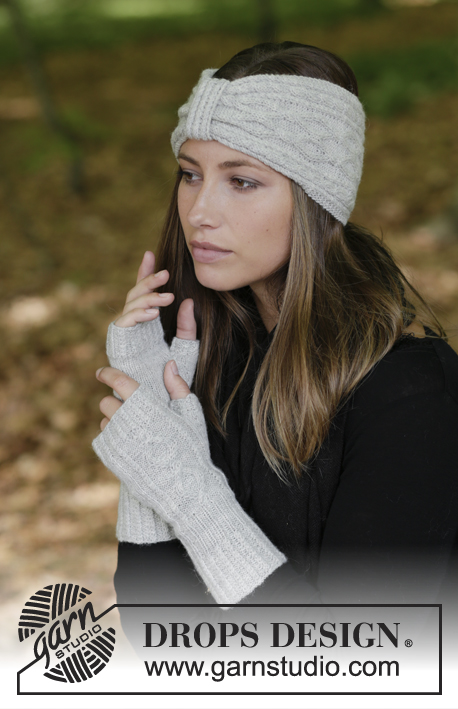
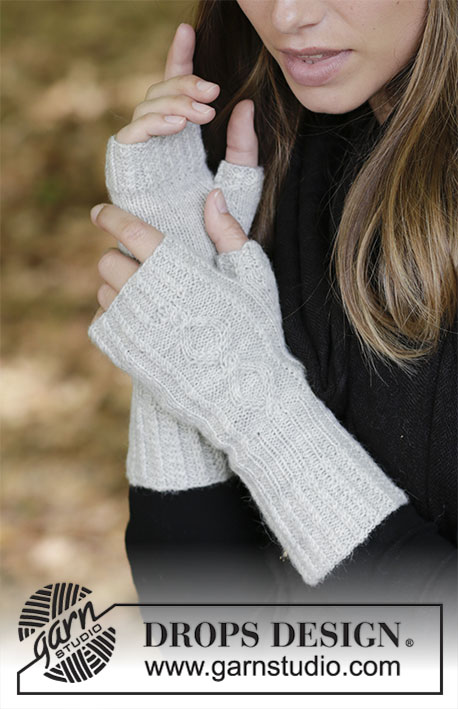
Souprava: čelenka a bezprsté rukavice s copánkovým vzorem pletené z příze DROPS Flora.

DROPS 182-12
DROPS Design: model č. fl-015
Skupina přízí A
-----------------------------------------------------------

ČELENKA:
Velikost: S/M - L/XL
Obvod hlavy: asi 54/56 - 58/60 cm
Materiál:
DROPS FLORA firmy Garnstudio (spadá do skupiny přízí A)
50 g pro obě velikosti, barva č. 03, světlá šedá

Použitou přízi můžete také nahradit některou ze seznamu:
"Náhradní příze (Skupina přízí A)" – viz link níže.

DROPS JEHLICE č.2,5 – nebo velikosti potřebné k upletení zkušebního vzorku o rozměrech 26 ok a 34 řad lícovým žerzejem = 10 cm na šířku a 10 cm na výšku.

DROPS POMOCNÁ JEHLICE copánková – na pletení copánků.
-----------------------------------------------------------

BEZPRSTÉ RUKAVICE:
Velikost: S/M - L/XL
Délka: asi 25 - 26 cm
Materiál:
DROPS FLORA firmy Garnstudio (spadá do skupiny přízí A)
50 g pro obě velikosti, barva č. 03, světlá šedá

DROPS PONOŽKOVÉ JEHLICE č.2,5 – nebo velikosti potřebné k upletení zkušebního vzorku o rozměrech 26 ok a 34 řad lícovým žerzejem.

DROPS POMOCNÁ JEHLICE copánková – na pletení copánků.

-------------------------------------------------------

Zkušební vzorek – Podívejte se, jak ho měřit a proč
Náhradní příze – Podívejte se, jak změnit přízi
Skupina přízí A až F – Neměňte návod, změňte přízi
Spotřeba příze při použití náhradní příze – Využijte náš převodník

-------------------------------------------------------


65% vlna, 35% alpaka
od 50.00 Kč /50g
DROPS Flora uni colour DROPS Flora uni colour 50.00 Kč /50g
Příze a Jehlice
Objednat
DROPS Flora mix DROPS Flora mix 54.00 Kč /50g
Příze a Jehlice
Objednat
needles Jehlice a háčky
Přízi na tento model můžete mít už za 100Kč. Více zde.

Návod

----------------------------------------------------------

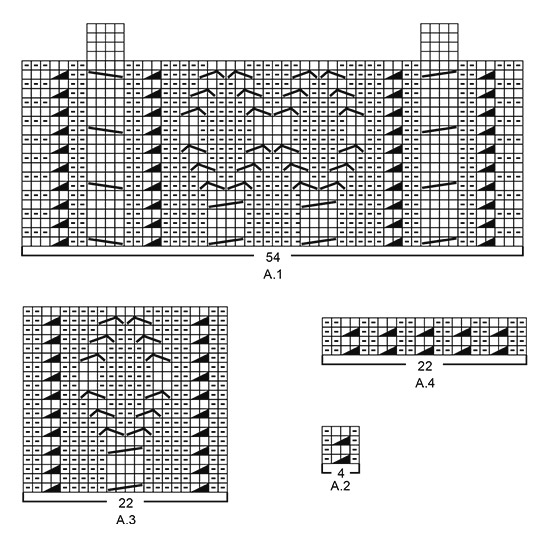
VROUBKOVÝ VZOR:
1 vroubek = 2 řady hladce. Pleteme stále hladce, lícové i rubové řady.

VZOR:
Čelenka: viz schémata A.1 a A.2.
Rukavice: viz schémata A.2 až A.4.
Zobrazeny jsou všechny řady vzoru nahlížené z lícové strany.

TIP - UJÍMÁNÍ (čelenka):
Abychom vypočítali, jak často musíme ujímat, odečteme od celkového počtu ok na jehlici (např.54 ok) krajová oka (tj. 6 ok) a zbytek vydělíme počtem ok, která potřebujeme ujmout (např. 12), takže 54 – 6 = 48 : 12 = 4. V tomto případě tedy spleteme hladce každé 3. a 4. oko (ujímáme mimo krajová oka).

TIP – PŘIDÁVÁNÍ 1 (klínek pro palec):
Pleteme až po označené oko, 1x nahodíme, 1 oko upleteme hladce (= označené oko), 1x nahodíme (= přidali jsme 2 oka). V následující kruhové řadě pleteme nahození za zadní nit, aby se v pletenině netvořily dírky.
Takto přidáváme na vnějších okrajích vznikajícího klínu.

TIP – PŘIDÁVÁNÍ 2 (rukavice):
Abychom vypočítali, jak často musíme přidávat, odečteme od celkového počtu ok na jehlici (např.50 ok) oka, nad nimiž přidávat nechceme (tj. 22 ok) a zbytek vydělíme počtem ok, která potřebujeme přidat (např. 14), takže 50 – 22 = 28 : 14 = 2. V tomto případě tedy přidáme za každým 2. okem. Přidáváme nahozením a v následující kruhové řadě pleteme nahození za zadní nit, aby se v pletenině netvořily dírky.
----------------------------------------------------------

ČELENKA:
Pleteme v řadách a nakonec sešijeme.
Na jehlice č.2,5 nahodíme přízí Flora 42 ok a upleteme 2 VROUBKY – viz výše. Následující lícovou řadu pleteme takto: 3 krajová oka hladce, *3 oka hladce, 1x nahodíme*, *-* opakujeme až po poslední 3 oka na jehlici, končíme 3 krajovými oky hladce = 54 ok. Poté upleteme 1 rubovou řadu obrace se 3 krajovými oky hladce na každé straně (nahození pleteme obrace za zadní nit, aby se v pletenině netvořily dírky). Pokračujeme v řadách vzorem A.1 (= 54 ok) až do výše asi 48-54 cm – končíme 6. řadou vzoru A.1, tak, aby vzor začínal i končil stejně. Pak upleteme 1 lícovou řadu hladce a SOUČASNĚ ujmeme rovnoměrně 12 ok – viz TIP – UJÍMÁNÍ = 42 ok. Upleteme 5 řad hladce a v následující lícové řadě všechna oka hladce uzavřeme.

PÁSKA:
Pleteme v řadách.
Na jehlice č.2,5 nahodíme 14 ok a upleteme 1 vroubek. Následující lícovou řadu pleteme takto: 1 krajové oko vroubkovým vzorem, následujících 12 ok vzorem A.2 (= 3 sekvence vzoru po 4 okách), končíme 1 krajovým okem vroubkovým vzorem. V tomto rozvržení vzoru pokračujeme až do výše 10 cm. Pak upleteme 1 vroubek a všechna oka z lícové strany volně hladce uzavřeme.
Přízi odstřihneme, pásku stočíme do kroužku a sešijeme.

Čelenku provlečeme kroužkem a konce sešijeme – šev leží na čele, schovaný v kroužku.
----------------------------------------------------------

BEZPRSTÉ RUKAVICE:

LEVÁ RUKAVICE:
Pleteme v kruhových řadách na ponožkových jehlicích.
Na ponožkové jehlice č.2,5 nahodíme přízí Flora 64-72 ok a upleteme 1 kruhovou řadu hladce. Pak pleteme v kruhových řadách vzor A.2 (= 16-18 sekvencí vzoru po 4 okách). Ve výši 5-6 cm spleteme v každém copánku každá 2 oka hladce – opakujeme v průběhu celé kruhové řady, zbylá oka pleteme obrace = 48-54 ok. Dál pleteme jak se oka jeví (hladká hladce, obrácená obrace) až do výše 10-11 cm.
Následující kruhovou řadu pleteme takto:
Velikost S/M: 2 oka hladce, 9 obrace, každé z následujících 2 ok rozpleteme na 2 (= přidáme 2 oka), 9 ok obrace a 26 hladce = 50 ok.
Velikost L/XL: 3 oka hladce, 9 obrace, každé z následujících 2 ok rozpleteme na 2 (= přidáme 2 oka), 9 ok obrace, 31 ok hladce a SOUČASNĚ nad těmito oky ujmeme rovnoměrně 2 oka = 54 ok.
Další kruhovou řadu pleteme takto – platí pro obě velikosti: 2-3 oka lícovým žerzejem, vzor A.3 (= 22 ok), 26-29 ok lícovým žerzejem. V tomto rozvržení vzoru pokračujeme.
Ve výši 14-15 cm začneme tvarovat klínek pro palec: označíme si předposlední oko v kruhové řadě a na obou jeho stranách přidáme 1 oko – viz TIP – PŘIDÁVÁNÍ 1. Takto přidáváme v každé 3. kruhové řadě, celkem 6-7x (přidáváme vždy na vnějších stranách vznikajícího klínu) = 13-15 ok klínu a 62-68 ok celkem.
Ve výši 19-21 cm odložíme 13-15 ok palce + 1 oko na každé straně klínu na pomocnou jehlici (= 15-17 odložených ok). V následující kruhové řadě za těmito oky nahodíme 3 oka nová = 50-54 ok.
Pokračujeme v kruhových řadách lícovým žerzejem a vzorem A.3 až do výše 21-22 cm. Pak pleteme 1 kruhovou řadu hladce a SOUČASNĚ přidáme rovnoměrně 14 ok – platí pro obě velikosti – viz TIP – PŘIDÁVÁNÍ 2 (přidáváme mimo 22 ok vzoru A.3) = 64-68 ok.
Pokračujeme v kruhových řadách vzorem A.2 – POZN.: schéma A.4 zobrazuje, jak vzor A.2 navazuje na vzor A.3, měli bychom mít v celé kruhové řadě 2 oka obrace nad 2 oky copánku.
Po dokončení 10 kruhových řad vzorem A.2 měří celá rukavice asi 24-25 cm. Poté všechna oka dle vzoru uzavřeme.

PALEC:
Odložených 15-17 ok palce vrátíme z pomocné jehlice zpět na ponožkové jehlice č.2,5 a navíc k nim nabereme 9-7 nových ok z okraje za palcem (tj. nabereme po 1 oku z každého ze 3 nových ok + 3-2 oka na každé straně těchto 3 nových ok)= na jehlicích máme 24-24 ok. Upleteme 3-5 kruhových řad hladce. Pak upleteme 6 kruhových řad vzorem A.2 a poté všechna oka dle vzoru uzavřeme.

PRAVÁ RUKAVICE:
Na ponožkové jehlice č.2,5 nahodíme 64-72 ok a upleteme 1 kruhovou řadu hladce. Pak pleteme v kruhových řadách vzor A.2 (= 16-18 sekvencí vzoru po 4 okách). Ve výši 5-6 cm spleteme v každém copánku každá 2 oka hladce – opakujeme v průběhu celé kruhové řady, zbylá oka pleteme obrace = 48-54 ok. Dál pleteme jak se oka jeví (hladká hladce, obrácená obrace) až do výše 10-11 cm.
Následující kruhovou řadu pleteme takto:
Velikost S/M: 26 ok hladce, 9 obrace, každé z následujících 2 ok rozpleteme na 2 (= přidáme 2 oka), 9 ok obrace a 2 oka hladce = 50 ok.
Velikost L/XL: 31 ok hladce a SOUČASNĚ nad těmito oky ujmeme rovnoměrně 2 oka, 9 obrace, každé z následujících 2 ok rozpleteme na 2 (= přidáme 2 oka), 9 ok obrace, 3 oka hladce = 54 ok.
Další kruhovou řadu pleteme takto – platí pro obě velikosti: 26-29 ok lícovým žerzejem, vzor A.3 (= 22 ok), 2-3 oka lícovým žerzejem. V tomto rozvržení vzoru pokračujeme.
Ve výši 14-15 cm začneme tvarovat klínek pro palec: označíme si 2. oko v kruhové řadě a na obou jeho stranách přidáme 1 oko – viz TIP – PŘIDÁVÁNÍ 1. Takto přidáváme v každé 3. kruhové řadě, celkem 6-7x (přidáváme vždy na vnějších stranách vznikajícího klínu) = 13-15 ok klínu a 62-68 ok celkem.
Ve výši 19-21 cm odložíme 13-15 ok palce + 1 oko na každé straně klínu na pomocnou jehlici (= 15-17 odložených ok). V následující kruhové řadě za těmito oky nahodíme 3 oka nová = 50-54 ok.
Pokračujeme v kruhových řadách lícovým žerzejem a vzorem A.3 až do výše 21-22 cm. Pak pleteme 1 kruhovou řadu hladce a SOUČASNĚ přidáme rovnoměrně 14 ok – platí pro obě velikosti – viz TIP – PŘIDÁVÁNÍ 2 (přidáváme mimo 22 ok vzoru A.3) = 64-68 ok.
Pokračujeme v kruhových řadách vzorem A.2 – POZN.: schéma A.4 zobrazuje, jak vzor A.2 navazuje na vzor A.3, měli bychom mít v celé kruhové řadě 2 oka obrace nad 2 oky copánku.
Po dokončení 10 kruhových řad vzorem A.2 měří celá rukavice asi 24-25 cm. Poté všechna oka dle vzoru uzavřeme.
Palec pleteme stejně jako u levé rukavice.

Schéma

symbols = lícový žerzej (líc hladce, rub obrace)
symbols = rubový žerzej (líc obrace, rub hladce)
symbols = 2 oka spleteme hladce
symbols = 1 oko odložíme na pomocnou jehlici ZA práci, 1 oko hladce, 1 oko z pom.jehlice hladce
symbols = 1 oko odložíme na pomocnou jehlici ZA práci, 2 oka hladce, oko z pom.jehlice obrace
symbols = 2 oka odložíme na pomocnou jehlici PŘED práci, 1 oko obrace, 2 oka z pom.jehlice hladce
symbols = 2 oka odložíme na pomocnou jehlici ZA práci, 2 oka hladce, 2 oka z pom.jehlice hladce
symbols = 2 oka odložíme na pomocnou jehlici PŘED práci, 2 oka hladce, 2 oka z pom.jehlice hladce
diagram

Potřebujete poradit s tímto návodem?

Děkujeme, že jste si vybrali návod DROPS Design. Zakládáme si na tom, že dáváme k dispozici návody ověřené a snadno srozumitelné. Všechny návody jsou přeložené z norského originálu a tak si můžete kdykoli srovnat rozměry a počty s původním návodem (DROPS 182-12) .

Máte s návodem potíže? Níže najdete seznam odkazů, které vám pomohou dokončit vaše dílo co nejdříve - nebo se třeba přiučit něco nového.

signature-image signature

Máte s návodem potíže? Níže najdete seznam odkazů, které vám pomohou dokončit vaše dílo co nejdříve - nebo se třeba přiučit něco nového.

Každý náš návod je doprovázen speciálními video-ukázkami, které vás navedou.

Máme takopodrobné rozpisy různých technik a postupů krok za krokem - najdete je zde.

1) Why is the knitting/crochet tension so important?

Knitting tension is what determines the final measurements of your work, and is usually measured per 10 x 10 cm. It is provided like so: number of stitches in width x number of rows in height - eg: 19 stitches x 26 rows = 10 x 10 cm.

The knitting tension is very individual; some people knit/crochet loosely while others work tightly. You adjust the knitting tension with the needle size, which is why the suggested needle size only serve as a guide! You need to adjust this (up or down) to ensure that YOUR knitting tension matches the knitting tension provided in the pattern. If you work with a different knitting tension than provided you will have a different yarn consumption, and your work will have different measurements than what the pattern suggests.

The knitting tension also determines which yarns can replace each other. As long as you achieve the same knitting tension you can replace one yarn with another.

See DROPS lesson: How to measure your tension/gauge

See DROPS video: How to make a gauge tension swatch

nahoru

2) What are the yarn groups?

All our yarns are categorised into yarn groups (from A to F) according to thickness and knitting tension – group A contains the thinnest yarns and group F the thickest. This makes it easier for you to find alternative yarns to our patterns, should you wish to switch yarn. All yarns within the same group have a similar knitting tension and can easily replace each other. However, different yarn qualities have different structures and properties which will give the finished work a unique look and feel.

Click here for an overview of the yarns in each yarn group

nahoru

3) Can I use a different yarn than what the pattern suggests?

The important thing when changing from one yarn to another is that the knitting/crochet tension remains the same. This is so that the measurements of the finished piece will be the same as on the sketch provided. It is easier to achieve the same knitting tension using yarns from the same yarn group. It is also possible to work with multiple strands of a thinner yarn to achieve the knitting tension of a thicker one. Please try our yarn converter. We recommend you to always work a test swatch.

Please NOTE: when changing yarn the garment might have a different look and feel to the garment in the photo, due to individual properties and qualities of each yarn.

See DROPS lesson: Can I use a different yarn than the one mentioned in the pattern?

nahoru

4) How do I use the yarn converter?

At the top of all our patterns you’ll find a link to our yarn converter, which is a helpful tool should you wish to use a different yarn than suggested. By filling in the yarn quality you wish to replace, the amount (in your size) and number of strands, the converter will present good alternative yarns with the same knitting tension. Additionally it will tell you how much you’ll require in the new qualities and whether you’ll need to work with multiple strands. Most skeins are 50g (some are 25g or 100g).

If the pattern is worked with multiple colours, every colour will have to be converted separately. Similarly, if the pattern is worked with several strands of different yarns (for example 1 strand Alpaca and 1 strand Kid-Silk) you will have to find alternatives for each, individually.

Click here to see our yarn converter

nahoru

5) Why do I get the wrong knitting tension with the suggested needle size?

The needle size provided in the pattern serves only as a guide, the important thing is to follow the knitting tension. And since knitting tension is very individual, you will have to adjust the needle size to ensure that YOUR tension is the same as in the pattern – maybe you’ll have to adjust 1, or even 2 needle sizes, up or down to achieve the correct tension. For this, we recommend that you work test swatches.

Should you work with a different knitting tension than the one provided, the measurements of the finished garment might deviate from the measurement sketch.

See DROPS lesson: How to measure your tension/gauge

See DROPS video: How to make a gauge tension swatch

nahoru

6) Why is the pattern worked top-down?

Working a garment top-down provides more flexibility and room for personal adjustment. For example it is easier to try the garment on while working, as well as making adjustments to length of yoke and shoulder caps.

The instructions are carefully explaining every step, in the correct order. Diagrams are adjusted to the knitting direction and are worked as usual.

nahoru

7) Why are the sleeves shorter in larger sizes?

The total width of the garment (from wrist-to-wrist) will be larger in the larger sizes, despite the actual sleeves being shorter. The larger sizes have longer sleeve caps and wider shoulders, so there will be a good fit in all sizes.

nahoru

8) What is a repeat?

Diagrams are often repeated on the round or in height. 1 repeat is the diagram the way it appears in the pattern. If it says to work 5 repeats of A.1 in the round, then you work A.1 a total of 5 times after/next to each other in the round. If it says to work 2 repeats of A.1 vertically/in height you work the entire diagram once, then begin again at the start and work the entire diagram one more time.

nahoru

9) How do I work according to a knitting diagram?

The diagram depicts all rows/rounds, and every stitch seen from the right side. It is read from bottom to top, from right to left. 1 square = 1 stitch.

When working back and forth, every other row is worked from the right side and every other row is worked from the wrong side. When working from the wrong side, the diagram will have to be worked reversed: from left to right, knit stitches are purled, purl stitches are knit etc.

When working in the round every round is worked from the right side and the diagram are worked from right to left on all rounds.

See DROPS lesson: How to read knitting diagrams

nahoru

10) How do I work according to a crochet diagram?

The diagram depicts all rows/rounds, and every stitch seen from the right side. It is worked from bottom to top, from right to left.

When working back and forth every other row is worked from the right side: from right to left and every other row is worked from the wrong side: from left to right.

When working in the round, every row in the diagram are worked from the right side, from right to left.

When working a circular diagram you start in the middle and work your way outwards, counter clockwise, row by row.

The rows usually start with a given number of chain stitches (equivalent to the height of the following stitch), this will either be depicted in the diagram or explained in the pattern.

See DROPS lesson: How to read crochet diagrams

nahoru

11) How do I work several diagrams simultaneously on the same row/round?

Instructions for working several diagrams after each other on the same row/round, will often be written like so: “work A.1, A.2, A.3 a total of 0-0-2-3-4 times". This means you work A.1 once, then A.2 is worked once, and A.3 is repeated (in width) the number of times provided for your size – in this case like so: S = 0 times, M = 0 times, L=2 times, XL= 3 times and XXL = 4 times.

The diagrams are worked as usual: begin with the first row in A.1, then work the first row in A.2 etc.

See DROPS lesson: How to read knitting diagrams

See DROPS lesson: How to read crochet diagrams

nahoru

12) Why does the piece start with more chain stitches than it’s worked with?

Chain stitches are slightly narrower than other stitches and to avoid working the cast-on edge too tight, we simply chain more stitches to begin with. The stitch count will be adjusted on the following row to fit the pattern and measurement sketch.

nahoru

13) Why increase before the rib edge when the piece is worked top-down?

The rib edge is more elastic and will contract slightly compared to, for example, stocking stitch. By increasing before the rib edge, you avoid a visible difference in width between the rib edge and the rest of the body.

nahoru

14) Why increase in the cast-off edge?

It’s very easy to cast off too tightly, and by making yarn overs while casting off (and simultaneously casting these off) you avoid a too tight cast off edge.

See DROPS video: How to bind off with yarn overs (yo)

nahoru

15) How do I increase/decrease on every 3rd and 4th row/round alternately?

To achieve an even increase (or decrease) you can increase on, for example: every 3rd and 4th row alternately, like so: work 2 rows and increase on the 3rd row, work 3 rows and increase on the 4th. Repeat this until the increase is complete.

See DROPS lesson: Increase or decrease 1 st on every 3rd and 4th row alternately

nahoru

16) Why is the pattern slightly different than what I see in the photo?

Pattern repeats can vary slightly in the different sizes, in order to get the correct proportions. If you’re not working the exact same size as the garment in the photo, yours might deviate slightly. This has been carefully developed and adjusted so that the complete impression of the garment is the same in all sizes.

Make sure to follow instructions and diagrams for your size!

nahoru

17) How can I work a jacket in the round instead of back and forth?

Should you prefer to work in the round instead of back and forth, you may of course adjust the pattern. You’ll need to add steeks mid-front (usually 5 stitches), and follow the instructions. When you would normally turn and work from the wrong side, simply work across the steek and continue in the round. At the end you’ll cut the piece open, pick up stitches to work bands, and cover the cut edges.

See DROPS video: How to knit steeks and cut open

nahoru

18) Can I work a jumper back and forth instead of in the round?

Should you prefer to work back and forth instead of in the round, you may of course adjust the pattern so you work the pieces separately and then assemble them at the end. Divide the stitches for the body in 2, add 1 edge stitch in each side (for sewing) and work the front and back pieces separately.

See DROPS lesson: Can I adapt a pattern for circular needles into straight needles?

nahoru

19) Why do you show discontinued yarns in the patterns?

Since different yarns have different qualities and textures we have chosen to keep the original yarn in our patterns. However, you can easily find options among our available qualities by using our yarn converter, or simply pick a yarn from the same yarn group.

It is possible that some retailers still have discontinued yarns in stock, or that someone has a few skeins at home that they would like to find patterns for.

The yarn converter will provide both alternative yarn as well as required amount in the new quality.

nahoru

20) How do I make a women’s size garment into a men’s size one?

If you have found a pattern you like which is available in women’s size it’s not very difficult to convert it to men’s size. The biggest difference will be the length of sleeves and body. Start working on the women size that you think would fit across the chest. The additional length will be worked right before you cast off for the armhole/sleeve cap. If the pattern is worked top-down you can add the length right after the armhole or before the first decrease on sleeve.

Regarding additional yarn amount, this will depend on how much length you add, but it is better with a skein too many than too few.

nahoru

21) How do I prevent a hairy garment from shedding?

All yarns will have excess fibres (from production) that might come off as lint or shedding. Brushed yarns (ie hairier yarns) have more of these loose, excess fibres, causing more shedding.

Shedding also depends on what is worn under or over the garment, and whether this pulls at the yarn fibres. It’s therefore not possible to guarantee that there will be no shedding

Below are some tips on how to get the best result when working with hairier yarns:

1. When the garment is finished (before you wash it) shake it vigorously so the looser hairs come off. NOTE: do NOT use a lint roller, brush or any method that pulls at the yarn.

2. Place the garment in a plastic bag and put it in your freezer - the temperature will cause the fibres to become less attached to each other, and excess fibres will come off easier.

3. Leave in the freezer for a few hours before taking it out and shaking it again.

4. Wash the garment according to the instructions on the yarn label.

nahoru

22) Where on the garment is the length measured?

The measurement sketch/schematic drawing provides information regarding the full length of the garment. If it’s a jumper or a jacket the length is measured from the highest point on the shoulder closest to the neckline, and straight down to the bottom of the garment. It is NOT measured from the tip of shoulder. Similarly, the length of yoke is measured from the highest point on the shoulder and down to where yoke is split into body and sleeves.

On a jacket measures are never taken along bands, unless specifically stated. Always measure inside band stitches when measuring the length.

See DROPS lesson: How to read a schematic drawing

nahoru

23) How do I know how many balls of yarn I need?

The required amount of yarn is provided in grams, eg: 450 g. To calculate how many balls you’ll need you first need to know how many grams are in 1 ball (25g, 50g or 100g). This information is available if you click on the individual yarn quality on our pages. Divide the amount required with the amount of each ball. For example, if each ball is 50g (the most common amount), the calculation will be as follows: 450 / 50 = 9 balls.

nahoru

Pořídili jste si přízi DROPS na tento model? Pak máte taky právo žádat po svém prodejci, u něhož jste nakoupili, pomoc a rady. Seznam DROPS obchodů najdete tady!
Pořád se nemůžete dobrat odpovědi, kterou hledáte? Pak posuňte stránku dolů a napište nám svůj dotaz, naši specialisté se vám pokusí poradit. Obvykle to zvládneme během 5 až 10 pracovních dnů.. Mezitím si můžete pročíst otázky a odpovědi, které k tomuto modelu položili ostatní, nebo navštívit skupinu DROPS Workshop na Facebooku, kde vám může poradit některá spřízněná duše!

Komentáře / Otázky (17)

country flag Marca wrote:

Kan ik het patroon vd polswarmers ook met rondbreinaalden breien ipv naalden zonder knop? En zo ja, kan ik het patroon dan gewoon letterlijk volgen?? En hoe lang moet mijn kabel dan zijn (ik heb 40, 60 en 80)?

28.11.2023 - 18:20

DROPS Design answered:

Dag Marca,

Jazeker dat kan. Kijk even welke lengte voor jou het handigst werkt. Zelf werk ik liever met een wat langere draad in combinatie met de magic loop techiek.

29.11.2023 - 09:31

country flag Amouret wrote:

Ok mais les 14 augmentation vu que c'est écrit ne pas les faire au dessus des 22 mailles du motif je les fait de quelle coté ? coté motif ou coté jersey?

24.04.2023 - 10:16

DROPS Design answered:

Bonjour Mme Amouret, oups je n'en étais pas au bon niveau... vous devez augmenter ces 14 mailles au-dessus des 40 mailles jersey, pour ne pas toucher aux 22 mailles de A.3. Bon tricot!

24.04.2023 - 10:40

country flag Angélique Amouret wrote:

Bonjour je suis arriver au niv des 14 augmentation , quand vous dite ne pas augmenter au dessus des 22 mailles du motif , et ce que ca veut dire que j'augmente sur le jersey ou j'augmente coté motif, et en regardant la photo du modèle j'ai l'impression que si je continue en motif A2 ca ne continuera pas la suite du motif de A3 car la sur ma mitaine j'ai que 1 cercle de dessiner sur le milieu de la mitaine et pas 2 comme sur le dessin en photo

23.04.2023 - 10:45

DROPS Design answered:

Bonjour Mme Amouret, tout dépend de votre tensionen hauteur; on va mettre les mailles du pouce en attente 10 cm (2ème taille) après avoir commencé A.3, autrement dit après 34 rangs de A.3 (soit 19 rangs de A.3 + les 15 premiers rangs), terminez votre motif A.3 si souhaité avant les côtes de la main - et ajustez en conséquence la hauteur des côtés de A.2. Bon tricot!

24.04.2023 - 10:10

country flag Amouret wrote:

Ok donc j'augmente sur mes 2 mailles du début et je continue le motif comme avant c ca? mais comment si retrouver pour retomber dans le bon sens du motif

21.04.2023 - 13:35

DROPS Design answered:

Bonjour Mme Amouret, pour la 1ère augmentation du pouce, augmenter 1 m avant + 1 maille après la maille avec le marqueur, la 2ème fois, augmentez avant puis après ces 3 mailles, la 3ème fois, augmentez avant puis après ces 5 mailles etc. J'ai peur de ne pas bien comprendre pas votre question , je suis désolée, le motif A.3 ne sera pas décalé, on rajoute juste des mailles de chaque côté de la maille avec un marqueur, les autres mailles se tricotent comme avant: en jersey endroit et diagramme A.3 sur le dessus de la main (lisez le diagramme de droite à gauche tous les tours car on tricote en rond). Bon tricot!

21.04.2023 - 14:11

country flag Amouret wrote:

Vu que je fait mes mitaine sur des aiguille circulaire , du coup et ce que je doit faire une augmentation au début et a la fin du travail pour former mon pouce vers la droite ?

19.04.2023 - 14:15

DROPS Design answered:

Bonjour Mme Amouret, l'avant-dernière maille reste la même maille dans tous les cas, vous devez juste augmenter 2 m à chaque fois: 1 m avant cette maille + 1 maille après cette maille (puis 1 m avant ces mailles et 1 m après ces mailles). Pour la mitaine droite, vous augmenterez de part et d'autre de la 2ème maille du tour. Bon tricot!

19.04.2023 - 15:16

country flag Angélique Amouret wrote:

Bonjour je suis au niveau de l'augmentation pour le gousser du pouce mais j'ai du mal a comprendre comment proceder exactement et surtout a quel moment j'augmente car je vois pas comment faire de chaque coté sur le coté paume et savoir du coup si on continue tjr sur le motif A3 car c pas indiquer cordialement,

19.04.2023 - 11:27

DROPS Design answered:

Bonjour Mme Amouret, vous augmentez d'abord de chaque côté de l'avant-dernière maille du tour (mitaine gauche), autrement dit, avant + après cette maille (= 2 mailles à chaque fois), la fois suivante, vous augmentez avant + après ces 3 mailles et ainsi de suite - cf AUGMENTATIONS-1 (gousset du pouce, mitaines):. Les autres mailles se tricotent exactement comme avant. Bon tricot!

19.04.2023 - 13:10

country flag Amouret wrote:

Bonjour je suis perdu je suis au niv ou je dois commencer le diagramme A3 mais je comprends pas pour les 2 mailles jersey c pas écrit comment les tricoter et vous mettez A3 = 22 maille et 26 maille en Jersey mais ça fait pas 50 mailles du coup comment on tricoté les 2 dernières mailles

09.04.2023 - 09:25

DROPS Design answered:

Bonjour Mme Amouret, en taille S/.M, si vous avez bien 50 mailles sur vos aiguilles, tricotez-les ainsi: 2 m jersey (en rond, on tricote ces mailles toujours à l'endroit), puis tricotez les 22 mailles de A.3 et terminez par 26 mailles jersey, soit: 2+22+26=50. Bon tricot!

11.04.2023 - 12:29

country flag Johanna Andersson wrote:

Hej! Jag förstår inte hur jag ska sticka varv 21-24 i diagram A1. Arbetet har 54 maskor men där finns bara beskrivna totalt sett 8 maskor. Hur kommer jag vidare? Jag stickar pannbandet. Tack!

11.03.2021 - 20:14

DROPS Design answered:

Hei Johanna. Når du er ferdig med rad 20 i A.1, begynner du på 1. rad igjen. De 8 maskene du ser på slutten av diagrammet er samme maske som er på 1.- 4. rad i diagrammet. mvh DROPS design

15.03.2021 - 13:02

country flag Sylvie wrote:

Bonjour, Le modèle « Annely » le diagramme A.1 , après les 20 rangs entre les 2 colonnes (marquer en jaune) je fais quoi ??? J’attends impatiemment votre réponse pour faire ce modèle Merci Sylvie

21.02.2021 - 23:17

DROPS Design answered:

Bonjour Sylvie, les différents motifs de A.1 se répètent sur un nombre différents de rangs, autrement dit, quand les 20 rangs du diagramme sont terminés, reprenez-le au début sur toutes les mailles sauf sur les 2 torsades de 4 mailles - ces torsades doivent être croisées tous les 6 rangs. Bon tricot!

22.02.2021 - 09:35

country flag Kari Bjerknes wrote:

Prøver å skrive ut mønsteret/oppskriften på pulsvanter. Det står at det er gratismønster og jeg kan ikke ha på mobilen hele tiden....... Kan dere hjelpe meg🥰

28.12.2019 - 15:40

DROPS Design answered:

Hei Kari. Da er det bare å klikke på skriver ikonet, nedenfor bildet eller til høyre. Får du ikke skrevet ut, sjekk dine skriver innstillinger på din printer/telefon/PC. God Fornøyelse!

20.01.2020 - 11:06

Přidejte komentář k návodu DROPS 182-12

Rádi bychom věděli, co si o tomto modelu myslíte!

Pokud se chcete na něco zeptat, dbejte prosím na to, abyste ve formuláři níže vybrali správnou kategorii - díky tomu se dříve dozvíte, co potřebujete vědět. Povinná pole jsou označena *.