DROPS Polaris
DROPS Polaris
100% Wool
from 4.25 £ /100g
Get the yarn to make this pattern from 68.00£.

The yarn cost is calculated from the pattern’s smallest size and the yarn’s cheapest product type. Looking for an even better price? You might find it on the DROPS Deals!

DROPS Super Sale

The Grove

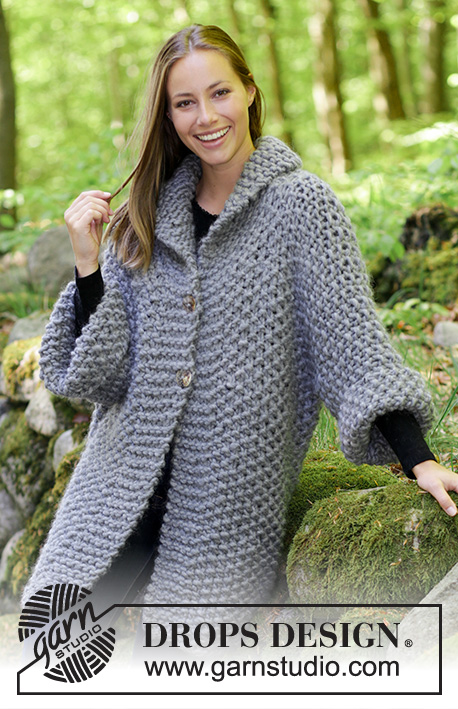
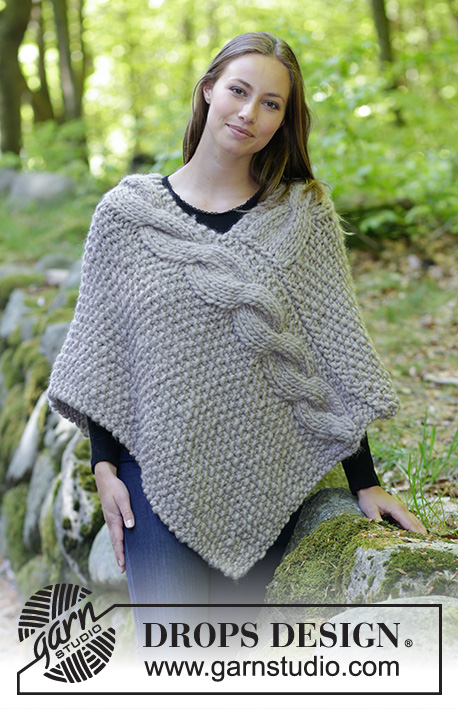
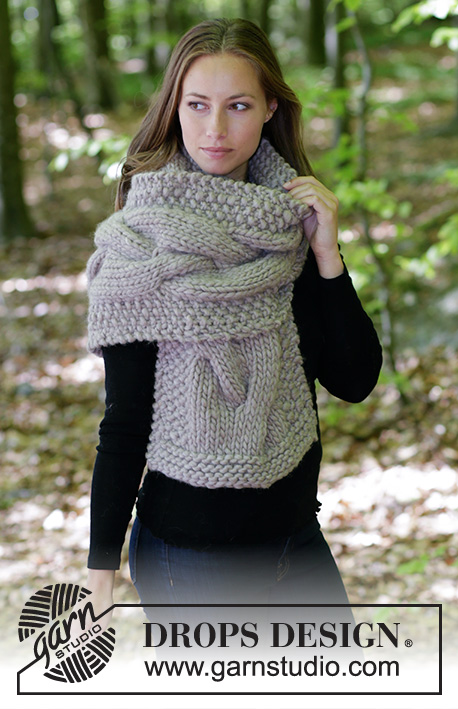
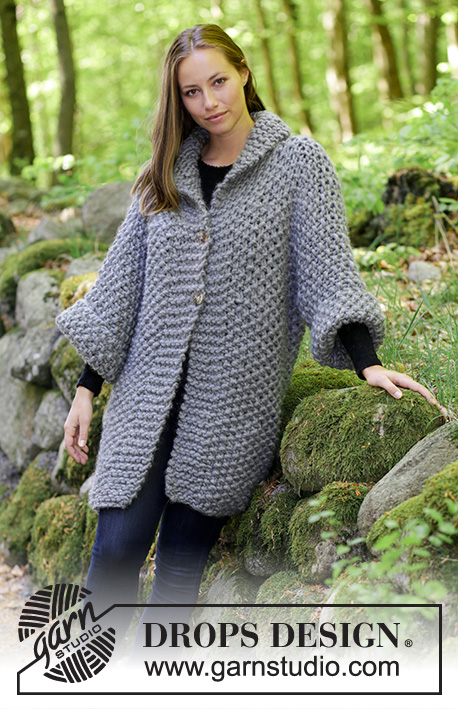
Knitted jacket in moss stitch. Size: S - XXXL Piece is knitted in DROPS Polaris.

DROPS 179-25
DROPS design: Pattern po-096
Yarn group F or E + E
----------------------------------------------------------
Size: S/M – L/XL – XXL/XXXL
Materials:
DROPS POLARIS from Garnstudio (belongs to yarn group F)
1600-1900-2300 g colour 04, medium grey

DROPS CIRCULAR NEEDLE (60 or 80 cm) SIZE 20 mm – or size needed to get 5.5 stitches and 7 rows in stocking stitch = width 10 cm and 10 cm vertically.

DROPS MOTHER-OF-PEARL BUTTON ARCHED (white), NO 540: 2 pieces for all sizes
----------------------------------------------------------

-------------------------------------------------------

Alternative Yarn – See how to change yarns here
Yarn Groups A to F – Use the same pattern and change the yarn here
Yarn usage using an alternative yarn – Use our yarn converter here

-------------------------------------------------------

DROPS Polaris
DROPS Polaris
100% Wool
from 4.25 £ /100g
Get the yarn to make this pattern from 68.00£.

The yarn cost is calculated from the pattern’s smallest size and the yarn’s cheapest product type. Looking for an even better price? You might find it on the DROPS Deals!

DROPS Super Sale

SAVE 30% on 6 cotton favourites!
Valid until 12.04.2024

Pattern instructions

NOTE: This pattern is written in British English. All measurements in charts are in cm. For conversion from cm to inches - click here. There are different terms for crocheting in British and American English. If this pattern includes crochet, click for "crochet terms" here. For this pattern in American English, please click here.
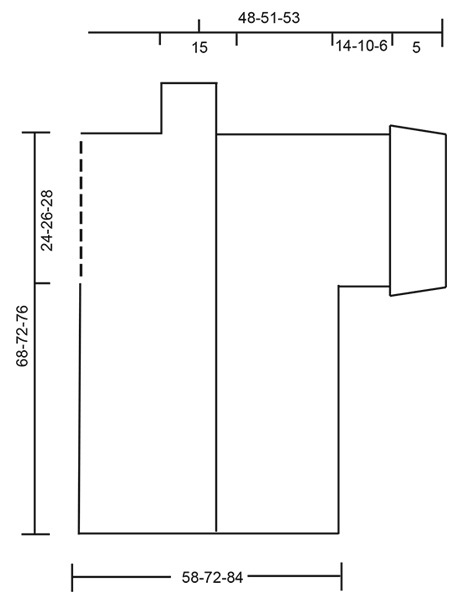
INFORMATION FOR PATTERN:

GARTER STITCH (back and forth):
1 ridge = knit 2 rows.

MOSS STITCH:
ROW 1: * knit 1, purl 1 *, repeat from *-* the rest of row.
ROW 2: Knit over purl and purl over knit. Repeat 2nd row upwards.
----------------------------------------------------------

JACKET:
Worked in one piece back and forth. Work front piece, cast on for sleeves, cast on stitches for neck and work down along back piece.

RIGHT FRONT PIECE + SLEEVE:
Worked back and forth on a circular needle to make room for all the stitches. Cast on 21-25-28 stitches on circular needle size 20 mm with Polaris. Work 1 ridge in GARTER STITCH - see explanation above. Then work as follows from right side: 5 stitches in garter stitch and 16-20-23 stitches MOSS STITCH - see explanation above. Continue pattern like this. REMEMBER THE KNITTING TENSION! When piece measures 44-46-48 cm, cast on 13-11-9 new stitches for sleeve at the end of next row from right side = 34-36-37 stitches. Insert 1 marker in piece, NOW MEASURE PIECE FROM HERE. When piece measures approx. 23-25-27 cm from marker (adjust so that next row is worked from right side), work the first 9 stitches as before, then slip them on 1 stitch holder = 25-27-28 stitches remain on needle, work the rest of row. Insert 1 new marker (= mid on top of shoulder) – NOW MEASURE PIECE FROM HERE! Work 1 row over stitches on needle. Slip stitches on 1 stitch holder and put piece aside.

LEFT FRONT PIECE + SLEEVE:
Cast on and work as right front piece but reversed. Cast on new stitches for sleeve at the end of row from wrong side. Slip the first 9 stitches from wrong side on a stitch holder, work the rest of row. Then continue with back piece without slipping the remaining stitches on 1 stitch holder. 

BACK PIECE:
Continue with moss stitch on next row as follows from right side: Work stitches from left front piece + sleeve, cast on 8 new stitches (= back of neck) and work stitches from right front piece + sleeve on to circular needle = 58-62-64 stitches. Continue back and forth until piece measures 24-26-28 cm from marker mid on top of shoulder. On next row cast off the first and last 13-11-9 stitches, cut the yarn = 32-40-46 stitches. Continue over the remaining stitches until piece measures approx. 66-70-74 cm, knit 2 rows over all stitches, then loosely cast off. 

COLLAR:
Slip the 9 stitches from stitch holder on right front piece back on needle. Knit over all stitches with short rows as follows: 
Rows 1 and 2: Beginning mid front - knit 5, turn and knit back.
Rows 3 and 4: Knit all stitches, turn and knit back. Repeat these 4 rows until collar measures approx. 7 cm on the inner side towards the shoulder, cast off. Work the same way over stitches from stitch holder on left front piece.

ASSEMBLY:
Sew sleeve and side seam in one, sew together edge to edge in outer loops of edge stitches to avoid a chunky seam. Sew collar together edge to edge mid back. Sew collar to neckline in the back of neck.
Sew the buttons on to left front piece. Sew 1st button approx. 45-50 cm up from cast-on edge, 2nd button approx. 57-62 cm from cast-on edge. Button jack through stitches, there is no need to decrease for button holes.

Diagram

diagram measurements
Do you have a question? See a list of frequently asked questions (FAQ)

Knitting tension is what determines the final measurements of your work, and is usually measured per 10 x 10 cm. It is provided like so: number of stitches in width x number of rows in height - eg: 19 stitches x 26 rows = 10 x 10 cm.

The knitting tension is very individual; some people knit/crochet loosely while others work tightly. You adjust the knitting tension with the needle size, which is why the suggested needle size is only meant as a guide! You need to adjust this (up or down) to ensure that YOUR knitting tension matches the knitting tension provided in the pattern. If you work with a different knitting tension than provided you will have a different yarn consumption, and your work will have different measurements than what the pattern suggests.

The knitting tension also determines which yarns can replace each other. As long as you achieve the same knitting tension you can replace one yarn with another.

See DROPS lesson: How to measure your tension/gauge

See DROPS video: How to make a gauge tension swatch

The required amount of yarn is provided in grams, eg: 450 g. To calculate how many balls you’ll need you first need to know how many grams are in 1 ball (25g, 50g or 100g). This information is available if you click on the individual yarn quality on our pages. Divide the amount required with the amount of each ball. For example, if each ball is 50g (the most common amount), the calculation will be as follows: 450 / 50 = 9 balls.

The important thing when changing from one yarn to another is that the knitting/crochet tension remains the same. This is so that the measurements of the finished piece will be the same as on the sketch provided. It is easier to achieve the same knitting tension using yarns from the same yarn group. It is also possible to work with multiple strands of a thinner yarn to achieve the knitting tension of a thicker one. Please try our yarn converter. We recommend you to always work a test swatch.

Please NOTE: when changing yarn the garment might have a different look and feel to the garment in the photo, due to individual properties and qualities of each yarn.

See DROPS lesson: Can I use a different yarn than the one mentioned in the pattern?

All our yarns are categorised into yarn groups (from A to F) according to thickness and knitting tension – group A contains the thinnest yarns and group F the thickest. This makes it easier for you to find alternative yarns to our patterns, should you wish to switch yarn. All yarns within the same group have a similar knitting tension and can easily replace each other. However, different yarn qualities have different structures and properties which will give the finished work a unique look and feel.

Click here for an overview of the yarns in each yarn group

At the top of all our patterns you’ll find a link to our yarn calculator, which is a helpful tool should you wish to use a different yarn than suggested. By filling in the yarn quality you wish to replace, the amount (in your size) and number of strands, the calculator will present good alternative yarns with the same knitting tension. Additionally it will tell you how much you’ll require in the new qualities and whether you’ll need to work with multiple strands. Most skeins are 50g (some are 25g or 100g).

If the pattern is worked with multiple colours, every colour will have to be calculated separately. Similarly, if the pattern is worked with several strands of different yarns (for example 1 strand Alpaca and 1 strand Kid-Silk) you will have to find alternatives for each, individually.

Click here to see our yarn calculator

Since different yarns have different qualities and textures we have chosen to keep the original yarn in our patterns. However, you can easily find options among our available qualities by using our yarn calculator, or simply pick a yarn from the same yarn group.

It is possible that some retailers still have discontinued yarns in stock, or that someone has a few skeins at home that they would like to find patterns for.

The yarn calculator will provide both alternative yarn as well as required amount in the new quality.

If you think it's hard to decide what size to make, it can be a good idea to measure a garment you own already and like the size of. Then you can pick the size by comparing those measures with the ones available in the pattern's size chart.

You'll find the size chart at the bottom of the pattern.

See DROPS lesson: How to read size chart

The needle size provided in the pattern serves only as a guide, the important thing is to follow the knitting tension. And since knitting tension is very individual, you will have to adjust the needle size to ensure that YOUR tension is the same as in the pattern – maybe you’ll have to adjust 1, or even 2 needle sizes, up or down to achieve the correct tension. For this, we recommend that you work test swatches.

Should you work with a different knitting tension than the one provided, the measurements of the finished garment might deviate from the measurement sketch.

See DROPS lesson: How to measure your tension/gauge

See DROPS video: How to make a tension/gauge swatch

Working a garment top-down provides more flexibility and room for personal adjustment. For example it is easier to try the garment on while working, as well as making adjustments to length of yoke and shoulder caps.

The instructions are carefully explaining every step, in the correct order. Diagrams are adjusted to the knitting direction and are worked as usual.

The diagram depicts all rows/rounds, and every stitch seen from the right side. It is read from bottom to top, from right to left. 1 square = 1 stitch.

When working back and forth, every other row is worked from the right side and every other row is worked from the wrong side. When working from the wrong side, the diagram will have to be worked reversed: from left to right, knit stitches are purled, purl stitches are knit etc.

When working in the round every round is worked from the right side and the diagram are worked from right to left on all rounds.

See DROPS lesson: How to read knitting diagrams

The diagram depicts all rows/rounds, and every stitch seen from the right side. It is worked from bottom to top, from right to left.

When working back and forth every other row is worked from the right side: from right to left and every other row is worked from the wrong side: from left to right.

When working in the round, every row in the diagram are worked from the right side, from right to left.

When working a circular diagram you start in the middle and work your way outwards, counter clockwise, row by row.

The rows usually start with a given number of chain stitches (equivalent to the height of the following stitch), this will either be depicted in the diagram or explained in the pattern.

See DROPS lesson: How to read crochet diagrams

Instructions for working several diagrams after each other on the same row/round, will often be written like so: “work A.1, A.2, A.3 a total of 0-0-2-3-4 times". This means you work A.1 once, then A.2 is worked once, and A.3 is repeated (in width) the number of times provided for your size – in this case like so: S = 0 times, M = 0 times, L=2 times, XL= 3 times and XXL = 4 times.

The diagrams are worked as usual: begin with the first row in A.1, then work the first row in A.2 etc.

See DROPS lesson: How to read knitting diagrams

See DROPS lesson: How to read crochet diagrams

The total width of the garment (from wrist-to-wrist) will be larger in the larger sizes, despite the actual sleeves being shorter. The larger sizes have longer sleeve caps and wider shoulders, so there will be a good fit in all sizes.

The measurement sketch/schematic drawing provides information regarding the full length of the garment. If it’s a jumper or a jacket the length is measured from the highest point on the shoulder closest to the neckline, and straight down to the bottom of the garment. It is NOT measured from the tip of shoulder. Similarly, the length of yoke is measured from the highest point on the shoulder and down to where yoke is split into body and sleeves.

On a jacket measures are never taken along bands, unless specifically stated. Always measure inside band stitches when measuring the length.

See DROPS lesson: How to read a schematic drawing

Diagrams are often repeated on the round or in height. 1 repeat is the diagram the way it appears in the pattern. If it says to work 5 repeats of A.1 in the round, then you work A.1 a total of 5 times after/next to each other in the round. If it says to work 2 repeats of A.1 vertically/in height you work the entire diagram once, then begin again at the start and work the entire diagram one more time.

Chain stitches are slightly narrower than other stitches and to avoid working the cast-on edge too tight, we simply chain more stitches to begin with. The stitch count will be adjusted on the following row to fit the pattern and measurement sketch.

The rib edge is more elastic and will contract slightly compared to, for example, stocking stitch. By increasing before the rib edge, you avoid a visible difference in width between the rib edge and the rest of the body.

It’s very easy to cast off too tightly, and by making yarn overs while casting off (and simultaneously casting these off) you avoid a too tight cast off edge.

See DROPS video: How to bind off with yarn overs (yo)

To achieve an even increase (or decrease) you can increase on, for example: every 3rd and 4th row alternately, like so: work 2 rows and increase on the 3rd row, work 3 rows and increase on the 4th. Repeat this until the increase is complete.

See DROPS lesson: Increase or decrease 1 st on every 3rd and 4th row alternately

Should you prefer to work in the round instead of back and forth, you may of course adjust the pattern. You’ll need to add steeks mid-front (usually 5 stitches), and follow the instructions. When you would normally turn and work from the wrong side, simply work across the steek and continue in the round. At the end you’ll cut the piece open, pick up stitches to work bands, and cover the cut edges.

See DROPS video: How to knit steeks and cut open

Should you prefer to work back and forth instead of in the round, you may of course adjust the pattern so you work the pieces separately and then assemble them at the end. Divide the stitches for the body in 2, add 1 edge stitch in each side (for sewing) and work the front and back pieces separately.

See DROPS lesson: Can I adapt a pattern for circular needles into straight needles?

Pattern repeats can vary slightly in the different sizes, in order to get the correct proportions. If you’re not working the exact same size as the garment in the photo, yours might deviate slightly. This has been carefully developed and adjusted so that the complete impression of the garment is the same in all sizes.

Make sure to follow instructions and diagrams for your size!

If you have found a pattern you like which is available in women’s size it’s not very difficult to convert it to men’s size. The biggest difference will be the length of sleeves and body. Start working on the women size that you think would fit across the chest. The additional length will be worked right before you cast off for the armhole/sleeve cap. If the pattern is worked top-down you can add the length right after the armhole or before the first decrease on sleeve.

Regarding additional yarn amount, this will depend on how much length you add, but it is better with a skein too many than too few.

All yarns will have excess fibres (from production) that might come off as lint or shedding. Brushed yarns (ie hairier yarns) have more of these loose, excess fibres, causing more shedding.

Shedding also depends on what is worn under or over the garment, and whether this pulls at the yarn fibres. It’s therefore not possible to guarantee that there will be no shedding

Below are some tips on how to get the best result when working with hairier yarns:

1. When the garment is finished (before you wash it) shake it vigorously so the looser hairs come off. NOTE: do NOT use a lint roller, brush or any method that pulls at the yarn.

2. Place the garment in a plastic bag and put it in your freezer - the temperature will cause the fibres to become less attached to each other, and excess fibres will come off easier.

3. Leave in the freezer for a few hours before taking it out and shaking it again.

4. Wash the garment according to the instructions on the yarn label.

Pilling is a natural process that happens to even the most exclusive of fibers. It's a natural sign of wear and tear that is hard to avoid, and that is most visible in high friction areas of your garment like a sweater's arms and cuffs.

You can make your garment look as new by removing the pilling, using a fabric comb or a pill/lint remover.

Still can't find the answer you need? Then scroll down and leave your question so one of our experts can try to help you. This will be done normally within 5 to 10 working days.
In the meantime, you can read the questions and answers that others have left to this pattern or join the DROPS Workshop on Facebook to get help from fellow knitters/crocheters!

You might also like...

Post a comment to pattern DROPS 179-25

We would love to hear what you have to say about this pattern!

If you want to leave a question, please make sure you select the correct category in the form below, to speed up the answering process. Required fields are marked *.

Comments / Questions (10)

country flag Fabiana wrote:

Buonasera, avrei due domande 1.c'è scritto di usare i ferri n 20 ma con la lana polaris non si usano i ferri 12? 2. Davanti destro+manica c'è scritto che quando il lavoro misura 44 46 48 cm, 13 11 9 nuove maglie. Cioè per la taglia xxxl bisogna aumentare 9 maglie? Grazie

10.11.2023 - 21:40

DROPS Design answered:

Buonasera Fabiana, deve utilizzare il numero di ferri che le permette di ottenere il campione indicato. Per il numero di aumenti è corretto, per la taglia XXXL deve aumentare 9 maglie. Buon lavoro!

12.11.2023 - 12:03

country flag Pat Ellis wrote:

I'm sorry but the picture with this pattern was lovely. I got the yarn suggested and the needles. My gauge was okay. The end result is just sad. WAY too BIG!!!! HEAVY - ways a ton!!!!! Sleeves way too long..... Not really anything that anyone would want to wear. Sorry to have spent the time and the money!!!!

12.05.2020 - 02:17

DROPS Design answered:

Dear Mrs Ellis, we are sorry to hear you had worries with this pattern, please show your work to your Store - even sending them a picture, they should be able to check if there is anything wrong. Happy knitting!

12.05.2020 - 09:54

country flag Pt Ellis wrote:

Knitting The Grove - a Drops pattern -using Polaris yarn. Collar instructions: Row 1 "Beginning mid front"? I don't understand. Do I knit 5 and then turn and go back? It says that, but being preceded with "Beginning mid front" , I'm just not sure.....Thanks.

10.05.2020 - 19:05

DROPS Design answered:

Dear Mrs Pt Ellis, beginning mid front means you should start this row on the outeredge of collar, ie from RS for the right front piece and from WS for the left front piece. You then work short rows: 2 rows over the first 5 sts only, 2 rows over all the 9 sts so that outer edge will be higher/longer than inner edge. Happy knitting!

11.05.2020 - 10:12

country flag María Teresa wrote:

PARA EL MODELO 179-25 EN SM/ CUÁNTOS GRAMOS DE MATERIAL NECESITO PARA HACER TODA LA CHAQUETA, NECESITO UNA LANA GRUESA . GRAMOS O YARDAS TOTAL NECESITO ?

16.04.2020 - 04:50

DROPS Design answered:

Hola Maria Teresa. Toda la información sobre los materiales la puedes encontrar en la parte superior del patrón.

25.05.2020 - 00:20

country flag María Teresa Perez wrote:

HE LEÍDO VARÍAS VECES EL PATRÓN DROSP 179-25 Y LAS MEDIDAS NO LAS ENCUENTRO EN LAS INSTRUCCIONES DEL PATRÓN , ALGUIEN ME PUEDE AYUDAR , EJEMPLO : 48-51-53 para SM,L ETC, PERO DENTRO DE LAS INSTRUCIONES ESCRITAS NO APARECEN ESOS MISMOS NÚMEROS , NECESITO AYUDA , GRACIAS

14.04.2020 - 23:24

DROPS Design answered:

Hola Maria Teresa Perez! Puedes ver las medidas finales al final del patrón. Buen trabajo!

17.11.2020 - 14:33

Valentina wrote:

Hola, estoy haciendo este diseño y tengo dudas para realizar la espalda, ¿como continuo tejiendo desde los nuevos puntos del escote del cuello?, ya que coloque la parte derecha de la chaqueta + manga. saludos cordiales Valentina

22.03.2018 - 14:11

DROPS Design answered:

Hola Valentina. Para unir los dos delanteros en la parte de la espalda hay que montar 8 puntos nuevos (escote en la espalda), es decir, trabajar como sigue: primero trabajar el delantero izquierdo con la manga, montar 8 puntos nuevos y continuar con los puntos del delantero derecho con la manga. Después continuar según el dibujo del patrón.

29.03.2018 - 19:43

country flag Zeller wrote:

Guten Tag ist eine schöne Jacke. Meine Tochter wünscht sie sich. nun meine Frage: das Rückenteil strick ich aus den beiden Vorderteilen oder wie? vielen Dank für die Antwort freundliche Grüsse JUdith Zeller

04.02.2018 - 15:47

DROPS Design answered:

Liebe Frau Zeller, ja genau, Sie stricken zuerst beiden Vorderteile und dann stricken Sie die Maschen vom linken Vorderteil (+ Ärmel), dann schlagen Sie 8 Maschen (Neck am Rückenteil) und dann stricken Sie die Maschen vom rechten Vorderteil (+ Ärmel), Rückenteil wird dan von oben nach unten gestrickt, die Maschen der Ärmel werden dann abgekettet. Viel Spaß beim stricken!

05.02.2018 - 09:47

country flag Amyah wrote:

Celui-là, je veux me le tricoter... ce serait parfait pour la côte ouest canadienne où les hiver ne sont pas froids mais humides... je me vois bien marcher sur la plage le long de l'océan Pacifique toute enrobée dans ce cocon de laine...

01.07.2017 - 07:13

country flag Gabriela wrote:

Lässig und edel vereint. Echt cool! Brauch ich im Winter.

01.07.2017 - 05:21

country flag Eva wrote:

Ein schöner, warmer Kurzmantel, den ich nachstricken möchte. Aber ich würde ihn gerne mit Fleece abfüttern. Kann man das bei der Anleitung vielleicht mit einbeziehen? Ein Schnittmuster fürs Futter nebst Anleitung zum Einnähen wäre toll . Stricksachen sind ja leider nie winddicht, egal, wie dick das verwendete Garn ist.

19.06.2017 - 19:01