
Popular categories
Looking for a yarn?


Comments / Questions (15)
![]() Elisa Pereira wrote:
Elisa Pereira wrote:
Quantos novelos são precisos para fazer 1 poncho tamanho 48 em lã quentinha com 1 pelozinho ralo
19.04.2024 - 14:11DROPS Design answered:
Bom dia, São necessários 12 novelos. Bons tricôs!
23.04.2024 - 10:43
![]() Brigitte wrote:
Brigitte wrote:
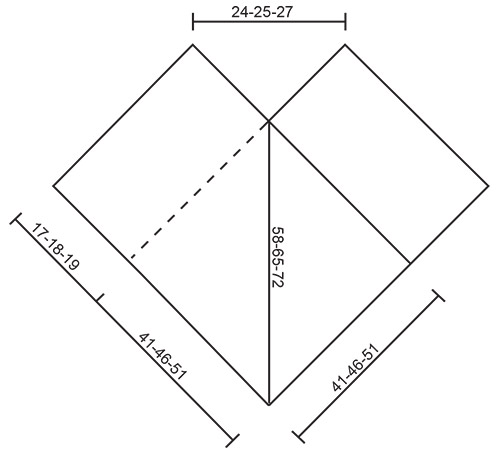
In der Strickanleitung steht, dass die Arbeit nach Fertigstellung eine Länge von 75 cm bei Größe S/M hat. In der Zeichnung jedoch ist eine Länge von 58 cm (17 + 41 cm). Hier muss ein Fehler sein. Welche Abmessungen sind erforderlich? Freundliche Grüße Brigitte
10.11.2023 - 17:16
![]() Ajna wrote:
Ajna wrote:
Zdravím, je možné pončo uplést tak, aby byl copánek jinou barvou? Pokud ano, poradíte mi, která oka mám pak ve vzoru plést jinou barvou? Děkuji!
23.11.2022 - 11:17DROPS Design answered:
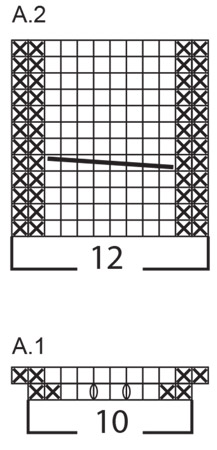
Dobrý den, Ajno, ano, copánek může mít jinou barvu - změňte přízi pro prostředních 8 ok (viz "přeškrtnutá" oka ve schématu - to jsou oka, která budete křížit do copánku), ppř. pro všech 12 ok (= celé schéma) - v tom případě budete mít jiak barevný nejen samotný copánek, ale celý vzorový pruh. Hodně zdaru! Hana
29.11.2022 - 06:16
![]() Patricia Helwig wrote:
Patricia Helwig wrote:
Merci pour votre réponse je vais essayer avec des aiguilles 3..... Je vous donnerais des nouvelles. Cordialement Patricia Helwig
29.03.2022 - 10:01
![]() Patricia Helwig wrote:
Patricia Helwig wrote:
Est ce qu'il est possible de faire ce modèle avec de la laine fine aiguille 3 ?
28.03.2022 - 17:40DROPS Design answered:
Bonjour Mme Helwig, probablement mais le rendu serait automatiquement différent et il vous faudra tout recalculer en fonction de votre propre tension; retrouvez ici tous nos modèles de ponchos réalisés dans une laine ou un fil du groupe A - ajoutez des filtrez pour trouver la tension souhaitée. Bon tricot!
29.03.2022 - 09:04
![]() Patricia Helwig wrote:
Patricia Helwig wrote:
Bonjur Je voudrais tricoter le modèle184-34 mais en montant 36 mailles jobtiens que 14 cm..Est ce correct ? Merci Cordialement Patricia Helwig
28.03.2022 - 16:17DROPS Design answered:
Bonjour Mme Helwig, pensez à bien vérifier votre échantillon: vous devez avoir 7 mailles x 8 rangs jersey = 10 x 10 cm avec 1 fil Polaris, ainsi, vos 36 mailles feront bien 51 cm comme dans le schéma. Retrouvez ici plus d'infos sur l'échantillon. Bon tricot!
28.03.2022 - 16:20
![]() Rita Schoonbrood wrote:
Rita Schoonbrood wrote:
Kan di model ook op 2 naalden gebreid worden ?
29.07.2021 - 09:17DROPS Design answered:
Dag Rita,
Ja, dat kan. De reden dat er een rondbreinaald geadviseerd wordt is omdat de steken dan beter op de naald passen. Met rechte naalden is het wat proppen. Technisch gezien is het geen probleem, dus je kunt gewoon het patroon volgen als je met rechte naalden wilt breien.
19.08.2021 - 13:30
![]() Sabine wrote:
Sabine wrote:
Bin mit Stricken fertig, super schön geworden, mit welchem Stich wird am besten zusammen genäht? Danke!
29.10.2020 - 09:10DROPS Design answered:
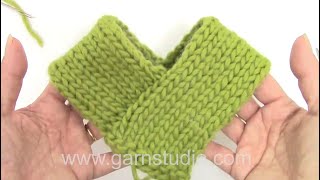
Liebe Sabine, in diesem Video zeigen wir, wie man so ein Poncho zusammennäht. Viel spass beim stricken!
29.10.2020 - 13:09
![]() Christina wrote:
Christina wrote:
Am I understanding this correctly? That the A2 pattern is to be repeated until length is desired. So this means that it is 12 rows between each cable? Because I am currently working on the piece and the cable seems too far apart.
07.06.2020 - 08:00DROPS Design answered:
Dear Christina, correct you will repeat A.2 in height, so that you will work the cables on every 12th row (there are 11 rows between each cable). Happy knitting!
08.06.2020 - 08:43
![]() Zab wrote:
Zab wrote:
Bonjour, J'ai un problème au sujet de la lecture de votre croquis Pour une taille S la longueur totale est de 17+41 soit 58 cm alors que dans vos explications il est noté de continuer jusqu'à 73 cm. Merci de votre aide Cordialement
28.01.2020 - 11:11DROPS Design answered:
Bonjour Zab, le schéma montre le poncho assemblé, vous aurez donc: 41 cm (= largeur de chacune des pièces) + 17 cm + 17 cm (partie cachée sur l'envers = jusqu'aux pointillés sur le schéma) = 75 cm (cf cette vidéo si besoin. Bon assemblage!
28.01.2020 - 13:28
|
|||||||||||||
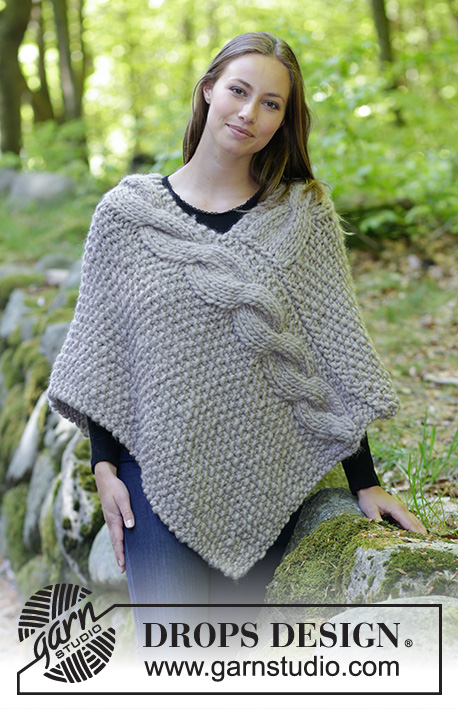
Noelia Poncho#noeliaponcho |
|||||||||||||
 |
 |
||||||||||||
Knitted poncho with cables and moss stitch. Size: S - XXXL Piece is knitted in DROPS Polaris.
DROPS 184-34 |
|||||||||||||
|
INFORMATION FOR PATTERN: GARTER STITCH (back and forth): 1 ridge = knit 2 rows. PATTERN: See diagram A.1. Diagrams show all rows in pattern seen from the right side. MOSS STITCH: ROW 1: * Knit 1, purl 1 *, repeat from *-*. ROW 2: Knit over purl and purl over knit. Repeat 2nd row upwards. ---------------------------------------------------------- PONCHO: Worked in two parts that are sewn together when finished. Each part is worked back and forth on circular needle. PART 1: Cast on 28-32-36 stitches on circular needle size 15 mm with Polaris. Work 1 ridge in GARTER STITCH - see explanation above. Then work as follows from right side: 2 stitches in garter stitch, A.1 (= 10 stitches), MOSS STITCH over the next 14-18-22 stitches, finish with 2 stitches in garter stitch. When A.1 is finished work A.2 over stitches in A.1, there are now 30-34-38 stitches on row. Continue this pattern upwards - REMEMBER THE KNITTING TENSION! When piece measures approx. 73-80-87 cm, decrease 2 stitches evenly over stitches in A.2 = 28-32-36 stitches. Work 1 ridge, then cast off by knitting from right side, piece measures approx. 75-82-89 cm. PART 2: Cast on and work as 1st part. ASSEMBLY: Place cast-off edge on 1st part towards right long side on 2nd part - at the bottom towards cast-on edge and 41-46-51 cm upwards – make sure not to stretch the piece too much. Sew the 2 parts tog with neat little stitches. Then sew cast-off edge on 2nd part to right side on 1st part the same way. |
|||||||||||||
Diagram explanations |
|||||||||||||
|
|||||||||||||
|
|||||||||||||
|
|||||||||||||
Have you finished this pattern?Tag your pictures with #dropspattern #noeliaponcho or submit them to the #dropsfan gallery. Do you need help with this pattern?You'll find 18 tutorial videos, a Comments/Questions area and more by visiting the pattern on garnstudio.com. © 1982-2025 DROPS Design A/S. We reserve all rights. This document, including all its sub-sections, has copyrights. Read more about what you can do with our patterns at the bottom of each pattern on our site. |
|||||||||||||


With over 40 years in knitting and crochet design, DROPS Design offers one of the most extensive collections of free patterns on the internet - translated to 17 languages. As of today we count 314 catalogues and 11822 patterns translated into English (UK/cm).
We work hard to bring you the best knitting and crochet have to offer, inspiration and advice as well as great quality yarns at incredible prices! Would you like to use our patterns for other than personal use? You can read what you are allowed to do in the Copyright text at the bottom of all our patterns. Happy crafting!
Post a comment to pattern DROPS 184-34
We would love to hear what you have to say about this pattern!
If you want to leave a question, please make sure you select the correct category in the form below, to speed up the answering process. Required fields are marked *.