
Popular categories
Looking for a yarn?


|
|||||||||||||||||||||||||
Micaela |
|||||||||||||||||||||||||
 |
 |
||||||||||||||||||||||||
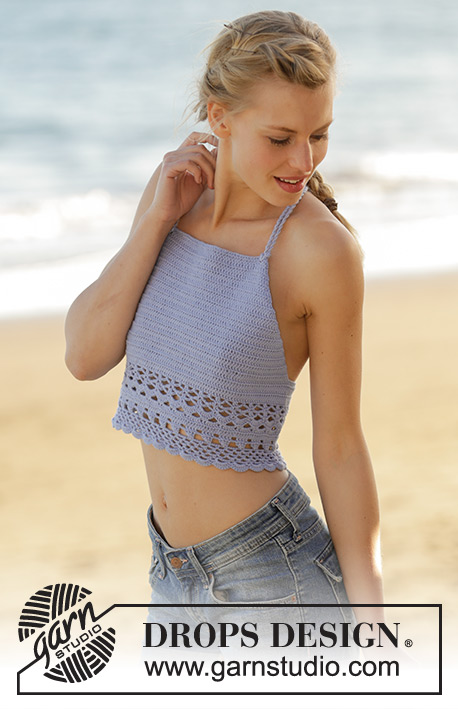
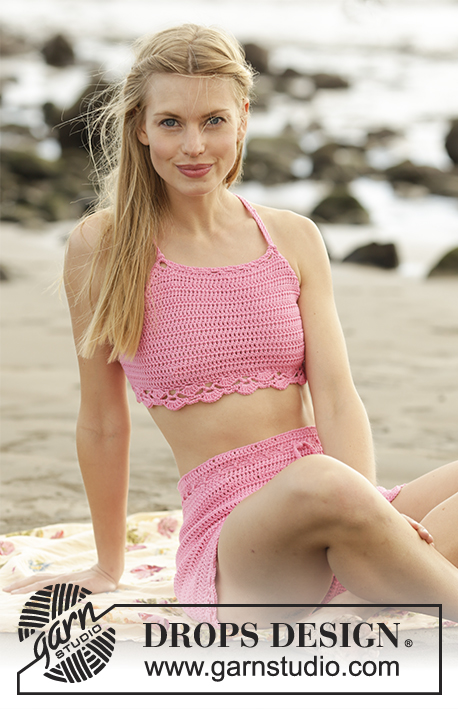
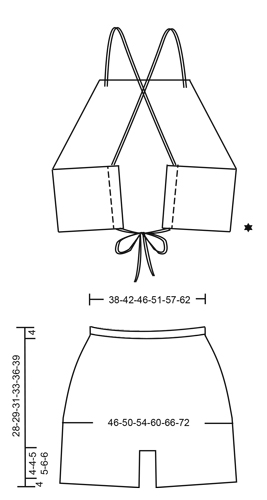
Bikini top and shorts with cord ties. The piece is crocheted in DROPS Muskat. Sizes S - XXXL.
DROPS 178-74 |
|||||||||||||||||||||||||
|
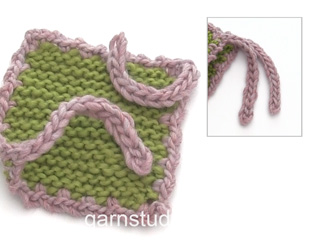
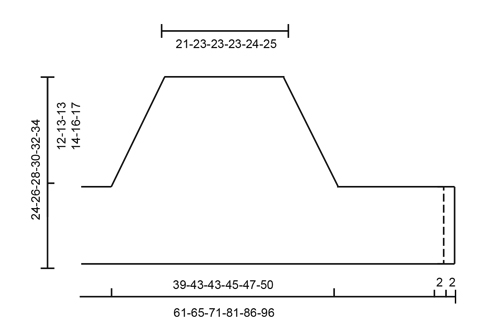
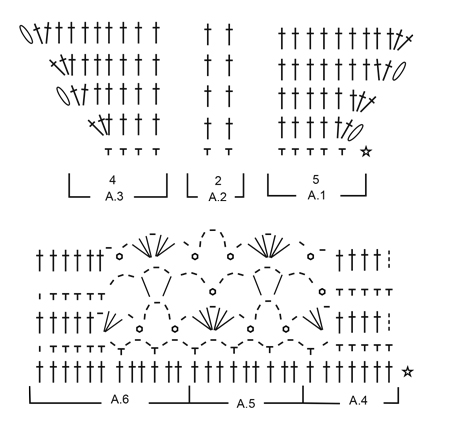
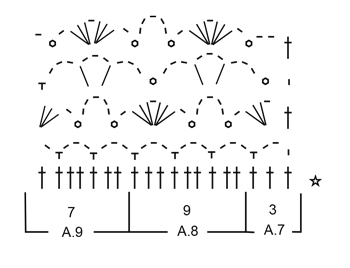
CROCHET INFO (for the bikini top): At the start of each row of treble crochets, work 5 chain stitches to turn. These 5 chain stitches do not replace the first treble crochet. PATTERN: See diagrams A.1 to A.9. CROCHET INFO (for the shorts): At the beginning of each round of treble crochets, the first treble crochet is replaced by 3 chain stitches. Finish the round with 1 slip stitch in the 3rd chain stitch at the beginning of the round. At the beginning of each round of double crochets, the first double crochet is replaced by 1 chain stitch. Finish the round with 1 slip stitch in the first chain stitch at the beginning of the round. INCREASE TIP (for the shorts): Work until there are 2 treble crochets left before the marker, work 2 treble crochets in the first treble crochet, 1 treble crochet in each of the next 2 treble crochets (the marker sits in the middle of these treble crochets) and 2 treble crochets in the next treble crochet (= 2 treble crochets increased). Repeat in the other side (= 4 treble crochets increased on the round). ---------------------------------------------------------- BIKINI TOP: The bikini top is worked back and forth, top down. Work 48-52-52-53-54-57 chain stitches (including 1 chain stitch to turn) with hook size 4 mm and Muskat. Turn and work as follows: Work 1 double crochet in the second chain stitch from the hook (= 1 chain stitch to turn + 1 double crochet), work 1 double crochet in each of the next 1-0-0-1-2-0 chain stitches, * skip 1 chain stitch, work 1 double crochet in each of the next 4 chain stitches *, repeat from *-* 8-9-9-9-9-10 more times = 38-41-41-42-43-45 double crochets. Turn and work pattern as follows: Work A.1 over the first 5 double crochets, A.2 over the next 29-32-32-33-34-36 double crochets, A.3 over the remaining 4 double crochets – read CROCHET INFO! REMEMBER THE CROCHET TENSION! When A.1 to A.3 have been completed in height, continue with treble crochets and increases in the same way until you have worked a total of 11-12-12-13-14-15 rows of treble crochets (you increase 3 treble crochets on each row). There are now 71-77-77-81-85-90 treble crochets on the row. Cut the strand. Work 22-26-33-39-44-52 loose chain stitches. Continue with treble crochets as before over the 71-77-77-81-85-90 treble crochets, then work 27-31-38-44-49-57 chain stitches (including the 5 chain stitches to turn) at the end of the row. Turn and work as follows: Work 1 treble crochet in the 6th chain stitch from the hook, then work 1 treble crochet in each of the next 3-1-2-2-1-3 chain stitches, * skip 1 chain stitch, work 1 treble crochet in each of the next 5 chain stitches *, repeat from *-* 2-3-4-5-6-7 more times, continue with treble crochets as before over the 71-77-77-81-85-90 treble crochets, then work over the chain stitches at the end of the row as follows: Work 1 treble crochet in each of the next 4-2-3-3-2-4 chain stitches, * skip 1 chain stitch, work 1 treble crochet in each of the next 5 chain stitches *, repeat from *-* 2-3-4-5-6-7 more times = 109-121-133-147-159-178 treble crochets. Work 6-7-9-10-10-11 rows with 1 treble crochet in each treble crochet, on the last row of treble crochets decrease0-3-6-2-5-6 stitches evenly on the row = 109-118-127-145-154-172 treble crochets. Continue working as follows: A.4 over the first 7 treble crochets, A.5 over the next 90-99-108-126-135-153 treble crochets (= 10-11-12-14-15-17 repeats of 9 stitches), finish with A.6 over the last 12 treble crochets. Work A.4, A.5 and A.6 one time in height. The last row is worked from the right side of the piece. Cut and fasten the strands. CROCHET EDGE: Work an edge around the top as follows: Begin from the wrong side of the piece – start with the one short side at the back, work up the diagonal side, over the row of chain stitches at top front, down the other diagonal side and along the last short side (do not work over the edge at the back of the fan pattern on the bottom edge): ROW 1: 1 double crochet,* 3 chain stitches, skip forward approx. 1-1½ cm, 1 double crochet *, repeat from *-*, make sure that the number of chain-spaces is divisible by 2. ROW 2: Work 1 double crochet around the first chain-space, * 3 chain stitches, 1 treble crochet in the first chain stitch, 1 double crochet around the next chain-space, repeat from *-*. Cut and fasten the strand. ASSEMBLY: Fold down the outermost 2 cm in each side on the wrong side of the top and sew down with small stitches through both layers so that there is a casting to thread the cord through. CORD TIE: Work 1 loose cord as follows: Work chain stitches with Muskat on hook size 4 mm until you have a cord which measures 140-150-160-170-180-190 cm, turn and work 1 slip stitch in each chain stitch, but make sure that you do not work the slip stitches tighter than the chain stitches! Cut and fasten the strands. Work 1 more cord in the same way. Start from the right side and thread one end of the cord through the outermost hole at top front, around the treble crochets and out through the next hole (= 2 cord ends out on the right side). Adjust the cord so that the ends are the same length, then thread the 2 ends under the cord on the wrong side and tighten. Repeat in the other side with the other cord. Then lay the cords in a cross at the back before they are threaded through the casting – see the illustration! The top is fastened by tying a knot. SHORTS: The piece is worked in the round, top down. Work 163-182-196-220-244-268 chain stitches with Muskat on hook size 4 mm and form them to a ring with 1 slip stitch in the first chain stitch. Insert 1 marker thread at the beginning of the round = mid back. The first round is worked as follows: 3 chain stitches (= 1 treble crochet) – read CROCHET INFO, work 0-1-1-1-1-1 treble crochet in each of the next 0-1-3-3-3-3 chain stitches, * skip 1 chain stitch, 1 treble crochet in each of the next 5 chain stitches *, repeat from *-* 26-29-31-35-39-43 more times = 136-152-164-184-204-224 treble crochets. Work 1 more round with 1 treble crochet in each treble crochet. REMEMBER THE CROCHET TENSION! Now work a row of holes as follows: Work 4 chain stitches (= 1 treble crochet + 1 chain stitch), skip 1 treble crochet, * 1 treble crochet in the next treble crochet, 1 chain stitch, skip 1 treble crochet *, repeat from *-* the whole round, finish with 1 slip stitch in the 3rd chain stitch at the beginning of the round. On the next round work 1 treble crochet in each treble crochet/around each chain stitch. Then you are going to work the shorts higher in the back than the front and this is done as follows – WITH DOUBLE CROCHETS: Work 8 double crochets past the marker thread mid back, turn and work 1 slip stitch in the first stitch, then 1 double crochet in each of the next 15 double crochets, turn and work 1 slip stitch in the first stitch, then 1 double crochet in each of the next 23 stitches (you also work the slip stitches). Continue in this way by working over 8 stitches more each time you turn, until you have worked over a total of 96-96-96-112-112-128 stitches. Turn again and work back to the marker thread mid back. The piece measures approx. 11-11-11-12-12-13 cm mid back. Insert 2 new marker threads in the piece, (keep the marker thread mid back), insert the 2nd marker thread after 34-38-41-46-51-56 stitches (= the side), 3rd marker thread after 68-76-82-92-102-112 new stitches (= the side). Continue with 1 treble crochets in each treble crochet, AT THE SAME TIME on the first round increase 1 treble crochet on each side of the marker threads in the sides – READ INCREASE TIP. Increase in this way every 2nd-3rd-4th-4th-5th-6th round a total of 5-4-4-4-4-4 times. AT THE SAME TIME when you have worked 4-3-2-2-2-2 rounds, increase 1 treble crochet on each side of the marker thread mid back. Increase in this way every 2nd round a total of 5-6-7-8-9-10 times. When all increases have been completed there are 166-180-194-216-238-260 treble crochets on the round. Continue with 1 treble crochet in each treble crochet until the piece measures 20-21-22-24-26-28 cm mid front and 27-28-29-32-34-37 cm mid back. Now divide for the legs as follows: Work 1 double crochet in each of the first 3-3-4-4-4-5 treble crochets on the round, turn and work back over the first 6-6-8-8-8-10 treble crochets (i.e. 3-3-4-4-4-5 treble crochets on each side of the marker mid back). These 6-6-8-8-8-10 treble crochets = gusset. Work treble crochets back and forth over these for 10-11-12-13-14-15 cm, cut the strand. Sew the gusset, edge to edge to the 6-6-8-8-8-10 middle stitches mid front. Continue by working the legs. LEG: Work 1 treble crochet in each of the 77-84-89-100-111-120 treble crochets around the one leg, in addition work 14-16-20-18-25-25 treble crochets along the gusset = 91-100-109-118-136-145 treble crochets. Continue with 1 treble crochet in each treble crochet until the leg measures 4-4-5-5-6-6 cm. Now work an edge at the bottom of the leg as follows: Work A.7 (= 3 treble crochets), A.8 (= 9 treble crochets) over the next 81-90-99-108-126-135 treble crochets, finish with A.9 (= 7 treble crochets). Work according to diagrams A.7. A.8 and A.9 one time in height. Cut and fasten the strand.elkHekle TIE CORD: Work 120-140-150-160-170-180 cm of LOOSE chain stitches, turn and work back with 1 slip stitch in each chain stitch. Thread the band into the row of holes at the top of the shorts – start mid front. |
|||||||||||||||||||||||||
Diagram explanations |
|||||||||||||||||||||||||
|
|||||||||||||||||||||||||
|
|||||||||||||||||||||||||
|
|||||||||||||||||||||||||
|
|||||||||||||||||||||||||
|
|||||||||||||||||||||||||
|
Have you made this or any other of our designs? Tag your pictures in social media with #dropsdesign so we can see them! Do you need help with this pattern?You'll find tutorial videos, a Comments/Questions area and more by visiting the pattern on garnstudio.com. © 1982-2024 DROPS Design A/S. We reserve all rights. This document, including all its sub-sections, has copyrights. Read more about what you can do with our patterns at the bottom of each pattern on our site. |
|||||||||||||||||||||||||


With over 40 years in knitting and crochet design, DROPS Design offers one of the most extensive collections of free patterns on the internet - translated to 17 languages. As of today we count 304 catalogues and 11422 patterns - 11422 of which are translated into English (UK/cm).
We work hard to bring you the best knitting and crochet have to offer, inspiration and advice as well as great quality yarns at incredible prices! Would you like to use our patterns for other than personal use? You can read what you are allowed to do in the Copyright text at the bottom of all our patterns. Happy crafting!
Comments / Questions (33)
Hi! Loving the pattern so far, i just have a quick question. For the side increases on the shorts in the 5th size is it a total 4 side increases including the one in the first row, or is it the side increase in the first row plus four more increase rows for a total of 5 side increase rows? Thank you!
06.08.2023 - 09:47DROPS Design answered:
Dear Ayana, if it's a total of 4 times then it's 4 side increases, including the one in the first row. Happy crochetting!
06.08.2023 - 22:04Hola!! No entiendo muy bien el tip para los aumentos. Dice: Trabajar hasta que queden 2 puntos altos antes del marcapuntos, trabajar 2 puntos altos en el primer punto alto, 1 punto alto en cada uno de los siguientes 2 puntos altos (el marcapuntos queda en el centro de estos puntos altos) y 2 puntos altos en el siguiente punto alto (= 2 puntos altos aumentados). Entonces, ¿el punto alto del marcapuntos lo dejo sin tejer?
22.05.2023 - 23:06DROPS Design answered:
Hola Odile, no hay puntos con marcapuntos; el marcapuntos se inserta entre los puntos. Por lo tanto, trabajas hasta 2 puntos antes del marcapuntos, aumentas en el 1º punto y trabajas 1 punto alto en el siguiente punto alto, deslizar el marcapuntos, trabajar 1 punto alto en el siguiente punto alto. Por lo tanto, el marcapuntos está entre esos 2 puntos.
28.05.2023 - 17:32Is there a video tutorial for this? I have adhd/autism and it’s really hard for me to process written word. Also are there any patterns you’re aware of for children with severe sensory sensitivity, mostly looking for high waisted underwear.
24.12.2022 - 16:21DROPS Design answered:
Dear Sugarpiggy, all videos that may help you make the pattern can be found after the pattern instructions; we don't have a specific video to make this piece. All our videos are made without sound so that they can be used for all languages. Here you can find all of our trousers and shorts for babies: https://www.garnstudio.com/search.php?action=browse&c=baby-trousers&lang=en and children: https://www.garnstudio.com/search.php?action=browse&c=children-trousers-overalls&lang=en and see if there are any that fit what you are looking for. Happy knitting!
25.12.2022 - 20:23I'm having trouble with instructions
21.06.2022 - 21:56DROPS Design answered:
Dear Sabrin, please feel free to ask your question here so that we can try to help. Happy crocheting!
22.06.2022 - 08:25Liebes Team, die Maschenprobe stimmt, dennoch wird die Hose viel zu weit an der Hüfte. wie ist das möglich? lieben gruß
02.02.2022 - 21:14DROPS Design answered:
Liebe Xela, sollte die Maschenprobe stimmen, dann bekommen Sie die selben Maßen wie in der Skizze, dh 180 Maschen (nach allen Zunahmen) sind 100 cm Umfang bzw 50 cm flach (siehe Maßskizze). Sollte das zu breit für Sie sein, dann sollen Sie die Zunahmen so anpassen, wie Sie es möchten. Viel Spaß beim häkeln!
03.02.2022 - 08:46Hey, danke für die tolle Anleitung! Ich habe nur ein Problem: Ich häkele die Shorts in Größe S mit Muskat und einer Häkelnadel Gr. 4. Jedoch ist mir die Shorts viel zu groß, und ich bin keinesfalls schlanker als die Person auf dem bild. Ich verstehe das nicht und bin für jeden tipp dankbar. lieben gruß!
01.02.2022 - 22:41DROPS Design answered:
Liebe Xela, stimmt Ihre Maschenprobe? Sie sollten 18 Stäbchen x 9 Reihen = 10 x 10 cm haben. Damit bekommen Sie die Maßen wie in der Maßskizze für die gewählte Größe. Viel Spaß beim häkeln!
02.02.2022 - 07:57Takk så mye for svaret! But if the dc and the sc are worked in separate ch-spaces, then shouldn't it be an ODD number of ch-spaces created in Row 1? Because if you need to work the initial sc in the first ch-sp, then the following repeats are worked over an even number, it should work out to be an odd number overall if you need to end with a sc: (n x 2) + 1 (1 for the first sc before the repeat). That is why I was so confused about the total number having to be even; it seems backwards to me.
31.01.2022 - 15:40DROPS Design answered:
Dear Toni S, for the picot, you work 3 chain stitches and in the first one of these you work a dc. The sc is then worked in the next chain space (these are the chain spaces formed in row 1). So you only need to have chain spaces for the sc; the dc are worked in stitches from row 2, not row 1. Happy crocheting!
05.02.2022 - 19:45Hi! I'm confused by the instructions for the Crochet Edge (top edge) of the bikini top. The repeat sequence for Row 2 says "ch3, 1 dc in the first chain st, 1 sc around the next chain-space" (ch-sp). Is this last sc done in the SAME ch-sp that the dc was worked into the first stitch of, or do we skip to the NEXT ch-sp? The photos look like it's the first, but if so, I don't see why the number of ch-sps needs to be a multiple of 2 in Row 1, since each ch-sp is worked in the same way?
29.01.2022 - 13:45DROPS Design answered:
Dear Toni, the single crochets on Row 2 are worked each in the 3-ch-space on row 1, and between each of these single crochet you will work a picot with (3 ch, 1 dc in the first of these 3 ch). Happy crocheting!
31.01.2022 - 08:51Hej☺️ Jeg vil gerne høre hvilken str der svarer til, brystvide 94 cm?? Og har i en general str skala? Med venlig hilsen Tina Reynolds.
22.08.2021 - 18:22DROPS Design answered:
Hej Tina, nederst i opskriften finder du målene i de forskellige størrelser. Du skal nok strikke en størrelse M, men det kommer selvfølgelig an på hvor stor du vil have åbningen i ryggen :)
25.08.2021 - 08:43Does the round start after the 92 stitches? In this paragraph "Insert 2 new marker threads in the piece, (keep the marker thread mid back), insert the 2nd marker thread after 34-38-41-46-51-56 stitches (= the side), 3rd marker thread after 68-76-82-92-102-112 new stitches (= the side). Continue with 1 double crochets in each double crochet"
29.06.2021 - 17:06DROPS Design answered:
Dear Mrs Tasia, the rounds now start on mid back (you stopped the short rows to the marker thread on mid back), you add 1 marker after the 46th stitch on the round (first side) and after the 92th stitch (2nd side) in 4th size. And now work with dc increasing before + after both of these 2 marker threads = on each side of piece. Happy crocheting!
30.06.2021 - 06:59