
Popular categories
Looking for a yarn?


|
|||||||||||||
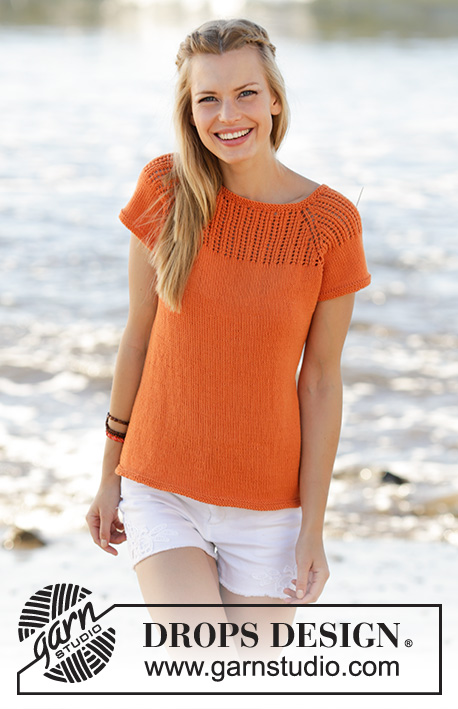
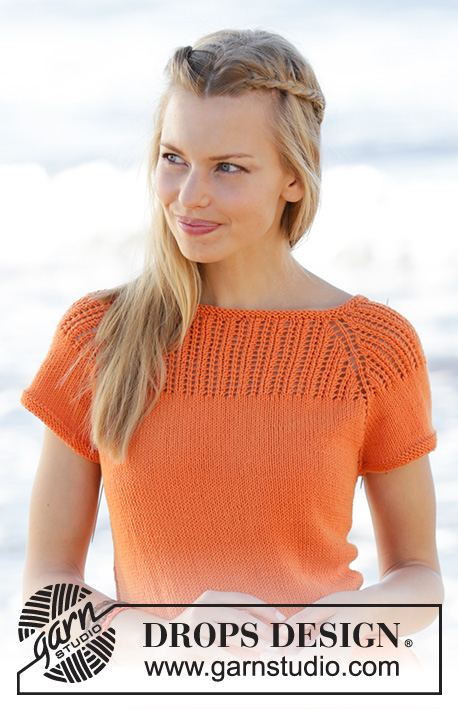
Orange Dream Top |
|||||||||||||
 |
 |
||||||||||||
Top knitted top down with raglan, lace pattern on yoke and A-shape in DROPS Safran. Size: S - XXXL
DROPS 178-45 |
|||||||||||||
|
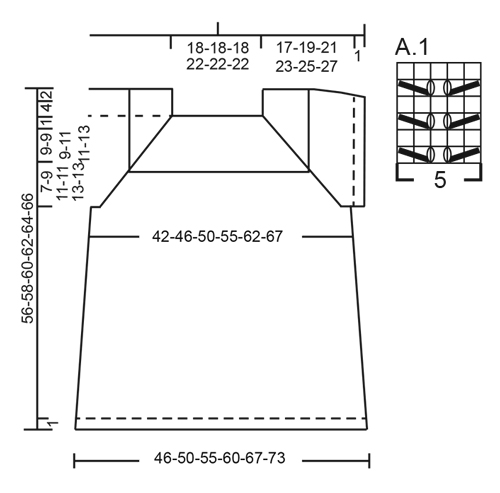
GARTER STITCH (worked in the round): 1 ridge = 2 rounds. Knit 1 round and purl 1 round. ELEVATION: Work as follows from beginning of round (= mid back), knit the first 7-7-7-8-8-8 stitches, turn, tighten yarn and knit 14-14-14-16-16-16 stitches, turn, tighten yarn and knit 21-21-21-24-24-24 stitches, turn, tighten yarn and knit 28-28-28-32-32-32 stitches. Continue back and forth like this by working 7-7-7-8-8-8 stitches more every time until the middle 70-70-70-80-80-80 stitches has been worked, turn and work back until beginning of round before continuing. INCREASE TIP-1: To calculate how to increase evenly, use the total number of stitches on row (e.g. 104 stitches) and divide number of stitches by number of increases to be done (e.g. 20) = 5.2. In this example increase after approx. every 5th stitch. Increase 1 stitch by making 1 yarn over, on next round purl yarn over twisted to avoid holes. INCREASE TIP-2 (applies to sides of body): Work until 2 stitches remain before A.1, make 1 yarn over, knit 2, A.1 (marker thread is in the middle of A.1), knit 2, make 1 yarn over (= 2 stitches increased). On next round knit yarn overs twisted to avoid holes. PATTERN: See diagram A.1. Diagrams show all rows in pattern seen from the right side. RAGLAN: Increase for raglan in every transition between sleeves and body. Knit the increased stitches until they fit the pattern. INCREASE AS FOLLOWS WHEN INCREASING 2 STITCHES ON EACH SIDE OF STITCH WITH MARKER THREAD: Begin before stitch with marker thread, pick up loop before stitch and knit loop twisted, make 1 yarn over, knit 1 (= stitch with marker thread), make 1 yarn over, pick up loop before next stitch and knit loop twisted (= 4 stitches increased). On next round knit the yarn overs to make holes. INCREASE AS FOLLOWS WHEN INCREASING 1 STITCH ON EACH SIDE OF STITCH WITH MARKER THREAD: Begin before stitch with marker thread, make 1 yarn over, knit 1 (= stitch with marker thread), make 1 yarn over (= 2 stitches increased). On next round knit the yarn overs to make holes. KNITTING TIP: When increasing for raglan on every 4th round, the holes in raglan line will be further apart than when increasing on every other round. To avoid this work holes on the rounds (every other round) without increase as follows: Begin 2 stitches before stitch with marker thread, knit 2 tog, make 1 yarn over, knit 1 (= stitch with marker thread), make 1 yarn over, slip 1 stitch knitwise, knit 1, pass slipped stitch over stitch worked. On next round knit the yarn overs to make holes. ---------------------------------------------------------- TOP: Worked in the round on circular needle, top down. Work sleeve edges in the round on double pointed needles. Beginning of round = mid back. YOKE: Cast on 104-104-104-124-124-124 stitches on circular needle size 2.5 mm / US 1.5 with Safran. Work 2 ridges in GARTER STITCH - see explanation above. Knit 1 round while increasing 20 stitches evenly - READ INCREASE TIP-1 = 124-124-124-144-144-144 stitches. Purl 1 round. For better fit work a small ELEVATION at the back of neck - see explanation above. When elevation has been worked, switch to circular needle size 3 mm / US 2.5. Knit 2 rounds. Insert 4 marker threads in piece, begin from beginning of round (without working the stitches): Insert first marker thread in 21st-21st-21st-26th-26th-26th stitch on round, insert second marker thread in 42nd-42nd-42nd-47th-47th-47th stitch on needle, insert third in 83rd-83rd-83rd-98th-98th-98th stitch on needle and insert fourth marker thread in 104th-104th-104th-119th-119th-119th stitch on needle. There are now 40-40-40-50-50-50 stitches between stitches with marker thread on front and back piece and 20 stitches in all sizes on each sleeve. Work next round as follows: Work A.1 (= 5 stitches) over the next 20-20-20-25-25-25 stitches on half back piece (= 4-4-4-5-5-5 repetitions of 5 stitches), increase 2 stitch on each side of stitch with marker thread for RAGLAN – see explanation above, work A.1 over the 20 stitches on sleeve (= 4 repetitions of 5 stitches), increase 2 stitches on each side of stitch with marker thread, work A.1 over the 40-40-40-50-50-50 stitches on front piece (= 8-8-8-10-10-10 repetitions of 5 stitches), increase 2 stitches on each side of stitch with marker thread, work A.1 over the 20 stitches on sleeve, increase 2 stitches on each side of stitch with marker thread, work A.1 over the next 20-20-20-25-25-25 stitches on half back piece. Continue pattern and increase for raglan in every transition between body and sleeves as follows: Increase 2 stitches on each side of stitches with marker thread on every other round 6-6-6-8-8-10 times in total (first increase is already done), then increase 1 stitch on each side of stitches with marker threads every other round 8-8-8-9-9-10 times in total. REMEMBER THE KNITTING GAUGE When increase has been done 14-14-14-17-17-20 times in total, there are 284-284-284-344-344-384 stitches on round and piece measures approx. 10-10-10-12-12-14 cm / 4"-4"-4"-4¾"-4¾"-5½" from cast-on edge (measured mid front). Then knit the stitches. AT THE SAME TIME continue increase for raglan and increase 1 stitch on each side of stitches with marker threads every other round 0-7-12-4-13-12 times in total and then every 4th round 6-4-3-7-4-5 times in total – READ KNITTING TIP. After last increase for raglan there are 332-372-404-432-480-520 stitches on round and piece measures approx. 17-19-21-23-25-27 cm / 6¾"-7½"-8¼"-9"-9¾"-10½" from cast-on edge (measured mid front). Work next round as follows: Work the first 47-52-56-62-68-73 stitches as before (= half back piece), slip the next 72-82-90-92-104-114 stitches on 1 stitch holder for sleeve, cast on 7-7-9-9-13-15 new stitches on needle (= in the side under sleeve), work the next 94-104-112-124-136-146 stitches as before (= front piece), slip the next 72-82-90-92-104-114 stitches on 1 stitch holder for sleeve, cast on 7-7-9-9-13-15 new stitches on needle (= in the side under sleeve) and work the remaining 47-52-56-62-68-73 stitches as before. Finish body and sleeves separately. Remove the marker threads in piece. NOW MEASURE PIECE FROM HERE! BODY: = 202-222-242-266-298-322 stitches. Insert 1 marker thread in the middle of the 7-7-9-9-13-15 stitches cast on under each sleeve and move the marker threads upwards when working. Continue in stockinette stitch in the round, in addition work A.1 over the middle 5 stitches in each side (stitch with marker thread is middle stitch in A.1). When piece measures 3 cm / 1", increase 2 stitches in each side - READ INCREASE TIP-2 (= 4 stitches increased). Increase like this every 6-6-6-5-5-4 cm / 2½"-2½"-2½"-2"-2"-1½" 5-5-5-6-6-7 times in total = 222-242-262-290-322-350 stitches. When piece measures 32 cm / 12½", switch to circular needle size 2.5 mm / US 1.5. Work 3 ridges over all stitches. Switch back to circular needle size 3 mm / US 2.5 and bind off by knitting. Top measures approx. 56-58-60-62-64-66 cm / 22"-22¾"-23⅝"-24⅜"-25¼"-26" from shoulder and down. SLEEVE EDGE: Slip the 72-82-90-92-104-114 stitches from stitch holder in one side of piece on double pointed needles size 2.5 mm / US 1.5 and pick in addition up 1 new stitch in each of the 7-7-9-9-13-15 stitches cast on under sleeve = 79-89-99-101-117-129 stitches on needle. Work 3 ridges in the round. Switch back to double pointed needles size 3 mm / US 2.5 and bind off by knitting. Work the other sleeve edge the same way. |
|||||||||||||
Diagram explanations |
|||||||||||||
|
|||||||||||||
|
|||||||||||||
|
Have you made this or any other of our designs? Tag your pictures in social media with #dropsdesign so we can see them! Do you need help with this pattern?You'll find tutorial videos, a Comments/Questions area and more by visiting the pattern on garnstudio.com. © 1982-2024 DROPS Design A/S. We reserve all rights. This document, including all its sub-sections, has copyrights. Read more about what you can do with our patterns at the bottom of each pattern on our site. |
|||||||||||||


With over 40 years in knitting and crochet design, DROPS Design offers one of the most extensive collections of free patterns on the internet - translated to 17 languages. As of today we count 304 catalogs and 11422 patterns - 11417 of which are translated into English (US/in).
We work hard to bring you the best knitting and crochet have to offer, inspiration and advice as well as great quality yarns at incredible prices! Would you like to use our patterns for other than personal use? You can read what you are allowed to do in the Copyright text at the bottom of all our patterns. Happy crafting!
Comments / Questions (43)
Na gemeerderd te hebben tot 124 steken is de opening zo " wijd" dat ik er maar net met mijn hoofd doorheen kan . Klopt dat ?
16.08.2019 - 18:55DROPS Design answered:
Dag Bertie,
Je zou er makkelijk met je hoofd door moeten kunnen. Kijk even of de stekenverhouding wel klopt en of je evt. een andere naalddikte moet hebben. Het kan ook zijn dat je te strak op hebt gezet. (Zelf zet ik het liefst met 2 naalden op.)
03.10.2019 - 16:40Ma se dopo gli aumenti ho 124 maglie nella taglia M, come faccio ad avere 40 maglie davanti e dietro e 20 maglie in ognunoa delle maniche? Farebbe 120 maglia totali
13.08.2019 - 06:24DROPS Design answered:
Buongiorno Ilona. Deve aggiungere anche le 4 maglie dove sono stati inseriti i segnapunti. Quindi in tutto 124 maglie. Buon lavoro!
13.08.2019 - 09:02Ich habe jetzt die 14 cm erreicht und 20 x die Raglanzunahmen gemacht, leider habe ich aber irgendwie 100 Machen zu wenig - statt 384 nur 284 - wie kommt das?
28.07.2019 - 23:30DROPS Design answered:
Liebe Heike, Sie müssen bei den Raglanzunahmen zuerst jeweils 2 Maschen beidseitig jeder markierten Masche zunehmen (d.h. 4 Maschen an jeder markierten Masche), d.h. in jeder Zunahmerunde nehmen Sie 16 Maschen zu. Das machen Sie 10x so, erst danach nehmen Sie (ebenfalls 10x) je 1 Masche beidseitig jeder markierten Masche zu, d.h. 2 Masche an jeder markierten Masche, also 8 Maschen pro Zunahmerunde. Dann haben Sie insgesamt 240 Maschen zugenommen. Gutes Gelingen!
29.07.2019 - 08:58Buongiorno, vorrei sapere come decidere quale taglia eseguire, nel senso come faccio a sapere quale sia la mia taglia? Grazie mille
28.07.2019 - 14:16DROPS Design answered:
Buongiorno Laura. Dopo la leggenda del diagramma, trova il grafico con le misure per le singole taglie. Confrontando queste misure con quelle di un suo indumento simile e la cui vestibilità la soddisfa, individua la taglia corretta da seguire. Buon lavoro!
28.07.2019 - 15:01Czy schemat A1 przerabia się ponad pięcioma oczkami na środku z każdej strony, na całej długości boku, aż do dolnego ściągacza ?
06.09.2018 - 17:54DROPS Design answered:
Witaj Ewo, dokładnie jest tak jak piszesz. Nie jest to jednak widoczne na zdjęciu. Pozdrawiamy!
06.09.2018 - 18:17Guten Tag, bei den Anleitungsschritten wird ein "ABNAHMETIPP (gilt für die untere Ärmelmitte)" erklärt. Wo kommt denn der zum Einsatz? Ich will gerade die Ärmel stricken und sehe, dass wenn man die stillgelegten Maschen wieder aufgenommen hat, man gleich den Krausrechts-Abschluss stricken soll. Also keine richtigen Ärmel? Vielen Dank für eine Antwort!
30.07.2018 - 20:10DROPS Design answered:
Liebe Frau Fischer, es gibt keine Abnahmen für den Ärmel zu dem Top (nur zu der Jacke und Pullover), bein den Ärmel werden nur eine Blende von 4 Krausrippen gestrickt. Viel Spaß beim stricken!
31.07.2018 - 09:56Hej Hvor tit skal jeg tage ud til raglan? Hver omgang, hver anden eller hver fjerde? Jeg har ikke prøvet det før :)
19.07.2018 - 07:52DROPS Design answered:
Hei Stine. Du skal øke til raglan på annenhver omgang. Du øker først 2 masker på hver side av merketråden annenhver omgang totalt 6-6-6-8-8-10 ganger. Dette inkluderer den første økingen som er forklart i oppskriften. Deretter øker du ytterligere 8-8-8-9-9-10 ganger (også annenhver omgang), men nå kun 1 maske på hver side av merketrådene. God fornøyelse.
25.07.2018 - 16:03Feride Ozek wrote:
I could'nt make the elevation because if turn back to do the 14 stiches the last 7 seven stiches are not suitable for garter stiches. If you knit further pattern went wrong. So?
24.05.2018 - 11:00DROPS Design answered:
Dear Mrs Ozek, all sts for elevation are worked K both from RS and from WS: on first row K the first 7 sts past marker mid back, turn and K 14 sts (= the 7 sts just worked + 7 sts past marker), and continue back and forth working 7 sts more at the end of each row both from RS and from WS until you have worked 70 sts, then turn and K to beg of round. Happy knitting!
24.05.2018 - 13:35Bonjour, j ai vraiment de la peine à m en sortir avec les explications pour le raglan ! On augmente de 4 mailles tous les 2 tours et de 2 mailles tous les 2 tours (av et ap le marqueur), autrement dit on augmente à tous les tours ? Mais si on lit l astuce tricot on nous parle de 4 tours et de tours sans augmentations, je suis paumée :-) c est par ailleurs bien juste qu il faut le même nb de mailles multiplié par deux sur le devant/dos que sur les manches ?
28.04.2018 - 11:12DROPS Design answered:
Bonjour Mme Borel, on augmente d'abord tous les 2 tours: 2 m de chaque côté des mailles avec un fil marqueur (= on a 4 marqueurs, on va donc augmenter 16 mailles au début) puis on augmente ensuite 1 maille de chaque côté de la m avec un fil marqueur (x 4 marqueur = 8 augmentations). Puis on augmente tous les 2 tours (= 8 augmentations) et enfin tous les 4 tours (= 8 augmentations tous les 4 tours), mais pour conserver l'effet ajouré, on va tricoter comme indiqué sous ASTUCE TRICOT tous les 4 tours sans diminutions. Bon tricot!
30.04.2018 - 10:00Skal man strikke mønster i de masker man tager ud, syntes det er svært at læse sig til, eller skal man vente til man har fem masker til et helt mønster
21.04.2018 - 17:29DROPS Design answered:
Hej Janne, de nye masker strikkes ret til de går op i mønsteret, det står øverst under forklaringen til RAGLAN. God fornøjelse! :)
24.04.2018 - 11:56