
Popular categories
Looking for a yarn?


|
||||||||||||||||||||||
Vanilla Kiss |
||||||||||||||||||||||
 |
 |
|||||||||||||||||||||
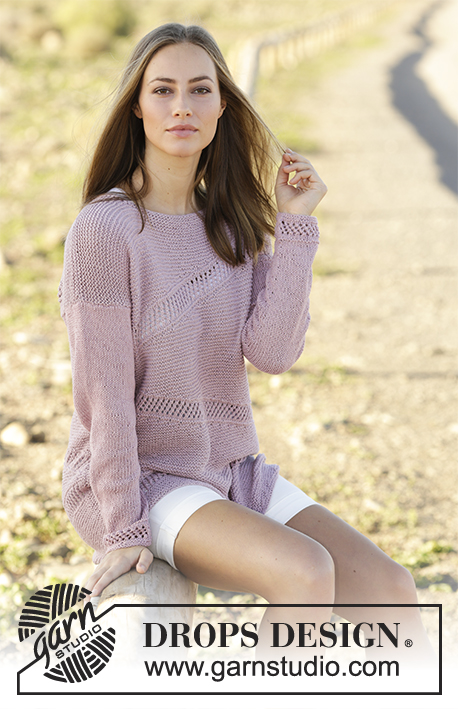
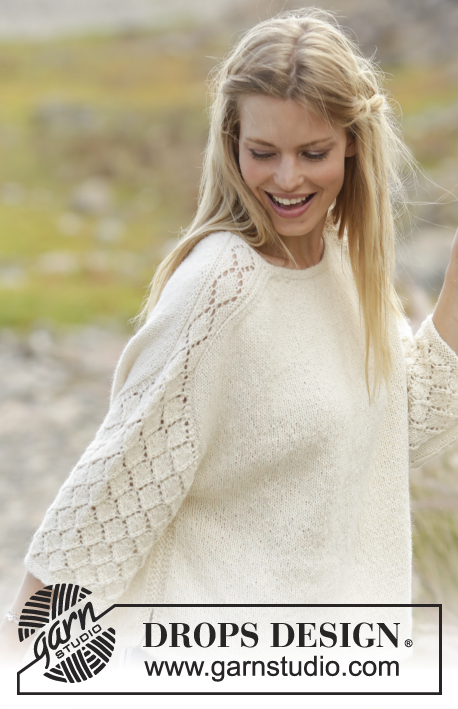
Knitted sweater with lace pattern on shoulders and sleeves, worked top down. Sizes S - XXXL. The piece is worked in DROPS Puna.
DROPS 178-16 |
||||||||||||||||||||||
|
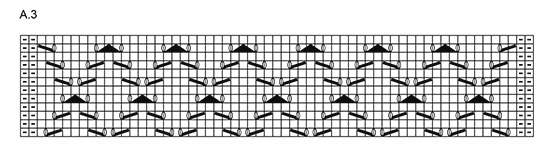
RIDGE/GARTER STITCH (worked in the round): 1 ridge = 2 rounds. Knit 1 round and purl 1 round. RIDGE/GARTER STITCH (worked back and forth): 1 ridge = Knit 2 rows. PATTERN: See diagrams A.1 to A.3. The diagrams show all rows in pattern seen from the right side. SHOULDER: NOTE: All increases worked from right side! On next row work yarn overs twisted to avoid holes. Increase 2 stitches as follows: INCREASE 2 STITCHES BEFORE MARKERS 1 AND 3: Start 3 stitches before marker, 1 yarn over, knit 2, 1 yarn over, knit 1, (= 2 stitches increased). INCREASE 2 STITCHES AFTER MARKERS 2 AND 4: Knit 1, 1 yarn over, knit 2, 1 yarn over (= 2 stitches increased). Increase 1 stitch as follows: INCREASE 1 STITCH BEFORE MARKERS 1 AND 3: Start 1 stitch before marker, 1 yarn over, knit 1 (= 1 stitch increased). INCREASE 1 STITCH AFTER MARKERS 2 AND 4: Knit 1, 1 yarn over (= 1 stitch increased). SLEEVE CAP: Increase 1 stitch by making 1 yarn over (make sure the yarn over is not too loose). On next round: purl yarn over twisted to avoid holes – knit the first 21 stitches increased, purl the remaining stitches. INCREASE TIP (for sides of front and back pieces): Increase on inside of the 4 outermost stitches in each side (i.e. 3 edge stitches in garter stitch + 1 stitch in stockinette stitch). Increase 1 stitch by making 1 yarn over, on next row work yarn over twisted to avoid a hole (the increased stitch is worked in stockinette stitch). DECREASE TIP (for mid under sleeve): Start 3 stitches before marker mid under sleeve, purl 2 together, knit 2 (the marker sits in the middle of these 2 stitches), purl 2 together (= 2 stitches decreased). ---------------------------------------------------------- SWEATER The piece is worked in the round with circular needle, top down, as far as below the sleeves. Then the front and back pieces are worked separately back and forth. The sleeves are worked in the round. The photo deviates somewhat from pattern regarding increases in sleeve caps (A.2) – the fit has been improved. YOKE: Cast on 102-102-106-106-110-110 stitches with short circular needle size 3 mm / US 2.5 and Puna. The round starts mid back. Insert a marker here which will follow your work onwards. Work 2 RIDGES in the round – see description above. Insert 4 new markers in the piece as follows (without working the stitches): Insert marker 1 after the first 19-19-20-20-21-21 stitches (= ½ back piece), marker 2 after the next 13 stitches (= shoulder/sleeve), marker 3 after the next 38-38-40-40-42-42 stitches (= front piece), marker 4 after the next 13 stitches (= shoulder/sleeve), there are now 19-19-20-20-21-21 stitches left after the last marker (= ½ back piece). Change to circular needle size 4 mm / US 6. Now work short rows over the stitches in the neck for a better fit, AT THE SAME TIME as you increase stitches to shoulder and work pattern on shoulders/sleeves (= 13 stitches) as follows: ROW 1 (from right side): Knit until 3 stitches before the marker 1, increase 2 stitches to SHOULDER – see description above, work A.1A (= 7 stitches), turn piece and tighten strand. ROW 2 (from wrong side): Work A.1A, purl as far as marker 4, A.1B (= 7 stitches –you read the diagram from left to right when working from the wrong side), turn the piece and tighten strand. ROW 3: Work A.1B, increase 2 stitches to shoulder, knit to 3 stitches before marker 1 and increase 2 stitches to shoulder, work A.2 (= 13 stitches), marker 2 is here, turn the piece and tighten strand. ROW 4: Work A.2, purl to marker 4, work A.2 – start on row 2 in the diagram, marker 3 is here, turn the piece and tighten strand. ROW 5: Work A.2, increase 2 stitches to shoulder, knit to 3 stitches before marker 1, increase 2 stitches to shoulder, continue A.2 and increase 2 stitches to shoulder on front piece, (i.e. you work as follows after marker 2: Knit 1, 1 yarn over, knit 2, 1 yarn over), knit 1, (= 4 stitches + 2 yarn overs on front piece), turn the piece and tighten strand. ROW 6: Purl to marker 2 (= purl 6 stitches on front piece), continue A.2, purl to marker 4, continue A.2, purl 4 stitches on front piece (= 4 stitches past marker 3) turn the piece and tighten strand. REMEMBER THE GAUGE! ROW 7: Knit 1, increase 2 stitches to shoulder (= 4 stitches + 2 yarn overs on front piece), continue A.2, increase 2 stitches to shoulder, knit to 3 stitches before marker 1, increase 2 stitches to shoulder, continue A.2, increase 2 stitches to shoulder on front piece and knit over 2 more stitches than on previous row on front piece (= 8 stitches + 2 yarn overs on front piece), turn the piece and tighten the strand. ROW 8: Purl to marker 2 (= 10 purled stitches on front piece), continue A.2, purl to marker 4, continue A.2 and purl over 2 stitches more than on the previous row on front piece (= 8 stitches on front piece), turn the piece and tighten strand. ROW 9: Knit to 3 stitches before the marker, increase 2 stitches to shoulder (= 8 knitted stitches + 2 yarn overs on front piece), continue A.2, increase 2 stitches to shoulder, knit to 3 stitches before marker 1, increase 2 stitches to shoulder, continue A.2, increase 2 stitches to shoulder on front piece, Knit over 2 stitches more than on the previous row on front piece (= 12 stitches + 2 yarn overs on front piece), turn piece and tighten strand. ROW 10: Purl to marker 2 (= 14 purled stitches on front piece), continue A.2, purl to marker 4, continue A.2 and purl over 2 stitches more than on previous row on front piece (= 12 stitches on front piece), turn the piece and tighten strand. ROW 11: Knit to 3 stitches before the marker, increase 2 stitches to shoulder (= 12 knitted stitches + 2 yarn overs on front piece), continue A.2, increase 2 stitches to shoulder, knit to 3 stitches before marker 1, increase 2 stitches to shoulder, continue A.2, increase 2 stitches to shoulder on front piece, knit over 2 more stitches than on the previous row on front piece (= 16 stitches + 2 yarn overs on front piece), turn the piece and tighten strand. ROW 12: Purl to marker 2 (= 18 purled stitches on front piece), continue A.2, purl to marker 4, continue A.2 and purl over 2 stitches more than on previous row on front piece (= 16 stitches on front piece), turn piece and tighten strand. ROW 13: Knit to 3 stitches before marker, increase 2 stitches to shoulder (= 18 stitches before next marker), continue A.2, increase 2 stitches to shoulder, knit to mid back (= start of the round). Continue with pattern but without increasing as far as marker 2. Now you have worked 11 rows of A.2. Cut the strand. You have now increased 2 stitches to shoulder in each side of the front piece 4 times and 2 stitches to shoulder in each side of the back piece 6 times = 142-142-146-146-150-150 stitches (= 54-54-56-56-58-58 stitches on front piece and 62-62-64-64-66-66 stitches on back piece). The short rows are now finished and you continue in the round with circular needle. Start at marker mid back. On the next round continue the increases to shoulder (= work the increased stitches on front and back piece in stockinette stitch) and work A.2 as before, AT THE SAME TIME on round with arrow in A.2 (i.e. before the increases to shoulder are finished) start the increases to sleeve cap (= work the first 21 increased stitches knit. AT THE SAME TIME work the new stitches into A.2 as A.2 expands outwards). When A.2 has been completed in height, repeat A.3 over A.2 to finished length. Increase to shoulder and to sleeve cap as described below: INCREASE TO SHOULDER AS FOLLOWS: NOTE: You increase differently on front and back pieces and, on the rounds after increases, the yarn overs are knitted twisted to avoid holes - Remember SHOULDER! INCREASE ON BACK PIECE (= between markers 4 and 1): Increase 2 stitches every 2nd round a total of 2-3-5-7-8-10 times, then increase 1 stitch every 2nd round a total of 9-11-12-14-16-18 times. INCREASE ON FRONT PIECE (= between markers 2 and 3): Increase 2 stitches every 2nd round a total of 6-7-9-11-12-14 times, then increase 1 stitch every 2nd round a total of 5-7-8-10-12-14 times. After all increases to shoulder there are 88-96-108-120-130-142 stitches on both front and back pieces. INCREASE TO SLEEVE CAP AS FOLLOWS: On the round with an arrow in diagram A.2 start increasing to SLEEVE CAP – see description above. Increase 1 stitch on each side of A.2 on every shoulder/sleeve (= 4 stitches increased on round). Increase in this way every round a total of 1-4-6-4-4-2 times and then every 2nd round a total of 25-26-28-32-34-38 times. There should always be 2 purled stitches on each side of the lace pattern A.2 on sleeves. (These purl stitches are included in the diagram). A.2 expands outwards as diagram is worked, so that more and more stitches are included in the lace pattern. When all increases to sleeve cap are finished, there are 65-73-81-85-89-93 stitches on each sleeve. After all increases to shoulder and sleeve cap there are 306-338-378-410-438-470 stitches on the needle and piece measures 31-33-35-37-38-41 cm / 12¼"-13"-13¾"-14½"-15"-16" (measured from shoulder down). There are now 4-8-12-14-16-18 purled stitches on each side of the lace pattern (including the 2 stitches in each side of A.2/A.3). The next round is worked as follows: Work 44-48-54-60-65-71 stitches stockinette stitch (= ½ back piece), place the next 65-73-81-85-89-93 stitches on 1 thread (= sleeve), cast on 4 new stitches on needle (= in side under sleeve), work 88-96-108-120-130-142 stitches stockinette stitch (= front piece), place the next 65-73-81-85-89-93 stitches on 1 thread (= sleeve), cast on 4 new stitches on needle (= in side under sleeve) and work the remaining 44-48-54-60-65-71 stitches in stockinette stitch (= ½ back piece). BODY: = 184-200-224-248-268-292 stitches. THE PIECE IS NOW MEASURED FROM HERE! Now divide the piece in the middle of the 4 new stitches under each sleeve and the front and back pieces are worked separately, back and forth on circular needle to finished length. BACK PIECE: = 92-100-112-124-134-146 stitches. Work stockinette stitch with 3 edge stitches in GARTER STITCH – see description above, in each side. When piece measures 3 cm / 1" from the division, increase 1 stitch in each side – read INCREASE TIP (= 2 stitches increased). Increase in this way every 14th-14th-14th-14th-14th-14th row a total of 4 times in each side = 100-108-120-132-142-154 stitches. When piece measures 24-24-24-24-25-24 cm / 9½"-9½"-9½"-9½"-9¾"-9½" from the division, change to circular needle size 3 mm / US 2.5. Work 3 ridges, change back to circular needle size 4 mm / US 6 and loosely bind off. The sweater measures approx. 56-58-60-62-64-66 cm / 22"-22¾"-23⅝"-24⅜"-25¼"-26" from top of shoulder down. FRONT PIECE: = 92-100-112-124-134-146 stitches. Work in the same way as the back piece. SLEEVE: Place the 65-73-81-85-89-93 stitches from the thread in one side of the piece onto short circular needle/double pointed needles size 4 mm / US 6 and, in addition, knit up 1 stitch in each of the 4 stitches cast on under the sleeve = 69-77-85-89-93-97 stitches on needle. Insert 1 marker in the middle of the 4 new stitches mid under sleeve and allow the marker to follow your work onwards. Continue A.3 as before, knit 1 stitch on each side of the marker mid under sleeve and purl the remaining stitches on the round. When piece measures 3 cm / 1" from the division, decrease 2 stitches mid under sleeve – read DECREASE TIP. Repeat the decrease when piece measures 8-8-7-7-6-6 cm / 3"-3"-2¾"-2¾"-2¼"-2¼" = 65-73-81-85-89-93 stitches. Continue working until piece measures 14-12-11-11-11-12 cm / 5½"-4¾"-4½"-4½"-4½"-4¾" from the division. Change to double pointed needles size 3 mm / US 2.5. Work 3 ridges over all stitches, change back to double pointed needles size 4 mm / US 6 and bind off. Work the other sleeve in the same way. ASSEMBLY: Sew side seams in outermost loop of outermost stitch so that the seam is flat, but stop when there is 6 cm / 2⅜" left in each side (= split). |
||||||||||||||||||||||
Diagram explanations |
||||||||||||||||||||||
|
||||||||||||||||||||||

|
||||||||||||||||||||||

|
||||||||||||||||||||||
|
||||||||||||||||||||||
|
Have you made this or any other of our designs? Tag your pictures in social media with #dropsdesign so we can see them! Do you need help with this pattern?You'll find tutorial videos, a Comments/Questions area and more by visiting the pattern on garnstudio.com. © 1982-2024 DROPS Design A/S. We reserve all rights. This document, including all its sub-sections, has copyrights. Read more about what you can do with our patterns at the bottom of each pattern on our site. |
||||||||||||||||||||||


With over 40 years in knitting and crochet design, DROPS Design offers one of the most extensive collections of free patterns on the internet - translated to 17 languages. As of today we count 304 catalogs and 11422 patterns - 11417 of which are translated into English (US/in).
We work hard to bring you the best knitting and crochet have to offer, inspiration and advice as well as great quality yarns at incredible prices! Would you like to use our patterns for other than personal use? You can read what you are allowed to do in the Copyright text at the bottom of all our patterns. Happy crafting!
Comments / Questions (95)
Jag är på det varv där stl M börjar ökning på ärmkullen. Ska alla dessa ökningar/omslag stickas aviga endast första varvet och sedan räta? Hur kan det bli 8 avigmaskor på varje sida om hålmönstret efter alla 30 ökningar?
19.02.2018 - 21:12DROPS Design answered:
Hej, du börjar med att sticka de ökade maskorna aviga. Efter hand när de räcker till en ny rapport av hålmönstret i A.2 stickas de in i mönstret.
20.02.2018 - 18:17Hallo. Ich stricke den Pullover in Gr.S . Bin jetzt bei Reie 13 stehen geblieben bei hinteren Mitte , Habe 54 Maschen am Vorderteil und 62 amHinterteil, aber es 18 (und nicht 2 ) Maschen an der vorderen Mitte über die nicht gestrickt wurde. Wie soll ich weiter striken?
15.02.2018 - 09:43DROPS Design answered:
Liebe Irina, bei der Reihe 5 stricken Sie 4 M vom Vorderteil bei der Hinreihe und 4 M vom Vorderteil bei der Rückreihen, dann immer 2 Maschen mehr vom Vorderteil (+ die Zunahmen) stricken (= R 7+8: 8 M auf beiden Seiten, R 9+10: 12 M, R 11+12: 16 M und R 13: 18 M auf einer Seite, 16 M auf der andere Seite + 2 M inzwischen = 36 M (+ die Zunahmen) für das Vorderteil. Viel Spaß beim stricken!
15.02.2018 - 10:18Hei! Jeg skal begynne å øke til ermetopp nå, men forstår ikke helt hvordan. Det står at alle de økte maskene til ermetopp skal strikkes vrange, men det ser ikke sånn ut på bilde?
02.12.2017 - 11:52DROPS Design answered:
Hej, du øger på retsiden og strikker maskerne drejet vrang fra vrangen nu hvor du strikker forkortede pinde. Det vil sige at det bliver til glatstrik på forstykket. God fornøjelse!
07.12.2017 - 14:02CHANTAL wrote:
Suite de ma question: Donc on a , je crois ?,à la fin ,des m envers de part et d'autre de A2 , mais cela n’apparaît PAS sur le dessin du motif (dans les explications) et je ne les vois pas NON PLUS sur les photos. D'autant plus que les 2m envers se décalent quand le motif s’agrandit , mais du coup, où sont les m envers .... bref , je n'y comprends rien et suis très contrariée .... MERCI pour votre aide ...
27.11.2017 - 12:14DROPS Design answered:
Bonjour Chantal, au début, quand on va augmenter, on aura plus de 2 m env au début et à la fin de A.2 mais progressivement ces mailles envers vont être tricotées dans le point ajouré de la fin de A.2 (partie qui augmente), mais on aura toujours au moins 2 m envers au début et à la fin de A.2. Les augmentations sont en m envers et à peine visible, le motif va progressivement empiéter sur les mailles envers qui vont se tricoter ensuite autrement, suivez bien les diminutions et les jetés dans A.2 pour bien élargir le point ajouré au début et à la fin du diagramme. Bon tricot!
27.11.2017 - 13:14CHANTAL wrote:
A partir de "commencer à tricoter pour l'arrondi des manches" , je ne comprends plus rien. On doit augmenter avant ou après les 2 m envers ? Sachant qu'on doit faire ses augmentations en m envers , on obtient finalement que des des m envers ?( et ... avant ou après les 2m env du motif ???) Je ne les vois ni sur le dessin de A2 , ni sur la photo ....
27.11.2017 - 12:12DROPS Design answered:
Bonjour Chantal, pour l'arrondi des manches on augmente avant A.2 et après A.2, et on tricote le diagramme comme il est indiqué, les mailles augmentées vont progressivement se tricoter dans A.2, mais on doit toujours avoir au minimum 2 m env avant et après le point ajouré de A.2 (= les 2 m env de A.2). Bon tricot!
27.11.2017 - 13:11Hei (igjen), jeg så først nå at oppskriften er revidert enda en gang etter den ble endret 27. oktober. Takk :)
16.11.2017 - 20:38Hei igjen, viser til spm fra 28.10. Jeg ser at oppskriften er gjort om og lagt ut i ny versjon, men det løser fremdeles ikke problemet. Siden mønsteret begynner på venstre skulder, strikker forkortede pinner frem og tilbake, og man skal klippe etter å ha avsluttet diagram A2 på venstre skulder jf P.13, vil fortsatt høyre skulder være flere omganger bak i mønsteret?
16.11.2017 - 20:30DROPS Design answered:
Hej Julie, de forkortede pinde strikkes frem og tilbage over lige mange masker på hver side, så du bør have kommet lige langt i diagrammerne. God fornøjelse!
07.12.2017 - 14:16Gosto muito de este modelo,e quero o tricotar so que ainda nao tem feito modelos tricotados de cima para a baixo.Em casos de duvida na Drops fazem explicacao em portugues?
02.11.2017 - 09:55DROPS Design answered:
Em caso de dúvida, tem os tutoriais em vídeo ao fundo das explicações. Ou pode pedir ajuda no Grupo DROPS Workshop do Facebook. Bom tricô!
06.11.2017 - 13:23Bonjour, Merci pour les nouvelles explications claires. J'ai terminé les rangs raccourcis. Sauf erreur de ma part, je vais tricoter A2 encore 2 fois. Mais que signifie au tour avec la flèche dans A2... quelle flèche?? Merci d'avance et meilleures salutations Christine
01.11.2017 - 15:56DROPS Design answered:
Bonjour Christine et merci, les nouveaux diagrammes adaptées aux nouvelles explications ont été mis en ligne. Bon tricot!
03.11.2017 - 12:45Etter beskrivelse til 13. pinne står det at man skal være ferdig med 11. omg av A2, klippe tråden og begynne igjen fra midt bak; men da er jo bare den ene skulderen ferdig med 11. omg A2? Hva med den andre (mellom merke 3 og 4) som nå ligger 2 omg bak i mønsteret? Jeg får heller ikke strikkefastheten riktig. I stedet for 21mx28p på 10x10cm får jeg 17mx32p! Så uansett om jeg går opp eller ned i pinnestr blir den ene dimensjonen feil. Hvordan kan jeg rette på det?
28.10.2017 - 00:15DROPS Design answered:
Hej Julie, har du set at vi har skrevet opskriften om og der er lagt en helt ny ud på hjemmesiden? Den nye skal være lettere at følge. God fornøjelse!
15.11.2017 - 13:58