
Popular categories
Looking for a yarn?


|
||||||||||||||||||||||
Vanilla Kiss |
||||||||||||||||||||||
 |
 |
|||||||||||||||||||||
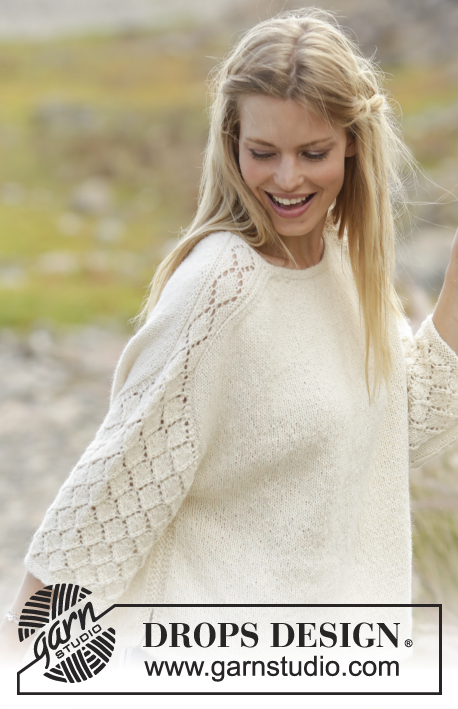
Knitted sweater with lace pattern on shoulders and sleeves, worked top down. Sizes S - XXXL. The piece is worked in DROPS Puna.
DROPS 178-16 |
||||||||||||||||||||||
|
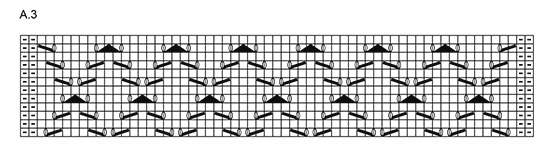
RIDGE/GARTER STITCH (worked in the round): 1 ridge = 2 rounds. Knit 1 round and purl 1 round. RIDGE/GARTER STITCH (worked back and forth): 1 ridge = Knit 2 rows. PATTERN: See diagrams A.1 to A.3. The diagrams show all rows in pattern seen from the right side. SHOULDER: NOTE: All increases worked from right side! On next row work yarn overs twisted to avoid holes. Increase 2 stitches as follows: INCREASE 2 STITCHES BEFORE MARKERS 1 AND 3: Start 3 stitches before marker, 1 yarn over, knit 2, 1 yarn over, knit 1, (= 2 stitches increased). INCREASE 2 STITCHES AFTER MARKERS 2 AND 4: Knit 1, 1 yarn over, knit 2, 1 yarn over (= 2 stitches increased). Increase 1 stitch as follows: INCREASE 1 STITCH BEFORE MARKERS 1 AND 3: Start 1 stitch before marker, 1 yarn over, knit 1 (= 1 stitch increased). INCREASE 1 STITCH AFTER MARKERS 2 AND 4: Knit 1, 1 yarn over (= 1 stitch increased). SLEEVE CAP: Increase 1 stitch by making 1 yarn over (make sure the yarn over is not too loose). On next round: purl yarn over twisted to avoid holes – knit the first 21 stitches increased, purl the remaining stitches. INCREASE TIP (for sides of front and back pieces): Increase on inside of the 4 outermost stitches in each side (i.e. 3 edge stitches in garter stitch + 1 stitch in stockinette stitch). Increase 1 stitch by making 1 yarn over, on next row work yarn over twisted to avoid a hole (the increased stitch is worked in stockinette stitch). DECREASE TIP (for mid under sleeve): Start 3 stitches before marker mid under sleeve, purl 2 together, knit 2 (the marker sits in the middle of these 2 stitches), purl 2 together (= 2 stitches decreased). ---------------------------------------------------------- SWEATER The piece is worked in the round with circular needle, top down, as far as below the sleeves. Then the front and back pieces are worked separately back and forth. The sleeves are worked in the round. The photo deviates somewhat from pattern regarding increases in sleeve caps (A.2) – the fit has been improved. YOKE: Cast on 102-102-106-106-110-110 stitches with short circular needle size 3 mm / US 2.5 and Puna. The round starts mid back. Insert a marker here which will follow your work onwards. Work 2 RIDGES in the round – see description above. Insert 4 new markers in the piece as follows (without working the stitches): Insert marker 1 after the first 19-19-20-20-21-21 stitches (= ½ back piece), marker 2 after the next 13 stitches (= shoulder/sleeve), marker 3 after the next 38-38-40-40-42-42 stitches (= front piece), marker 4 after the next 13 stitches (= shoulder/sleeve), there are now 19-19-20-20-21-21 stitches left after the last marker (= ½ back piece). Change to circular needle size 4 mm / US 6. Now work short rows over the stitches in the neck for a better fit, AT THE SAME TIME as you increase stitches to shoulder and work pattern on shoulders/sleeves (= 13 stitches) as follows: ROW 1 (from right side): Knit until 3 stitches before the marker 1, increase 2 stitches to SHOULDER – see description above, work A.1A (= 7 stitches), turn piece and tighten strand. ROW 2 (from wrong side): Work A.1A, purl as far as marker 4, A.1B (= 7 stitches –you read the diagram from left to right when working from the wrong side), turn the piece and tighten strand. ROW 3: Work A.1B, increase 2 stitches to shoulder, knit to 3 stitches before marker 1 and increase 2 stitches to shoulder, work A.2 (= 13 stitches), marker 2 is here, turn the piece and tighten strand. ROW 4: Work A.2, purl to marker 4, work A.2 – start on row 2 in the diagram, marker 3 is here, turn the piece and tighten strand. ROW 5: Work A.2, increase 2 stitches to shoulder, knit to 3 stitches before marker 1, increase 2 stitches to shoulder, continue A.2 and increase 2 stitches to shoulder on front piece, (i.e. you work as follows after marker 2: Knit 1, 1 yarn over, knit 2, 1 yarn over), knit 1, (= 4 stitches + 2 yarn overs on front piece), turn the piece and tighten strand. ROW 6: Purl to marker 2 (= purl 6 stitches on front piece), continue A.2, purl to marker 4, continue A.2, purl 4 stitches on front piece (= 4 stitches past marker 3) turn the piece and tighten strand. REMEMBER THE GAUGE! ROW 7: Knit 1, increase 2 stitches to shoulder (= 4 stitches + 2 yarn overs on front piece), continue A.2, increase 2 stitches to shoulder, knit to 3 stitches before marker 1, increase 2 stitches to shoulder, continue A.2, increase 2 stitches to shoulder on front piece and knit over 2 more stitches than on previous row on front piece (= 8 stitches + 2 yarn overs on front piece), turn the piece and tighten the strand. ROW 8: Purl to marker 2 (= 10 purled stitches on front piece), continue A.2, purl to marker 4, continue A.2 and purl over 2 stitches more than on the previous row on front piece (= 8 stitches on front piece), turn the piece and tighten strand. ROW 9: Knit to 3 stitches before the marker, increase 2 stitches to shoulder (= 8 knitted stitches + 2 yarn overs on front piece), continue A.2, increase 2 stitches to shoulder, knit to 3 stitches before marker 1, increase 2 stitches to shoulder, continue A.2, increase 2 stitches to shoulder on front piece, Knit over 2 stitches more than on the previous row on front piece (= 12 stitches + 2 yarn overs on front piece), turn piece and tighten strand. ROW 10: Purl to marker 2 (= 14 purled stitches on front piece), continue A.2, purl to marker 4, continue A.2 and purl over 2 stitches more than on previous row on front piece (= 12 stitches on front piece), turn the piece and tighten strand. ROW 11: Knit to 3 stitches before the marker, increase 2 stitches to shoulder (= 12 knitted stitches + 2 yarn overs on front piece), continue A.2, increase 2 stitches to shoulder, knit to 3 stitches before marker 1, increase 2 stitches to shoulder, continue A.2, increase 2 stitches to shoulder on front piece, knit over 2 more stitches than on the previous row on front piece (= 16 stitches + 2 yarn overs on front piece), turn the piece and tighten strand. ROW 12: Purl to marker 2 (= 18 purled stitches on front piece), continue A.2, purl to marker 4, continue A.2 and purl over 2 stitches more than on previous row on front piece (= 16 stitches on front piece), turn piece and tighten strand. ROW 13: Knit to 3 stitches before marker, increase 2 stitches to shoulder (= 18 stitches before next marker), continue A.2, increase 2 stitches to shoulder, knit to mid back (= start of the round). Continue with pattern but without increasing as far as marker 2. Now you have worked 11 rows of A.2. Cut the strand. You have now increased 2 stitches to shoulder in each side of the front piece 4 times and 2 stitches to shoulder in each side of the back piece 6 times = 142-142-146-146-150-150 stitches (= 54-54-56-56-58-58 stitches on front piece and 62-62-64-64-66-66 stitches on back piece). The short rows are now finished and you continue in the round with circular needle. Start at marker mid back. On the next round continue the increases to shoulder (= work the increased stitches on front and back piece in stockinette stitch) and work A.2 as before, AT THE SAME TIME on round with arrow in A.2 (i.e. before the increases to shoulder are finished) start the increases to sleeve cap (= work the first 21 increased stitches knit. AT THE SAME TIME work the new stitches into A.2 as A.2 expands outwards). When A.2 has been completed in height, repeat A.3 over A.2 to finished length. Increase to shoulder and to sleeve cap as described below: INCREASE TO SHOULDER AS FOLLOWS: NOTE: You increase differently on front and back pieces and, on the rounds after increases, the yarn overs are knitted twisted to avoid holes - Remember SHOULDER! INCREASE ON BACK PIECE (= between markers 4 and 1): Increase 2 stitches every 2nd round a total of 2-3-5-7-8-10 times, then increase 1 stitch every 2nd round a total of 9-11-12-14-16-18 times. INCREASE ON FRONT PIECE (= between markers 2 and 3): Increase 2 stitches every 2nd round a total of 6-7-9-11-12-14 times, then increase 1 stitch every 2nd round a total of 5-7-8-10-12-14 times. After all increases to shoulder there are 88-96-108-120-130-142 stitches on both front and back pieces. INCREASE TO SLEEVE CAP AS FOLLOWS: On the round with an arrow in diagram A.2 start increasing to SLEEVE CAP – see description above. Increase 1 stitch on each side of A.2 on every shoulder/sleeve (= 4 stitches increased on round). Increase in this way every round a total of 1-4-6-4-4-2 times and then every 2nd round a total of 25-26-28-32-34-38 times. There should always be 2 purled stitches on each side of the lace pattern A.2 on sleeves. (These purl stitches are included in the diagram). A.2 expands outwards as diagram is worked, so that more and more stitches are included in the lace pattern. When all increases to sleeve cap are finished, there are 65-73-81-85-89-93 stitches on each sleeve. After all increases to shoulder and sleeve cap there are 306-338-378-410-438-470 stitches on the needle and piece measures 31-33-35-37-38-41 cm / 12¼"-13"-13¾"-14½"-15"-16" (measured from shoulder down). There are now 4-8-12-14-16-18 purled stitches on each side of the lace pattern (including the 2 stitches in each side of A.2/A.3). The next round is worked as follows: Work 44-48-54-60-65-71 stitches stockinette stitch (= ½ back piece), place the next 65-73-81-85-89-93 stitches on 1 thread (= sleeve), cast on 4 new stitches on needle (= in side under sleeve), work 88-96-108-120-130-142 stitches stockinette stitch (= front piece), place the next 65-73-81-85-89-93 stitches on 1 thread (= sleeve), cast on 4 new stitches on needle (= in side under sleeve) and work the remaining 44-48-54-60-65-71 stitches in stockinette stitch (= ½ back piece). BODY: = 184-200-224-248-268-292 stitches. THE PIECE IS NOW MEASURED FROM HERE! Now divide the piece in the middle of the 4 new stitches under each sleeve and the front and back pieces are worked separately, back and forth on circular needle to finished length. BACK PIECE: = 92-100-112-124-134-146 stitches. Work stockinette stitch with 3 edge stitches in GARTER STITCH – see description above, in each side. When piece measures 3 cm / 1" from the division, increase 1 stitch in each side – read INCREASE TIP (= 2 stitches increased). Increase in this way every 14th-14th-14th-14th-14th-14th row a total of 4 times in each side = 100-108-120-132-142-154 stitches. When piece measures 24-24-24-24-25-24 cm / 9½"-9½"-9½"-9½"-9¾"-9½" from the division, change to circular needle size 3 mm / US 2.5. Work 3 ridges, change back to circular needle size 4 mm / US 6 and loosely bind off. The sweater measures approx. 56-58-60-62-64-66 cm / 22"-22¾"-23⅝"-24⅜"-25¼"-26" from top of shoulder down. FRONT PIECE: = 92-100-112-124-134-146 stitches. Work in the same way as the back piece. SLEEVE: Place the 65-73-81-85-89-93 stitches from the thread in one side of the piece onto short circular needle/double pointed needles size 4 mm / US 6 and, in addition, knit up 1 stitch in each of the 4 stitches cast on under the sleeve = 69-77-85-89-93-97 stitches on needle. Insert 1 marker in the middle of the 4 new stitches mid under sleeve and allow the marker to follow your work onwards. Continue A.3 as before, knit 1 stitch on each side of the marker mid under sleeve and purl the remaining stitches on the round. When piece measures 3 cm / 1" from the division, decrease 2 stitches mid under sleeve – read DECREASE TIP. Repeat the decrease when piece measures 8-8-7-7-6-6 cm / 3"-3"-2¾"-2¾"-2¼"-2¼" = 65-73-81-85-89-93 stitches. Continue working until piece measures 14-12-11-11-11-12 cm / 5½"-4¾"-4½"-4½"-4½"-4¾" from the division. Change to double pointed needles size 3 mm / US 2.5. Work 3 ridges over all stitches, change back to double pointed needles size 4 mm / US 6 and bind off. Work the other sleeve in the same way. ASSEMBLY: Sew side seams in outermost loop of outermost stitch so that the seam is flat, but stop when there is 6 cm / 2⅜" left in each side (= split). |
||||||||||||||||||||||
Diagram explanations |
||||||||||||||||||||||
|
||||||||||||||||||||||

|
||||||||||||||||||||||

|
||||||||||||||||||||||
|
||||||||||||||||||||||
|
Have you made this or any other of our designs? Tag your pictures in social media with #dropsdesign so we can see them! Do you need help with this pattern?You'll find tutorial videos, a Comments/Questions area and more by visiting the pattern on garnstudio.com. © 1982-2024 DROPS Design A/S. We reserve all rights. This document, including all its sub-sections, has copyrights. Read more about what you can do with our patterns at the bottom of each pattern on our site. |
||||||||||||||||||||||


With over 40 years in knitting and crochet design, DROPS Design offers one of the most extensive collections of free patterns on the internet - translated to 17 languages. As of today we count 304 catalogs and 11422 patterns - 11417 of which are translated into English (US/in).
We work hard to bring you the best knitting and crochet have to offer, inspiration and advice as well as great quality yarns at incredible prices! Would you like to use our patterns for other than personal use? You can read what you are allowed to do in the Copyright text at the bottom of all our patterns. Happy crafting!
Comments / Questions (95)
Desculpe insistir: nas carreira encurtadas há dir e avesso. Assim o primeiro A2 começa na carreira 3, direito, e só na 4ª carreira começa o 2º A2, pelo avesso. Dizem mesmo para começar na 2ª carreira do diagrama que é 13 malhas em liga, logo os 2 ombros ficam com começo diferente. um não faz a 1ª carreira do diagrama. É assim? Obrigada.
06.09.2018 - 10:09DROPS Design answered:
Bom dia, Como este modelo já foi revisto , sim, deve seguir as explicações como indicado. Bom Tricô!
06.09.2018 - 11:31I seneste opdatering til opskriften skriver I nu, at udtagninger til ærmekuppel skal strikkes ret. Hvor anbefaler I, at disse udtagninger laves, såd det ser pænest ud? I en del af mønsteret vil de jo foregå samtidig med udtagning til skulder, men skal også senere kunne strikkes ind i mønster A2.
04.09.2018 - 12:12DROPS Design answered:
Hei Birgitte. Du øker som forklart i oppskriften: Øk 1 maske på hver side av A.2 på hver skulder/erme (= 4 masker økt på omgangen). Øk slik på hver omgang totalt 1-4-6-4-4-2 ganger og deretter på hver 2.omgang totalt 25-26-28-32-34-38 ganger. A.2 vil etterhvert øke utover, og vil da "spise" av de glattstrikkede maskene. God fornøyelse
06.09.2018 - 10:28Muito obrigada pela rápida resposta, mas a minha dúvida continua. Na carreira 3 já se faz A2 pelo direito e só na carreira 4 se começa o segundo ombro pelo avesso e então este começa diferente porque começa pela segunda carreira do diagrama e o outro pela primeira. Obrigada
03.09.2018 - 18:42DROPS Design answered:
Bom dia, Uniu a peça para tricotar em redondo? O que se está a fazer, na carreira 3 e 4, para além do ponto dos ombros, são as carreiras encurtadas, mas sempre pelo direito, uma vez que a peça se tricota em redondo. Esperamos ter ajudado! Bom Tricô!
04.09.2018 - 12:27Bom dia. Na carreira 4 dizem para começar o A2 do segundo ombro pela carreira 2 do diagrama, que são 13malhas em liga e assim este começo fica diferente nos dois ombros porque o outro começou na carreira 1 do diagrama. E assim? Muito obrigada.
01.09.2018 - 09:57DROPS Design answered:
Boa tarde, Na carreira 4, tricota-se o diagrama A.2 duas vezes: a primeira vez, para um dos ombros e a segunda vez, para o outro ombro. (CARREIRA 4: Tricotar A.2, tricotar em liga até ao marcador 4, tricotar A.2 – começar pela carreira 2 do diagrama, o marcador 3 está aqui, virar a peça e puxar o fio.) Desta forma, começam-se os ombros/mangas ao mesmo tempo, Bom Tricô!
03.09.2018 - 15:57Bom dia. Adoro o modelo mas é difícil. Na carreira 1 encurtadas quando dizem para arrematar o fio deve recomeçar-se a maio das costas? O primeiro losango de A2fica diferente nos dois ombros? Muito obrigada.
31.08.2018 - 11:21DROPS Design answered:
Bom dia. Na 1.ª carreira encurtada, puxa o fio, vira a peça e continua, tricotando a 2.ª carreira. O primeiro losango de A.2 fica igual nos dois ombros. Bom tricô!
31.08.2018 - 12:10Bonjour, Augmentation arrondi des manches = faire un 1 jeté à 4 mailles du marqueur + 3 mailles mousses + 1 m Jersey + A2 après marqueur Est-ce exact ?
26.08.2018 - 23:27DROPS Design answered:
Bonjour Gaëlle, les augmentations pour l'arrondi des manches ont été récemment modifiées. Vous augmentez avec 1 jeté avant les 2 m env de A.2 et après les 2 m env de A.2 (il n'y a pas de mailles au point mousse). Bon tricot!
05.09.2018 - 12:37Jag har stickat tom varv 13 och har 142 maskor. Det står att framstycket ska ha 54 maskor och bakstycket 62 maskor, det blir 116 maskor. Jag har betydligt fler än 2 maskor som inte är stickade i de förkortade varven.
23.06.2018 - 23:21DROPS Design answered:
Hei Ellinor. Du har helt rett i at det er betydelig fler masker som det ikke er strikket forkortede pinner over. Bare se bort ifra dette punktet, det er nå fjernet fra oppskriften. Takk for beskjed og god fornøyelse.
26.06.2018 - 13:32Bonjour,suis arrivée au rang avec flèche (S). Sur ce rang, je continue augm. épaule et pointfantaisie A2. Puis au rang suivant (env) augm. arrondi manches: (4 m avant le marqueur , 1 jeté puis 2 m mousse,1 m torse end (augm. épaule de rang précédent) et 1 m env puis A2). + 4 mailles à la fin du rang. est-ce correct ? Merci
12.06.2018 - 03:31DROPS Design answered:
Bonjour Gaëlle, les augmentations pour les épaules se font comme avant (continuez-les comme avant juqu'à ce qu'elles soient toutes terminées), et augmentez maintenant pour l'arrondi des manches 1 m avant A.2 et 1 m après A.2 à chaque épaule/manche (= 2 m augmentées pour chaque épaule/manche). Bon tricot!
12.06.2018 - 08:51Jeg har fått beskjed om at det har kommet et svar på mitt spørsmål fra 19/5. Det stemmer ikke....
09.06.2018 - 18:49DROPS Design answered:
Hei Anne. Takk for beskjed, det hadde skjedd en feil i posting av svaret ditt. Nå skal det være i orden og svaret er synlig. Beklager dette og god fornøyelse
25.06.2018 - 10:56Bonjour , encore moi . Ok pour les augmentations (2x2 + 9x1 = dos ) et ( 6x2 + 5x1= devant) mais ca fait 11 rangs d'augmentation. Je me fis sur le diagramme pour compter mes rangs . Si le 11e rang du diagramme correspond au dernier rang raccourci , le 12ème rang jusqu'au 31e ( 1ère flèche) , je ne compte que 10rg ou l'on peut augmenter ...y'a sûrement quelques chose que je n'ai pas saisie je suis désolée 😐.
05.06.2018 - 05:26DROPS Design answered:
Bonjour Gaëlle, on augmente pour l'arrondi des manches avant la fin des augmentations du dos et du devant = vous continuez à augmenter pour le devant et le dos et au rang avec la flèche dans A.2, vous commencez à augmenter pour l'arrondi des manches. Bon tricot!
05.06.2018 - 09:00