
Populaarsed kategooriad
Otsid lõnga?


|
||||||||||||||||||||||||||||||||||||||||||||||
Fall Festival |
||||||||||||||||||||||||||||||||||||||||||||||
 |
 |
|||||||||||||||||||||||||||||||||||||||||||||
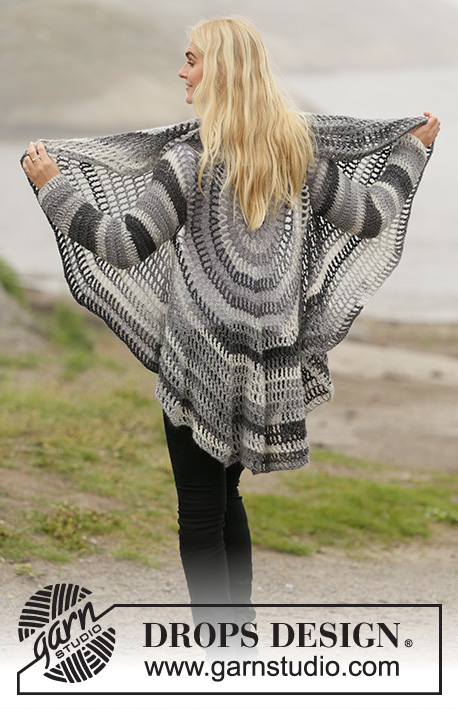
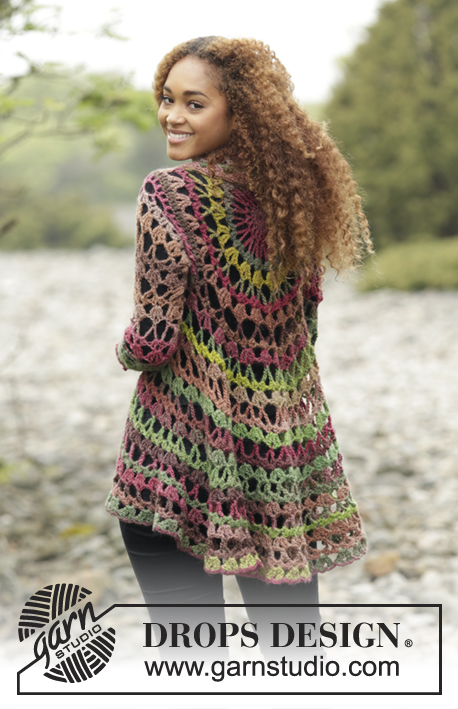
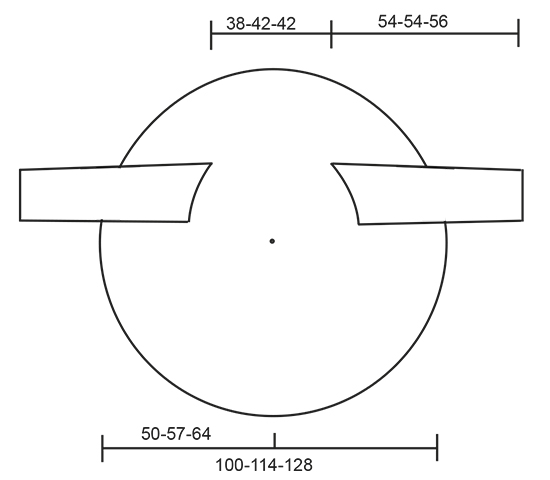
DROPS Big Delight või DROPS Fabel ja DROPS Flora lõngadest ringselt heegeldatud ratasjakk suurustele S kuni XXXL
DROPS 171-21 |
||||||||||||||||||||||||||||||||||||||||||||||
|
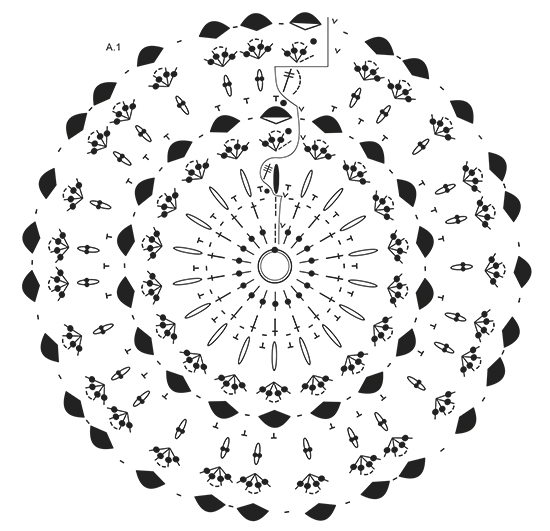
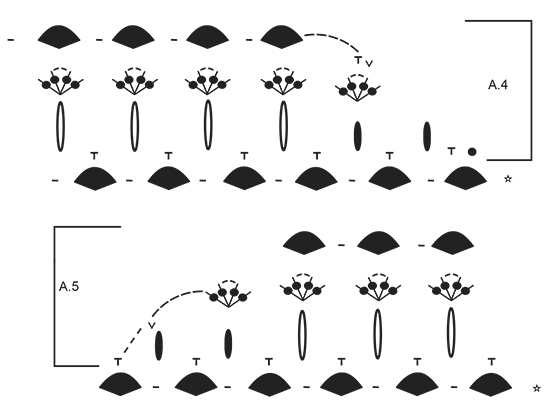
MUSTER Vaata skeeme A.1 kuni A.5. HEEGELDAMISE INFO Asenda esimene kinnissilmus (ks) ringi alguses 1 ahelsilmusega, lõpus tee 1 aass esimesse ahels-sse ringi alguses. Asenda esimene ühekordne sammas (sm) ringi alguses 3 ahelsilmusega, lõpus tee 1 aass kolmandasse ahels-sse ringi alguses. Asenda esimene kahekordne sammas (2xsm) ringi alguses 4 ahelsilmusega, lõpus tee 1 aass neljandasse ahels-sse ringi alguses. ------------------------------- RATASJAKK Heegelda 4 ahels 5,5 mm heegelnõelaga ja Big Delight (või DROPS Fabel ja DROPS Flora) lõngaga, ühenda ringiks 1 aassilmusega esimesse ahels-sse. Siis heegelda skeemi A.1. LOE HEEGELDAMISE INFOT! JÄLGI HEEGELDAMISE TUGEVUST! Kui skeem A.1 on tehtud, on ringi läbimõõt u. 33 cm ja viimasel ringil on 27 2xsm-gruppi. SUURUSED L/XL - XXL/XXXL Heegelda vastavalt skeemile A.2, skeemi A.2 esimesel ringil kasvata 9 ahels-kaart ühtlaste vahedega (kasvata samamoodi nagu skeemi A.1 6. ringil, kasvata 1 ahels-kaar nii: tee 1 ks ümber ahels-kaare 2xsm-grupi keskel, 9 ahels, 1 ks ümber ahels 2xsm-gruppide vahel, 9 ahels, 1 ks ümber ahels-kaare järgmise 2xsm-grupi keskel) = 36-36 ahels-kaart. Heegelda skeemi A.2 1 kord vertikaalselt. KÕIK SUURUSED = 27-36-36 2xsm-gruppi. Heegelda järgmine ring nagu 1. ring skeemil A.3, SAMAL AJAL tee käeaugud nii: tee 1 ks ümber ahels-kaare 2xsm-grupi keskel, tee 30-33-36 lõtva ahels, jäta vahele 5-6-7 2xsm-gruppi, 1 ks ümber ahels-kaare järgmise 2xsm-grupi keskel (käeauk on tehtud), * 12 ahels, 1 ks ümber ahels-kaare 2xsm-grupi keskel *, korda * kuni * 8-14-12 korda kokku. Tee 30-33-36 lõtva ahels, jäta vahele 5-6-7 2xsm-gruppi, 1 ks ümber ahels-kaare järgmise 2xsm-grupi keskel (teine käeauk on tehtud), * 12 ahels, 1 ks ümber ahels-kaare 2xsm-grupi keskel *, korda * kuni * tervel ringil ja lõpus tee 1 aass esimesse ks-sse ringi alguses (mitte 1 ks ümber järgmise ahels-kaare). Heegelda järgmine ring nagu 2. ring skeemil A.3 nii: heegelda nagu enne, tehes 2 sm + 2 ahels + 2 sm ümber iga ahels-kaare, ümber iga ahels-kaare käeaugus tee 6-7-8 sm-gruppi, SAMAL AJAL kasvata 9 sm-gruppi ühtlaste vahedega ringil, kasvata 1 sm-grupp, tehes 2 sm + 2 ahels + 2 sm + 2 sm + 2 ahels + 2 sm ümber 1 ahels-kaare = 36-45-45 sm-gruppi. 3. RING: tee 2 2xsm + 2 ahels + 2 2xsm ümber ahels-kaare iga sm-grupi keskel ja 1 ahels iga 2xsm-grupi vahele = 36-45-45 2xsm-gruppi ja 1 ahels nende vahel. Jätka heegeldamist skeemi A.3 järgi, SAMAL AJAL kasvata 9 ahels-kaart ühtlaste vahedega iga kord kui teed 1. ringi, nii: 1. RING: tee aassilmuseid kuni esimese ahels-kaare keskele (2xsm-grupi keskel), 1 ks, * 12 ahels, 1 ks ümber järgmis ahels-kaare 2xsm-grupi keskel *, korda * kuni * tervel ringil, SAMAL AJAL kasvata 9 ahels-kaart ühtlaste vahedega ringil = 45-54-54 ahels-kaart (ringi lõpus tee 6 ahels ja 1 3xsm esimesse ks-sse ringi alguses). 2. RING: tee 2 sm + 2 ahels + 2 sm ümber iga ahels-kaare tervel ringil = 45-54-54 sm-gruppi. 3. RING: tee 2 2xsm + 2 ahels + 2 2xsm ümber iga ahels-kaare sm-grupis ja 1 ahels iga 2xsm-grupi vahele tervel ringil = 45-54-54 2xsm-gruppi ja 1 ahels nende vahel. Korda 1. - 3. ringi veel 3-3-4 korda, SAMAL AJAL kasvata 9 ahels-kaart iga kord tehes 1. ringi = 72-81-90 2xsm-gruppi. Et jakk oleks ovaalse kujuga, heegelda edasi-tagasi ainult alumise 47-54-61 2xsm-grupi kohale, ära heegelda keskmise 25-27-29 2xsm-grupi kohale kaela taga. Alusta töö PP pool ja korda 1.-3. rida skeemil A.3 nagu enne 2 korda kokku (st. seljaosa on 6 rida pikem). Et pöördekohad jääks kenad, heegelda nagu skeemil A.4 ja A.5, SAMAL AJAL kasvata 7 ahels-kaart iga kord, kui teed 1. rida (= 86-95-104 2xsm-gruppi kokku ringil, k.a. 2xsm-gruppi kaela pool). Lõpuks tee 1 ring ahels-kaari ümber terve jaki ääre (töö PP pool) nii: * 4 ahels, 1 ks ümber ahels-kaare 2xsm-grupi keskel, 4 ahels, 1 ks enne järgmist 2xsm-gruppi *, korda * kuni * tervel ringil, katkesta ja kinnita lõng. VARRUKAS Tee 60-66-72 sm ümber käeaugu (u. 5 sm igasse 2xsm-gruppi ja u. 30-33-36 sm ümber ahels-kaare – alusta kaenlaaugust). Heegelda järgmine ring nii: * 1 sm esimesse/järgmisesse sm-sse, 1 ahels, jäta vahele 1 sm *, korda * kuni * tervel ringil = 30-33-36 sm + 30-33-36 ahels. Jätka nii: 1. RING: * 6 ahels, jäta vahele 5 s, 1 ks järgmisesse silmusesse *, korda * kuni * tervel ringil = 10-11-12 ahels-kaart. 2. RING: tee 2 sm + 2 ahels + 2 sm ümber iga ahels-kaare tervel ringil = 10-11-12 sm-gruppi. 3. RING: tee 2 2xsm + 2 ahels + 2 2xsm ümber iga ahels-kaare sm-grupis ja 1 ahels iga 2xsm-grupi vahele tervel ringil = 10-11-12 2xsm-gruppi ja 1 ahels nende vahel. 4. RING: * 12 ahels, 1 ks ümber ahels-kaare 2xsm-grupi keskel *, korda * kuni * tervel ringil = 10-11-12 ahels-kaart, aga SAMAL AJAL kahanda 1 ahels-kaare ringil kaenlaaugus nii: 1 ks ümber ahels-kaare ringi eelviimase 2xsm-grupi keskel, 6 ahels, 1 sm ümber ahels-kaare 2xsm-grupi keskel ?, 6 ahels, 1 ks ümber ahels-kaare järgmise 2xsm-grupi keskel). Järgmisel ringil tee kaenlaaugu keskel sm-grupp sambasse kahe 6-ahels-kaare vahel = 9-10-11 sm-gruppi. Korda 2.-4. ringi ja kahanda SAMAL AJAL 1 ahels-kaar igal 3. ringil, nii et ringil on 1 2xsm-grupp/ahels-kaar vähem. Kui ringil on 5-6-7 2xsm-gruppi/ahels-kaart, heegelda kahandamiseta, kuni töö pikkus on 54-54-56 cm, või soovitud pikkusega, proovi jakki selga. Katkesta ja kinnita lõng. Korda teisel varrukal. |
||||||||||||||||||||||||||||||||||||||||||||||
Skeemi seletused |
||||||||||||||||||||||||||||||||||||||||||||||
|
||||||||||||||||||||||||||||||||||||||||||||||
|
||||||||||||||||||||||||||||||||||||||||||||||

|
||||||||||||||||||||||||||||||||||||||||||||||
|
||||||||||||||||||||||||||||||||||||||||||||||
|
||||||||||||||||||||||||||||||||||||||||||||||
|
Oled teinud selle või mõne meie teise disaini? Lisa oma piltidele sotsiaalmeedias silt #dropsdesign , et me näeksime neid pilte. Vajad abi selle mustriga?Garnstudio.com kodulehel on õppevideot, küsimuste/vastuste osa ja muudki. © 1982-2024 DROPS Design A/S. Kõik õigused kaitstud. See dokument, ning selle alajaotused on kaitsud autoriõigustega. Loe rohkem, mida meie mustritega võib teha, iga mustrilehe alt meie kodulehel. |
||||||||||||||||||||||||||||||||||||||||||||||


Tegeledes üle 40 aasta kudumise ja heegeldamise disainidega, pakub DROPS Design ühte suurimat tasuta mustrite kollektsiooni internetis - tõlgituna 17 keelde. Tänaseks on meil 304 kataloogi ja 11422 mustrit - millest 8501 on tõlgitud Eesti keelde.
Me anname endast parima, et tuua teieni kõike mida kudumine ja heegeldamine võib pakkuda - inspiratsiooni, nõuandeid ning ka kvaliteetseid lõngu parima hinnaga! Soovid kasutada mustreid muukski, kui ainult oma tarbeks? Loe infot meie Copyright osas iga lehekülje all. Rõõmsat loomist!
Kommentaarid / Küsimused (292)
Hi i am also having trouble reading the pattern, i don't understand if i am to go straight to creating arm holes and continue for 8, armholes and continue for 8 back to start AND THEN where do i crochet into for the next round? on the arm hole chains or the stitches underneath that were missed out? I understand the diagram of the order of stitches but the written part is not very clear. If there were pictures or videos on this it would be really helpful!
16.08.2019 - 18:50DROPS Design answered:
Dear Kerri, on the round with chains for armholes, crochet this round as explained in the text skipping stitches replaced by chains, these "holes" will create armholes - on next round, continue pattern as before (as there weren't any chains) increasing evenly on the whole round. Happy crocheting!
19.08.2019 - 08:51Please can you repost tutorial pictures? I’m really struggling with just the pattern and no visual tutorial.
14.08.2019 - 16:39DROPS Design answered:
Dear Mrs Bracken, the pictures are unfortunately currently unavailable, please feel free to ask your question here, for any further individual assistance, please contact the store where you bought the yarn, even per mail or telephone. Happy crocheting!
15.08.2019 - 09:26Sorry for the typo errors. Competent should have been the word not compliant...
12.08.2019 - 13:31Loving the design. Very quick to make. But some of the written patterns seems to be over complicated. If you put arches from dc to dc instead oval loops on the diagram it would make sense that you are going from dc, chains to making a dc... I'm a compliant crocheter but even I'm finding the wording over repetitive. Needs precise and shorter explanations. But I am able to understand the British crochet terms. Great work overall. X
12.08.2019 - 13:27Hi, on the next round after the armhole and chains. It says inc 9 does that mean increase or including 9 treble groups. If it increases does that mean do 2 treble groups in one 12chain space plus 1 extra in armhole chain space? I do think another treble is required in armhole space. Instead of 6 do 7 for all sizes. Cheers Chriss
12.08.2019 - 13:20DROPS Design answered:
Dear Chriss, you have to increase evenly on the round, ie you will have to increase as if there wouldn't be any chain spaces for armholes, there should be some increases between these chain spaces as well as in the chain spaces. Happy crocheting!
12.08.2019 - 14:34What happened to the diagrams showing the pictures of each step? that was super helpful and now the link is not working to those pages
07.08.2019 - 15:59DROPS Design answered:
Dear Corinne, for security reasons we had to close down the forum, you will find here how to read diagrams - for any further individual assistance, please feel free to contact the store where you bought the yarn - even per mail or telephone. Happy crocheting!
08.08.2019 - 09:27Hay un video explicativo? Porque luego del patrón a1 no sé cómo seguir. Gracias
02.08.2019 - 22:56DROPS Design answered:
Hola Gisela. No hay un vídeo completo sobre este patrón. Tienes que continuar según la talla. Para las tallas L/XL-XXL/XXXL trabajar con A.2. Para la talla S/M comenzar ya con A.3. Si sigues teniendo problemas, acude a la tienda DROPS más cercana, dónde te podrán dar ayuda más personalizada.
27.10.2019 - 23:07With 22 pages of questions on how to figure out this pattern wouldn't you think it was time to rewrite the pattern so most people with some crochet knowledge could make this wrap? it's a very pretty cardigan but really I'm terrified to even start to make it.
30.07.2019 - 03:29DROPS Design answered:
Dear Mrs Finney, The DROPS patterns are knitted and crocheted by thousands and thousands of people around the world. We understand however that in certain countries, with different knitting/crochet traditions than Scandinavia, our patterns might be written in a way that differs from what some are used to. But of course we want everyone to understand our patterns, so that’s why we have created an extensive library of tutorial videos as well as step by step lessons that explain how to follow the techniques we use and how to read the diagrams in our patterns. Give them a try!
06.08.2019 - 10:51Hello, I'm having a really hard time with this pattern as it's not written very clearly. Would someone be able to help me?
01.07.2019 - 02:58DROPS Design answered:
Dear Amber, you will find here how to read crochet diagrams and you will find a tutorial showing all diagrams step by step. Happy crocheting!
01.07.2019 - 08:07Tiene el tutorial en español?, no entiendo las instrucciones que están escritas. Muchas gracias.
22.06.2019 - 05:08DROPS Design answered:
Hola Veronica. En este link tienes las explicaciones en español: https://www.garnstudio.com/pattern.php?id=7632&cid=23
23.06.2019 - 22:44