
Popular categories
Looking for a yarn?


Comments / Questions (12)
![]() Olivia Gissel Sparrebro wrote:
Olivia Gissel Sparrebro wrote:
Hej Drops! Jeg vil rigtig gerne strikke den her flotte bluse. Men jeg kan ikke se, at i har farverne der skal bruges. Kommer de hjem igen? Har også forsøgt mig på andre hjemmeside, men har svært ved at finde de rigtige farver. Håber i kan hjælpe! Mvh Olivia
02.11.2024 - 20:46DROPS Design answered:
Hei Olivia. Ja, her er det mange av fargene som er utgått fra vårt sortiment. Men ta en titt på farge 02, lys blå (i stedefor 32, turkis), farge 04 syrin (i stedenfor 14, lilla), farge 12 rød (i stedenfor 40 tomat), farge 29 pink panther (i stedenfor 34 pink) og farge 85, sennep eller 30 vanilje ( i stedenfor 51 varm gul). Vil nok bli en litt lysere utgave enn den du ser på bildet, men like fin :) mvh DROPS Design
04.11.2024 - 10:28
![]() Vibeke wrote:
Vibeke wrote:
Hej. Kan man strikke denne model som kjole og hvilken opskrift skal man da følge. Hvor meget garn skal man beregne ekstra til det. Mvh Vibeke
24.02.2024 - 08:25DROPS Design answered:
Hej Vibeka, ja du kan strikke overdelen ifølge den her og så strikke masker op forneden og fortsætte fra livet af DROPS 211-1 som strikkes oppefra og ned :)
01.03.2024 - 14:10
![]() Sylvie wrote:
Sylvie wrote:
Bonjour. Est-ce que l’on peut adapter ce modèle à du XL ? Si oui comment faire ? Merci d’avance pour vos réponses
26.05.2023 - 10:55DROPS Design answered:
Bonjour Sylvie, probablement, retrouvez ici tous les pulls de tension similaire tricotés de bas en haut avec des manches 3/4 et montées, en taille XL. Ils peuvent vous servir de guide pour adapter à la taille souhaitée. Votre magasin saura vous aider, même par mail ou téléphone. Bon tricot!
26.05.2023 - 11:53
![]() Wineke wrote:
Wineke wrote:
Hallo Weet je waar ik deze kleuren nog kan krijgen? Deel lijkt uit het assortiment? Wineke
11.05.2022 - 14:43DROPS Design answered:
Dag Wineke,
Dit is inderdaad een wat ouder patroon waarvan een aantal kleuren uit de handel zijn. Je zou bij een verkooppunt kunnen navragen of ze de kleuren nog hebben. En anders zou je ze kunnen vervangen door andere kleuren. DROPS Muskat heeft een breed kleurenpalet, dus dat gaat vast lukken.
14.05.2022 - 10:02
![]() Tina wrote:
Tina wrote:
Hi, is there a reason why this is not made with circular needles please? I'm planning to use circular needles but do not want any surprises later. Thanks :D I realise now that you still have that yellow, but labelled it light orange. Found a nice hot pink in Cotton Light YaY
01.05.2022 - 16:37DROPS Design answered:
Dear Tina, it might be a designer choice, to also give explanations to people who don't work with circular needle, so that there are different kind of patterns for everyone. Happy knitting!
02.05.2022 - 10:09
![]() Tina wrote:
Tina wrote:
I love the colours of this piece, but the yellow and pink for Muskat seem to be discontinued. Drops Paris have the cerise and yellow that are more similar. Will it be alright if I mix Paris and Muskat for this please? (using the 4mm needle size for Muskat)
25.04.2022 - 11:05DROPS Design answered:
Dear Tina, this pattern is worked with Muskat or any yarn group B, you cannot use Paris which is yarn group C and whose tension would give you other measurements. Please feel free to ask your DROPS store for the best matching colours available in Muskat/yarn B. They will help you even per mail or telephone. Happy knitting!
25.04.2022 - 12:13
![]() Katarina wrote:
Katarina wrote:
Hej! Ska man sticka aviga maskor för att markera även på de aviga varven? Blir väl ingen markering då?
13.07.2021 - 09:21DROPS Design answered:
Hej Katarina. På de aviga varven stickar du de maskorna räta så att det blir en markering på rätsidan. Mvh DROPS Design
13.07.2021 - 11:36
![]() Katarina Nilsson wrote:
Katarina Nilsson wrote:
Jag har stickat fram till diagram M1. Stickas diagrammet i slätstickning eller rätstickning? De maskor som markerar där man sedan ska brodera ska väl stickas aviga varje gång? Tacksam för svar! Hälsningar Katarina
13.07.2021 - 06:51DROPS Design answered:
Hej Katarina. Diagrammet stickas i slätstickning i de färger som uppges i ikonförklaringen. De maskor som markerar där det ska broderas (de som är en svart prick i diagrammet) stickas aviga. Mvh DROPS Design
13.07.2021 - 08:20
![]() Katarina wrote:
Katarina wrote:
Hej! Ska det vara 102 maskor för storlek large eller 104 maskor? Är kantmaskorna inräknade i 102 maskor?
06.07.2021 - 14:11DROPS Design answered:
Hej Katarina. Det ska vara 102 maskor, kantmaskorna är inräknade i dessa 102 maskor. Mvh DROPS Design
08.07.2021 - 08:29
![]() Esther Schirmuli wrote:
Esther Schirmuli wrote:
Ist es möglich, dass sie diesen Pullover nochmal als Kinderpulli (Gr. 122) neu berechnen? Meine Tochter findet ihn ganz toll, aber ich kann ihn leider nicht umrechnen.
02.04.2020 - 20:28DROPS Design answered:
Liebe Frau Schirmuli, leider können wir jeder Anleitung nach jedem individuellen Frage anpassen und einzelne Modelle auf individuellen Wunsch hin umrechnen. Wenn sie Hilfe damit brauchen, wenden Sie sich bitte an Ihrem DROPS Laden, dort hilft man Ihnen gerne weiter. Viel Spaß beim stricken!
03.04.2020 - 07:41
|
||||||||||||||||||||||||||||
That Seventies Spell |
||||||||||||||||||||||||||||
 |
 |
|||||||||||||||||||||||||||
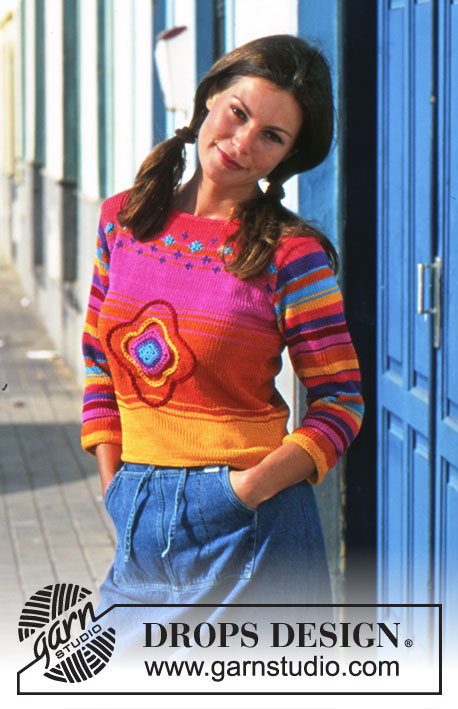
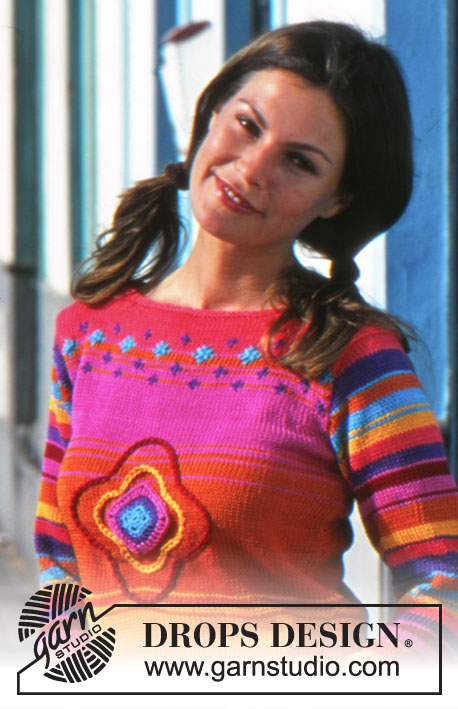
Colourful knitted DROPS jumper in "Muskat" with ¾-length sleeves
DROPS 68-22 |
||||||||||||||||||||||||||||
|
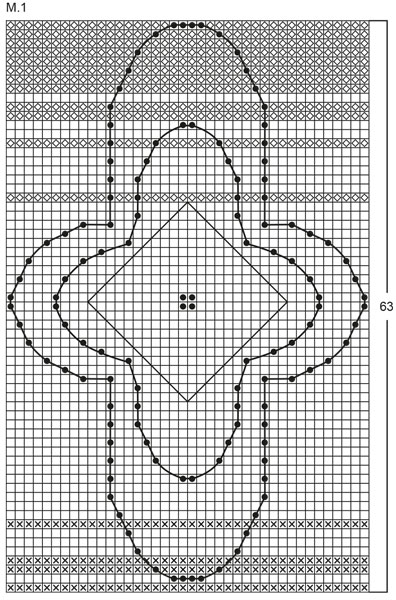
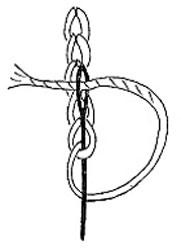
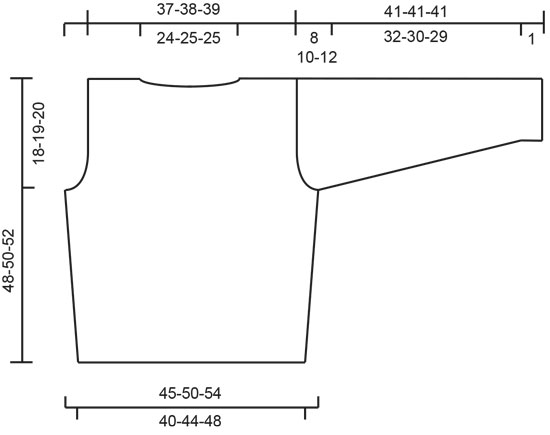
Knitting tension: 21 stitches x 28 rows = 10 x 10 cm with needle size 4 mm and stocking stitch. Remember needle size is only a guide! Ridge/Garter stitch (back and forth on needle): 1 ridge = Knit 2 rows. Pattern: See diagrams - M.1 to M.3. Diagram M.1 also shows the motif which is embroidered and crocheted at the end. To make it easier to see where to work the motif, some stitches are purled as markers. ------------------------------------------------------------- Front piece: Cast on 86-94-102 stitches (incl. 1 edge stitch in each side) with needle size 3.5 mm and light orange. Work 2 ridges. Change to needle size 4 mm and continue with stocking stitch. Remember the knitting tension! When piece measures 6 cm increase in each side: 1 stitch a total of 5-6-7 times every 4-3.5-3 cm = 96-106-116 stitches. At the same time, when piece measures 9-10-11 cm work M.1 - see description above. Read the whole of the next section before continuing! After M.1 the piece measures approx. 32-33-34 cm. Continue working with pink until piece measures 35-37-38 cm, then work M.2. After M.2 finish working with coral. At the same time, when piece measures 30-31-32 cm decrease for armholes in each side every 2nd row: 3 stitches 1-1-1 time, 2 stitches a total of 1-3-5 times, 1 stitch a total of 4-4-4 times = 78-80-82 stitches on needle. When piece measures 43-45-47 cm place the middle 32-34-34 stitches on 1 thread for neck. Continue to decrease in each side of neck every 2nd row: 3 stitches 1-1-1 time, 2 stitches a total of 2-2-2 times and 1 stitch a total of 2-2-2 times = 14-14-15 stitches left on each shoulder. Cast off the remaining stitches when piece measures 48-50-52 cm. Back piece: Cast on and work as for front piece, but there is no motif on the back so there are no purled stitches in M.1 (all stitches are worked in stocking stitch). Decrease for armholes as for front piece and continue working until piece measures 46-48-50 cm. Now cast off the middle 46-48-48 stitches for neck. Then decrease 2 stitches on next row towards neck = 14-14-15 stitches left on each shoulder. Cast off the remaining stitches when piece measures 48-50-52 cm. Sleeve: Cast on 52-56-60 stitches (incl. 1 edge stitch in each side) with needle size 3.5 mm and light orange. Work 2 ridges. Change to needle size 4 mm and continue with stocking stitch and M.3 to finished length. When piece measures 6-6-7 cm increase in each side: 1 stitch a total of 9-9-9 times every 8th-7th-6th row = 70-74-78 stitches. When sleeve measures 33-31-30 cm decrease for sleeve cap in each side every 2nd row: 3 stitches 1-1-1 time, 2 stitches a total of 4-3-3 times, 1 stitch a total of 1-6-8 times, 2 stitches a total of 4-3-3 times, then, if necessary, 3 stitches in each side until piece measures 41-41-41 cm. Cast off the remaining stitches. Crochet square: Work with turquoise and hook size 4 mm: 5 chain stitches and form them to a ring with 1 slip stitch. Round 1: 2 chain stitches, 7 double crochets in ring. Round 2: * 3 chain stitches, 2 double crochets *, repeat from *-* a total of 4 times. Round 3: * 4 double crochets around chain-space, 1 double crochet in middle of the 2 double crochets from previous round *, repeat from *-* a total of 4 times. Round 4: Change to purple: 3 chain stitches, * 1 treble crochet in next double crochet, 2 treble crochets in each of the next 2 double crochets, 1 treble crochet in each of the next 2 double crochets *, repeat from *-* a total of 3 times, 1 treble crochet in next double crochet, 2 treble crochets in the next 2 double crochets, 1 treble crochet in next double crochet, fasten with 1 slip stitch in beginning of round. Round 5: Change to pink: 3 chain stitches, 1 treble crochet in next double crochet, * 2 treble crochets in next double crochet, 3 chain stitches, 2 treble crochets in next double crochet, 1 treble crochet in each of the next 5 double crochets *, repeat from *-* a total of 3 times, 2 treble crochets in next double crochet, 3 chain stitches, 2 treble crochets in next double crochet, 1 treble crochet in each of the next 3 double crochets, fasten with 1 slip stitch in beginning of round. The crochet square measures approx. 7 x 7 cm. Assembly: Motif: Sew the crochet square onto the front piece as shown in diag. M.1 - the 4 purl stitches mark the middle of the square. Embroider - see fig.1: 2 rows around the square, sew over the purl stitches - see M.1. The row nearest the square is embroidered with 2 strands light orange and the next row with 2 strands bordeaux. Each stitch should be approx. 1 cm long. (You can also crochet the rows if you wish by keeping the yarn at the back of the piece and pulling it through with crochet hook for each stitch). Embroidery: Embroider with 2 strands turquoise one cross stitch over each of the small turquoise squares in M.2, place a small horizontal stitch in the middle of the cross sting to finish - see fig.2 Sewing together: Sew the right shoulder seam. Knit up approx. 115 to 125 stitches around neck (incl. stitches on thread) with needle size 3.5 mm and coral. Work 2 ridges, cast off. Sew left shoulder seam and up along neck edge. Sew in sleeves. Sew sleeve and side seams in one go inside the 1 edge stitch. |
||||||||||||||||||||||||||||
Diagram explanations |
||||||||||||||||||||||||||||
|
||||||||||||||||||||||||||||
|
||||||||||||||||||||||||||||

|
||||||||||||||||||||||||||||
|
||||||||||||||||||||||||||||
|
||||||||||||||||||||||||||||
|
||||||||||||||||||||||||||||
Have you finished this pattern?Tag your pictures with #dropspattern or submit them to the #dropsfan gallery. Do you need help with this pattern?You'll find 23 tutorial videos, a Comments/Questions area and more by visiting the pattern on garnstudio.com. © 1982-2025 DROPS Design A/S. We reserve all rights. This document, including all its sub-sections, has copyrights. Read more about what you can do with our patterns at the bottom of each pattern on our site. |
||||||||||||||||||||||||||||


With over 40 years in knitting and crochet design, DROPS Design offers one of the most extensive collections of free patterns on the internet - translated to 17 languages. As of today we count 314 catalogues and 11822 patterns translated into English (UK/cm).
We work hard to bring you the best knitting and crochet have to offer, inspiration and advice as well as great quality yarns at incredible prices! Would you like to use our patterns for other than personal use? You can read what you are allowed to do in the Copyright text at the bottom of all our patterns. Happy crafting!
Post a comment to pattern DROPS 68-22
We would love to hear what you have to say about this pattern!
If you want to leave a question, please make sure you select the correct category in the form below, to speed up the answering process. Required fields are marked *.