
Popular categories
Looking for a yarn?


|
|
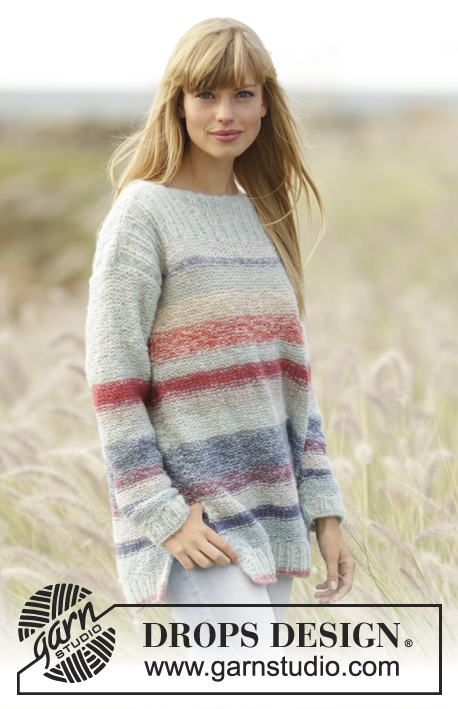
Weekend Getaway |
|
|
|
|
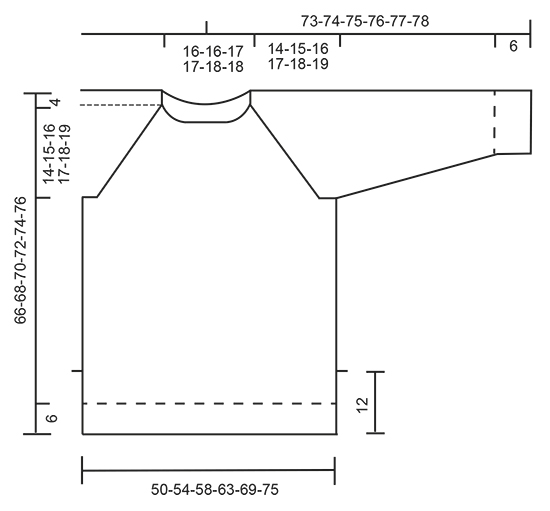
Knitted DROPS jumper with raglan, vent in the sides and stripes, worked top down in ”Brushed Alpaca Silk”. Size S-XXXL.
DROPS 169-7 |
|
|
GARTER ST (worked in the round): 1 ridge = 2 rounds. * K 1 round and P 1 round *, repeat from *-*. GARTER ST (back and forth): K all rows. 1 ridge = 2 rows K. STRIPES: Work stripes as follows on body and sleeves: Work 9-9-10-10-11-11 cm with off white. Work 9-9-10-10-11-11 cm with light sea green. Then work with off white until finished measurements. RAGLAN BODY: NOTE: K all YOs on next round to make holes. Inc 2 sts as follows: Before 1st and 3rd marker: Work until 3 sts remain before marker, K 2 in next st, 1 YO, K 2. After 2nd and 4th marker: K 2, 1 YO, K 2 in next st. Then inc 1 st as follows: Before 1st and 3rd marker: Work until 2 sts remain before marker, 1 YO, K 2. After 2nd and 4th marker: K 2, 1 YO. RAGLAN SLEEVE: Inc 1 st after 1st and 3rd marker as follows: K 2, 1 YO. Inc 1 st before 2nd and 4th marker as follows: Work until 2 sts remain before marker, 1 YO, K 2. On next round K the YO to make hole. DECREASE TIP: Dec as follows before marker: Work until 3 sts remain before marker, K 2 tog, K 1. Dec as follows after marker: K 1, slip 1 st as if to K, K 1, psso ---------------------------------------------------------- JUMPER: Worked in stocking st in the round, from the top and down to vent on body. Then divide the piece in front and back piece and continue back and forth until finished measurements. NOTE: Beg round = mid back. YOKE: Cast on 80-80-85-85-90-90 sts on circular needle size 4.5 mm with light sea green. K 1 round. Then work 4 rounds rib (= K 2/P 3). Switch to circular needle size 5 mm and work 1 round in stocking st while inc 18-20-21-25-24-30 sts evenly = 98-100-106-110-114-120 sts. Now insert 4 markers in the piece as follows: Work the first 15-16-16-16-17-18 sts (= half back piece), insert 1st marker, work the next 18-18-20-22-22-24 sts (= sleeve), insert 2nd marker, work the next 31-32-33-33-35-36 sts (= front piece), insert 3rd marker, work the next 18-18-20-22-22-24 sts (= sleeve), insert 4th marker, work the remaining 16-16-17-17-18-18 sts (= half back piece). On next round beg inc for raglan. NOTE: Inc differently on sleeves and body - READ RAGLAN BODY and RAGLAN SLEEVE. Inc as follows: Work until 3 sts remain before 1st marker, K 2 in next st, 1 YO, K 4 (marker is in the middle of these sts), 1 YO, work until 2 sts remain before 2nd marker, 1 YO, K 4 (marker is in the middle of these sts), 1 YO, K 2 in next st, work until 3 sts remain before 3rd marker, K 2 in next st, 1 YO, K 4 (marker is in the middle of these sts), 1 YO, work until 2 sts before 4th marker, 1 YO, K 4 (marker is in the middle of these sts), 1 YO, K 2 in next st, work the remaining sts on round. REMEMBER THE KNITTING TENSION Repeat inc on every other round as follows: On sleeves 14-15-16-17-19-20 more times (= 15-16-17-18-20-21 times in total), on body with 2 sts 7-9-11-14-16-20 more times (= 8-10-12-15-17-21 times in total) and then on body with 1 st 7-6-5-3-3-0 times. When all inc are done, there are 250-268-290-314-342-372 sts on round and piece measures 14-15-16-17-18-19 cm from the neck mid front and down. Now work as follows: Work the first 38-42-45-49-54-60 sts (= half back piece) slip the next 48-50-54-58-62-66 sts on a stitch holder (= sleeve), cast on 8 sts under sleeve, work the next 77-84-91-99-109-120 sts (= front piece), slip the next 48-50-54-58-62-66 sts on a stitch holder (= sleeve), cast on 8 sts under sleeve, work the remaining 39-42-46-50-55-60 sts on needle (= half back piece). NOW MEASURE THE PIECE FROM HERE. BODY: There are now 170-184-198-214-234-256 sts on round. Continue in the round in stocking st and STRIPES - see explanation above. When piece measures 35-36-37-38-39-40 cm, work as follows: Work 39-43-46-50-55-61 sts in stocking st, work 6 sts in GARTER ST - see explanation above, work 79-86-93-101-111-122 sts in stocking st, work 6 sts in garter st, work stocking st over the remaining 40-43-47-51-56-61 sts. Continue like this until 2 ridges have been work over the 6 sts in each side (= over vents). Now divide the piece into front and back piece as follows: Work the first 42-46-49-53-58-64 sts as before (i.e. stocking st with 3 sts in garter st in the side), turn and work back over 85-92-99-107-117-128 sts (work the first and last 3 sts in garter st) = back piece. Slip the remaining 85-92-99-107-117-128 sts on a stitch holder for front piece. Continue back and forth over sts on needle until piece measures 42-43-44-48-46-47 cm. On next row from RS switch to circular needle size 4.5 mm and inc 13-16-19-21-21-25 sts evenly (but not over the 3 outermost sts) = 98-108-118-128-138-153 sts. Work 1 row from WS as before, then work rib (K 2/P 3) with 3 sts in garter st in each side. NOTE: Beg and end with K 2 inside the 3 sts in garter st in each side. When rib measures 6 cm, cast off with K over K and P over P. Piece measures 66-68-70-72-74-76 cm in total from shoulder. Slip sts from stitch holder back on needle and work as back piece. SLEEVE: Work sleeve in stocking st in the round on double pointed needles. There are 48-50-54-58-62-66 sts for each sleeve. Slip sts from stitch holder back on double pointed needles size 5 mm and cast on 8 new sts under sleeve = 56-58-62-66-70-74 sts. Work in stocking st and stripes as on body in the round, AT THE SAME TIME insert a marker in the middle of the new sts under sleeve (i.e. 4 new sts on each side of marker). NOW MEASURE THE PIECE FROM HERE. When piece measures 4 cm, dec 1 st on each side of marker - READ DECREASE TIP. Repeat dec approx. every 4-4-3-3-2½-2½ cm 10-10-12-13-14-15 more times = 34-36-36-38-40-42 sts. When sleeve measures 45-45-45-45-44-44 cm (NOTE: Shorter measurements in the larger sizes because of longer yoke), switch to double pointed needles size 4.5 mm and inc 6-4-9-7-5-8 sts evenly on next round = 40-40-45-45-45-50 sts. Work rib = K 2/P 3 for 6 cm. When sleeve measures 51-51-51-51-50-50 cm, cast off with K over K and P over P. Work the other sleeve the same way. ASSEMBLY: Sew the openings under the sleeves. |
|
|
|
|
Have you made this or any other of our designs? Tag your pictures in social media with #dropsdesign so we can see them! Do you need help with this pattern?You'll find tutorial videos, a Comments/Questions area and more by visiting the pattern on garnstudio.com. © 1982-2024 DROPS Design A/S. We reserve all rights. This document, including all its sub-sections, has copyrights. Read more about what you can do with our patterns at the bottom of each pattern on our site. |


With over 40 years in knitting and crochet design, DROPS Design offers one of the most extensive collections of free patterns on the internet - translated to 17 languages. As of today we count 304 catalogues and 11422 patterns - 11422 of which are translated into English (UK/cm).
We work hard to bring you the best knitting and crochet have to offer, inspiration and advice as well as great quality yarns at incredible prices! Would you like to use our patterns for other than personal use? You can read what you are allowed to do in the Copyright text at the bottom of all our patterns. Happy crafting!
Comments / Questions (46)
Hej! Jag skulle precis börja sticka det här mönstret med fick inte de första maskorna över mitt huvud ens. När jag tittar på bilden där måtten på tröjan står så tolkar jag att det är som minst 40 cm och som mest 44 cm i omkrets vid starten/oket. Så litet huvud har jag inte. Antal maskor i mönstret passar bra till bilden, men tyvärr inte till ett mänskligt huvud.
03.01.2017 - 13:50DROPS Design answered:
Hej Evalena. Tror du ikke du har strikket lidt stramt. Du har 80 m i mindste str. Med 5 mm og den rette strikkefasthed bliver det ca. 47 cm i glat. Du strikker med 4,5 mm og i rib, (som er elastisk), saa det burde blive en 43-44 cm tror jeg. Du kan evt saette op paa en pind 5 og saa strikke med 4,5- saa er din opsaetpind lösere og mere elastisk.
08.03.2017 - 14:15Hvilken størrelse har modellen på seg?
09.09.2016 - 17:42DROPS Design answered:
Hej Iselin. Det er den mindste str.
12.09.2016 - 11:16J'ai choisi un patron Drops Design "Weekend Getaway" 169-7 Je voudrais savoir comment trouver les mesures pour ma taille. Merci.
14.06.2016 - 20:58DROPS Design answered:
Bonjour France, vous trouverez en bas de page un schéma avec toutes les mesures pour chaque taille, comparez ces mesures à celle d'un pull analogue que vous avez et dont vous aimez la forme pour trouver la taille idéale - Plus d'infos ici. Bon tricot!
15.06.2016 - 08:45Why reglan instructions are different? Example... Before 1st and 3rd marker: Work until 3 sts remain before marker, K 2 in next st, 1 YO, K 2. In text it says: Work until 3 sts remain before 1st marker, K 2 in next st, 1 YO, K 4 (marker is in the middle of these sts), 1 Y Which one should i do k2 or k4 after yo?
03.06.2016 - 21:45DROPS Design answered:
Dear Selam, the inc explained in pattern is the first inc round that has to be worked, you inc then differently on sleeve and on body - see "Raglan body" and "Raglan sleeve" at the beg of the pattern. Happy knitting!
06.06.2016 - 08:48Jeg får ikke lengde til å gå opp... Jeg stikker lengste lenge. Jeg får ikke strikk til 47 cm, bytt til pinne nr 4,5 og 6 cm vrbord til å bli 76 cm....Hva er det jeg misforstår?
29.05.2016 - 21:58DROPS Design answered:
Hej. Se den sista meningen under "BÆREST", där står det: "ARB MÅLES VIDERE HERFRA!". Det är alltså 47 cm därifrån vi menar. Sedan menar vi 76 cm totalt fra skulderen efter de 6 cm vrbord. Lycka till!
30.05.2016 - 09:29Hei...Hadde tenkt og strikke denne genseren. Men ser på kommentar fra Norge at det er noe som ikke stemmer med maskeantallet. Er det riktig? Eller er det bare å sette i gang? Mvh Grete Dalstein
06.05.2016 - 11:49DROPS Design answered:
Hej Grethe, maskeantallet stemmer, rigtig god fornøjelse!
06.05.2016 - 12:04Magali Rigaudias wrote:
Merci!
06.04.2016 - 15:13Bonjour, Je continue ce pull. J'ai maintenant fait dos & devant. Comme je l'ai deja indique, je travaille sur des aiguilles normales et en partant du bas.Pour les manches, j'essaye de convertir les explications mais je les trouve assez compliquees. Auriez vous un patron similaire que je pourrais suivre afin de faire terminer cet ouvrage ? Meme si je dois convertir les dimensions/nombres de mailles cela serait plus facile. Merci d'avance. Magali
05.04.2016 - 02:40DROPS Design answered:
Bonjour Mme Rigaudias, retrouvez ici tous les modèles de pull avec la même tension (17 m à partir de la fin de la 1ère page) qui pourront vous aider à recalculer les manches. Bon tricot!
05.04.2016 - 09:33Jeg får absolutt ikke denne oppskriften til å stemme. Det er noe galt med maskeantallet. Fint h is det blir korrigert
03.04.2016 - 16:38Bonjour, Pourriez-vous me dire combien de mailles et centimetres il y a juste en dessous des manches avant de commencer l'empiècement ? Je fais ce modèle en partant du bas et sur des aiguilles non circulaires. Il semble que ce soit environ 4 cms ... Merci de votre aide
25.03.2016 - 13:30DROPS Design answered:
Bonjour Mme Rigaudias, de haut en bas, on monte 8 m sous chacune des manches lorsque l'on met les mailles des manches en attente. Bon tricot!
25.03.2016 - 14:07