DROPS Belle
DROPS Belle
53% Cotton, 33% Viscose, 14% Linen
from 2.00 £ /50g
Get the yarn to make this pattern from 16.00£.

The yarn cost is calculated from the pattern’s smallest size and the yarn’s cheapest product type. Looking for an even better price? You might find it on the DROPS Deals!

DROPS SS24

Freja

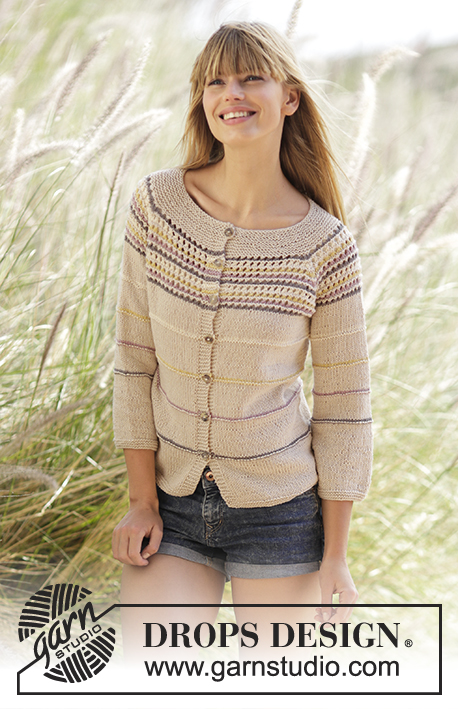
Knitted DROPS jumper with stripes, lace edge, ¾ sleeves and raglan in “Belle”. Size: S - XXXL.

DROPS 169-30
DROPS design: Pattern no vs-023
Yarn group B
----------------------------------------------------------
Size: S - M - L - XL - XXL - XXXL
Materials:
DROPS BELLE from Garnstudio
350-400-400-450-500-550 g colour no 03, light beige
50 g in each of the following colours:
Colour no 02, off white
Colour no 04, dandelion
Colour no 07, zinc
Colour no 16, mauve

DROPS DOUBLE POINTED NEEDLES AND CIRCULAR NEEDLE (60 or 80 cm) SIZE 4 mm - or size needed to get 21 sts x 28 rows in stocking st = 10 x 10 cm.
DROPS DOUBLE POINTED NEEDLES and CIRCULAR NEEDLE (60 cm) SIZE 3 mm - for edges in garter st.

-------------------------------------------------------

Alternative Yarn – See how to change yarns here
Yarn Groups A to F – Use the same pattern and change the yarn here
Yarn usage using an alternative yarn – Use our yarn converter here

-------------------------------------------------------

DROPS Belle
DROPS Belle
53% Cotton, 33% Viscose, 14% Linen
from 2.00 £ /50g
Get the yarn to make this pattern from 16.00£.

The yarn cost is calculated from the pattern’s smallest size and the yarn’s cheapest product type. Looking for an even better price? You might find it on the DROPS Deals!

Pattern instructions

NOTE: This pattern is written in British English. All measurements in charts are in cm. For conversion from cm to inches - click here. There are different terms for crocheting in British and American English. If this pattern includes crochet, click for "crochet terms" here. For this pattern in American English, please click here.
GARTER ST (worked in the round):
1 ridge = 2 rounds. * K 1 round and P 1 round *, repeat from *-*.

STRIPES BODY:
P 1 round zinc, K 1 round zinc, 6-6-6-6½-6½-6½ cm in stocking st with light beige, P 1 round with mauve, K 1 round with mauve, 6-6-6-6½-6½-6½ cm in stocking st with light beige, P 1 round with dandelion, K 1 round with dandelion, 6-6-6-6½-6½-6½ cm in stocking st with light beige, P 1 round with off white, K 1 round with off white.

STRIPES SLEEVE:
P 1 round zinc, K 1 round zinc, 4 cm in stocking st with light beige, P 1 round with mauve, K 1 round with mauve, 4 cm in stocking st with light beige, P 1 round with dandelion, K 1 round with dandelion, 4 cm in stocking st with light beige, P 1 round with off white, K 1 round with off white.

PATTERN:
See diagram A.1.

INCREASE TIP (applies to sides on body and mid under sleeve):
Inc on each side of marker as follows: Work until 2 sts remain before marker: Make 1 YO, work 4 sts in stocking st (marker is in the middle of these sts), make 1 YO. On next round K YOs twisted to avoid holes (= 2 sts inc).

RAGLAN:
Dec for raglan in every transition between sleeves and body.
Dec as follows after marker: Slip 1 st as if to K, K 1, psso.
Dec as follows before marker: K 2 tog.

DECREASE TIP (applies to neck edge):
To calculate how often dec should be done, use the total no of sts on row (e.g. 126 sts) and divide by no of dec to be done (e.g. 18) = 7. I.e. in this example K approx. every 6th and 7th st tog.
----------------------------------------------------------

BODY:
Worked in the round on circular needle.
Cast on 160-176-192-216-240-264 sts on circular needle size 3 mm with light beige. Work 3 ridges in GARTER ST - see explanation above. Switch to circular needle size 4 mm and work in stocking st. When piece measures 8 cm, insert 1 marker at beg of round and 1 marker after 80-88-96-108-120-132 sts. Inc 1 st on each side of both markers – READ INCREASE TIP (= 4 sts inc). Repeat inc every 8-8-8-9-9-9 cm a total of 4 times = 176-192-208-232-256-280 sts. AT THE SAME TIME when piece measures 10-11-12-10-11-12 cm, work STRIPES BODY - see explanation above. REMEMBER THE KNITTING TENSION When stripes are done, continue with light beige and in stocking st. When piece measures 36-37-38-39-40-41 cm, work next round as follows: Cast off 3-3-4-4-5-5 sts for armhole, work 82-90-96-108-118-130 sts (= back piece), cast off 6-6-8-8-10-10 sts for armhole, work 82-90-96-108-118-130 sts (= front piece) and cast off the last 3-3-4-4-5-5 sts for armhole. Cut the yarn and pull it through last st. Put piece aside and knit the sleeves.

SLEEVE:
Worked in the round on double pointed needles.
Cast on 54-56-58-60-62-64 sts on circular needle size 3 mm with light beige. Work 3 ridges in GARTER ST - see explanation above. Switch to double pointed needles size 4 mm and work in stocking st. When piece measures 5 cm, inc 2 sts mid under sleeve - READ INCREASE TIP. Repeat inc every 6-5-4-3½-3-2½ cm a total of 5-6-7-8-8-9 times = 64-68-72-76-78-82 sts. AT THE SAME TIME when piece measures 13-12-11-10-9-8 cm, work STRIPES SLEEVE - see explanation above. When stripes are done, continue with light beige and in stocking st. When piece measures 33-32-31-31-30-29 cm (shorter measurements in the larger sizes because of longer yoke), work next round as follows: Cast off 3-3-4-4-5-5 sts, work the next 58-62-64-68-68-72 sts and cast off the remaining 3-3-4-4-5-5 sts. Cut the yarn and pull it through last st. Knit another sleeve.

YOKE:
Slip sleeves on to same circular needle size 4 mm as body where armholes were cast off = 280-304-320-352-372-404 sts. Insert 1 marker in every transition between sleeves and body = 4 markers. Work pattern in the round according to diagram A.1 - NOTE: Repeat A.1 upwards. AT THE SAME TIME on first round dec for RAGLAN in every transition between body and sleeves – see explanation above. Repeat dec on every other round 18-20-21-22-23-24 times in total = 136-144-152-176-188-212 sts remain on needle. Cut the yarn.

ELEVATION IN BACK OF NECK:
Switch to circular needle size 3 mm, beg mid back and K 1 round while dec 10 sts evenly = 126-134-142-166-178-202 sts. Then work in garter st back and forth as follows (1st row = RS): K 8-9-10-11-12-13 sts, turn, tighten yarn and K 16-18-20-22-24-26 sts back. Turn, tighten yarn and K 24-27-30-33-36-39 sts, turn, tighten yarn and K 32-36-40-44-48-52 sts back. Turn, tighten yarn and K 40-45-50-55-60-65 sts, turn, tighten yarn and K 48-54-60-66-72-78 sts back. Turn piece, tighten yarn and K until mid back. Insert 1 marker, NOW MEASURE FROM HERE!

NECK EDGE:
Continue in garter st in the round. When piece measures 2 cm from marker - adjust so that next round is a round worked K - dec 18-18-17-16-16-16 sts evenly - READ DECREASE TIP = 108-116-125-150-162-186 sts. When edge in garter st measures 4 cm in all sizes, dec 24-24-23-23-23-23 sts evenly = 84-92-102-127-139-163 sts. Repeat dec one more time in size XL + XXL + XXXL when edge in garter st measures 5 cm but now dec 23-25-39 sts evenly. After all dec are done, 84-92-102-104-114-124 sts remain on needle. Loosely cast off when edge in garter st measures 5-5-5-6-6-6 cm, jumper measures approx. 54-56-58-60-62-64 cm from shoulder and down.

ASSEMBLY:
Sew the openings under the sleeves.

Diagram

symbols = K with zinc
symbols = K with mauve
symbols = K with dandelion
symbols = K with off white
symbols = P with light beige
symbols = K 2 tog, 1 YO with light beige
diagram

Each of our patterns has specific tutorial videos to help you.

Do you have a question? See a list of frequently asked questions (FAQ)

Knitting tension is what determines the final measurements of your work, and is usually measured per 10 x 10 cm. It is provided like so: number of stitches in width x number of rows in height - eg: 19 stitches x 26 rows = 10 x 10 cm.

The knitting tension is very individual; some people knit/crochet loosely while others work tightly. You adjust the knitting tension with the needle size, which is why the suggested needle size is only meant as a guide! You need to adjust this (up or down) to ensure that YOUR knitting tension matches the knitting tension provided in the pattern. If you work with a different knitting tension than provided you will have a different yarn consumption, and your work will have different measurements than what the pattern suggests.

The knitting tension also determines which yarns can replace each other. As long as you achieve the same knitting tension you can replace one yarn with another.

See DROPS lesson: How to measure your tension/gauge

See DROPS video: How to make a gauge tension swatch

The required amount of yarn is provided in grams, eg: 450 g. To calculate how many balls you’ll need you first need to know how many grams are in 1 ball (25g, 50g or 100g). This information is available if you click on the individual yarn quality on our pages. Divide the amount required with the amount of each ball. For example, if each ball is 50g (the most common amount), the calculation will be as follows: 450 / 50 = 9 balls.

The important thing when changing from one yarn to another is that the knitting/crochet tension remains the same. This is so that the measurements of the finished piece will be the same as on the sketch provided. It is easier to achieve the same knitting tension using yarns from the same yarn group. It is also possible to work with multiple strands of a thinner yarn to achieve the knitting tension of a thicker one. Please try our yarn converter. We recommend you to always work a test swatch.

Please NOTE: when changing yarn the garment might have a different look and feel to the garment in the photo, due to individual properties and qualities of each yarn.

See DROPS lesson: Can I use a different yarn than the one mentioned in the pattern?

All our yarns are categorised into yarn groups (from A to F) according to thickness and knitting tension – group A contains the thinnest yarns and group F the thickest. This makes it easier for you to find alternative yarns to our patterns, should you wish to switch yarn. All yarns within the same group have a similar knitting tension and can easily replace each other. However, different yarn qualities have different structures and properties which will give the finished work a unique look and feel.

Click here for an overview of the yarns in each yarn group

At the top of all our patterns you’ll find a link to our yarn calculator, which is a helpful tool should you wish to use a different yarn than suggested. By filling in the yarn quality you wish to replace, the amount (in your size) and number of strands, the calculator will present good alternative yarns with the same knitting tension. Additionally it will tell you how much you’ll require in the new qualities and whether you’ll need to work with multiple strands. Most skeins are 50g (some are 25g or 100g).

If the pattern is worked with multiple colours, every colour will have to be calculated separately. Similarly, if the pattern is worked with several strands of different yarns (for example 1 strand Alpaca and 1 strand Kid-Silk) you will have to find alternatives for each, individually.

Click here to see our yarn calculator

Since different yarns have different qualities and textures we have chosen to keep the original yarn in our patterns. However, you can easily find options among our available qualities by using our yarn calculator, or simply pick a yarn from the same yarn group.

It is possible that some retailers still have discontinued yarns in stock, or that someone has a few skeins at home that they would like to find patterns for.

The yarn calculator will provide both alternative yarn as well as required amount in the new quality.

If you think it's hard to decide what size to make, it can be a good idea to measure a garment you own already and like the size of. Then you can pick the size by comparing those measures with the ones available in the pattern's size chart.

You'll find the size chart at the bottom of the pattern.

See DROPS lesson: How to read size chart

The needle size provided in the pattern serves only as a guide, the important thing is to follow the knitting tension. And since knitting tension is very individual, you will have to adjust the needle size to ensure that YOUR tension is the same as in the pattern – maybe you’ll have to adjust 1, or even 2 needle sizes, up or down to achieve the correct tension. For this, we recommend that you work test swatches.

Should you work with a different knitting tension than the one provided, the measurements of the finished garment might deviate from the measurement sketch.

See DROPS lesson: How to measure your tension/gauge

See DROPS video: How to make a tension/gauge swatch

Working a garment top-down provides more flexibility and room for personal adjustment. For example it is easier to try the garment on while working, as well as making adjustments to length of yoke and shoulder caps.

The instructions are carefully explaining every step, in the correct order. Diagrams are adjusted to the knitting direction and are worked as usual.

The diagram depicts all rows/rounds, and every stitch seen from the right side. It is read from bottom to top, from right to left. 1 square = 1 stitch.

When working back and forth, every other row is worked from the right side and every other row is worked from the wrong side. When working from the wrong side, the diagram will have to be worked reversed: from left to right, knit stitches are purled, purl stitches are knit etc.

When working in the round every round is worked from the right side and the diagram are worked from right to left on all rounds.

See DROPS lesson: How to read knitting diagrams

The diagram depicts all rows/rounds, and every stitch seen from the right side. It is worked from bottom to top, from right to left.

When working back and forth every other row is worked from the right side: from right to left and every other row is worked from the wrong side: from left to right.

When working in the round, every row in the diagram are worked from the right side, from right to left.

When working a circular diagram you start in the middle and work your way outwards, counter clockwise, row by row.

The rows usually start with a given number of chain stitches (equivalent to the height of the following stitch), this will either be depicted in the diagram or explained in the pattern.

See DROPS lesson: How to read crochet diagrams

Instructions for working several diagrams after each other on the same row/round, will often be written like so: “work A.1, A.2, A.3 a total of 0-0-2-3-4 times". This means you work A.1 once, then A.2 is worked once, and A.3 is repeated (in width) the number of times provided for your size – in this case like so: S = 0 times, M = 0 times, L=2 times, XL= 3 times and XXL = 4 times.

The diagrams are worked as usual: begin with the first row in A.1, then work the first row in A.2 etc.

See DROPS lesson: How to read knitting diagrams

See DROPS lesson: How to read crochet diagrams

The total width of the garment (from wrist-to-wrist) will be larger in the larger sizes, despite the actual sleeves being shorter. The larger sizes have longer sleeve caps and wider shoulders, so there will be a good fit in all sizes.

The measurement sketch/schematic drawing provides information regarding the full length of the garment. If it’s a jumper or a jacket the length is measured from the highest point on the shoulder closest to the neckline, and straight down to the bottom of the garment. It is NOT measured from the tip of shoulder. Similarly, the length of yoke is measured from the highest point on the shoulder and down to where yoke is split into body and sleeves.

On a jacket measures are never taken along bands, unless specifically stated. Always measure inside band stitches when measuring the length.

See DROPS lesson: How to read a schematic drawing

Diagrams are often repeated on the round or in height. 1 repeat is the diagram the way it appears in the pattern. If it says to work 5 repeats of A.1 in the round, then you work A.1 a total of 5 times after/next to each other in the round. If it says to work 2 repeats of A.1 vertically/in height you work the entire diagram once, then begin again at the start and work the entire diagram one more time.

Chain stitches are slightly narrower than other stitches and to avoid working the cast-on edge too tight, we simply chain more stitches to begin with. The stitch count will be adjusted on the following row to fit the pattern and measurement sketch.

The rib edge is more elastic and will contract slightly compared to, for example, stocking stitch. By increasing before the rib edge, you avoid a visible difference in width between the rib edge and the rest of the body.

It’s very easy to cast off too tightly, and by making yarn overs while casting off (and simultaneously casting these off) you avoid a too tight cast off edge.

See DROPS video: How to bind off with yarn overs (yo)

To achieve an even increase (or decrease) you can increase on, for example: every 3rd and 4th row alternately, like so: work 2 rows and increase on the 3rd row, work 3 rows and increase on the 4th. Repeat this until the increase is complete.

See DROPS lesson: Increase or decrease 1 st on every 3rd and 4th row alternately

Should you prefer to work in the round instead of back and forth, you may of course adjust the pattern. You’ll need to add steeks mid-front (usually 5 stitches), and follow the instructions. When you would normally turn and work from the wrong side, simply work across the steek and continue in the round. At the end you’ll cut the piece open, pick up stitches to work bands, and cover the cut edges.

See DROPS video: How to knit steeks and cut open

Should you prefer to work back and forth instead of in the round, you may of course adjust the pattern so you work the pieces separately and then assemble them at the end. Divide the stitches for the body in 2, add 1 edge stitch in each side (for sewing) and work the front and back pieces separately.

See DROPS lesson: Can I adapt a pattern for circular needles into straight needles?

Pattern repeats can vary slightly in the different sizes, in order to get the correct proportions. If you’re not working the exact same size as the garment in the photo, yours might deviate slightly. This has been carefully developed and adjusted so that the complete impression of the garment is the same in all sizes.

Make sure to follow instructions and diagrams for your size!

If you have found a pattern you like which is available in women’s size it’s not very difficult to convert it to men’s size. The biggest difference will be the length of sleeves and body. Start working on the women size that you think would fit across the chest. The additional length will be worked right before you cast off for the armhole/sleeve cap. If the pattern is worked top-down you can add the length right after the armhole or before the first decrease on sleeve.

Regarding additional yarn amount, this will depend on how much length you add, but it is better with a skein too many than too few.

All yarns will have excess fibres (from production) that might come off as lint or shedding. Brushed yarns (ie hairier yarns) have more of these loose, excess fibres, causing more shedding.

Shedding also depends on what is worn under or over the garment, and whether this pulls at the yarn fibres. It’s therefore not possible to guarantee that there will be no shedding

Below are some tips on how to get the best result when working with hairier yarns:

1. When the garment is finished (before you wash it) shake it vigorously so the looser hairs come off. NOTE: do NOT use a lint roller, brush or any method that pulls at the yarn.

2. Place the garment in a plastic bag and put it in your freezer - the temperature will cause the fibres to become less attached to each other, and excess fibres will come off easier.

3. Leave in the freezer for a few hours before taking it out and shaking it again.

4. Wash the garment according to the instructions on the yarn label.

Pilling is a natural process that happens to even the most exclusive of fibers. It's a natural sign of wear and tear that is hard to avoid, and that is most visible in high friction areas of your garment like a sweater's arms and cuffs.

You can make your garment look as new by removing the pilling, using a fabric comb or a pill/lint remover.

Still can't find the answer you need? Then scroll down and leave your question so one of our experts can try to help you. This will be done normally within 5 to 10 working days.
In the meantime, you can read the questions and answers that others have left to this pattern or join the DROPS Workshop on Facebook to get help from fellow knitters/crocheters!

You might also like...

Freja

Joe5, France

Freja by DROPS Design

Niebo, Germany

Freja by DROPS Design

Svetlana Cox, United States

Post a comment to pattern DROPS 169-30

We would love to hear what you have to say about this pattern!

If you want to leave a question, please make sure you select the correct category in the form below, to speed up the answering process. Required fields are marked *.

Comments / Questions (19)

country flag Petig wrote:

"Maska av för ärmhål..." inte bra, blir klumpigt! Jfr 166-3

11.08.2017 - 10:31

country flag Rian wrote:

Ik brei de pas, herhaal A1. Maar dan heb ik nog niet 22 keer geminderd voor de raglan (nl nog maar 16 keer geminderd) Hoe brei ik verder? Nog een keer A1 herhalen?

07.06.2017 - 21:00

DROPS Design answered:

Hoi Rian, Er staat bij de pas 'LET OP: herhaal A.1 in de hoogte.' Je moet A.1 dus 2 keer breien in totaal. Dit is ook te zien in de afbeelding. Waarschijnlijk kom je dan wel op het aantal minderingen. Veel breiplezier!

09.06.2017 - 08:43

country flag Emilie wrote:

Bonjour, je voudrais savoir si il n'y a pas un problème avec les rangs raccourcis, car quand je réalise cette partie, l'ensemble des rangs ne paraît pas symétrique ?

15.11.2016 - 19:00

DROPS Design answered:

Bonjour Émilie, les rangs raccourcis de la ré-hausse encolure dos vont être symétriques: en commençant au milieu dos, tricotez 8-13 m tournez et tricotez 16-26 m (soit les 8-13 premières m et les 8-13 m suivantes), tournez et tricotez 24-39 m (= les 16-26 m précédentes + 8-13 m), tournez et tricotez 32-52 m (= les 24-39 m précédentes + 8-13 m) etc.. Bon tricot!

16.11.2016 - 09:07

country flag Kathryn Briggs wrote:

Yolk question when sleeves are slipped onto body of sweater you have 304 stitches with 4 markers between sleeves and body. Decreases are done every alternate round twenty times. 4×20=80sts. 304-80=224 pattern says you have 144 sys left?

19.10.2016 - 22:02

DROPS Design answered:

Dear Mrs Briggs, dec for raglan are done on each side of the marker (= before marker + after marker), ie you will dec 8 sts 20 times in total = 160 sts dec. 304-160=144 sts. Happy knitting!

20.10.2016 - 12:03

country flag Slávka wrote:

Zajímavé, povedené

18.01.2016 - 19:10

country flag Vera Tagseth wrote:

Nydelig genser. Gleder meg til mønsteret kommer!

11.01.2016 - 14:02

country flag Anita wrote:

Sehr schön mit der Rundpasse , gute Farbkombination, gefällt mir .

01.01.2016 - 13:45

country flag Sabine wrote:

Sehr hübscher Pulli. Würde ich gern machen. Belle ist auch ein tolles, weiches Garn! Das Modell ist nicht so typisch wie sonst immer bei Drops, gefällt mir sehr gut!

14.12.2015 - 11:34

country flag Catharina Duden wrote:

Sehr schön und tragbar dieses Modell

10.12.2015 - 15:00