DROPS Delight
DROPS Delight
75% Wool, 25% Polyamide
Discontinued
find alternatives
DROPS Super Sale
DROPS 163-11
DROPS design: Pattern no de-143
Yarn group A
----------------------------------------------------------
Measurements: approx. 88 x 145 cm
Materials:
DROPS DELIGHT from Garnstudio
350 g colour no 17, raspberry cake
350 g colour no 18, autumn forest

DROPS CROCHET HOOK SIZE 3.5 mm – or size needed to get 22 tr x 12 rows = 10 x 10 cm.
Categories:
Home Blankets
Keywords:
granny square stripes

-------------------------------------------------------

Alternative Yarn – See how to change yarns here
Yarn Groups A to F – Use the same pattern and change the yarn here
Yarn usage using an alternative yarn – Use our yarn converter here

-------------------------------------------------------

DROPS Delight
DROPS Delight
75% Wool, 25% Polyamide
Discontinued
find alternatives

DROPS Super Sale

SAVE 30% on 6 cotton favourites!
Valid until 12.04.2024

Pattern instructions

NOTE: This pattern is written in British English. All measurements in charts are in cm. For conversion from cm to inches - click here. There are different terms for crocheting in British and American English. If this pattern includes crochet, click for "crochet terms" here. For this pattern in American English, please click here.
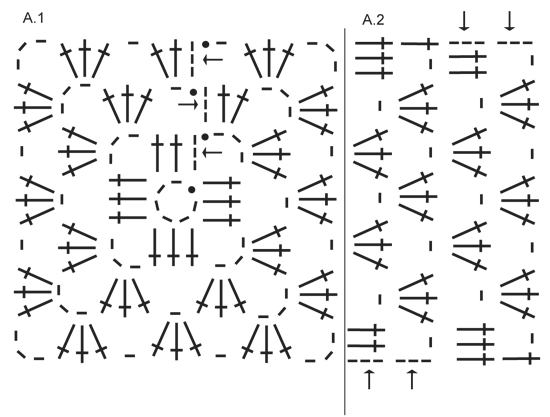
PATTERN:
See diagrams A.1 and A.2. A.1 shows square and A.2 shows the sides.
----------------------------------------------------------

BLANKET:
Work entire piece in stripes, i.e. switch colour on every row. First work square, then work edges in 2 of the sides. Finally work an edge around the entire blanket.

SQUARE:
Work 6 ch on hook size 3.5 mm with raspberry cake and form 1 ring with 1 sl st in first ch. Then work in the round but alternately from RS and WS as shown in diagram A.1. I.e. work as follows:
ROW 1: 3 ch, 2 tr around ring, 3 ch, * 3 tr around ring, 3 ch *, repeat from *-* 3 times in total. Switch to autumn forest and finish with 1 sl st in 3rd ch at beg of row, turn piece.
ROW 2: 3 ch, 2 tr around first ch-space, 3 ch, 3 tr around same ch-space, * 1 ch, 3 tr around next ch-space, 3 ch, 3 tr in same ch-space *, repeat from *-* 3 times in total. Switch to raspberry cake and finish with 1 ch and 1 sl st in 3rd ch at beg of row, turn piece.
ROW 3: 3 ch, 2 tr around first ch-space, 1 ch, * 3 tr around next ch-space, 3 ch, 3 tr around same ch-space, 1 ch, 3 tr around next ch-space, 1 ch *, repeat from *-* 3 times in total, 3 tr around next ch-space, 3 ch, 3 tr around same ch-space and 1 ch. Switch to autumn forest and finish with 1 sl st in 3rd ch at beg of row, turn piece.
Continue to switch colour on every row and continue the same way - i.e. there are 3 tr and 1 ch more between every corner on every row worked. REMEMBER THE CROCHET TENSION! Work until square measures approx. 80 x 80 cm. Finish with 1 sl st at beg of round. Fasten off.

SIDES:
Now work back and forth along 2 opposite sides (do not work in the side of square where beg of row was). Work in stripes as before and work according to diagram A.2, i.e. work as follows:
ROW 1: Beg with both colours (= 2 strands), work 1 sl st in corner and 3 ch, remove one colour and work with the other colour as follows: 2 tr around corner, 1 ch * skip to next ch (between 3 tr) and work 3 tr and 1 ch *, repeat from *-* until corner, work 3 tr around corner.
ROW 2: Do not turn piece, but beg next row where previous row started (now beg with other colour). Work 3 ch, 1 ch, * skip to next ch (between 3 tr) and work 3 tr and 1 ch *, repeat from *-* until the last 3 tr from previous row, finish with 1 tr in last tr from previous row. Now both strands are in the same side again.
ROW 3: Work 3 ch with both colours, remove one strand and work 2 tr around first ch, 1 ch, * skip until next ch (between 3 tr) and work 3 tr and 1 ch *, repeat from *-* until 1 ch and 3 ch (= 1st tr) remain, work 2 tr around ch and 1 tr in 3rd ch from previous row.
ROW 4: Work as 2nd row. Repeat 1st-4th row until edge measures approx. 30 cm from where square ended. Work the same way on opposite side of square.

EDGE:
Work an edge around the entire blanket. Work the same way as on square. I.e. work in rows and stripes, i.e. work row tog at the end of row. Beg in one of the corners.
ROW 1: Beg with both colours, work 1 sl st in corner and 3 ch, remove one colour and work with the other colour as follows: 2 tr, 3 ch and 3 tr around corner, (* 3 tr around next ch, 1 ch *, repeat from *-* until next corner. Work 3 tr, 3 ch and 3 tr around corner). Repeat from (-) 2 more times and repeat from *-* until beg of row and finish with 1 sl st in 3rd ch at beg of row. Turn piece.
ROW 2: Beg next row with both colours and work 3 ch, remove one colour and work the same way as on previous row. Turn piece.
ROW 3: Work as 2nd row. Fasten off.

Diagram

symbols = tr
symbols = ch
symbols = sl st
symbols = crochet direction
diagram
Do you have a question? See a list of frequently asked questions (FAQ)

Knitting tension is what determines the final measurements of your work, and is usually measured per 10 x 10 cm. It is provided like so: number of stitches in width x number of rows in height - eg: 19 stitches x 26 rows = 10 x 10 cm.

The knitting tension is very individual; some people knit/crochet loosely while others work tightly. You adjust the knitting tension with the needle size, which is why the suggested needle size is only meant as a guide! You need to adjust this (up or down) to ensure that YOUR knitting tension matches the knitting tension provided in the pattern. If you work with a different knitting tension than provided you will have a different yarn consumption, and your work will have different measurements than what the pattern suggests.

The knitting tension also determines which yarns can replace each other. As long as you achieve the same knitting tension you can replace one yarn with another.

See DROPS lesson: How to measure your tension/gauge

See DROPS video: How to make a gauge tension swatch

The required amount of yarn is provided in grams, eg: 450 g. To calculate how many balls you’ll need you first need to know how many grams are in 1 ball (25g, 50g or 100g). This information is available if you click on the individual yarn quality on our pages. Divide the amount required with the amount of each ball. For example, if each ball is 50g (the most common amount), the calculation will be as follows: 450 / 50 = 9 balls.

The important thing when changing from one yarn to another is that the knitting/crochet tension remains the same. This is so that the measurements of the finished piece will be the same as on the sketch provided. It is easier to achieve the same knitting tension using yarns from the same yarn group. It is also possible to work with multiple strands of a thinner yarn to achieve the knitting tension of a thicker one. Please try our yarn converter. We recommend you to always work a test swatch.

Please NOTE: when changing yarn the garment might have a different look and feel to the garment in the photo, due to individual properties and qualities of each yarn.

See DROPS lesson: Can I use a different yarn than the one mentioned in the pattern?

All our yarns are categorised into yarn groups (from A to F) according to thickness and knitting tension – group A contains the thinnest yarns and group F the thickest. This makes it easier for you to find alternative yarns to our patterns, should you wish to switch yarn. All yarns within the same group have a similar knitting tension and can easily replace each other. However, different yarn qualities have different structures and properties which will give the finished work a unique look and feel.

Click here for an overview of the yarns in each yarn group

At the top of all our patterns you’ll find a link to our yarn calculator, which is a helpful tool should you wish to use a different yarn than suggested. By filling in the yarn quality you wish to replace, the amount (in your size) and number of strands, the calculator will present good alternative yarns with the same knitting tension. Additionally it will tell you how much you’ll require in the new qualities and whether you’ll need to work with multiple strands. Most skeins are 50g (some are 25g or 100g).

If the pattern is worked with multiple colours, every colour will have to be calculated separately. Similarly, if the pattern is worked with several strands of different yarns (for example 1 strand Alpaca and 1 strand Kid-Silk) you will have to find alternatives for each, individually.

Click here to see our yarn calculator

Since different yarns have different qualities and textures we have chosen to keep the original yarn in our patterns. However, you can easily find options among our available qualities by using our yarn calculator, or simply pick a yarn from the same yarn group.

It is possible that some retailers still have discontinued yarns in stock, or that someone has a few skeins at home that they would like to find patterns for.

The yarn calculator will provide both alternative yarn as well as required amount in the new quality.

If you think it's hard to decide what size to make, it can be a good idea to measure a garment you own already and like the size of. Then you can pick the size by comparing those measures with the ones available in the pattern's size chart.

You'll find the size chart at the bottom of the pattern.

See DROPS lesson: How to read size chart

The needle size provided in the pattern serves only as a guide, the important thing is to follow the knitting tension. And since knitting tension is very individual, you will have to adjust the needle size to ensure that YOUR tension is the same as in the pattern – maybe you’ll have to adjust 1, or even 2 needle sizes, up or down to achieve the correct tension. For this, we recommend that you work test swatches.

Should you work with a different knitting tension than the one provided, the measurements of the finished garment might deviate from the measurement sketch.

See DROPS lesson: How to measure your tension/gauge

See DROPS video: How to make a tension/gauge swatch

Working a garment top-down provides more flexibility and room for personal adjustment. For example it is easier to try the garment on while working, as well as making adjustments to length of yoke and shoulder caps.

The instructions are carefully explaining every step, in the correct order. Diagrams are adjusted to the knitting direction and are worked as usual.

The diagram depicts all rows/rounds, and every stitch seen from the right side. It is read from bottom to top, from right to left. 1 square = 1 stitch.

When working back and forth, every other row is worked from the right side and every other row is worked from the wrong side. When working from the wrong side, the diagram will have to be worked reversed: from left to right, knit stitches are purled, purl stitches are knit etc.

When working in the round every round is worked from the right side and the diagram are worked from right to left on all rounds.

See DROPS lesson: How to read knitting diagrams

The diagram depicts all rows/rounds, and every stitch seen from the right side. It is worked from bottom to top, from right to left.

When working back and forth every other row is worked from the right side: from right to left and every other row is worked from the wrong side: from left to right.

When working in the round, every row in the diagram are worked from the right side, from right to left.

When working a circular diagram you start in the middle and work your way outwards, counter clockwise, row by row.

The rows usually start with a given number of chain stitches (equivalent to the height of the following stitch), this will either be depicted in the diagram or explained in the pattern.

See DROPS lesson: How to read crochet diagrams

Instructions for working several diagrams after each other on the same row/round, will often be written like so: “work A.1, A.2, A.3 a total of 0-0-2-3-4 times". This means you work A.1 once, then A.2 is worked once, and A.3 is repeated (in width) the number of times provided for your size – in this case like so: S = 0 times, M = 0 times, L=2 times, XL= 3 times and XXL = 4 times.

The diagrams are worked as usual: begin with the first row in A.1, then work the first row in A.2 etc.

See DROPS lesson: How to read knitting diagrams

See DROPS lesson: How to read crochet diagrams

The total width of the garment (from wrist-to-wrist) will be larger in the larger sizes, despite the actual sleeves being shorter. The larger sizes have longer sleeve caps and wider shoulders, so there will be a good fit in all sizes.

The measurement sketch/schematic drawing provides information regarding the full length of the garment. If it’s a jumper or a jacket the length is measured from the highest point on the shoulder closest to the neckline, and straight down to the bottom of the garment. It is NOT measured from the tip of shoulder. Similarly, the length of yoke is measured from the highest point on the shoulder and down to where yoke is split into body and sleeves.

On a jacket measures are never taken along bands, unless specifically stated. Always measure inside band stitches when measuring the length.

See DROPS lesson: How to read a schematic drawing

Diagrams are often repeated on the round or in height. 1 repeat is the diagram the way it appears in the pattern. If it says to work 5 repeats of A.1 in the round, then you work A.1 a total of 5 times after/next to each other in the round. If it says to work 2 repeats of A.1 vertically/in height you work the entire diagram once, then begin again at the start and work the entire diagram one more time.

Chain stitches are slightly narrower than other stitches and to avoid working the cast-on edge too tight, we simply chain more stitches to begin with. The stitch count will be adjusted on the following row to fit the pattern and measurement sketch.

The rib edge is more elastic and will contract slightly compared to, for example, stocking stitch. By increasing before the rib edge, you avoid a visible difference in width between the rib edge and the rest of the body.

It’s very easy to cast off too tightly, and by making yarn overs while casting off (and simultaneously casting these off) you avoid a too tight cast off edge.

See DROPS video: How to bind off with yarn overs (yo)

To achieve an even increase (or decrease) you can increase on, for example: every 3rd and 4th row alternately, like so: work 2 rows and increase on the 3rd row, work 3 rows and increase on the 4th. Repeat this until the increase is complete.

See DROPS lesson: Increase or decrease 1 st on every 3rd and 4th row alternately

Should you prefer to work in the round instead of back and forth, you may of course adjust the pattern. You’ll need to add steeks mid-front (usually 5 stitches), and follow the instructions. When you would normally turn and work from the wrong side, simply work across the steek and continue in the round. At the end you’ll cut the piece open, pick up stitches to work bands, and cover the cut edges.

See DROPS video: How to knit steeks and cut open

Should you prefer to work back and forth instead of in the round, you may of course adjust the pattern so you work the pieces separately and then assemble them at the end. Divide the stitches for the body in 2, add 1 edge stitch in each side (for sewing) and work the front and back pieces separately.

See DROPS lesson: Can I adapt a pattern for circular needles into straight needles?

Pattern repeats can vary slightly in the different sizes, in order to get the correct proportions. If you’re not working the exact same size as the garment in the photo, yours might deviate slightly. This has been carefully developed and adjusted so that the complete impression of the garment is the same in all sizes.

Make sure to follow instructions and diagrams for your size!

If you have found a pattern you like which is available in women’s size it’s not very difficult to convert it to men’s size. The biggest difference will be the length of sleeves and body. Start working on the women size that you think would fit across the chest. The additional length will be worked right before you cast off for the armhole/sleeve cap. If the pattern is worked top-down you can add the length right after the armhole or before the first decrease on sleeve.

Regarding additional yarn amount, this will depend on how much length you add, but it is better with a skein too many than too few.

All yarns will have excess fibres (from production) that might come off as lint or shedding. Brushed yarns (ie hairier yarns) have more of these loose, excess fibres, causing more shedding.

Shedding also depends on what is worn under or over the garment, and whether this pulls at the yarn fibres. It’s therefore not possible to guarantee that there will be no shedding

Below are some tips on how to get the best result when working with hairier yarns:

1. When the garment is finished (before you wash it) shake it vigorously so the looser hairs come off. NOTE: do NOT use a lint roller, brush or any method that pulls at the yarn.

2. Place the garment in a plastic bag and put it in your freezer - the temperature will cause the fibres to become less attached to each other, and excess fibres will come off easier.

3. Leave in the freezer for a few hours before taking it out and shaking it again.

4. Wash the garment according to the instructions on the yarn label.

Pilling is a natural process that happens to even the most exclusive of fibers. It's a natural sign of wear and tear that is hard to avoid, and that is most visible in high friction areas of your garment like a sweater's arms and cuffs.

You can make your garment look as new by removing the pilling, using a fabric comb or a pill/lint remover.

Still can't find the answer you need? Then scroll down and leave your question so one of our experts can try to help you. This will be done normally within 5 to 10 working days.
In the meantime, you can read the questions and answers that others have left to this pattern or join the DROPS Workshop on Facebook to get help from fellow knitters/crocheters!

You might also like...

Post a comment to pattern DROPS 163-11

We would love to hear what you have to say about this pattern!

If you want to leave a question, please make sure you select the correct category in the form below, to speed up the answering process. Required fields are marked *.

Comments / Questions (19)

country flag Clare wrote:

Hi, are you supposed to cut the yarn after each row or somehow carry it on? Any tips gratefully received as I’m not sure what to do with all these ends at the moment. Thank you

18.04.2021 - 08:35

DROPS Design answered:

Dear Clare, you can do it either was. If you want to carry the yarn, you can try, and use a technique similar that is used in THIS video (excpet, you do not have to turn the piece). If you want to cut, you can "weave in" or catch the yarn ends as you go , by laying them over the upper edge of the previous row, and crochet the forst few stitch around them as well as around the proper stitches. Happy Crafting!

18.04.2021 - 10:54

country flag Cornelia Lehmann wrote:

Können die Ränder auch anders gehaekelt werden?

22.10.2020 - 14:51

DROPS Design answered:

Liebe Frau Lehmann, Sie können also einen anderen Rands als die 3 vorgeschlagenen Runden häkeln. Viel spaß beim häkeln!

22.10.2020 - 15:32

country flag Yvette wrote:

Bonjour ! Comment faire pour que la marque du changement de rang ne soit pas trop visible ? Cette sorte d’échelle n’est pas vraiment jolie et lorsque l’ouvrage est terminé on repaire immédiatement l’endroit du changement de sens de l’ouvrage. Merci d’avance pour vos bons conseils et meilleurs messages.

14.02.2020 - 12:59

DROPS Design answered:

Bonjour Yvette, faites bien en sorte que le changement de fil se fasse sur l'envers de l'ouvrage et que les fils soient toujours du même côté. La seule façon de n'avoir aucun raccord serait de couper le fil à chaque rang, mais il faudrait alors plus de laine. Bon crochet!

14.02.2020 - 14:08

country flag Stefanie Meyer wrote:

Heißt das es ein quadrat gehäkelt Dann links ein Quadrat rechts ein Quadrat und dann drum rum gehäkelt den Rand

11.01.2020 - 15:54

country flag Sus wrote:

Hej igen, og tak for hurtigt svar. Havde ikke set det var multifarvet garn :-) Jeg ville helst lave det i jeres Alpaca, på hæklenål 5,5 og med dobbelt garn. Tror du det er muligt? Mvh. Sus

25.11.2019 - 12:06

DROPS Design answered:

Hei Sus. Oppskriften er skrevet med 1 tråd (gjelder både om du ønsker å hekle den i DROPS Delight eller DROPS Alpaca). Du kan hekle det med dobbelt tråd, men heklefastheten og garnmengden som er oppgitt vil ikke stemme, heller ikke målene. Det kan hende det vil stramme litt i hjørnene, men lag en prøvelapp og test litt ut. Resultatet kan bli et deilig stor teppe. God Fornøyelse!

25.11.2019 - 13:17

country flag Sus wrote:

Hej. Kan I oplyse hvor mange forskellige farver der er brugt til tæppet, der står kun 2 farver angivet? På foto ser det bestemt ud til der er brugt mange flere farver ;-) og iøvrigt nogle rigtig flotte farver, som jeg godt kunne tænke mig at ramme nogenlunde. Håber I kan hjælpe, på forhånd tak, Mvh. Sus

25.11.2019 - 11:47

DROPS Design answered:

Hei Sus. DROPS Delight er et multifarget garn/et nøste innholder mange farger. Da en titt på fargekartet til DROPS Delight, der vil du se hvordan et nøste ser ut og hvordan en liten oppstrikket prøvelapp ser ut. God Fornøyelse!

25.11.2019 - 11:52

country flag Agnes wrote:

Hei! Hvordan er det en skal føre garnet opp ved fargeskifte? Det holder ikke kun å skifte garn i kjedemaske hver omgang. Da får man en tråd på lengde med de 3lm. Kan ikke tenke meg å feste tråder hver omgang. Jeg har andre farger med mer kontrast mellom fargene. Noen forslag til hvordan jeg kan gjøre dette?

10.03.2019 - 10:28

DROPS Design answered:

Hei Agnes. Det er egentlig ikke noe god teknikk for hvordan å trekke tråden som ikke hekles med opp 1 rad uten at den syntes. Den vil bli på høyde med de 3 luftmaskene, dessverre. Alternativet blir som du sier å feste trådeendene på hver omgang. Beklager å ikke kunne være til mer hjelp. God fornøyelse

18.03.2019 - 12:55

country flag Jennifer wrote:

Ich habe mir einen Poncho mit dem Muster gehäkelt, doch leider wird die Spitze, in der ich die Maschen zunehme, schräg. Es dreht sich alles in die Richtung, in die ich häkel. Was mache ich falsch?

16.01.2019 - 20:59

DROPS Design answered:

Liebe Jennifer, dieses Modell kann vielleicht Ihnen helfen, um einen Poncho in so einem Muster zu häkeln. Viel Spaß beim häkeln!

17.01.2019 - 09:23

country flag Yvette wrote:

Bonjour ! Faut-il couper le fil à chaque tour ou le faire suivre....et de quelle façon ? Merci !

19.03.2018 - 08:40

DROPS Design answered:

Bonjour Yvette, on change de couleur tous les rangs, on va donc faire suivre le fil entre chaque changement de couleur, à la fin du tour, crochetez la mc avec la couleur suivante en veillant bien à ne pas trop tirer le fil pour ne pas trop resserrer les rangs à ce niveau. Bon crochet!

19.03.2018 - 11:15

Gabriella Abraham wrote:

Hi. How can I make this design into a rectangle for a queen size bed? Thanks Gabriella

01.03.2018 - 21:03

DROPS Design answered:

Dear Mrs Abraham, you can just continue working the square until the desired measurements, then adjust lenght working each side separately - for any individual assistance your DROPS store will help you, even per mail or telephone. Happy crocheting!

02.03.2018 - 08:31