
Popular categories
Looking for a yarn?


|
|
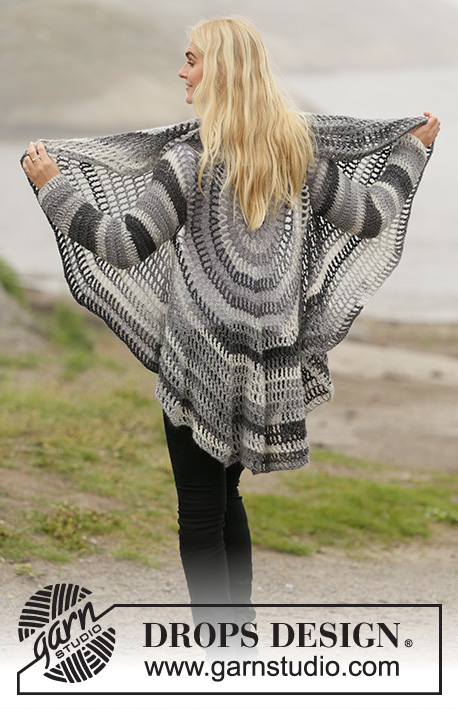
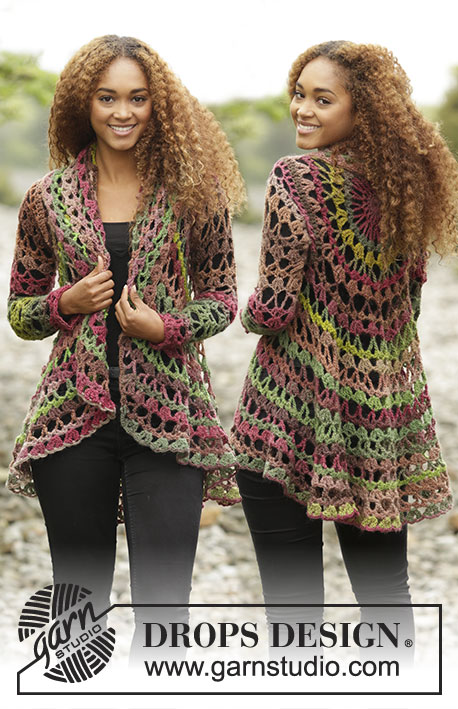
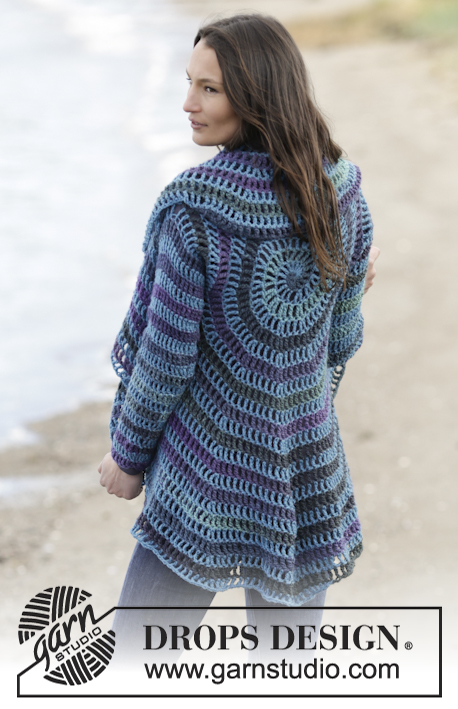
Gypsy Blue |
|
 |
 |
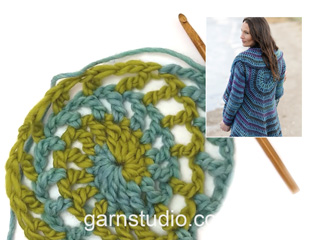
Crochet DROPS jacket worked in a circle in "Big Delight" and "Karisma". Size: S - XXXL.
DROPS 165-40 |
|
|
DECREASE TIP: 2 dtr tog into 1 dtr as follows: Work 1 dtr but wait with last YO and pull through, work 1 dtr in next st but pull last YO through all 3 sts on hook. CROCHET TIP: Replace first dtr on round with 4 ch. Finish with 1 sl st in fourth ch from beg of round. ---------------------------------------------------------- CIRCLE: When piece is worked in the round, start with this technique to avoid hole in the middle (instead of ch-ring) use Big Delight: Hold the yarn end and wind the yarn one time around the index finger to make a loop. Hold the loop with left thumb and middle finger, place the yarn over left index finger. Insert hook through the loop, make a YO and pull yarn through loop, work 1 ch, then work around the loop as follows: ROUND 1: 1 ch, 1 dc, 2 htr, 2 tr, 2 dtr. Insert 1 stitch marker in loop on last dtr so that it does not unravel and place yarn aside. Switch to Karisma and work as follows in loop: 1 dc, 2 htr, 2 tr, 2 dtr. Pull the yarn end to tighten loop. Fasten the yarn end on the back side. ROUND 2: (Continue with Karisma). Work 1 dtr + 1 ch in each of the first 7 sts (= 1 dc, 2 htr, 2 tr and 2 dtr worked with Big Delight). Insert 1 stitch marker in loop on last dtr so that it does not unravel and place yarn aside. Continue with Big Delight. Work 1 dtr + 1 ch in each of the next 7 sts (= 1 dc, 2 htr, 2 tr and 2 dtr worked with Karisma) = 14 dtr + 14 ch. ROUND 3: (Continue with Big Delight.) Work 1 dtr + 1 ch + 1 dtr + 1 ch in each of the first 7 dtr, insert 1 stitch marker in loop on last dtr so that it does not unravel and put yarn aside. Continue with Karisma, work 1 dtr + 1 ch + 1 dtr + 1 ch in each of the next 7 dtr = 28 dtr + 28 ch. ROUND 4: (Continue with Karisma). * Work 1 dtr + 1 ch in the next dtr, work 1 dtr + 1 ch + 1 dtr + 1 ch in the next dtr *, repeat from *-* 7 times. Insert 1 stitch marker in loop on last dtr so that it does not unravel and place yarn aside. Continue with Big Delight. * Work 1 dtr + 1 ch in the next dtr, work 1 dtr + 1 ch + 1 dtr + 1 ch in the next dtr *, repeat from *-* 7 times = 42 dtr + 42 ch. ROUND 5: (Continue with Big Delight.) * Work 1 dtr + 1 ch in each of the next 2 dtr, work 1 dtr + 1 ch + 1 dtr + 1 ch in the next dtr *, repeat from *-* 7 times. Insert 1 stitch marker in loop on last dtr so that it does not unravel and place yarn aside. Continue with Karisma. * Work 1 dtr + 1 ch in each of the next 2 dtr, work 1 dtr + 1 ch + 1 dtr + 1 ch in the next dtr *, repeat from *-* 7 times = 56 dtr + 56 ch. Repeat 4th and 5th round but on every round work 1 dtr + 1 ch more between every inc = 14 dtr + 14 ch inc on every round. Continue until there are 112-112-126-126-140-140 dtr + 112-112-126-126-140-140 ch on round, circle measures approx. 20-20-23-23-25-25 cm from centre (= 40-40-46-46-50-50 cm in diameter). Work next round as follows: (Continue with spiral and colour change but without inc.) Work 1 dtr + 1 ch in each of the first 16-16-18-18-20-20 dtr, work 24-24-28-28-32-32 loose ch for armhole, skip the next 16-16-18-18-20-20 dtr, work 1 dtr + 1 ch in every dtr until 32-32-36-36-40-40 dtr remain on round, work 24-24-28-28-32-32 loose ch for armhole, skip the next 16-16-18-18-20-20 dtr, work 1 dtr + 1 ch in each of the last 16-16-18-18-20-20 dtr. Work next round as follows: * Work 1 dtr + 1 ch in each of the next 7-7-8-8-9-9 dtr, work 1 dtr + 1 ch + 1 dtr + 1 ch in next dtr *, repeat from *-* 2 times, work 18-18-20-20-22-22 dtr with 1 ch between each around ch-space, * work 1 dtr + 1 ch in each of the next 7-7-8-8-9-9 dtr, work 1 dtr + 1 ch + 1 dtr + 1 ch in next dtr *, repeat from *-* 3 times. Insert 1 stitch marker in loop on last dtr so that it does not unravel and place yarn aside. Switch yarn. * Work 1 dtr + 1 ch in each of the next 7-7-8-8-9-9 dtr, work 1 dtr + 1 ch + 1 dtr + 1 ch in next dtr *, repeat from *-* 3 times, work 18-18-20-20-22-22 dtr with 1 ch between each around ch-space, * work 1 dtr + 1 ch in each of the next 7-7-8-8-9-9 dtr, work 1 dtr + 1 ch + 1 dtr + 1 ch in next dtr *, repeat from *-* 2 times = 126-126-140-140-154-154 dtr + ch on round. Work as 4th and 5th round but on every round work 1 dtr + 1 ch more between every inc = 14 dtr + 14 ch inc on every round. Continue until circle measures 52-54-56-58-60-62 cm from centre (= 104-108-112-116-120-124 cm in diameter, or desired measurements). Finish circle as follows: Continue with the same yarn as last round. Work 1 dtr in each of the next 2 dtr, 1 tr in each of the next 2 dtr, 1 htr in each of the next 2 dtr, 1 dc in next dtr, 1 sl st in next dtr, fasten off. SLEEVES: Work in the round from armhole and down. Use hook size 6 mm and beg with opposite colour of the one the last dtr around armholes was worked with. Work stripes, i.e. work 1 round with Karisma and 1 round with Big Delight - READ CROCHET TIP. Work 36-38-40-42-44-46 dtr around the opening for sleeve, beg of round should be under sleeve. Then work 3 rounds with 1 dtr in every dtr. Continue with 1 dtr in every dtr - AT THE SAME TIME dec 2 dtr mid under sleeve - READ DECREASE TIP. Repeat dec every 8 cm 6 more times = 22-24-26-28-30-32 dtr. Continue to work until sleeve measures 54-55-54-55-54-55 cm. Fasten off. Work the other sleeve the same way. |
|

|
|
|
Have you made this or any other of our designs? Tag your pictures in social media with #dropsdesign so we can see them! Do you need help with this pattern?You'll find tutorial videos, a Comments/Questions area and more by visiting the pattern on garnstudio.com. © 1982-2024 DROPS Design A/S. We reserve all rights. This document, including all its sub-sections, has copyrights. Read more about what you can do with our patterns at the bottom of each pattern on our site. |
|


With over 40 years in knitting and crochet design, DROPS Design offers one of the most extensive collections of free patterns on the internet - translated to 17 languages. As of today we count 304 catalogues and 11422 patterns - 11422 of which are translated into English (UK/cm).
We work hard to bring you the best knitting and crochet have to offer, inspiration and advice as well as great quality yarns at incredible prices! Would you like to use our patterns for other than personal use? You can read what you are allowed to do in the Copyright text at the bottom of all our patterns. Happy crafting!
Comments / Questions (168)
Jeg tror jeg fandt ud af det. Tak
06.02.2021 - 12:35Så med en farve under ærmet, den anden over og så køre rundt som før?
06.02.2021 - 12:11DROPS Design answered:
Hei Malou-Cheanne. Så bra du fant det ut selv. God Fornøyelse videre.
12.02.2021 - 13:01Endnu en gang svarer I ikke på det, jeg faktisk spørger om... Hvor placerer jeg de 36? Og hvordan med skift af farve. De 36 skal jo laves med en og samme farve. Derefter ny farve en omgang osv. Er der nogen smart måde at gøre dette, eller skal jeg klippe garnet efter hver omgang? I må meget gerne svare på det, jeg spørger om denne gang. Mange tak.
03.02.2021 - 16:30DROPS Design answered:
Hej Malou, de 36 masker skal fordeles jævnt, det vil sige 18 masker på hver "side". Hvis du starter omgangen under ærmet, så kan du trække tråden med op til næste række, så behøver du ikke klippe tråden. Vi har også en video som viser hvordan man skifter farve / hækler striber :)
04.02.2021 - 14:32Jeg skal til at hækle ærmerne, men jeg er i tvivl om hvordan jeg gør. Det er str s. Jeg har 16 dbl-st (18 med dem i hjørnerne). På siden tættest mod midten, 1 RK i højde, 18 dbl-st (20 med hjørnerne) på rækken ved luftmaskerne. Hvor skal jeg placere de 36? Og skal alle være med en farve? Hvordan skifter jeg farve? Er det ved at klippe garnet hele tiden, hæfte, starte ny farve, klippe, hæfte osv?
29.01.2021 - 23:46DROPS Design answered:
Hej Malou, du hækler de 36 masker hele vejen rundt i ærmegabet (på samme måde som du hele tiden har gjort). Du skifter farve for hver omgang :)
03.02.2021 - 14:01Nach der 5. Runde steht in der Anleitung die 4. und 5. Runde fortlaufend wiederholen - heißt das ich arbeite jede Runde wieder 7x oder arbeite ich bis ich am Ende Runde bin ( ich würde dann nämlich bei der 1. Wiederholung der 4. Runde 14x arbeiten). 2te Frage: in jeder Runde ein D-Stb +1 Lm mehr zunehmen - bedeutet das wirklich nur mit einer Farbe ein D-Stb+1Lm oder mit beiden Farben - also 2 DStb+2lm/Runde
24.01.2021 - 09:02DROPS Design answered:
Liebe Eva, es wird wie zuvor gehäkelt: 1 Runde = 7 Mal mit jeder Wolle und gleichzeitig immer wie zuvor zunehmen, d.h. bei der 6. Runde (= wie 4. aber mit mehr Maschen zwischen Zunahmen): * je 1 D-Stb + 1 Lm in die 2 nächsten D-Stb, 1 D-Stb + 1 Lm + 1 D-Stb + 1 Lm in das nächste D-Stb *, von *-* insgesamt 7 x arb usw. Viel Spaß beim häkeln!
25.01.2021 - 09:42Hallo, ich würde gerne statt der 2 Farben - 3 verschiedene Farben verwenden - wie gehe ich da am besten vor ? danke und lg Eva
20.01.2021 - 16:42DROPS Design answered:
Liebe Eva, leider können wir nicht jede Anleitung nach jeder Anfrage anpassen - vielleicht könnnen Sie mal jede Runde entweder Halb mit jeder Farbe hier, jeweils 1/3 mit jeder Farbe? hier zeigen wir mit 4 Farben. Am besten versuchen Sie mit einer Maschenprobe, wie Sie es machen können. Viel Spaß beim häkeln!
21.01.2021 - 07:32Hallo, ich habe die 4. Und 5. Runde wie in der Anleitung beschrieben weiter gehäkelt bis ich die 140 DStb habe. Die Maschenmakierer sind so jeweils gegenüberliegend. Jetzt kommen die Armausschnitte und ich verstehe nicht wie weiter. Ich fange also mit irgendeiner Farbe an und wann wechsel ich zu der anderen? Das steht da nicht. Oder muss jeder Schritt in der anderen Farbe gemacht werden? 20 DStb in Karisma und dann die LM mit Big Delight?
21.10.2020 - 21:57DROPS Design answered:
Liebe Petra, bei der nächsten Runde, weiter wie zuvor mit dem Farbwechsel häkeln, aber keine Zunahmen bei dieser nächsten Runden arbeiten: die ersten 20 D-Stb mit 1 Lm wie zuvor, dann 32 Lm häkeln und die nächsten 20 Stb überspringen (= 1. Armloch), weiter wie zuvor bis 40 D-Stb vor der Ende der Runde bleiben, 32 Lm häkeln und die nächsten 20 Stb überpsringen (= 2. Armloch) und die Runde enden (= 20 Dstb mit 1 Lm dazwischen). Farbe/Garne wechseln Sie wie zuvor, die Hälfte der Runde muss - wie zuvor- mit je einer Farbe/einem Garn gehäkelt werden. Viel Spaß beim häkeln!
22.10.2020 - 10:22Hi. Lovely pattern. I just wanted to check, this uses a combination of an aran weight & DK yarn, as the yarns don't look a different weight in the photos. Also, you are using a washable yarn with a hand-wash yarn. Can you suggest an alternative mix that is all washable? Thanks.
28.09.2020 - 12:15DROPS Design answered:
Dear Mrs Tier, this pattern is worked with 2 different kind of yarn to get the right result - we use here DROPS Big Delight to play with colours - if you like a superwash yarn group C you can use instead DROP Big Merino or 2 strands DROPS Fabel (to play with colours too), but remember that it will look different because fibers/yarns are different - read more about alternatives here - you can use the yarn converter to check the other suggested alternatives. Happy knitting!
28.09.2020 - 12:40Working on this one now, this is so pretty - still working on the circle, then to the sleeves. Can't wait to complete and wear, and then do the Circle Jacket. Lovely patterns. Thank you for the tutorials they really help me get started.
08.08.2020 - 03:51I am stuck in the section were we are chaining in for the sleeves. I have 112 tr from the section before.And no matter what I do I end up with extra 16. I can't figure out were they go reading the instructions. Leave it for the front. Turn and start back or continue? Help confused!!!
05.05.2020 - 00:46DROPS Design answered:
Dear Kris, next round for armholes will be worked with the two yarns/colours as before but you won't increase on this round as you did before: Work 1 tr + 1 ch in each of the first 16tr, work 24 loose ch for armhole, skip the next 16 tr (this create a hole for armhole), work 1 tr + 1 ch in every tr until 32 tr remain on round, work 24 loose ch for armhole, skip the next 16 tr (2nd hole for 2nd armhole), work 1 tr + 1 ch in each of the last 16 tr. On next round, work as before with both yarns and increasing as explained for this round. Happy crocheting!
05.05.2020 - 11:28