DROPS Brushed Alpaca Silk
77% Alpaca, 23% Silk
from 2.90 £ /25g
Get the yarn to make this pattern from 26.10£.

The yarn cost is calculated from the pattern’s smallest size and the yarn’s cheapest product type. Looking for an even better price? You might find it on the DROPS Deals!

DROPS SS24

Sweet Winter

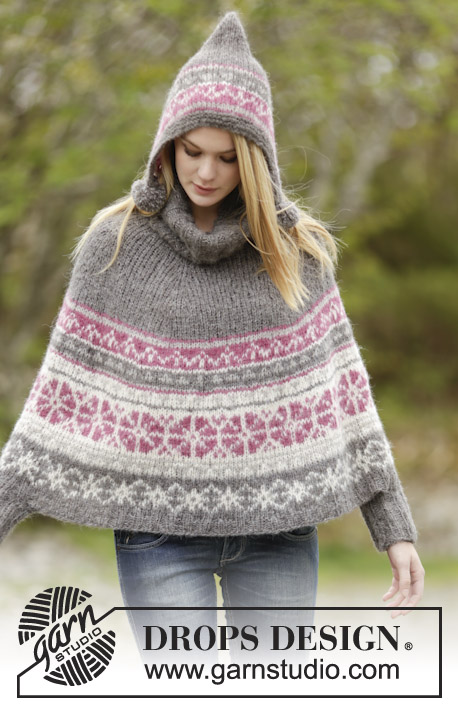
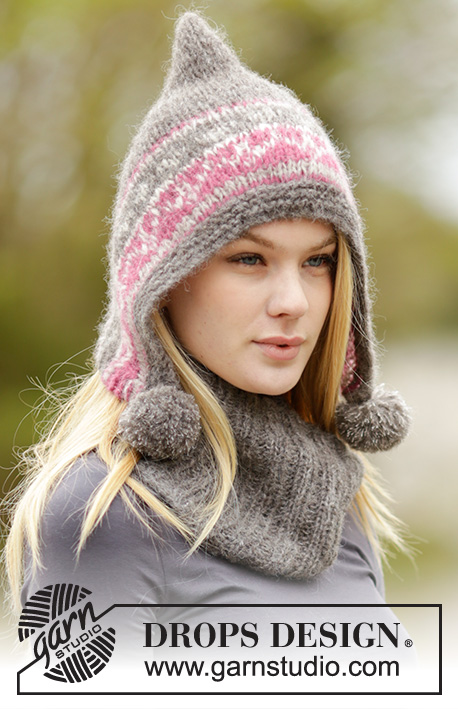
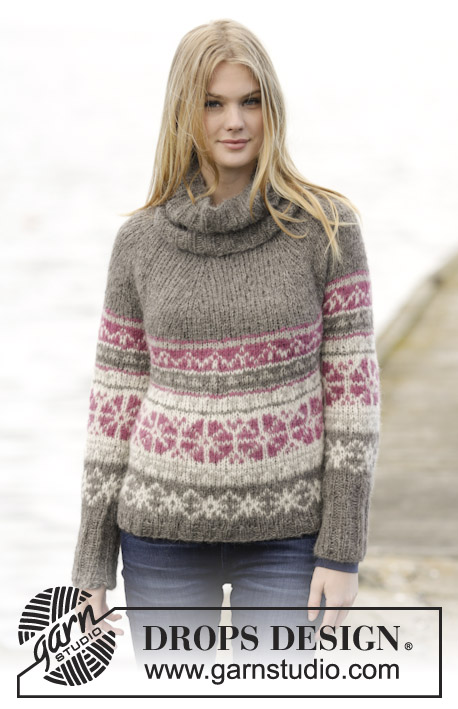
Knitted DROPS jumper with Nordic pattern, round yoke, high collar and rib, worked top down in 2 strands ”Brushed Alpaca Silk” or 1 strand ”Melody”. Size: S - XXXL.

DROPS 164-19
DROPS design: Pattern no as-040
Yarn group C+C (or D)
----------------------------------------------------------
Size: S - M - L - XL - XXL - XXXL
Materials:
DROPS BRUSHED ALPACA SILK from Garnstudio
100-125-125-150-150-175 g colour no 03, grey
50-75-75-75-75-100 g colour no 01, off white
50-50-50-50-50-75 g colour no 08, heather
25 g for all sizes in colour no 02, light grey.
Or use:
DROPS MELODY from Garnstudio
100-150-150-150-150-200 g colour no 04, grey
50-100-100-100-100-100 g colour nr 01, off white
50-50-50-50-50-100 g colour no 10, heather
50 g in all sizes colour no 03, pearl grey

DROPS DOUBLE POINTED NEEDLES and CIRCULAR NEEDLE (40 and 80 cm) SIZE 6 mm - or size needed to get 13 sts x 17 rows in stocking st with 2 strands ”Brushed Alpaca Silk” or 1 strand ”Melody” = 10 x 10 cm.
DROPS DOUBLE POINTED NEEDLES and CIRCULAR NEEDLE (40 and 80 cm) SIZE 5.5 mm - for rib.

-------------------------------------------------------

Alternative Yarn – See how to change yarns here
Yarn Groups A to F – Use the same pattern and change the yarn here
Yarn usage using an alternative yarn – Use our yarn converter here

-------------------------------------------------------

DROPS Brushed Alpaca Silk
77% Alpaca, 23% Silk
from 2.90 £ /25g
Get the yarn to make this pattern from 26.10£.

The yarn cost is calculated from the pattern’s smallest size and the yarn’s cheapest product type. Looking for an even better price? You might find it on the DROPS Deals!

Pattern instructions

NOTE: This pattern is written in British English. All measurements in charts are in cm. For conversion from cm to inches - click here. There are different terms for crocheting in British and American English. If this pattern includes crochet, click for "crochet terms" here. For this pattern in American English, please click here.
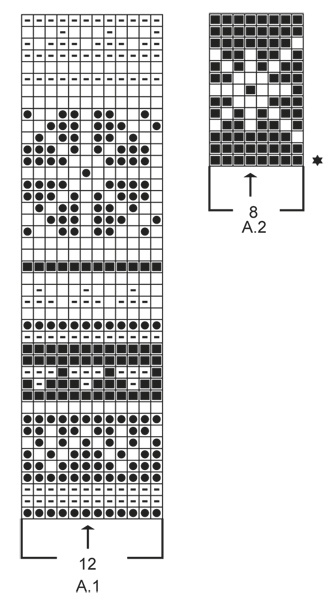
KNITTING TIP:
To avoid the knitting tension to tighten when working pattern, it is important not to tighten the strands on back side of piece. Switch to a higher needle no when working pattern if the pattern is somewhat tight.

DOUBLE YARN TIP:
Use yarn from both inside and outside of the ball. When switching to a new ball, try to avoid switching both strands at the same time - to avoid a thick yarn when fastening.

GARTER ST (back and forth):
K all rows. 1 ridge = 2 rows K.

PATTERN:
See diagrams A.1-A.2. Work all pattern sts in stocking st with 2 strands Brushed Alpaca Silk (= BAS) or 1 strand Melody (= M).

DECREASE TIP:
Work until 3 sts remain before marker, K 2 tog, 2 sts in stocking st (marker is in the middle of these 2 sts), slip 1 st as if to K, K 1, psso (= 2 sts dec).

INCREASE TIP:
Inc alternately before and after marker.
Inc as follows before marker: Work until 1 st before marker, 1 YO.
Inc as follows after marker: 1 st in stocking st, 1 YO.
On next round K YO twisted (i.e. work in the back loop of st instead of front) to avoid holes.
----------------------------------------------------------

JUMPER:
Work in the round on circular needle, top down - READ DOUBLE YARN TIP. Rounds beg = mid back.

YOKE:
Cast on 96-100-104-108-112-120 sts on circular needle size 5.5 mm with 2 strands grey Brushed Alpaca Silk or 1 strand grey Melody. Work rib = K 2/P 2 for 20-20-21-21-22-22 cm. Switch to circular needle size 6 mm and work 1 round in stocking st – AT THE SAME TIME dec 28-30-32-32-34-40 sts evenly = 68-70-72-76-78-80 sts. Work 1 more round in stocking st. On next round, inc 18-20-26-30-36-38 sts evenly = 86-90-98-106-114-118 sts. On next round insert 6 markers in the piece as follows: Work 8-8-9-11-10-12 sts, insert a marker, then insert 5 markers 14-15-16-17-19-19 sts apart, 8-7-9-10-9-11 sts remain on round after last marker. On next round inc 1 st at every marker – see INCREASE TIP. Repeat inc at every marker on every round 0-0-1-3-6-7 more times, every other round 13-16-18-18-17-18 times and every 3rd round 3-2-0-0-0-0 times = 188-204-218-238-258-274 sts. REMEMBER THE KNITTING TENSION
Now continue as follows: Work the first 24-27-29-33-37-40 sts (= half back piece), slip the next 46-48-50-52-54-56 sts on a stitch holder (= sleeve), cast on 6 new sts under sleeve, work the next 48-54-59-67-75-81 sts (= front piece), slip the next 46-48-50-52-54-56 sts on a stitch holder (= sleeve), cast on 6 new sts under sleeve, work the remaining 24-27-30-34-38-41 sts on round (= half back piece). Piece measures approx. 20-21-22-23-24-25 cm.

BODY:
There are now 108-120-130-146-162-174 sts for body. Insert a marker in each side of body where new sts were cast on under sleeves (= 3 new sts on each side of marker). NOW MEASURE THE PIECE FROM HERE. Now work 1-1-2-2-2-3 rounds with grey (2 strands Brushed Alpaca Silk/ 1 strand Melody), AT THE SAME TIME on last round adjust no of sts to 108-120-132-144-168-180 sts. Now work pattern A.1 (= 12 sts) 9-10-11-12-14-15 times in width - READ KNITTING TIP. When entire A.1 has been worked vertically, continue with A.2 (= 8 sts) over all sts and inc 4-8-4-8-8-4 sts on 1st round in diagram = 112-128-136-152-176-184 sts. When entire A.2 has been worked vertically, piece measures 33-33-34-34-34-35 cm. Now work 1-2-2-2-3-3 rounds in stocking st with grey (2 strands Brushed Alpaca Silk/ 1 strand Melody), AT THE SAME TIME on last round inc 20-20-24-24-28-28 sts evenly = 132-148-160-176-204-212 sts. Now work rib = K 2/P 2 for 3-3-3-4-4-4 cm. Cast off sts with K over K and P over P. Piece measures 56-58-60-62-64-66 cm in total.

SLEEVE:
Work sleeve in the round on circular needle/double pointed needles. There are 46-48-50-52-54-56 sts for each sleeve. Slip sts from stitch holder back on circular needle/double pointed needles size 6 mm and cast on 6 new sts under sleeve = 52-54-56-58-60-62 sts. Insert a marker in the middle of these new sts (i.e. 3 new sts on each side of marker). NOTE: This is beg of round. Work with grey (2 strands Brushed Alpaca Silk/ 1 strand Melody) as follows: Work the first 25-26-27-28-29-30 sts, insert a marker in next st, work the remaining 26-27-28-29-30-31 sts. On next round, work pattern A.1 (= 12 sts). NOTE: Adjust so that the 7th st in diagram (see arrow) fits with st with marker in the middle of sleeve. I.e. pattern repetition does not fit under sleeve but work pattern over all sts on sleeve and the pattern will then be symmetrical under sleeve.
When piece measures 3 cm, dec 1 st on each side of marker under sleeve - READ DECREASE TIP. Repeat dec every 3-2½-2½-2½-2½-2½ cm 10-11-11-11-12-12 more times = 30-30-32-34-34-36 sts. When A.1 has been worked vertically, continue with A.2. NOTE: Adjust so that the 5th st in diagram (see arrow) fits with st with marker in the middle of sleeve. I.e. pattern repetition does not fit under sleeve but work pattern over all sts on sleeve. When A.2 has been worked vertically the sleeve measures 33 cm in all sizes. Now continue with grey (2 strands Brushed Alpaca Silk/ 1 strand Melody) until finished measurements. Work 3-3-3-2-2-2 rounds in stocking st, AT THE SAME TIME on last round inc 2-2-0-2-2-0 sts evenly = 32-32-32-36-36-36 sts. Switch to double pointed needles size 5.5 mm and work rib K 2/P 2 until sleeve measures 45-45-45-44-44-44 cm in total. Cast off sts with K over K and P over P. Knit another sleeve the same way.

ASSEMBLY:
Sew the openings under the sleeves.

This pattern has been corrected.

Updated online: 08.12.2015
under YOKE (dec 28-30-32-32-34-40 sts, not inc):

Cast on 96-100-104-108-112-120 sts on circular needle size 5.5 mm with 2 strands grey Brushed Alpaca Silk or 1 strand grey Melody. Work rib = K 2/P 2 for 20-20-21-21-22-22 cm. Switch to circular needle size 6 mm and work 1 round in stocking st – AT THE SAME TIME dec 28-30-32-32-34-40 sts evenly = 68-70-72-76-78-80 sts.....
Updated online: 26.02.2016
The measurement on neck has been edited, the measurement for neck is after the high neck in rib.

Diagram

symbols = 2 strands heather BAS or 1 strand heather M
symbols = 2 strands light grey BAS or 1 strand pearl grey M
symbols = 2 strands off white BAS or 1 strand off white M
symbols = 2 strands grey BAS or 1 strand grey M
symbols = increase round - see explanation in pattern
diagram
diagram

Each of our patterns has specific tutorial videos to help you.

Do you have a question? See a list of frequently asked questions (FAQ)

Knitting tension is what determines the final measurements of your work, and is usually measured per 10 x 10 cm. It is provided like so: number of stitches in width x number of rows in height - eg: 19 stitches x 26 rows = 10 x 10 cm.

The knitting tension is very individual; some people knit/crochet loosely while others work tightly. You adjust the knitting tension with the needle size, which is why the suggested needle size is only meant as a guide! You need to adjust this (up or down) to ensure that YOUR knitting tension matches the knitting tension provided in the pattern. If you work with a different knitting tension than provided you will have a different yarn consumption, and your work will have different measurements than what the pattern suggests.

The knitting tension also determines which yarns can replace each other. As long as you achieve the same knitting tension you can replace one yarn with another.

See DROPS lesson: How to measure your tension/gauge

See DROPS video: How to make a gauge tension swatch

The required amount of yarn is provided in grams, eg: 450 g. To calculate how many balls you’ll need you first need to know how many grams are in 1 ball (25g, 50g or 100g). This information is available if you click on the individual yarn quality on our pages. Divide the amount required with the amount of each ball. For example, if each ball is 50g (the most common amount), the calculation will be as follows: 450 / 50 = 9 balls.

The important thing when changing from one yarn to another is that the knitting/crochet tension remains the same. This is so that the measurements of the finished piece will be the same as on the sketch provided. It is easier to achieve the same knitting tension using yarns from the same yarn group. It is also possible to work with multiple strands of a thinner yarn to achieve the knitting tension of a thicker one. Please try our yarn converter. We recommend you to always work a test swatch.

Please NOTE: when changing yarn the garment might have a different look and feel to the garment in the photo, due to individual properties and qualities of each yarn.

See DROPS lesson: Can I use a different yarn than the one mentioned in the pattern?

All our yarns are categorised into yarn groups (from A to F) according to thickness and knitting tension – group A contains the thinnest yarns and group F the thickest. This makes it easier for you to find alternative yarns to our patterns, should you wish to switch yarn. All yarns within the same group have a similar knitting tension and can easily replace each other. However, different yarn qualities have different structures and properties which will give the finished work a unique look and feel.

Click here for an overview of the yarns in each yarn group

At the top of all our patterns you’ll find a link to our yarn calculator, which is a helpful tool should you wish to use a different yarn than suggested. By filling in the yarn quality you wish to replace, the amount (in your size) and number of strands, the calculator will present good alternative yarns with the same knitting tension. Additionally it will tell you how much you’ll require in the new qualities and whether you’ll need to work with multiple strands. Most skeins are 50g (some are 25g or 100g).

If the pattern is worked with multiple colours, every colour will have to be calculated separately. Similarly, if the pattern is worked with several strands of different yarns (for example 1 strand Alpaca and 1 strand Kid-Silk) you will have to find alternatives for each, individually.

Click here to see our yarn calculator

Since different yarns have different qualities and textures we have chosen to keep the original yarn in our patterns. However, you can easily find options among our available qualities by using our yarn calculator, or simply pick a yarn from the same yarn group.

It is possible that some retailers still have discontinued yarns in stock, or that someone has a few skeins at home that they would like to find patterns for.

The yarn calculator will provide both alternative yarn as well as required amount in the new quality.

If you think it's hard to decide what size to make, it can be a good idea to measure a garment you own already and like the size of. Then you can pick the size by comparing those measures with the ones available in the pattern's size chart.

You'll find the size chart at the bottom of the pattern.

See DROPS lesson: How to read size chart

The needle size provided in the pattern serves only as a guide, the important thing is to follow the knitting tension. And since knitting tension is very individual, you will have to adjust the needle size to ensure that YOUR tension is the same as in the pattern – maybe you’ll have to adjust 1, or even 2 needle sizes, up or down to achieve the correct tension. For this, we recommend that you work test swatches.

Should you work with a different knitting tension than the one provided, the measurements of the finished garment might deviate from the measurement sketch.

See DROPS lesson: How to measure your tension/gauge

See DROPS video: How to make a tension/gauge swatch

Working a garment top-down provides more flexibility and room for personal adjustment. For example it is easier to try the garment on while working, as well as making adjustments to length of yoke and shoulder caps.

The instructions are carefully explaining every step, in the correct order. Diagrams are adjusted to the knitting direction and are worked as usual.

The diagram depicts all rows/rounds, and every stitch seen from the right side. It is read from bottom to top, from right to left. 1 square = 1 stitch.

When working back and forth, every other row is worked from the right side and every other row is worked from the wrong side. When working from the wrong side, the diagram will have to be worked reversed: from left to right, knit stitches are purled, purl stitches are knit etc.

When working in the round every round is worked from the right side and the diagram are worked from right to left on all rounds.

See DROPS lesson: How to read knitting diagrams

The diagram depicts all rows/rounds, and every stitch seen from the right side. It is worked from bottom to top, from right to left.

When working back and forth every other row is worked from the right side: from right to left and every other row is worked from the wrong side: from left to right.

When working in the round, every row in the diagram are worked from the right side, from right to left.

When working a circular diagram you start in the middle and work your way outwards, counter clockwise, row by row.

The rows usually start with a given number of chain stitches (equivalent to the height of the following stitch), this will either be depicted in the diagram or explained in the pattern.

See DROPS lesson: How to read crochet diagrams

Instructions for working several diagrams after each other on the same row/round, will often be written like so: “work A.1, A.2, A.3 a total of 0-0-2-3-4 times". This means you work A.1 once, then A.2 is worked once, and A.3 is repeated (in width) the number of times provided for your size – in this case like so: S = 0 times, M = 0 times, L=2 times, XL= 3 times and XXL = 4 times.

The diagrams are worked as usual: begin with the first row in A.1, then work the first row in A.2 etc.

See DROPS lesson: How to read knitting diagrams

See DROPS lesson: How to read crochet diagrams

The total width of the garment (from wrist-to-wrist) will be larger in the larger sizes, despite the actual sleeves being shorter. The larger sizes have longer sleeve caps and wider shoulders, so there will be a good fit in all sizes.

The measurement sketch/schematic drawing provides information regarding the full length of the garment. If it’s a jumper or a jacket the length is measured from the highest point on the shoulder closest to the neckline, and straight down to the bottom of the garment. It is NOT measured from the tip of shoulder. Similarly, the length of yoke is measured from the highest point on the shoulder and down to where yoke is split into body and sleeves.

On a jacket measures are never taken along bands, unless specifically stated. Always measure inside band stitches when measuring the length.

See DROPS lesson: How to read a schematic drawing

Diagrams are often repeated on the round or in height. 1 repeat is the diagram the way it appears in the pattern. If it says to work 5 repeats of A.1 in the round, then you work A.1 a total of 5 times after/next to each other in the round. If it says to work 2 repeats of A.1 vertically/in height you work the entire diagram once, then begin again at the start and work the entire diagram one more time.

Chain stitches are slightly narrower than other stitches and to avoid working the cast-on edge too tight, we simply chain more stitches to begin with. The stitch count will be adjusted on the following row to fit the pattern and measurement sketch.

The rib edge is more elastic and will contract slightly compared to, for example, stocking stitch. By increasing before the rib edge, you avoid a visible difference in width between the rib edge and the rest of the body.

It’s very easy to cast off too tightly, and by making yarn overs while casting off (and simultaneously casting these off) you avoid a too tight cast off edge.

See DROPS video: How to bind off with yarn overs (yo)

To achieve an even increase (or decrease) you can increase on, for example: every 3rd and 4th row alternately, like so: work 2 rows and increase on the 3rd row, work 3 rows and increase on the 4th. Repeat this until the increase is complete.

See DROPS lesson: Increase or decrease 1 st on every 3rd and 4th row alternately

Should you prefer to work in the round instead of back and forth, you may of course adjust the pattern. You’ll need to add steeks mid-front (usually 5 stitches), and follow the instructions. When you would normally turn and work from the wrong side, simply work across the steek and continue in the round. At the end you’ll cut the piece open, pick up stitches to work bands, and cover the cut edges.

See DROPS video: How to knit steeks and cut open

Should you prefer to work back and forth instead of in the round, you may of course adjust the pattern so you work the pieces separately and then assemble them at the end. Divide the stitches for the body in 2, add 1 edge stitch in each side (for sewing) and work the front and back pieces separately.

See DROPS lesson: Can I adapt a pattern for circular needles into straight needles?

Pattern repeats can vary slightly in the different sizes, in order to get the correct proportions. If you’re not working the exact same size as the garment in the photo, yours might deviate slightly. This has been carefully developed and adjusted so that the complete impression of the garment is the same in all sizes.

Make sure to follow instructions and diagrams for your size!

If you have found a pattern you like which is available in women’s size it’s not very difficult to convert it to men’s size. The biggest difference will be the length of sleeves and body. Start working on the women size that you think would fit across the chest. The additional length will be worked right before you cast off for the armhole/sleeve cap. If the pattern is worked top-down you can add the length right after the armhole or before the first decrease on sleeve.

Regarding additional yarn amount, this will depend on how much length you add, but it is better with a skein too many than too few.

All yarns will have excess fibres (from production) that might come off as lint or shedding. Brushed yarns (ie hairier yarns) have more of these loose, excess fibres, causing more shedding.

Shedding also depends on what is worn under or over the garment, and whether this pulls at the yarn fibres. It’s therefore not possible to guarantee that there will be no shedding

Below are some tips on how to get the best result when working with hairier yarns:

1. When the garment is finished (before you wash it) shake it vigorously so the looser hairs come off. NOTE: do NOT use a lint roller, brush or any method that pulls at the yarn.

2. Place the garment in a plastic bag and put it in your freezer - the temperature will cause the fibres to become less attached to each other, and excess fibres will come off easier.

3. Leave in the freezer for a few hours before taking it out and shaking it again.

4. Wash the garment according to the instructions on the yarn label.

Pilling is a natural process that happens to even the most exclusive of fibers. It's a natural sign of wear and tear that is hard to avoid, and that is most visible in high friction areas of your garment like a sweater's arms and cuffs.

You can make your garment look as new by removing the pilling, using a fabric comb or a pill/lint remover.

Still can't find the answer you need? Then scroll down and leave your question so one of our experts can try to help you. This will be done normally within 5 to 10 working days.
In the meantime, you can read the questions and answers that others have left to this pattern or join the DROPS Workshop on Facebook to get help from fellow knitters/crocheters!

You might also like...

Sweet Winter

Hello_love_by_katie, Poland

Sweet Winter

Olga, Australia

Post a comment to pattern DROPS 164-19

We would love to hear what you have to say about this pattern!

If you want to leave a question, please make sure you select the correct category in the form below, to speed up the answering process. Required fields are marked *.

Comments / Questions (19)

country flag Gerlinda Verbeeck wrote:

Ik ben vol goede moed begonnen aan Drops 164- 19, maar in de beschrijving zit denk ik een foutje. Opgezet in maat m 100 st voor 20cm kraag en dan meerderen maar na de eerste keer meerderen (30 st) kom ik op 130 st uit ipv 70 st kan iemand me verder helpen? alvast bedankt

06.11.2015 - 12:50

DROPS Design answered:

Hoi Gerlinda. Het moet minderen zijn natuurlijk. Ik heb het foutje aangepast. Bedankt voor het melden.

06.11.2015 - 13:02

country flag Lola wrote:

Bonjour, il est indiqué qu'il faut monter 96m. Une fois la partie en côtes 2/2 terminée, il faut passer au jersey et faire 28 augmentations. Si je compte bien, on arrive donc à 124m. Or dans les explications, il est indiqué qu'on arrive à 68m. Je vous avoue que je suis perdue... Nulle part on ne parle de diminution. Je trouve ce modèle très beau et j'aimerais vraiment pouvoir le faire. Merci pour votre aide!

05.11.2015 - 22:33

DROPS Design answered:

Bonjour Lola et merci, il faut effectivement répartir 28 diminutions pour arriver à 68 m (la correction a été faite), puis répartir 18 augmentations (en taille S). Bon tricot!

06.11.2015 - 12:58

country flag Anne-Marie Pedersen wrote:

Jeg har købt garn til trøje Drops 164-19. Garn er Drops Brushed Alpaca Silk fra Garnstudio. Til str. S har jeg købt som der står i opskriften ialt 225g, men det rækker ikke. Skal der købes det dobbelte antal nøgler, når der strikkes med dobbelt garn? Det fremgår ikke af opskriften. Efter diagrammet måler kraven 18cm i bredden,min måler 36cm. I alt 72cm i fuld bredde. Strikkefastheden passer med beskrivelsen.

06.09.2015 - 20:44

DROPS Design answered:

Hej Anne-Marie, Vi skal se på det! MEN har du målt så du har 13 m på 10 cm i bredden og 17 p på 10 cm i højden? Det er utroligt vigtigt at du ikke strikker den for stramt!

18.09.2015 - 15:42

country flag Antje Scharfenberg wrote:

Beim Zunahmetipp ist immer die Rede von Abnahmen vor und nach den Maschenmarkierern,das kann doch so nicht stimmen? Man soll doch bestimmt zunehmen,oder?

23.08.2015 - 08:28

DROPS Design answered:

Ja, Sie haben natürlich Recht, das ist ein Fehler, der gleich korrigiert wird, danke für den Hinweis!

01.09.2015 - 10:10

country flag Denise Chassagne wrote:

Bonjour le modèle 164-19 est proposé en deux qualités de laine. Hors je ne trouve pas la qualité drops mélody ni sur le site drops ni sur les sites des revendeurs. où oui-je trouver ce nuancier ? Cordialement

27.07.2015 - 12:08

DROPS Design answered:

Bonjour Mme Chassagne, DROPS Melody est une toute nouvelle qualité qui sortira très prochainement. Bientôt plus d'informations à ce sujet, pensez à vous abonner à notre Newsletter et/ou à nous suivre sur Facebook pour plus d'informations. Bon tricot!

27.07.2015 - 18:01

country flag Tina wrote:

Så himla snygg! Kommer definitivt sticka både denna, den matchande ponchon och mössan! När kommer beskrivningarna på nätet?

13.06.2015 - 14:36

country flag Susanne Putz wrote:

Sehr ansprechendes Muster und Farbkombination. Ärmelkante könnte etwas feiner gearbeitet sein. Insgesamt würde ich ihn nachstricken!

12.06.2015 - 10:59

country flag Paola Tarantino wrote:

E' una coccola

06.06.2015 - 19:53

country flag Lene Christensen wrote:

Den skal jeg bare lave til efteråret! Den er bare lækker og den har det der rustikke look som jeg elsker... 😀

30.05.2015 - 10:00