DROPS Brushed Alpaca Silk
77% Alpaca, 23% Silk
from 2.90 £ /25g
Get the yarn to make this pattern from 14.50£.

The yarn cost is calculated from the pattern’s smallest size and the yarn’s cheapest product type. Looking for an even better price? You might find it on the DROPS Deals!

DROPS Super Sale

Sweet Winter Hat

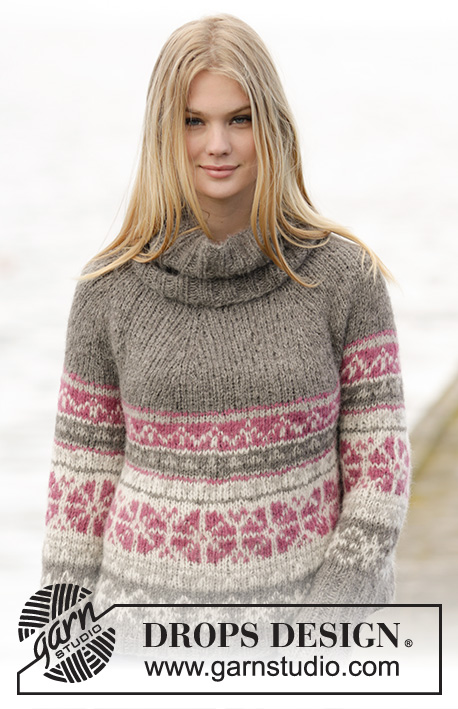
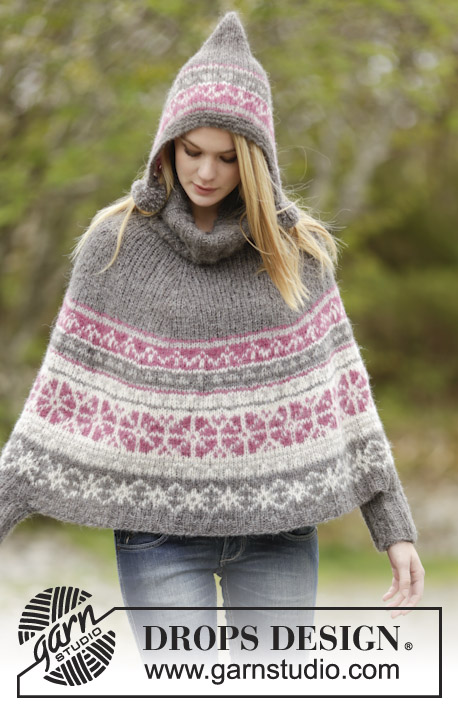
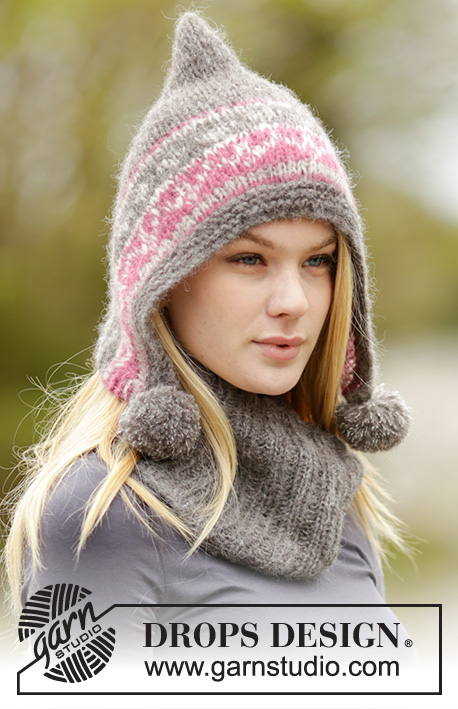
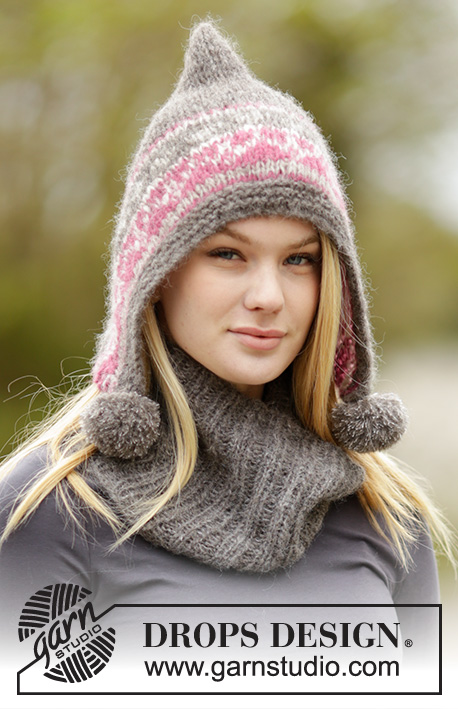
Set consists of: Knitted DROPS hat in 2 strands ”Brushed Alpaca Silk” or 1 strand ”Melody” with Nordic pattern, pompoms and garter band and neckwarmer with rib.

DROPS 164-7
DROPS design: Pattern no as-042
Yarn group C+C (or D)
----------------------------------------------------------
HAT:
Size: One-size
Head circumference: 54/56 cm
Materials:
DROPS BRUSHED ALPACA SILK from Garnstudio
25 g colour no 03, grey
25 g colour no 02, light grey
25 g colour no 08, heather
25 g colour no 01, off white
Or use:
DROPS MELODY from Garnstudio
50 g colour no 04, grey
50 g colour no 03, pearl grey
50 g colour no 10, heather
50 g colour no 01, off white

DROPS CIRCULAR NEEDLE (40 cm) SIZE 6 mm - or size needed to get 13 sts x 17 rows in stocking st with 2 strands Brushed Alpaca Silk or 1 strand Melody = 10 x 10 cm.
DROPS CIRCULAR NEEDLE (40 cm) SIZE 5.5 mm – for edge in garter st.

NECK WARMER:
Size: S/M - L/XL
Measurements: Circumference: approx. 52-55 cm Height: 20-22 cm
Materials:
DROPS BRUSHED ALPACA SILK from Garnstudio
50 g for both sizes in colour no 03, grey
Or use:
DROPS MELODY from Garnstudio
50 g in both sizes colour no 04, grey

DROPS CIRCULAR NEEDLE (40 cm) SIZE 5.5 mm - or size needed to get 14 sts x 18 rows in stocking st with 2 strands Brushed Alpaca Silk or 1 strand Melody = 10 x 10 cm.

-------------------------------------------------------

Alternative Yarn – See how to change yarns here
Yarn Groups A to F – Use the same pattern and change the yarn here
Yarn usage using an alternative yarn – Use our yarn converter here

-------------------------------------------------------

DROPS Brushed Alpaca Silk
77% Alpaca, 23% Silk
from 2.90 £ /25g
Get the yarn to make this pattern from 14.50£.

The yarn cost is calculated from the pattern’s smallest size and the yarn’s cheapest product type. Looking for an even better price? You might find it on the DROPS Deals!

DROPS Super Sale

SAVE 30% on 6 cotton favourites!
Valid until 12.04.2024

Pattern instructions

NOTE: This pattern is written in British English. All measurements in charts are in cm. For conversion from cm to inches - click here. There are different terms for crocheting in British and American English. If this pattern includes crochet, click for "crochet terms" here. For this pattern in American English, please click here.
KNITTING TIP:
To avoid the knitting tension to tighten when working pattern, it is important not to tighten the strands on back side of piece. Switch to a higher needle no when working pattern if the pattern is somewhat tight.

DOUBLE YARN TIP:
Use yarn from both inside and outside of the ball. When switching to a new ball, try to avoid switching both strands at the same time - to avoid a thick yarn when fastening.

GARTER ST (back and forth):
K all rows. 1 ridge = 2 rows K.

PATTERN:
See diagram A.1. The diagrams show all rows in pattern seen from RS. Work all pattern sts in stocking st with 2 strands Brushed Alpaca Silk (= BAS) or 1 strand Melody (= M).

DECREASE TIP:
Dec 1 st by K 2 sts tog.
----------------------------------------------------------

HAT:
Work back and forth on circular needle and sew tog mid back - READ DOUBLE YARN TIP and KNITTING TIP. NOTE: Work the 3 sts in garter st in each side always in base colour on every row in pattern.

Cast on 73 sts with 2 strands grey Brushed Alpaca Silk or 1 strand grey Melody on circular needle size 5.5 mm. Work 3 ridges in GARTER ST back and forth - see explanation above, and dec on 5th row 6 sts evenly (but no over the outermost 3 sts in each side) - READ DECREASE TIP = 67 sts. Switch to circular needle size 6 mm and continue with PATTERN - see explanation above - as follows: Work 3 sts in garter st, work A.1 (= 12 sts) 5 times in width, work first st in A.1 so that pattern is symmetrical in each side, 3 sts in garter st. Continue like this back and forth. REMEMBER THE KNITTING TENSION When A.1 has been worked vertically, continue with grey ( 2 strands Brushed Alpaca Silk/ 1 strand Melody) until finished measurements. When piece measures 20 cm, work as follows: Work until 10 sts remain, turn and work until 10 sts remain, turn and work until 15 sts remain, turn and work until 15 sts remain. Continue like this by working 5 sts less on every row until piece measures 25 cm. Switch to circular needle size 5.5 mm. Work 1 ridge in garter st over all sts and inc on first row 6 sts evenly = 73 sts. Cast off.

POMPOMS:
Make 2 large pompoms with grey with an approx. diameter of 7 cm. Fasten a pompom in each end of cast-on edge.

ASSEMBLY:
Fold hat so that cast-off edge is placed double. Beg at the edge in each side and sew one and one st neatly tog towards the middle of cast-off edge. Cut the yarn and fasten.
----------------------------------------------------------

NECK WARMER:
Worked in the round on circular needle. READ DOUBLE YARN TIP.
Cast on 76-84 sts on circular needle size 5.5 mm with 2 strands Brushed Alpaca Silk or 1 strand Melody. Work rib = K 2/P 2 for 20-22 cm. REMEMBER THE KNITTING TENSION Cast off sts with K over K and P over P.

Diagram

symbols = 2 strands grey BAS or 1 strand grey M
symbols = 2 strands heather BAS or 1 strand heather M
symbols = 2 strands off white BAS or 1 strand off white M
symbols = 2 strands light grey BAS or 1 strand pearlgrey M
diagram

Each of our patterns has specific tutorial videos to help you.

Do you have a question? See a list of frequently asked questions (FAQ)

Knitting tension is what determines the final measurements of your work, and is usually measured per 10 x 10 cm. It is provided like so: number of stitches in width x number of rows in height - eg: 19 stitches x 26 rows = 10 x 10 cm.

The knitting tension is very individual; some people knit/crochet loosely while others work tightly. You adjust the knitting tension with the needle size, which is why the suggested needle size is only meant as a guide! You need to adjust this (up or down) to ensure that YOUR knitting tension matches the knitting tension provided in the pattern. If you work with a different knitting tension than provided you will have a different yarn consumption, and your work will have different measurements than what the pattern suggests.

The knitting tension also determines which yarns can replace each other. As long as you achieve the same knitting tension you can replace one yarn with another.

See DROPS lesson: How to measure your tension/gauge

See DROPS video: How to make a gauge tension swatch

The required amount of yarn is provided in grams, eg: 450 g. To calculate how many balls you’ll need you first need to know how many grams are in 1 ball (25g, 50g or 100g). This information is available if you click on the individual yarn quality on our pages. Divide the amount required with the amount of each ball. For example, if each ball is 50g (the most common amount), the calculation will be as follows: 450 / 50 = 9 balls.

The important thing when changing from one yarn to another is that the knitting/crochet tension remains the same. This is so that the measurements of the finished piece will be the same as on the sketch provided. It is easier to achieve the same knitting tension using yarns from the same yarn group. It is also possible to work with multiple strands of a thinner yarn to achieve the knitting tension of a thicker one. Please try our yarn converter. We recommend you to always work a test swatch.

Please NOTE: when changing yarn the garment might have a different look and feel to the garment in the photo, due to individual properties and qualities of each yarn.

See DROPS lesson: Can I use a different yarn than the one mentioned in the pattern?

All our yarns are categorised into yarn groups (from A to F) according to thickness and knitting tension – group A contains the thinnest yarns and group F the thickest. This makes it easier for you to find alternative yarns to our patterns, should you wish to switch yarn. All yarns within the same group have a similar knitting tension and can easily replace each other. However, different yarn qualities have different structures and properties which will give the finished work a unique look and feel.

Click here for an overview of the yarns in each yarn group

At the top of all our patterns you’ll find a link to our yarn calculator, which is a helpful tool should you wish to use a different yarn than suggested. By filling in the yarn quality you wish to replace, the amount (in your size) and number of strands, the calculator will present good alternative yarns with the same knitting tension. Additionally it will tell you how much you’ll require in the new qualities and whether you’ll need to work with multiple strands. Most skeins are 50g (some are 25g or 100g).

If the pattern is worked with multiple colours, every colour will have to be calculated separately. Similarly, if the pattern is worked with several strands of different yarns (for example 1 strand Alpaca and 1 strand Kid-Silk) you will have to find alternatives for each, individually.

Click here to see our yarn calculator

Since different yarns have different qualities and textures we have chosen to keep the original yarn in our patterns. However, you can easily find options among our available qualities by using our yarn calculator, or simply pick a yarn from the same yarn group.

It is possible that some retailers still have discontinued yarns in stock, or that someone has a few skeins at home that they would like to find patterns for.

The yarn calculator will provide both alternative yarn as well as required amount in the new quality.

If you think it's hard to decide what size to make, it can be a good idea to measure a garment you own already and like the size of. Then you can pick the size by comparing those measures with the ones available in the pattern's size chart.

You'll find the size chart at the bottom of the pattern.

See DROPS lesson: How to read size chart

The needle size provided in the pattern serves only as a guide, the important thing is to follow the knitting tension. And since knitting tension is very individual, you will have to adjust the needle size to ensure that YOUR tension is the same as in the pattern – maybe you’ll have to adjust 1, or even 2 needle sizes, up or down to achieve the correct tension. For this, we recommend that you work test swatches.

Should you work with a different knitting tension than the one provided, the measurements of the finished garment might deviate from the measurement sketch.

See DROPS lesson: How to measure your tension/gauge

See DROPS video: How to make a tension/gauge swatch

Working a garment top-down provides more flexibility and room for personal adjustment. For example it is easier to try the garment on while working, as well as making adjustments to length of yoke and shoulder caps.

The instructions are carefully explaining every step, in the correct order. Diagrams are adjusted to the knitting direction and are worked as usual.

The diagram depicts all rows/rounds, and every stitch seen from the right side. It is read from bottom to top, from right to left. 1 square = 1 stitch.

When working back and forth, every other row is worked from the right side and every other row is worked from the wrong side. When working from the wrong side, the diagram will have to be worked reversed: from left to right, knit stitches are purled, purl stitches are knit etc.

When working in the round every round is worked from the right side and the diagram are worked from right to left on all rounds.

See DROPS lesson: How to read knitting diagrams

The diagram depicts all rows/rounds, and every stitch seen from the right side. It is worked from bottom to top, from right to left.

When working back and forth every other row is worked from the right side: from right to left and every other row is worked from the wrong side: from left to right.

When working in the round, every row in the diagram are worked from the right side, from right to left.

When working a circular diagram you start in the middle and work your way outwards, counter clockwise, row by row.

The rows usually start with a given number of chain stitches (equivalent to the height of the following stitch), this will either be depicted in the diagram or explained in the pattern.

See DROPS lesson: How to read crochet diagrams

Instructions for working several diagrams after each other on the same row/round, will often be written like so: “work A.1, A.2, A.3 a total of 0-0-2-3-4 times". This means you work A.1 once, then A.2 is worked once, and A.3 is repeated (in width) the number of times provided for your size – in this case like so: S = 0 times, M = 0 times, L=2 times, XL= 3 times and XXL = 4 times.

The diagrams are worked as usual: begin with the first row in A.1, then work the first row in A.2 etc.

See DROPS lesson: How to read knitting diagrams

See DROPS lesson: How to read crochet diagrams

The total width of the garment (from wrist-to-wrist) will be larger in the larger sizes, despite the actual sleeves being shorter. The larger sizes have longer sleeve caps and wider shoulders, so there will be a good fit in all sizes.

The measurement sketch/schematic drawing provides information regarding the full length of the garment. If it’s a jumper or a jacket the length is measured from the highest point on the shoulder closest to the neckline, and straight down to the bottom of the garment. It is NOT measured from the tip of shoulder. Similarly, the length of yoke is measured from the highest point on the shoulder and down to where yoke is split into body and sleeves.

On a jacket measures are never taken along bands, unless specifically stated. Always measure inside band stitches when measuring the length.

See DROPS lesson: How to read a schematic drawing

Diagrams are often repeated on the round or in height. 1 repeat is the diagram the way it appears in the pattern. If it says to work 5 repeats of A.1 in the round, then you work A.1 a total of 5 times after/next to each other in the round. If it says to work 2 repeats of A.1 vertically/in height you work the entire diagram once, then begin again at the start and work the entire diagram one more time.

Chain stitches are slightly narrower than other stitches and to avoid working the cast-on edge too tight, we simply chain more stitches to begin with. The stitch count will be adjusted on the following row to fit the pattern and measurement sketch.

The rib edge is more elastic and will contract slightly compared to, for example, stocking stitch. By increasing before the rib edge, you avoid a visible difference in width between the rib edge and the rest of the body.

It’s very easy to cast off too tightly, and by making yarn overs while casting off (and simultaneously casting these off) you avoid a too tight cast off edge.

See DROPS video: How to bind off with yarn overs (yo)

To achieve an even increase (or decrease) you can increase on, for example: every 3rd and 4th row alternately, like so: work 2 rows and increase on the 3rd row, work 3 rows and increase on the 4th. Repeat this until the increase is complete.

See DROPS lesson: Increase or decrease 1 st on every 3rd and 4th row alternately

Should you prefer to work in the round instead of back and forth, you may of course adjust the pattern. You’ll need to add steeks mid-front (usually 5 stitches), and follow the instructions. When you would normally turn and work from the wrong side, simply work across the steek and continue in the round. At the end you’ll cut the piece open, pick up stitches to work bands, and cover the cut edges.

See DROPS video: How to knit steeks and cut open

Should you prefer to work back and forth instead of in the round, you may of course adjust the pattern so you work the pieces separately and then assemble them at the end. Divide the stitches for the body in 2, add 1 edge stitch in each side (for sewing) and work the front and back pieces separately.

See DROPS lesson: Can I adapt a pattern for circular needles into straight needles?

Pattern repeats can vary slightly in the different sizes, in order to get the correct proportions. If you’re not working the exact same size as the garment in the photo, yours might deviate slightly. This has been carefully developed and adjusted so that the complete impression of the garment is the same in all sizes.

Make sure to follow instructions and diagrams for your size!

If you have found a pattern you like which is available in women’s size it’s not very difficult to convert it to men’s size. The biggest difference will be the length of sleeves and body. Start working on the women size that you think would fit across the chest. The additional length will be worked right before you cast off for the armhole/sleeve cap. If the pattern is worked top-down you can add the length right after the armhole or before the first decrease on sleeve.

Regarding additional yarn amount, this will depend on how much length you add, but it is better with a skein too many than too few.

All yarns will have excess fibres (from production) that might come off as lint or shedding. Brushed yarns (ie hairier yarns) have more of these loose, excess fibres, causing more shedding.

Shedding also depends on what is worn under or over the garment, and whether this pulls at the yarn fibres. It’s therefore not possible to guarantee that there will be no shedding

Below are some tips on how to get the best result when working with hairier yarns:

1. When the garment is finished (before you wash it) shake it vigorously so the looser hairs come off. NOTE: do NOT use a lint roller, brush or any method that pulls at the yarn.

2. Place the garment in a plastic bag and put it in your freezer - the temperature will cause the fibres to become less attached to each other, and excess fibres will come off easier.

3. Leave in the freezer for a few hours before taking it out and shaking it again.

4. Wash the garment according to the instructions on the yarn label.

Pilling is a natural process that happens to even the most exclusive of fibers. It's a natural sign of wear and tear that is hard to avoid, and that is most visible in high friction areas of your garment like a sweater's arms and cuffs.

You can make your garment look as new by removing the pilling, using a fabric comb or a pill/lint remover.

Still can't find the answer you need? Then scroll down and leave your question so one of our experts can try to help you. This will be done normally within 5 to 10 working days.
In the meantime, you can read the questions and answers that others have left to this pattern or join the DROPS Workshop on Facebook to get help from fellow knitters/crocheters!

You might also like...

Post a comment to pattern DROPS 164-7

We would love to hear what you have to say about this pattern!

If you want to leave a question, please make sure you select the correct category in the form below, to speed up the answering process. Required fields are marked *.

Comments / Questions (31)

country flag Marga Flaßwinkel wrote:

Eine sehr schöne Mütze, die ich gern stricken würde. Warum gibt es keine Angabe zur Maschenprobe, vor allem aber keine Maße in cm und keine graphische Abbildung?

10.04.2023 - 14:43

DROPS Design answered:

Liebe Frau Flaßwinkel, Maschenprobe finden Sie unter die Kopfzeilen, zusammen mit den Größen, Garn, Garnmenge, Nadel usw... Skizze gibt es dazu keine, nur Diagram für das 2-Fädig Muster. Viel Spaß beim stricken!

11.04.2023 - 14:15

country flag Giliane wrote:

Bonjour, N’étant pas douée pour tricoter en jacquard, Je souhaite le faire en uni. Combien de pelotes dois-je utiliser ? Cordialement, Giliane

12.12.2022 - 20:51

DROPS Design answered:

Bonjour Giliane, comme ce modèle a été tricoté en jacquard, nous avons seulement cette quantité et n'avons plus le modèle pour le peser. Vous pouvez ajouter toutes les couleurs ensemble, il vous en faudra probablement un peu moins. Votre magasin DROPS saura vous aider et vous conseiller, même par mail ou téléphone. Bon tricot!

13.12.2022 - 08:04

country flag Maria wrote:

Per realizzare il cappello non è necessario usare i ferri circolari. Giusto? Non si vede il dietro del cappello. immagino che al centro del dietro si formi una motivo a legaccio di 6 maglie giusto?

06.10.2022 - 06:56

DROPS Design answered:

Buonasera Maria, è corretto, non deve usare i ferri circolari e ci sono 3 maglie a legaccio a ogni lato. Buon lavoro!

07.10.2022 - 20:59

country flag Beatriz wrote:

Bonjour, c'est-ce que j'ai fait 13mx17rx 2 fils BAS = en double (pour avoir 10cm), aiguilles 6,5,5,5 mais je n'arrive pas à avoir le bon résultat pour commencer à tricoter. j'ai changé les aiguilles de plus grandes à plus petites jusqu'à 4.5 et cela me donne toujours 7 cm sur 10 cm. quoi faire d'autre

27.11.2020 - 17:02

DROPS Design answered:

Bonjour Beatriz, vous tricotez peut-être serré? Essayez de changer d'aiguilles - mais pas seulement la taille, également la matière si possible, ça joue parfois sur votre tension. Demandez conseil à votre magasin (même par mail ou téléphone), il aura peut-être des astuces pour vous. Bon tricot!

30.11.2020 - 07:51

country flag Beatriz wrote:

Bonjour, je n'arrive pas à faire un échantillon 2 mailles ensemble Brushed Alpaca Silk comme indiqué. J'ai pris des aiguilles plus petites et plus grandes et j'arrive au même résultat, cad. ça ne me donne que 7 mailles sur 10. quoi faire d'autre, j'ai hâte de commencer ce bonnet et je suis incapable de le faire, merci beaucoup si vous pouvez m'aider

27.11.2020 - 15:54

DROPS Design answered:

Bonjour Beatriz, je ne suis pas sûre de comprendre, votre échantillon doit être de 13 m x 17rangs pour le bonnet avec 2 fils Brushed Alpaca Silk tricotés ensemble (= en double) - je ne comprends pas vos "2 mailles ensemble". Si vous n'avez pas le bon échantillon, vous ne pourrez obtenir les bonnes mesures. Bon tricot!

27.11.2020 - 16:17

country flag Coraline wrote:

Bonjour , quand on fait les rangs raccourcis qu’est ce qu’on fait avec les mailles non tricotées de chaque côté ? Exemple les 10 mailles ou 5 mailles non tricoteées sont en attente sur l’aiguille .. elles ne sont pas encore rabattues . Merci de votre aide !

14.11.2019 - 15:31

DROPS Design answered:

Bonjour Coraline, on laisse les mailles de chaque côté en attente jusqu'à la fin des rangs raccourcis, on les reprendra ensuite quand on va tricoter la côte mousse sur toutes les mailles avec l'aiguille 5,5. Bon tricot!

14.11.2019 - 15:50

country flag Kathryn wrote:

Hi, the pattern says to use a40cm circular needle or long enough to cast on 13st but then it says cast on 73st which will not fit on a 40cm needle, but 14st would. ???

21.10.2019 - 17:07

DROPS Design answered:

Hi Kathryn, The 13 stitches mentioned after the needle size is for your knitting tension - so 13 stitches x 17 rows should give you 10 x 10 cm if your tension is right. If you find the length of the needle too short you could try 60 cm in length. Happy knitting!

22.10.2019 - 07:28

country flag Gwendoline HILLAIRET wrote:

Oui ça j\'avais compris mais le soucis quand on arrive a la fin des 15 mailles mais pour faire les mailles endroits ( point mousse) je me retrouve au milieu du travail et pas sur un côté du travail ?

13.12.2018 - 09:54

DROPS Design answered:

Bonjour Mme Hillairet, tout à fait, à la fin des rangs raccourcis, vous êtes au milieu du rang, vous pouvez couper le fil, glisser toutes les mailles sur la même aiguille et tricoter 1 rang sur l'endroit sur toutes les mailles en augmentant 6 mailles à intervalles réguliers. Bon tricot!

13.12.2018 - 12:35

Gwen wrote:

Bonjour Alors moi j'ai compris pour laisser les mailles 10 puis 15 puis 20 mais arrive a 30 mailles on arrive au milieu du travail du coup je ne sais pas quoi faire?

12.12.2018 - 23:00

DROPS Design answered:

Bonjour Gwen, les rangs raccourcis se tricotent sur 5 m en moins à chaque rang: tricotez jusqu'à ce qu'il reste 10 m à la fin du rang sur l'endroit, tournez et tricotez jusqu'à ce qu'il reste 10 m à la fin du rang sur l'envers, tournez, tricotez 5 m en moins à la fin de chacun des rangs suivants de chaque côté (= on a 15 m non travaillées, puis 20 m, puis 25 m et ainsi de suite) jusqu'à ce que l'ouvrage mesure 25 cm. En fonction de votre tension en hauteur, vous aurez besoin de plus ou moins de rangs pour atteindre cette hauteur. Tricotez ensuite 2 rangs endroit sur toutes les mailles en augmentant 6 m au 1er de ces rangs. Bon tricot!

13.12.2018 - 09:28

country flag Irene wrote:

Salve, per fare il pompon da 7 cm di diametro immagino che il disco di cartone per realizzarlo dovra' essere di diametro maggiore, di quanto? Grazie

21.08.2018 - 05:58

DROPS Design answered:

Buongiorno Irene, il disco deve avere le stesse dimensioni del pom pom. Buon lavoro!

21.08.2018 - 07:42