
Popular categories
Looking for a yarn?


|
|||||||||||||||||||
Autumn Leaf |
|||||||||||||||||||
|
|
|||||||||||||||||||
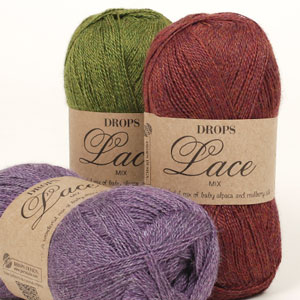
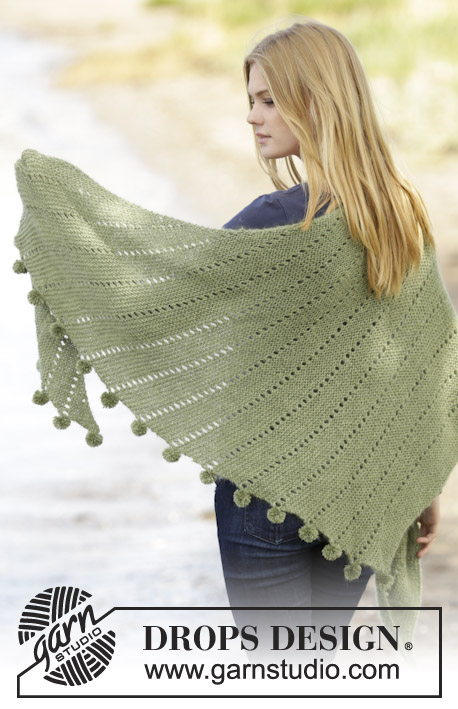
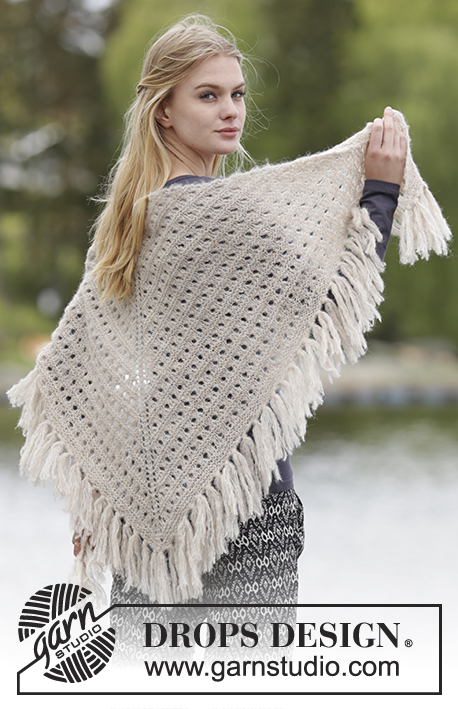
Knitted DROPS shawl with lace pattern and leaves in "Lace" or "BabyAlpaca Silk".
DROPS 164-41 |
|||||||||||||||||||
|
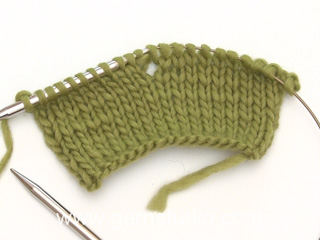
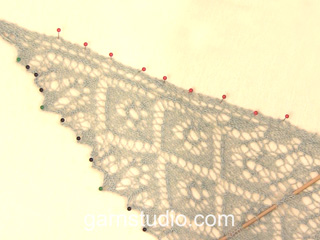
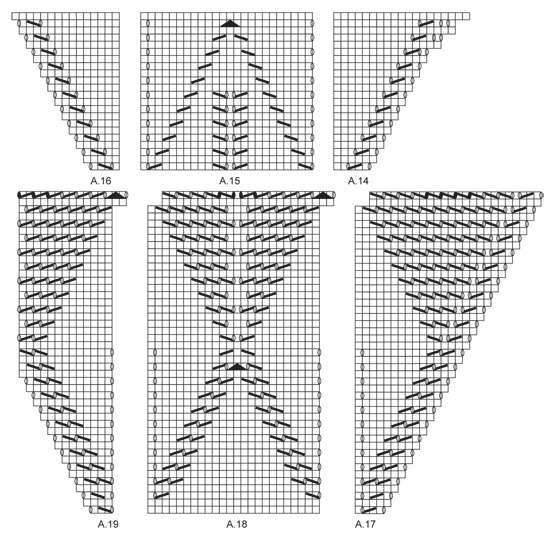
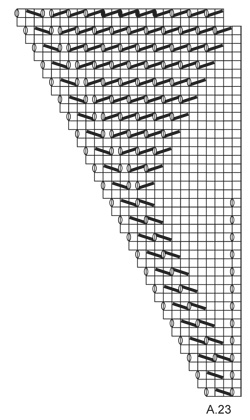
GARTER ST (back and forth): K all rows. 1 ridge = 2 rows K. PATTERN: See diagrams A.1 to A.23. The diagrams show all rows in pattern seen from RS. KNITTING TIP: The shawl can be knitted with other needle sizes than those given here. Use smaller needles for a smaller shawl and larger needles for a larger shawl. Stretch the shawl to side at the end and even out possible uneven places. SHAPING: When using another yarn than Lace from yarn group A, there is no need to stretch to measurements, but place it gently out in shape. Leave to dry. Repeat the process when the garment has been washed. ---------------------------------------------------------- SHAWL: Worked back and forth on circular needle to make room for all the sts. READ KNITTING TIP! Cast on 9 sts with Lace or BabyAlpaca Silk on circular needle size 3 mm and K 1 row from WS. Work in GARTER ST - see explanation above as follows (= RS): K 3, 1 YO, K 1, 1 YO, K 1, 1 YO, K 1, 1 YO, K 3 = 13 sts. Insert 1 marker in the middle st and move it upwards when working. Then inc 4 sts on every row from RS as follows: Inc 1 st inside 3 edge sts in each side and 1 st on each side of mid st. Inc like this 5 times in total, there are 33 sts on the needle. Now work according to diagram A.1 as follows: 3 edge sts in garter st, A.1 over the next 13 sts, 1 st in stocking st (= mid st, always worked in stocking st), A.1 over 13 sts and 3 edge sts in garter st. Work A.1 1 time vertically = 61 sts on needle (i.e. 30 sts on each side of mid st). Work according to diagram A.2-A.4 as follows: 3 edge sts in garter st, A.2 over 7 sts, A.3 over 14 sts, A.4 over 6 sts, 1 mid st, A.2 over 7 sts, A.3 over 14 sts, A.4 over 6 sts and 3 edge sts in garter st. When A.2-A.4 have been worked 1 time vertically, there is room for 1 more repetition of A.3 between A.2 and A.4. Continue to work according to diagram until diagram A.2-A.4 have been worked 3 times in total vertically = 145 sts on needle (i.e. 72 sts on each side of mid st). Work according to diagram A.5-A.10 as follows: 3 edge sts in garter st, A.5 over 11 sts, repeat A.6 until 10 sts remain before mid st, A.7 over 10 sts, 1 mid st, A.8 over 10 sts, repeat A.9 until 14 sts remain, A.10 over 11 sts and 3 edge sts in garter st. Work A.5-A.10 1 time vertically = 217 sts on needle (i.e. 108 sts on each side of mid st). Work diagram A.11-A.16 as follows: 3 edge sts in garter st, A.11 over 4 sts, repeat A.12 until 5 sts remain before mid st, A.13 over 5 sts, 1 mid st, A.14 over 5 sts, repeat A.15 until 7 sts remain, A.16 over 4 sts and 3 edge sts in garter st. Work diagram A.11-A.16 1 time vertically = 267 sts on needle (i.e. 133 sts on each side of mid st). Work diagram A.17-A.23 as follows: 3 edge sts in garter st, A.17 over 4 sts, repeat A.18 until 6 sts remain before mid st, A.19 over 3 st, A.20 over 7 sts (mid st is in the middle of these sts), A.21 over 3 st, repeat A.22 until 7 sts remain, A.23 over 4 sts and 3 edge sts in garter st. When diagrams have been worked 1 time vertically, loosely cast off. NOTE: Work double YOs on last row in diagram as follows when casting off: K 1st YO, K 2nd YO twisted. BLOCKING: Place the shawl in lukewarm water until it is soaking wet. Carefully squeeze the water out of the shawl - do not twist the shawl - then roll the shawl in a towel and squeeze to remove more water - the shawl will now only be moist. When using BabyAlpaca Silk – READ SHAPING! Place the shawl on a carpet or mattress - carefully stretch it out to size and fasten it with pins, pull in the tips of leaves along the cast-off edge. Leave to dry. Repeat the process when the shawl has been washed. |
|||||||||||||||||||
Diagram explanations |
|||||||||||||||||||
|
|||||||||||||||||||

|
|||||||||||||||||||

|
|||||||||||||||||||
|
|||||||||||||||||||

|
|||||||||||||||||||
|
|||||||||||||||||||
|
Have you made this or any other of our designs? Tag your pictures in social media with #dropsdesign so we can see them! Do you need help with this pattern?You'll find tutorial videos, a Comments/Questions area and more by visiting the pattern on garnstudio.com. © 1982-2024 DROPS Design A/S. We reserve all rights. This document, including all its sub-sections, has copyrights. Read more about what you can do with our patterns at the bottom of each pattern on our site. |
|||||||||||||||||||


With over 40 years in knitting and crochet design, DROPS Design offers one of the most extensive collections of free patterns on the internet - translated to 17 languages. As of today we count 304 catalogues and 11422 patterns - 11422 of which are translated into English (UK/cm).
We work hard to bring you the best knitting and crochet have to offer, inspiration and advice as well as great quality yarns at incredible prices! Would you like to use our patterns for other than personal use? You can read what you are allowed to do in the Copyright text at the bottom of all our patterns. Happy crafting!
Comments / Questions (55)
Liebes Drops - Team, Ich habe den Denk - Fehler gefunden. In der 3. Reihe endet man mit 11 Maschen, anstatt zuvor mit 10 Maschen vor der Mittel Masche. Einfacher wäre es gewesen, wenn dies in der Anleitung vermerkt wäre. Aber vielleicht hilft der Hinweis anderen Stricker - innen. LG Petra
24.10.2019 - 17:39Hallo, ich bin jetzt in der 3. Reihe und die Anzahl der Maschen ist korrekt ( je 74 pro Nadel +1 MM). In der 3. Reihe habe ich allerdings 12, anstatt 10 M vor der MM . D.h. 2 Maschen zu viel.... Wo liegt der Fehler? LG Petra
21.10.2019 - 18:26DROPS Design answered:
Liebe Petra, es ist etwas schwierig um Ihnen so zu beantworten, eine gute Idee ist Markierer zwischen jedem Diagram einzusetzen, so können Sie bei jeder Reihe die Maschenanzahl prüfen. Viel Spaß beim stricken!
22.10.2019 - 10:35Hallo, ich bin beim Diagramm A5 -A10 , in der 3. Reihe. Beidseitig der Mittel Masche habe ich je 74 Maschen auf der Nadel. Beim Stricken nach der Strickschrift, habe ich auf beiden Seiten je 2 Maschen, die ich nicht integrieren kann. Wo könnte der Fehler liegen? Leider komme ich nun nicht mehr weiter. Für eine rasche Antwort, wäre ich sehr dankbar. LG Petra
20.10.2019 - 19:26DROPS Design answered:
Liebe Petra, bei den Diagrammen A.5, A.7, A.9 und A.10 nehmen Sie je 1 Masche = 4 Maschen pro Hinreihen werden zugenommen. Nach der 2. Reihe, haben Sie dann 145 +4= 149 M (= 74 M auf beiden Seiten von der mittelren Maschen). Viel Spaß beim stricken!
21.10.2019 - 11:17Se cierra del lado derecho o del revés ?
10.05.2019 - 04:48DROPS Design answered:
Hola Susana. Se cierra la labor según el diagrama, por el lado derecho.
18.05.2019 - 20:351000 Tak for svar
07.02.2019 - 19:29Har jeg ret i at et mønster strikkes fra Højre mod Venstre blev lige pludselig i tvivl Med venlig hilsen Judithe Andersen
07.02.2019 - 00:18DROPS Design answered:
Hej Judith, ja det stemmer, du strikker fra nederst i højre hjørne af diagrammet fra retsiden og næste pind strikkes fra vrangen ifølge 2.pind fra venstre i diagrammet (dvs i vrang da diagrammet ses fra retsiden). God fornøjelse!
07.02.2019 - 15:54Désolée, je viens de m'en apercevoir. L'avantage, ayant du défaire une dizaine de fois mon ouvrage, cette laine se tient bien !
05.09.2018 - 19:47Bonjour\r\nEn lisant le commentaire de Geoffroy, du 16.05.2016 - 22:28: \r\nJe suis d\'accord.\r\nJe n\'ai tricoté que quelques rangs, mais ça ne correspond pas à la photo. \r\nPar exemple, à la pointe, c\'est à dire, en début d\'ouvrage, je vois sur la photo 7 jeté successifs, entre des mailles ensembles (ou surjet), alors qu\'il est indiqué de tricoté 3 mailles au point mousse dans les explications....
31.08.2018 - 23:33DROPS Design answered:
Bonjour Pascale, le châle se tricote de haut en bas, c'est-à-dire que l'on commence par 9 mailles seulement et on va augmenter 4 m tous les 2 rangs sur l'endroit pour former le triangle. La pointe sera formée par la maille centrale (= avec 1 augm de chaque côté de cette maille jersey). Bon tricot!
04.09.2018 - 11:33Merci pour votre aide. Je rabats donc sur l'envers à l'envers mais les explications précisent "tricoter le 1er jeté à l'end et le 2ème jeté torse à l'end" Donc les mailles à l'envers sauf les jetés à l'endroit?
13.04.2018 - 15:21DROPS Design answered:
Bonjour M Madeleine et oups, vous avez raison, on rabat à l'endroit sur l'envers (les mailles et les jetés). Bon tricot!
13.04.2018 - 16:00Bonjour, Est ce que je dois rabattre sur l'endroit (donc tricoter un rang envers d'abord) ou sur l'envers? merci de votre réponse Cordialement
13.04.2018 - 15:03DROPS Design answered:
Bonjour M Madeleine, rabattez au rang suivant après les diagrammes, c'est-à-dire à l'envers sur l'envers. Bon tricot!
13.04.2018 - 15:09