DROPS Cotton Merino
DROPS Cotton Merino
50% Wool, 50% Cotton
from 3.55 £ /50g
Get the yarn to make this pattern from 17.75£.

The yarn cost is calculated from the pattern’s smallest size and the yarn’s cheapest product type. Looking for an even better price? You might find it on the DROPS Deals!

DROPS SS24

Little Hedda

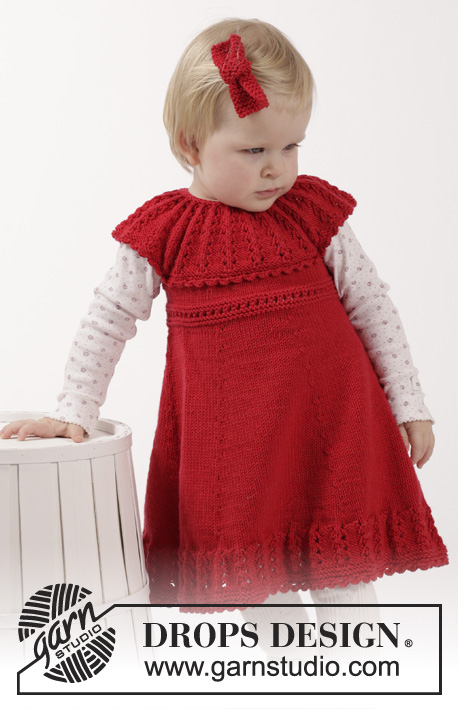
Knitted dress with lace edge and round yoke plus hair bow in garter st in DROPS Cotton Merino. For baby and children in sizes 1 month - 6 years.

DROPS Children 26-14
DROPS design: Pattern no cm-001-bn
Yarn group B
----------------------------------------------------------
DRESS:
Size: 1/3 - 6/9 - 12/18 months (2 - 3/4 - 5/6 years)
Size in cm: 56/62 - 68/74 - 80/86 - 92 - 98/104 - 110/116
Materials:
DROPS COTTON MERINO from Garnstudio
200-200-250 (300-300-350) g colour no 06, red

DROPS CIRCULAR NEEDLE (80 and 40 cm) SIZE 3.5 mm - or size needed to get 22 sts x 30 rows in stocking st = 10 x 10 cm.
DROPS CROCHET HOOK SIZE 3.5 mm - for edges.
DROPS BUTTON: ARCHED (white), NO 521: 2 pieces in all sizes

HAIR BOW:
Measurements: Small approx. 5 x 8 cm Large approx. 9 x 12 cm
Materials:
DROPS COTTON MERINO from Garnstudio
50 g colour no 06, red (small bow weighs approx. 6 and large bow weighs approx. 10 g).

DROPS STRAIGHT NEEDLES SIZE 3.5 mm - or size needed to get 22 sts x 45 rows in garter st = 10 x 10 cm.
ACCESSORY: Silk ribbon or hair pin for fastening the bow.

-------------------------------------------------------

Alternative Yarn – See how to change yarns here
Yarn Groups A to F – Use the same pattern and change the yarn here
Yarn usage using an alternative yarn – Use our yarn converter here

-------------------------------------------------------

DROPS Cotton Merino
DROPS Cotton Merino
50% Wool, 50% Cotton
from 3.55 £ /50g
Get the yarn to make this pattern from 17.75£.

The yarn cost is calculated from the pattern’s smallest size and the yarn’s cheapest product type. Looking for an even better price? You might find it on the DROPS Deals!

Pattern instructions

NOTE: This pattern is written in British English. All measurements in charts are in cm. For conversion from cm to inches - click here. There are different terms for crocheting in British and American English. If this pattern includes crochet, click for "crochet terms" here. For this pattern in American English, please click here.
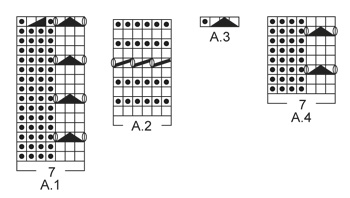
GARTER ST (worked in the round):
* K 1 round and P 1 round *, repeat from *-*. 1 ridge = 2 rounds.

GARTER ST (back and forth):
K all rows. 1 ridge = 2 rows K.

PATTERN:
See diagrams A.1 to A.4. The diagrams show all rows in pattern seen from RS.

DECREASE TIP:
Dec as follows after 1st, 2nd, 4th and 5th marker: Slip 1 st as if to K, K 1, psso (= 1 st dec).
Dec as follows before 3rd, 4th, 6th and 1st marker: Beg 2 sts before marker, K 2 sts tog (= 1 st dec).
----------------------------------------------------------

DRESS:
Worked in the round on circular needle from bottom up.
Cast on 217-231-245 (259-280-287) sts on circular needle size 3.5 mm with Cotton Merino. Work 2 ridges in GARTER ST in the round - see explanation above. K 1 round, then continue pattern in the round according to diagram A.1. When A.1 has been worked 1 time vertically, 186-198-210 (222-240-246) sts remain on needle and piece measures approx. 6 cm. K 1 round while AT THE SAME TIME dec 2-4-0 (2-4-2) sts evenly = 184-194-210 (220-236-244) sts.
Now insert 6 markers in the piece as follows: Insert 1st marker at beg of round (= side), 2nd marker after 27-29-32 (33-35-37) sts, 3rd marker after another 38-39-41 (44-48-48) sts, 4th marker after another 27-29-32 (33-35-37) sts (= side), 5th marker after another 27-29-32 (33-35-37) sts, 6th marker after another 38-39-41 (44-48-48) sts (27-29-32 (33-35-37) sts remain on round after last marker). Work in stocking st and move the markers upwards when working. REMEMBER THE KNITTING TENSION
When piece measures 8 cm, dec 1 st on each side of 1st and 4th marker, dec 1 st after 2nd and 5th marker and 1 st before 3rd and 6th marker – READ DECREASE TIP (= 8 sts dec). Repeat dec every 1½-1½-2 (2-2-2½) cm 11-11-12 (12-13-13) times in total = 96-106-114 (124-132-140) sts. Remove the 6 markers and insert 1 new marker at beg of round and 1 marker after 48-53-57 (62-66-70) sts (= sides). When piece measures 24-25-30 (33-36-40) cm (dec should now be done), work pattern in the round according to diagram A.2. When A.2 has been worked 1 time vertically, work in stocking st. When piece measures 28-29-34 (37-40-44) cm, work 2 ridges in garter st over the middle 10-10-12 (12-14-14) sts in each side (i.e. over 5-5-6 (6-7-7) sts on each side of both markers – NOTE: Work the other sts in stocking st as before). On next round after the 2 ridges, cast off the middle 6-6-8 (8-10-10) sts in each side for armholes (i.e. 3-3-4 (4-5-5) sts on each side of both markers) = 42-47-49 (54-56-60) sts remain on front and back piece. Cut the yarn.

YOKE:
Insert 1 marker – NOW MEASURE PIECE FROM HERE.
Beg mid back and K over sts on half back piece, cast on 36-38-44 (46-50-56) sts over one armhole, K over front piece, cast on 36-38-44 (46-50-56) sts over the other armhole and K until mid back again = 156-170-186 (200-212-232) sts. Now work piece back and forth on circular needle from mid back as follows: K 3 rows while AT THE SAME TIME on 1st row (= WS) dec 2-2-4 (4-2-8) sts evenly = 154-168-182 (196-210-224) sts. Work next row as follows from RS: 2 edge sts in garter st, work pattern according to diagram A.4 until 5 sts remain, finish with the first 3 sts in A.4 and 2 edge sts in garter st. Continue pattern like this. AT THE SAME TIME when piece measures 3-4-5 (6-7-8) cm from marker, dec all 4 P to 3 P by P the first 2 sts in every P-section tog. Repeat dec in every P-section when piece measures 5-6-7 (8-9-10) and 6-7-8 (9-10-11) cm = 91-99-107 (115-123-131) sts remain and there is only 1 P between every eyelet row. When piece measures approx. 7-8-9 (10-11-12) cm – adjust so that next row is a row with holes, work A.3 from RS over all sts (continue 2 edge sts in garter st as before) = 47-51-55 (59-63-67) sts remain.

NECK EDGE:
Work 2 ridges back and forth over all sts and then LOOSELY cast off.

ASSEMBLY:
Crochet 2 buttonhole straps along left side on opening at the back.
1 buttonhole strap = work with hook size 3.5 mm and Cotton Merino as follows: 1 dc in edge st at the top by neck, 4 ch and then 1 sl st in same st as dc was worked, fasten off. Work another strap in the middle along opening. Sew buttons on to the right side of opening.

CROCHET EDGE:
Work a finishing edge around the bottom of dress on hook size 3.5 mm as follows: 1 ch in first st, * 3 ch, 1 tr in 1st ch worked, skip 2-3 sts, 1 dc in next st *, repeat from *-* the entire round and finish with 1 sl st in 1st dc from beg of round. Fasten off.
Work a similar edge at the bottom around yoke - i.e. work along bottom ridge on yoke and then along both sleeve edges.

----------------------------------------------------------

HAIR BOW:
Numbers in ( ) applies to large bow.
Cast on 10 (20) sts on needle size 3.5 mm with Cotton Merino. Work in GARTER ST – see explanation above – back and forth until piece measures 8 (12) cm, cast off.

MIDDLE BAND:
Cast on 10 (15) sts on needle size 3.5 mm and work 4 (5) ridges. Cast off. Sew the short ends tog to form a ring.

Pull the bow through the ring and fasten the two parts tog with a couple of stitches. Fasten bow with a silk ribbon or a hair pin with a couple of stitches.

This pattern has been corrected.

Updated online: 02.05.2019
Correction - YOKE: When piece measures approx. 7-8-9 (10-11-12) cm – adjust so that next row is a row with holes, work A.3 from RS over all sts (continue 2 edge sts in garter st as before) = 47-51-55 (59-63-67) sts remain.

Diagram

symbols = K from RS, P from WS
symbols = P from RS, K from WS
symbols = 1 YO between 2 sts
symbols = K 2 tog
symbols = P 2 tog
symbols = slip 2 sts as if to K tog, K 1, pass the 2 slipped sts over
diagram
diagram

Each of our patterns has specific tutorial videos to help you.

Do you have a question? See a list of frequently asked questions (FAQ)

Knitting tension is what determines the final measurements of your work, and is usually measured per 10 x 10 cm. It is provided like so: number of stitches in width x number of rows in height - eg: 19 stitches x 26 rows = 10 x 10 cm.

The knitting tension is very individual; some people knit/crochet loosely while others work tightly. You adjust the knitting tension with the needle size, which is why the suggested needle size is only meant as a guide! You need to adjust this (up or down) to ensure that YOUR knitting tension matches the knitting tension provided in the pattern. If you work with a different knitting tension than provided you will have a different yarn consumption, and your work will have different measurements than what the pattern suggests.

The knitting tension also determines which yarns can replace each other. As long as you achieve the same knitting tension you can replace one yarn with another.

See DROPS lesson: How to measure your tension/gauge

See DROPS video: How to make a gauge tension swatch

The required amount of yarn is provided in grams, eg: 450 g. To calculate how many balls you’ll need you first need to know how many grams are in 1 ball (25g, 50g or 100g). This information is available if you click on the individual yarn quality on our pages. Divide the amount required with the amount of each ball. For example, if each ball is 50g (the most common amount), the calculation will be as follows: 450 / 50 = 9 balls.

The important thing when changing from one yarn to another is that the knitting/crochet tension remains the same. This is so that the measurements of the finished piece will be the same as on the sketch provided. It is easier to achieve the same knitting tension using yarns from the same yarn group. It is also possible to work with multiple strands of a thinner yarn to achieve the knitting tension of a thicker one. Please try our yarn converter. We recommend you to always work a test swatch.

Please NOTE: when changing yarn the garment might have a different look and feel to the garment in the photo, due to individual properties and qualities of each yarn.

See DROPS lesson: Can I use a different yarn than the one mentioned in the pattern?

All our yarns are categorised into yarn groups (from A to F) according to thickness and knitting tension – group A contains the thinnest yarns and group F the thickest. This makes it easier for you to find alternative yarns to our patterns, should you wish to switch yarn. All yarns within the same group have a similar knitting tension and can easily replace each other. However, different yarn qualities have different structures and properties which will give the finished work a unique look and feel.

Click here for an overview of the yarns in each yarn group

At the top of all our patterns you’ll find a link to our yarn calculator, which is a helpful tool should you wish to use a different yarn than suggested. By filling in the yarn quality you wish to replace, the amount (in your size) and number of strands, the calculator will present good alternative yarns with the same knitting tension. Additionally it will tell you how much you’ll require in the new qualities and whether you’ll need to work with multiple strands. Most skeins are 50g (some are 25g or 100g).

If the pattern is worked with multiple colours, every colour will have to be calculated separately. Similarly, if the pattern is worked with several strands of different yarns (for example 1 strand Alpaca and 1 strand Kid-Silk) you will have to find alternatives for each, individually.

Click here to see our yarn calculator

Since different yarns have different qualities and textures we have chosen to keep the original yarn in our patterns. However, you can easily find options among our available qualities by using our yarn calculator, or simply pick a yarn from the same yarn group.

It is possible that some retailers still have discontinued yarns in stock, or that someone has a few skeins at home that they would like to find patterns for.

The yarn calculator will provide both alternative yarn as well as required amount in the new quality.

If you think it's hard to decide what size to make, it can be a good idea to measure a garment you own already and like the size of. Then you can pick the size by comparing those measures with the ones available in the pattern's size chart.

You'll find the size chart at the bottom of the pattern.

See DROPS lesson: How to read size chart

The needle size provided in the pattern serves only as a guide, the important thing is to follow the knitting tension. And since knitting tension is very individual, you will have to adjust the needle size to ensure that YOUR tension is the same as in the pattern – maybe you’ll have to adjust 1, or even 2 needle sizes, up or down to achieve the correct tension. For this, we recommend that you work test swatches.

Should you work with a different knitting tension than the one provided, the measurements of the finished garment might deviate from the measurement sketch.

See DROPS lesson: How to measure your tension/gauge

See DROPS video: How to make a tension/gauge swatch

Working a garment top-down provides more flexibility and room for personal adjustment. For example it is easier to try the garment on while working, as well as making adjustments to length of yoke and shoulder caps.

The instructions are carefully explaining every step, in the correct order. Diagrams are adjusted to the knitting direction and are worked as usual.

The diagram depicts all rows/rounds, and every stitch seen from the right side. It is read from bottom to top, from right to left. 1 square = 1 stitch.

When working back and forth, every other row is worked from the right side and every other row is worked from the wrong side. When working from the wrong side, the diagram will have to be worked reversed: from left to right, knit stitches are purled, purl stitches are knit etc.

When working in the round every round is worked from the right side and the diagram are worked from right to left on all rounds.

See DROPS lesson: How to read knitting diagrams

The diagram depicts all rows/rounds, and every stitch seen from the right side. It is worked from bottom to top, from right to left.

When working back and forth every other row is worked from the right side: from right to left and every other row is worked from the wrong side: from left to right.

When working in the round, every row in the diagram are worked from the right side, from right to left.

When working a circular diagram you start in the middle and work your way outwards, counter clockwise, row by row.

The rows usually start with a given number of chain stitches (equivalent to the height of the following stitch), this will either be depicted in the diagram or explained in the pattern.

See DROPS lesson: How to read crochet diagrams

Instructions for working several diagrams after each other on the same row/round, will often be written like so: “work A.1, A.2, A.3 a total of 0-0-2-3-4 times". This means you work A.1 once, then A.2 is worked once, and A.3 is repeated (in width) the number of times provided for your size – in this case like so: S = 0 times, M = 0 times, L=2 times, XL= 3 times and XXL = 4 times.

The diagrams are worked as usual: begin with the first row in A.1, then work the first row in A.2 etc.

See DROPS lesson: How to read knitting diagrams

See DROPS lesson: How to read crochet diagrams

The total width of the garment (from wrist-to-wrist) will be larger in the larger sizes, despite the actual sleeves being shorter. The larger sizes have longer sleeve caps and wider shoulders, so there will be a good fit in all sizes.

The measurement sketch/schematic drawing provides information regarding the full length of the garment. If it’s a jumper or a jacket the length is measured from the highest point on the shoulder closest to the neckline, and straight down to the bottom of the garment. It is NOT measured from the tip of shoulder. Similarly, the length of yoke is measured from the highest point on the shoulder and down to where yoke is split into body and sleeves.

On a jacket measures are never taken along bands, unless specifically stated. Always measure inside band stitches when measuring the length.

See DROPS lesson: How to read a schematic drawing

Diagrams are often repeated on the round or in height. 1 repeat is the diagram the way it appears in the pattern. If it says to work 5 repeats of A.1 in the round, then you work A.1 a total of 5 times after/next to each other in the round. If it says to work 2 repeats of A.1 vertically/in height you work the entire diagram once, then begin again at the start and work the entire diagram one more time.

Chain stitches are slightly narrower than other stitches and to avoid working the cast-on edge too tight, we simply chain more stitches to begin with. The stitch count will be adjusted on the following row to fit the pattern and measurement sketch.

The rib edge is more elastic and will contract slightly compared to, for example, stocking stitch. By increasing before the rib edge, you avoid a visible difference in width between the rib edge and the rest of the body.

It’s very easy to cast off too tightly, and by making yarn overs while casting off (and simultaneously casting these off) you avoid a too tight cast off edge.

See DROPS video: How to bind off with yarn overs (yo)

To achieve an even increase (or decrease) you can increase on, for example: every 3rd and 4th row alternately, like so: work 2 rows and increase on the 3rd row, work 3 rows and increase on the 4th. Repeat this until the increase is complete.

See DROPS lesson: Increase or decrease 1 st on every 3rd and 4th row alternately

Should you prefer to work in the round instead of back and forth, you may of course adjust the pattern. You’ll need to add steeks mid-front (usually 5 stitches), and follow the instructions. When you would normally turn and work from the wrong side, simply work across the steek and continue in the round. At the end you’ll cut the piece open, pick up stitches to work bands, and cover the cut edges.

See DROPS video: How to knit steeks and cut open

Should you prefer to work back and forth instead of in the round, you may of course adjust the pattern so you work the pieces separately and then assemble them at the end. Divide the stitches for the body in 2, add 1 edge stitch in each side (for sewing) and work the front and back pieces separately.

See DROPS lesson: Can I adapt a pattern for circular needles into straight needles?

Pattern repeats can vary slightly in the different sizes, in order to get the correct proportions. If you’re not working the exact same size as the garment in the photo, yours might deviate slightly. This has been carefully developed and adjusted so that the complete impression of the garment is the same in all sizes.

Make sure to follow instructions and diagrams for your size!

If you have found a pattern you like which is available in women’s size it’s not very difficult to convert it to men’s size. The biggest difference will be the length of sleeves and body. Start working on the women size that you think would fit across the chest. The additional length will be worked right before you cast off for the armhole/sleeve cap. If the pattern is worked top-down you can add the length right after the armhole or before the first decrease on sleeve.

Regarding additional yarn amount, this will depend on how much length you add, but it is better with a skein too many than too few.

All yarns will have excess fibres (from production) that might come off as lint or shedding. Brushed yarns (ie hairier yarns) have more of these loose, excess fibres, causing more shedding.

Shedding also depends on what is worn under or over the garment, and whether this pulls at the yarn fibres. It’s therefore not possible to guarantee that there will be no shedding

Below are some tips on how to get the best result when working with hairier yarns:

1. When the garment is finished (before you wash it) shake it vigorously so the looser hairs come off. NOTE: do NOT use a lint roller, brush or any method that pulls at the yarn.

2. Place the garment in a plastic bag and put it in your freezer - the temperature will cause the fibres to become less attached to each other, and excess fibres will come off easier.

3. Leave in the freezer for a few hours before taking it out and shaking it again.

4. Wash the garment according to the instructions on the yarn label.

Pilling is a natural process that happens to even the most exclusive of fibers. It's a natural sign of wear and tear that is hard to avoid, and that is most visible in high friction areas of your garment like a sweater's arms and cuffs.

You can make your garment look as new by removing the pilling, using a fabric comb or a pill/lint remover.

Still can't find the answer you need? Then scroll down and leave your question so one of our experts can try to help you. This will be done normally within 5 to 10 working days.
In the meantime, you can read the questions and answers that others have left to this pattern or join the DROPS Workshop on Facebook to get help from fellow knitters/crocheters!

You might also like...

Post a comment to pattern DROPS Children 26-14

We would love to hear what you have to say about this pattern!

If you want to leave a question, please make sure you select the correct category in the form below, to speed up the answering process. Required fields are marked *.

Comments / Questions (60)

country flag Alex wrote:

Dankeschön! Aber dann stimmt das Muster A 4 doch nicht,denn da soll doch jede Reihe 4Maschen links 3 rechts gestrickt werden. Das ist doch krass oder habe ich das falsch verstanden?Liebe Grüße

22.09.2017 - 17:07

DROPS Design answered:

Liebe Alex, die linke Maschen im A.4 werden abgenommen, wenn der Passe fertig ist, git es nur 1 li M in A.4. Viel Spaß beim stricken!

25.09.2017 - 11:07

country flag Alex wrote:

Liebes Drops-Team, zunächst einmal DANKE für dieses süße Kleid! Bei mir hat sich ein Problem ergeben bei der Passe. Die Größe 2 Jahre hat wunderbar funktioniert. Aber bei 3/4 Jahre hatte ich auf der Rückseite, nach der Abnahme in den Krausrippen, einen "V-Auschnitt" im Rücken. Was habe ich da falsch gemacht? Danke und liebe Grüße!

17.09.2017 - 19:19

DROPS Design answered:

Liebe Alex, die Abnahmen sollen bei der Partien mit linken Maschen gearbeitet, nich in den Krausrippen. Die Blende sollen "gerade" sein (wie man es im 4. Foto sieht). Viel Spaß beim stricken!

18.09.2017 - 09:37

Margareta Söderlund wrote:

Det är stor skillnad på hur många maskor man ska lägga upp. Om vi tar storlek 3/4 år som finns i båda mönstren så ska man lägga upp 248 m på st 4 på Bright Smile och 280 m på st 3.5 på Litle Hedda. Det maskantalet blir storlek 11/12 år på Br. Smile. Hur kan det vara så stora skillnader när det är samma garn, Cotton Merino, och nästan samma stickor, 4 resp. 3.5?

03.08.2017 - 12:32

DROPS Design answered:

Hej Margareta, de 2 plagg har helt olika mönster, så det går inte att jämföra. Lycka till!

05.09.2017 - 15:30

country flag Graciela wrote:

Excelente descripción de todo el patrón logré hacerlo me salió hermoso gracias, yo soy de Argentina, por estos lados no se consigue esa calidad de hilo, igual lo hice y quedó precioso, seguiré experimentando con sus patrones.

15.07.2017 - 05:14

country flag Graciela wrote:

Buenas noches, sobre el patrón 26, 14, puede explicarme un poco la última parte, me dice que trabaje hasta que me queden 5 puntos, y luego dice de seguir con una cantidad de puntos no se de donde sacarlo, gracias

11.07.2017 - 07:29

DROPS Design answered:

Hola Graciela. Te refieres a este parte del patrón: Trabajar la sig fila como sigue por el LD: 2 pts del borde en pt musgo, trabajar el patrón según el diagrama A.4 hasta que queden 5 pts, finalizar con los primeros 3 pts de A.4 y 2 pts del borde en pt musgo; es decir, los 5 últimos puntos de la fila se trabajan de la siguiente manera: 3 puntos según los primeros tres puntos de A.4 y los dos últimos puntos en punto musgo.

14.07.2017 - 14:13

Graciela wrote:

Una consulta en la descripción de los cm para dos años da 92cm, como calculan los cm , en puntos, la cuenta que yo hago no da gracias

02.07.2017 - 00:32

DROPS Design answered:

Hola Graciela. Dividimos los puntos de montaje (259) entre los cm de la parte inferior del vestido (118 cm) y tenemos aprox 2,19 pts en 1 cm, que es igual a la tensión del tejido recomendado 2,2 pts en 1 cm

02.07.2017 - 12:09

country flag Marti wrote:

Dobrý den, ráda bych věděla jak uplést sedýlko u šatiček. Je zde vzor A.4, nahlížený z lícové strany. To chápu, ale potřebovala bych vědět jestli mám plést rubovou stranu jak se oka jeví. V návodu jsem to nenašla. Nebo dělám někde chybu? Děkuji za odpověď.

26.04.2017 - 09:55

DROPS Design answered:

Dobrý den, ano - vzor bývá ve schématech DROPS zakreslen tak, jak oka vypadají při pohledu z lícové strany, a jsou v něm vyznačeny vždy všechny řady, tj. i rubové. V rubových (sudých) řadách pleteme jednotlivé vzorky (oka) podle instrukcí pro rubové řady (viz vysvětlivky u značek). Zde máme jen lícový a rubový žerzej, takže jednoduše řečeno: ano, v tomto případě pleteme rubové řady tak, jak se oka jeví :-) Hodně zdaru! Hana

27.04.2017 - 06:37

country flag Inger Pisarski wrote:

Jeg forstår ikke hvordan jeg har reduceret masketallet fra 217 til 186 efter første gennemstrikning af mønsterA 1 nederst på Little Hedda kjolen. mønsterrraporten viser jo tværtimod tydeligt at der altid skal være 4 vr fra retten mellem selve hulmønsteret på 3 masker. så hvordan gør jeg?

04.04.2017 - 15:42

DROPS Design answered:

Hei Inger. På siste omgang av A.1 skal det minkes 1 maske. Det strikkes hullmønster som vanlig og så 1 vrang, 2 vrang sammen og 1 vrang. Her minsker du med 1 maske i hver rapport av A.1. Derfor vil maskeantallet bli 186 når du er ferdig med A.1. God fornøyelse.

05.04.2017 - 08:25

country flag Susan Sprachman wrote:

I'm unclear how to do the pattern. If you start with 7 stitches in the pattern and reduce by 2 at the first slip stitch, how do you have 7 stitches (4 perl, 3 knit) for the next row? I don't see any instructions to add back stitches via yarn over, for example. I love the pattern and am anxious to make it, but am stuck.

15.12.2016 - 22:49

DROPS Design answered:

Dear Mrs Sprachman, on row 3 in A.1 you will work: YO, slip 2 as if to K tog, K1, passo (= 2 sts dec), YO = there are now 3 sts again on needle. On next row, K these 3 sts from RS. Happy knitting!

16.12.2016 - 09:33

country flag Chiara wrote:

Se volessi realizzare una versione "natalizia" di questo abitino, quale filato mi consigliate?! forse un baby merino extra fine...

03.12.2016 - 10:23

DROPS Design answered:

Buongiorno Chiara. Può sostituire il cotton merino con un filato del gruppo B, sempre verificando di ottenere la corretta tensione. Può p.es considerare Karisma, Lima o Merino Extra fine. Baby Merino è del gruppo A quindi più sottile. Buon lavoro!

03.12.2016 - 10:51