
Popular categories
Looking for a yarn?


Comments / Questions (23)
![]() Manu wrote:
Manu wrote:
Si può lavorare solo a maglia rasata,sul dietro tra i due segnapunti,senza complicazioni?
11.03.2025 - 16:50DROPS Design answered:
Buonasera Manu, può apportare le modifiche che preferisce al modello, tenga conto che il lavoro sarà diverso da quello riportato. Buon lavoro!
18.03.2025 - 21:23
![]() Jenny Strick wrote:
Jenny Strick wrote:
Ein wunderschöner luftiger Pulli! Stricke ihn schon zum zweiten Mal. Macht richtig Spaß. Perfekt fürs Frühjahr und kühlere Sommerabende.
13.08.2022 - 14:46
![]() Teresa Ruiz De Azua García wrote:
Teresa Ruiz De Azua García wrote:
Hola, estoy tejiendo este jersey (Sweet Peach) y de pronto, cuando llego a los 36 cm y dejo la aguja circular para hacer por separado el frente y la espalda me encuentro con el problema de que no sé cómo tejer el revés de los gráficos A.2 y A.3. Tengo claro que el punto del derecho pasa a ser del revés, pero ¿cómo tejo las lazadas, los dos puntos juntos del derecho o el surjete? Muchas gracias.
22.07.2021 - 16:15DROPS Design answered:
Hola Teresa, en las filas pares (por el lado revés) se trabajan todos los puntos de revés. El dibujo solo se trabaja por el lado derecho.
31.07.2021 - 17:57
![]() Helena wrote:
Helena wrote:
Ich habe noch etwas vergessen: die Schultern haben bei allen Grössen 18M! Aber auf dem Bild wird der Zopf bis oben gestrickt. Dazu müsste man mind. 24M haben...
01.01.2020 - 13:11
![]() Helena wrote:
Helena wrote:
Obwohl ich extra nur vorne das Mittelmuster gestrickt habe reicht die Wolle bei weitem nicht! Ich musste 3 zusätzliche Knäuel kaufen. Jemand anderer sogar 4 Knäuel... Bitte berichtigen sie die Garnmenge für die nachfolgenden Stricker.
27.12.2019 - 22:35
![]() Tannis Langford wrote:
Tannis Langford wrote:
I’m knitting Sweet Peach design and I’m having trouble understanding the pattern when I got to the back piece. How do I knitt in the round and not knitt the front at the same time .
04.04.2018 - 22:49DROPS Design answered:
Hi Tannis, You have worked in the round until the piece measured 35-36-37-38-39-40 cm. Then you bind off 3 stitches on each side of each marker thread for the start of the armholes. Now you continue by working back and forth with first the back piece then the front piece. Happy knitting!
05.04.2018 - 08:04
![]() Ulla-Britt Olofsson wrote:
Ulla-Britt Olofsson wrote:
Mönster 159-16 Paris. Jag har stickat med rundsticka till ärmhålet och delat på arbetet men jag förstår inte hur jag kommer´vidare med rundsticka när det bara ska stickas från framsidan och bakstycket först. har ni en bra förklaring.
14.02.2018 - 11:35DROPS Design answered:
Hei Ulla-Britt. Selv om du strikker med rundpinne, skal det etter du har kommet til armhullet og arbeidet delt, strikkes frem og tilbake. Først strikker du bakstykket frem og tilbake (følg oppskriften under BAKST) og deretter strikker du forstykket (følg oppskriften under FRAMST). God Fornøyelse!
14.02.2018 - 12:53
![]() Pia Träger wrote:
Pia Träger wrote:
Sweet peach 159-16 Jeg skal lave bluse i str. xl jeg slår 194 masker op starter på mønsteret selve mønstret er på 104 masker det ville sige at jeg har 90 masker tilbage I opskriften står der ud fra sidste mønster at jeg skal gentage fra *-* dette kan ikke helt lade sig gøre da der mangler 14 masker for at kunne lave mønstret endnu engang er de sidst 90 masker glatstrik Pia Träger
19.04.2016 - 15:26DROPS Design answered:
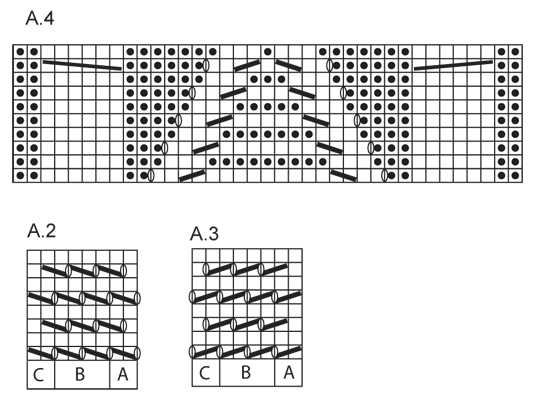
Hej Pia mønsteret imellem *-* går over 97 m, du strikker samme mønster på forstykket som på ryggen. * A.3 A (= 2 m ), A.3 B over de næste 26 m, A.3 C (= 2 m), A.4 (= 37 m), A.2 A (= 2 m), A.2 B over de næste 26 m, A.2 C (= 2 m) * = 97 masker. God fornøjelse!
20.04.2016 - 09:33
![]() Angelika Kneifel wrote:
Angelika Kneifel wrote:
Danke für die Info. Ich wollte leider nicht 3 Wochen auf Ihre Antwort warten und habe jetzt selbst ausprobiert. Wenn man in XL am Armausschnitt nicht so viele Maschen abnimmt (ich habe 3 x 2 und 3 x 1 abgenommen, dann passt die Schulter einigermaßen und mit der Ärmellänge zusammen kommt man hin. Aber insgesamt habe ich mit Drops Herz you 5 - viel mehr Garn gebraucht als angegeben, trotz gleicher Lauflänge (75 m / 50 g) - insgesamt 4 Knäuel mehr!
21.09.2015 - 15:26
![]() Angelika Kneifel wrote:
Angelika Kneifel wrote:
Ich habe genau nach Anleitung gestrickt. XL. Mit den Abnahmen nach dem Rumpfteil werden hinter und Vorderteil zu schmal. Auf dem Bild, das sicher kleiner als xl ist, sehen die Schultern auch breiter aus. 18 Maschen am Schluss bei den Schultern ist zu schmal. Hat das noch niemand reklamiert? Ich habe jetzt bis zum Rumpf alles wieder aufgetrennt. Gerne hätte ich Ihre Meinung gehört. Sonst muss ich es evtl selbst vermessen. Die Zeichnung sieht auch anders aus. Viele Grüße Angelika Kneifel.
03.09.2015 - 01:21DROPS Design answered:
Nach der Skizze ergibt sich für alle Größen in etwa die gleiche Schulterbreite. In Gr. XL haben Sie ja auch einen weiteren Halsausschnitt und eine längere Armkugel, durch die die vergleichsweise schmalere Schulter dann wieder ausgelichen werden sollte.
20.09.2015 - 15:49
|
||||||||||||||||||||||
Sweet Peach#sweetpeachsweater |
||||||||||||||||||||||
 |
 |
|||||||||||||||||||||
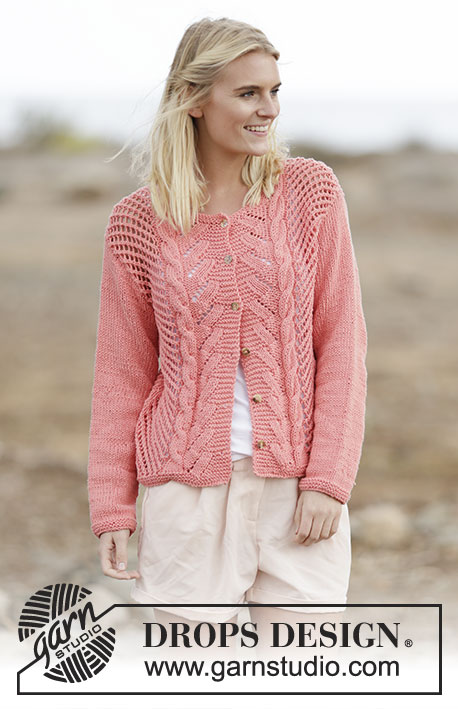
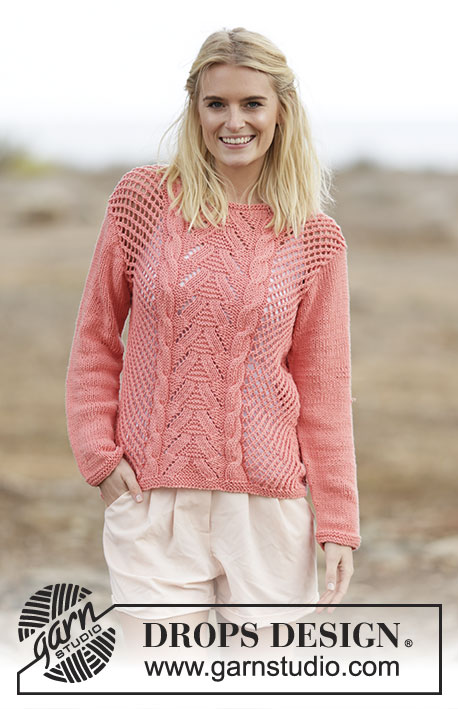
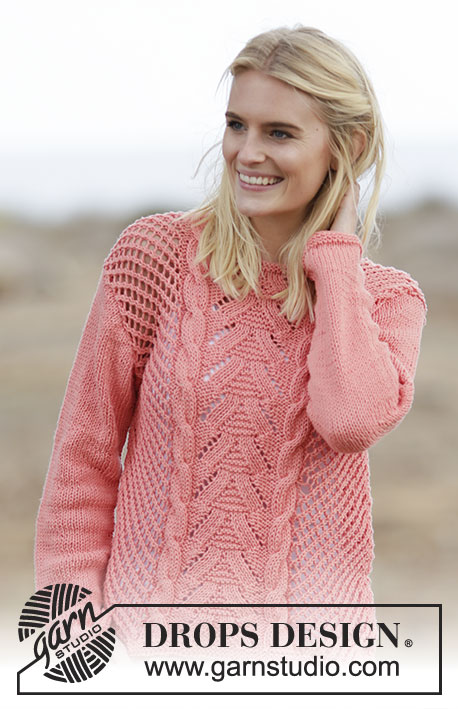
Knitted DROPS jumper with lace pattern and cables in ”Paris”. Size: S - XXXL.
DROPS 159-16 |
||||||||||||||||||||||
|
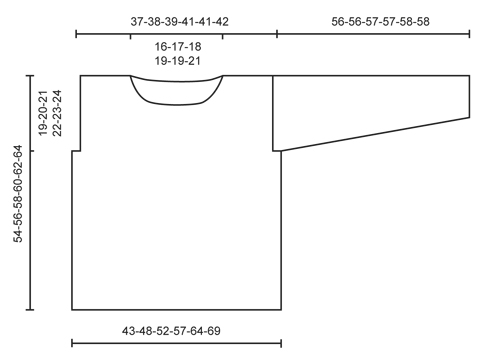
GARTER ST (worked in the round): * K 1 round and P 1 round *, repeat from *-*. 1 ridge = 2 rounds. PATTERN: See diagrams A.2 to A.4. The diagrams show all rows in pattern seen from RS. ---------------------------------------------------------- JUMPER: Worked in the round on circular needle. Cast on 146-162-178-194-218-234 sts on circular needle size 4 mm with Paris. Work 3 ridges in GARTER ST - see explanation above. Switch to circular needle size 5 mm. Then work pattern as follows: * A.3 A (= 2 sts ), A.3 B over the next 14-18-22-26-32-36 sts, A.3 C (= 2 sts), A.4 (= 37 sts), A.2 A (= 2 sts), A.2 B over the next 14-18-22-26-32-36 sts, A.2 C (= 2 sts) *, repeat from *-* one more time. Insert 1 marker at beg of round and 1 marker after 73rd-81st-89th-97th-109th-117th st. REMEMBER THE KNITTING TENSION. Continue pattern until piece measures 35-36-37-38-39-40 cm. Now cast off 3 sts on each side of every marker (= 6 sts in each side) and finish each part separately. BACK PIECE: = 67-75-83-91-103-111 sts. Continue to cast off for armholes at beg of row in each side as follows: 2 sts 1-2-3-4-6-7 times and 1 st 0-1-2-3-5-6 times = 63-65-67-69-69-71 sts. Continue the pattern like this. When piece measures 52-54-56-58-60-62 cm, slip the middle 25-27-29-31-31-33 sts on a stich holder for neck and finish each side separately. On next row dec 1 st towards the neck = 18-18-18-18-18-18 st. Cast off when piece measures 54-56-58-60-62-64 cm. Work the other shoulder the same way. FRONT PIECE: = 67-75-83-91-103-111 sts. Cast off for armholes in the sides as on back piece = 63-65-67-69-69-71 sts. Continue the pattern like this. When piece measures 48-50-52-54-54-56 cm, slip the middle 19-21-23-25-25-27 sts on a stitch holder for neck and finish each part separately. Then cast off on every other row towards neck as follows: 2 sts 1 time and 1 st 2 times = 18-18-18-18-18-18 sts. Cast off when piece measures 54-56-58-60-62-64 cm. Work the other shoulder the same way. SLEEVES: Worked in the round on double pointed needles. Cast on 37-39-41-43-44-46 sts on double pointed needles size 4 mm. Work 3 ridges. Switch to double pointed needles size 5 mm. Insert 1 marker at the beg of the round. Then work in stocking st. When piece measures 8 cm, inc 1 st on each side of marker. Inc every 4-3½-3-2½-2-2 cm 10-11-12-14-16-17 times in total = 57-61-65-71-76-80 sts. When piece measures 48-47-47-46-45-43 cm (NOTE! Shorter measurements in the larger sizes because of longer sleeve cap and wider shoulders) cast off 6 sts mid under sleeve (cast off 3 sts on each side of marker). Then continue back and forth on needle and cast off for sleeve cap at the beg of row in each side as follows: 2 sts 3 times, 1 st 1-2-3-4-6-9 times, then cast off 2 sts in each side until piece measures 55-55-56-56-57-57 cm. Cast off 3 sts 1 time in each side before the remaining sts are cast off. ASSEMBLY: Sew the shoulder seams. Sew in the sleeves. NECK EDGE: Pick up approx. 84-95 sts (incl sts on stitch holders) around the neck on a short circular needle size 4 mm. Work 2 ridges. Cast off. |
||||||||||||||||||||||
Diagram explanations |
||||||||||||||||||||||
|
||||||||||||||||||||||
|
||||||||||||||||||||||
|
||||||||||||||||||||||
Have you finished this pattern?Tag your pictures with #dropspattern #sweetpeachsweater or submit them to the #dropsfan gallery. Do you need help with this pattern?You'll find 30 tutorial videos, a Comments/Questions area and more by visiting the pattern on garnstudio.com. © 1982-2025 DROPS Design A/S. We reserve all rights. This document, including all its sub-sections, has copyrights. Read more about what you can do with our patterns at the bottom of each pattern on our site. |
||||||||||||||||||||||


With over 40 years in knitting and crochet design, DROPS Design offers one of the most extensive collections of free patterns on the internet - translated to 17 languages. As of today we count 314 catalogues and 11822 patterns translated into English (UK/cm).
We work hard to bring you the best knitting and crochet have to offer, inspiration and advice as well as great quality yarns at incredible prices! Would you like to use our patterns for other than personal use? You can read what you are allowed to do in the Copyright text at the bottom of all our patterns. Happy crafting!
Post a comment to pattern DROPS 159-16
We would love to hear what you have to say about this pattern!
If you want to leave a question, please make sure you select the correct category in the form below, to speed up the answering process. Required fields are marked *.