
Popular categories
Looking for a yarn?


Comments / Questions (79)
![]() Caroline wrote:
Caroline wrote:
Bonjour, bon décidément, je n'arrive pas à démarrer le pull, je ne comprends pas la démarche pour faire la rehausse du dos. Je suis déçue et triste car j'ai acheté cette jolie laine pour confectionner le pull pour la sœur. Dernier recours 🙏, pourriez vous m'envoyer où me donner un lien pour crocheter la rehausse du pull ou est ce que je peux faire sans ? Merci 🥲
01.02.2025 - 19:36DROPS Design answered:
Bonjour Caroline, essayez de demander de l'aide auprès de votre magasin (même par mail ou téléphone), ou bien auprès d'un forum crochet; mais vous pouvez aussi simplement sauter cette réhausse et continuer directement en rond en commençant après la réhausse, en brides, en plaçant les marqueurs comme indiqué. L'encolure devant et dos auront alors la même hauteur. Bon crochet!
03.02.2025 - 10:44
![]() Caroline wrote:
Caroline wrote:
Merci pour ces précisions. Cependant pourriez vous me confirmer : a chaque début de tour on fait 1 ml en l'air ensuite 1 ms (=2mls), ensuite 1 ml au dessus de la ms du r g précédent (=2 MLS) etc. Rangs 2 : comme le marqueur est à 40 ml (taille M), on crochète 10 mls et laisse les 30 restantes, on tourne, Rang 3 : idem. Rangs 4 et 5 : on crochète 16 mls et laisse 24 mls, on tourne etc... Est ce bien ça ?
31.01.2025 - 06:27DROPS Design answered:
Bonjour Caroline, à la fin du 1er rang, vous crochetez comme avant en mailles en l'air et mailles serrées jusqu'à ce qu'il reste 30 mailles avant le marqueur du milieu du devant (rang 2j); tournez et crochetez (sur l'envers) en mailles en l'air et mailles serrées jusqu'à ce qu'il reste 30 mailles avant le marqueur du milieu devant (vous avez 60 mailles non crochetées au milieu), tournez et continuez ainsi en laissant le nombre de mailles indiqué non crocheté à la fin de chaque rang. Bon crochet!
31.01.2025 - 08:22
![]() Caroline wrote:
Caroline wrote:
Désolée, je ne comprends pas comment faire la rehausse pour démarrer le pull, pourriez vous m'aider , ce n'est pas clair. Si vous pouviez me donner plus de précisions. J'ai acheté votre laine et le modèle me plaît beaucoup. Merci pour votre aide 🙏
22.01.2025 - 16:56DROPS Design answered:
Bonjour Caroline, au 1er rang, vous crochetez à partir du milieu dos jusqu'à ce qu'il reste 28-42 m avant le marqueur, tournez et crochetez sur l'envers jusqu'à ce qu'il reste 28-42 m avant le marqueur (soit 56-84 m non crochetées au milieu devant), tournez et crochetez jusqu'à ce qu'il reste 22-42 m avant le marqueur (= vous crochetez 6 m de plus), tournez et crochetez jusqu'à ce qu'il reste 22-42 m avant le marqueur (6 m de plus aussi) = 44-82 m non crochetées au milieu du devant, et ainsi de suite, vous crochetez 6 m de plus à la fin des 2 rangs suivants = il reste 32-60 m non crochetées au milieu du devant (16-30 de chaque côté du marqueur). Bon crochet!
23.01.2025 - 09:57
![]() Caroline wrote:
Caroline wrote:
Bonjour, pour les tours de 1 à rangs 7 (rehausse dos/devant), à partir de marqueur Rang, 1, il faut crocheter : . Rangs 2 et 3 : 10 ms à partir de ce marqueur et tourner (on ne crochète pas les 30 ms de ce rang) . Rangs 4 et 5 : 16 ms (on ne crochète pas les 24 ms de ce rang) . Rangs 6 et 7 : 22 ms (on laisse les 18 suivantes) ??
19.01.2025 - 17:59DROPS Design answered:
Bonjour Caroline, au 2ème rang, vous crochetez 10 m après le marqueur du milieu dos, au 3ème rang 20 m (10 m de chaque côté du marqueur du milieu dos = 56 m non crochetées= 28 de chaque côté du marqueur du milieu devant ), au 4ème rang, vous crochetez 16 m après le marqueur du milieu dos et au 5ème rang 16 m après le marqueur du milieu dos (- il reste 44 m non crochetées sur ces 2 rangs= 22 de chaque côté du milieu devant), au 6èm rang vous crochetez 22 m après le milieu dos, au 7ème rang 22 m après le milieu dos = 32 m non crochetées au milieu devant (16 de chaque côté). Bon crochet!
20.01.2025 - 08:42
![]() Caroline wrote:
Caroline wrote:
Bonjour, pour le commencement Dos et Devant : Tour 1 = Rang 1 ? et après le marqueur (milieu devant) il faut tourner ou aller jusqu'à la fin du tour ? Pour les autres rangs où on tourne après le marqueur, à chaque rang c'est une fois à l'envers et une fois à l'endroit comme on fait des allers retours ? [Le début du pull n'est pas évident car après avoir fait la chaînette de base, j'ai du mal à fermer le tour, ça "roulotte" ] Merci 🙂
11.12.2024 - 18:38DROPS Design answered:
Bonjour Caroline, le 1er tour est bien un tour que vous crochetez jusqu'à la fin du tour en plaçant le marqueur pour repérer le milieu du devant. Vous crochetez ensuite les rangs 2 à 7 alternativement sur l'envers et sur l'endroit. Cette astuce peut vous aider au tout début pour éviter de vriller la chaînette de base. Bon crochet!
12.12.2024 - 09:30
![]() Caroline wrote:
Caroline wrote:
Bonjour, j'aimerais réaliser ce modèle, j'ai acheté la laine. J'ai pris connaissance du patron mais pourriez vous me donner plus d éclaircissements : "se réalise de haut en bas en rond" = ça veut dire qu'on commence à crocheter en démarrant de l encolure et on avance progressivement vers le devant et le dos ? Ce n'est pas très clair pour moi ☹️ Merci.
25.11.2024 - 21:52DROPS Design answered:
Bonjour Caroline, tout à fait, vous avez bien compris, vous crochetez le pull en le commençant par l'encolure, et vous augmentez (comme indiqué dans les explications)pour l'empiècement arrondi, puis vous diviserez l'ouvrage en sautant les mailles des manches (qui seront crochetées à la fin), ces mailles sont remplacées lors de la division par des mailles en l'air (pour les emmanchures) et on termine le dos/le devant en rond jusqu'en bas. Puis on crochète les manches. Bon crochet!
26.11.2024 - 09:48
![]() Cattaneo wrote:
Cattaneo wrote:
Bonjour, pour réaliser ce joli modèle, j'ai acheté la laine conseillée Drops Mérinos Extra Fine, mais je voudrais savoir si c'est bien un crochet 4,5 qu'il faut utiliser car sur les pelotes c'est indiqué 4 mm. Et pourriez vous me dire pourquoi un crochet plus gros ? Merci beaucoup
10.11.2024 - 08:34DROPS Design answered:
Bonjour Mme Catteneo, rappelez-vous que l'important est la taille de l'échantillon plus que la taille du crochet, il vous faut ici 16 brides x 9 rangs de brides pour 10 x 10 cm, nous avions utilisé un cochet 4,5, mais il vous faudra peut-être soit le même, soit un plus petit, soit un plus gros en fonction de votre tension. Vous pouvez aussi crocheter A.2 pour votre échantillon (1 x A.2 en largeur = 2,5 cm, soit 4 fois A.2 en largeur = 10 cm). Bon crochet!
11.11.2024 - 09:04
![]() Cattaneo wrote:
Cattaneo wrote:
Bonjour, j'ai commandé une de vos laines DROPS MÉRINOS EXTRA FINE coloris viole foncé dans une boutique revendeur de votre marque LUCELAINE TRICOTS. Ils ont bien encaissé l'argent (j'ai pris 16 pelotes), mais malgré mes mails et mes appels, ça ne répond pas. C'est Mondial Relais qui est en charge de l'expédition (j ai envoyé un message à la boutique avoir un numéro d'expédition). Mais rien. Pourriez vous les contactez pour moi ou me donner un numéro de contact ? Merci ☹️
05.11.2024 - 13:44DROPS Design answered:
Message transmis :)
06.11.2024 - 09:14
![]() Anna wrote:
Anna wrote:
Ik wil de trui graag in 2 kleuren haken, het bovenlijf in een kleur en de mouwen/onderlijf en hals in een andere kleur. Hoeveel gram garen moet ik voor het bovenlijf rekenen in maat xxl?
28.10.2024 - 17:51DROPS Design answered:
Dag Anna,
Dat weet ik eerlijk gezegd niet precies. Het bovenste deel zal wat meer garen in beslag nemen als het onderste deel omdat je daar stokjes haakt en je hebt ook de kraag. Je kunt wat extra bollen bestellen en eventueel overgebleven bollen terug sturen naar de winkel. Vraag je verkooppunt naar de voorwaarden.
31.10.2024 - 20:26
![]() Caroline wrote:
Caroline wrote:
Drops Karisma Bonjour, je voudrais savoir si cette laine, ou celle que vous conseillez qui est un peu chère pour moi, 100 % laine, est ce qu'elle gratte ? Je vous pose cette question car je voudrais réaliser ce joli pull pour ma sœur qui a du mal a supporter les lainages qui grattent. Avant de le réaliser, j'aimerais en être sûre, ne pouvant pas tester la texture de cette laine. Merci.
26.10.2024 - 09:32DROPS Design answered:
Bonjour Caroline, la sensibilité de chacune étant différente, la réponse varie d'une personne à l'autre, Merino Extra Fine ou Cotton Merino pourraient convenir, mais n'hésitez pas à contacter votre magasin DROPS pour toute assistance personnalisée, même par mail ou téléphone. Bon crochet!
28.10.2024 - 08:07
|
||||||||||||||||||||||
Yesterday#yesterdaysweater |
||||||||||||||||||||||
|
|
||||||||||||||||||||||
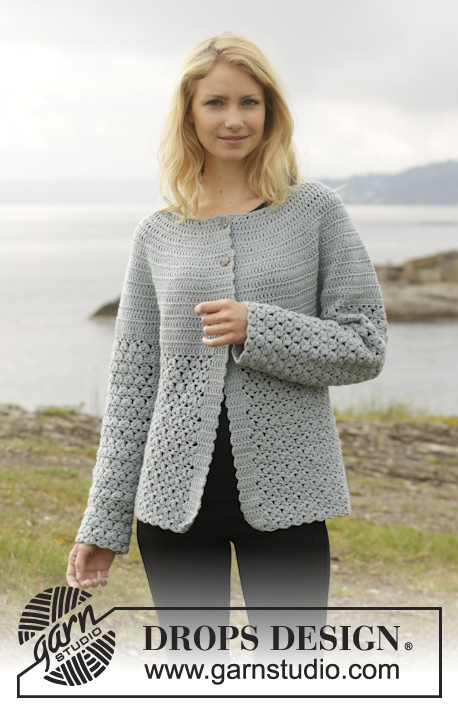
Crochet DROPS jumper with lace pattern, round yoke and detachable collar, worked top down in ”Merino Extra Fine”. Size: S - XXXL.
DROPS 156-18 |
||||||||||||||||||||||
|
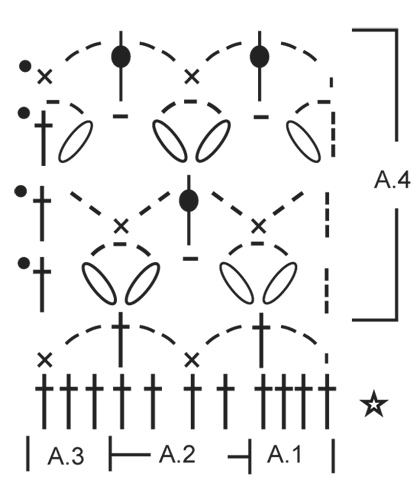
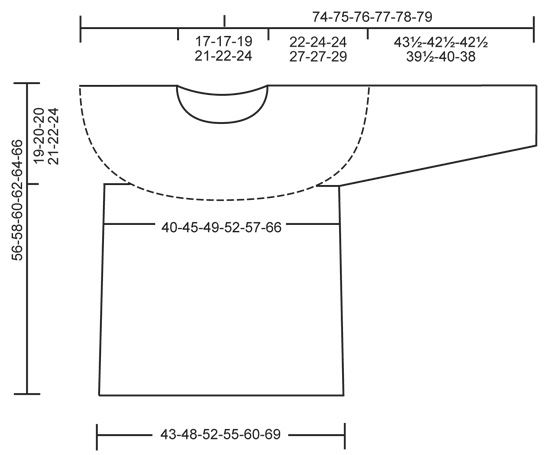
PATTERN: See diagrams A.1-A.4. CROCHET INFO: Replace first tr on every round with 3 ch. Finish every tr round with 1 sl st in 3rd ch from beg of round. Replace first dc on every round with 1 ch. Finish every dc round with 1 sl st in 1st ch on round. INCREASE TIP: Inc 1 st by working 2 tr in 1 tr, first on one side of all markers on round, next time on the other side of all markers on round, continue inc like this. DECREASE TIP: Work 1 tr but wait with last pull through (= 2 sts on hook), then work next tr but on last pull through, pull yarn through all sts on hook = 1 tr dec. ---------------------------------------------------------- BODY: The piece is worked top down. Worked in the round from mid back. Work 93-98-103-113-118-128 ch on hook size 4.5 mm with Merino Extra Fine and form a ring with 1 sl st in first ch. Work next round as follows: 1 ch, 1 dc in first ch, 1 dc in each of the next 2 ch, * skip 1 ch, 1 dc in each of the next 4 ch *, repeat from *-* = 76-80-84-92-96-104 dc – READ CROCHET INFO. Then work an elevation in the back of neck as follows: ROUND 1 (= RS): Beg mid back, work 1 ch, 1 dc in 1st dc, * 1 ch, skip 1 dc, 1 dc in next dc *, repeat from *-* around the neck AT THE SAME TIME insert 1 marker after 38-40-42-46-48-52 sts (= mid front), turn piece. ROW 2 (= WS): Work 1 dc in every ch and 1 ch over every dc around the neck until 28-30-32-36-38-42 sts remain until marker, turn piece. ROW 3: Work 1 dc in every ch and 1 ch over every dc until 28-30-32-36-38-42 sts remain until marker, turn piece. ROW 4: Work 1 dc in every ch and 1 ch over every dc around the neck until 22-24-26-30-32-36 sts remain until marker, turn piece. ROW 5: Work 1 dc in every ch and 1 ch over every dc around the neck until 22-24-26-30-32-36 sts remain until marker, turn piece. ROW 6: Work 1 dc in every ch and 1 ch over every dc around the neck until 16-18-20-24-26-30 sts remain until marker, turn piece. ROW 7: Work 1 dc in every ch and 1 ch over every dc until 16-18-20-24-26-30 sts remain until marker, turn and work back to mid back. Then work in the round with tr AT THE SAME TIME on 1st round insert 19-20-21-23-24-26 markers in piece as follows: Insert 1st marker at beg of round (= mid back), then insert 18-19-20-22-23-25 markers 4 tr apart, after last marker there are 4 tr. Work in the round with tr AT THE SAME TIME inc 1 tr at all markers as follows: Inc every other round 5-6-6-5-5-6 times, and every 4th round 2-2-2-3-3-3 times - READ INCREASE TIP = 209-240-252-276-288-338 tr. Work a round while at the same time inc 14-7-7-7-19-5 tr evenly = 223-247-259-283-307-343 tr. REMEMBER THE CROCHET TENSION! On next round work as follows from mid back: 30-34-37-41-45-52 tr, 8 ch (under sleeve), skip 52-56-56-60-64-68 tr from previous round (to be used for sleeve later), 60-68-74-82-90-104 tr (front piece), 8 ch (under sleeve), skip 52-56-56-60-64-68 tr from previous round (to be used for sleeve later) and 29-33-36-40-44-51 tr = 135-151-163-179-195-223 tr/ch. Insert a marker, now measure piece from here! Work 1 tr in every tr/ch AT THE SAME TIME dec 8-8-8-12-12-12 sts evenly – READ DECREASE TIP = 127-143-155-167-183-211 tr. Continue to work as follows: Work A.1, A.2 30-34-37-40-44-51 repetitions in total in width, finish with A.3. Continue pattern like this. When A.1-A.3 have been worked 1 time vertically, repeat A.4 vertically until finished measurements. When piece measures 14-14-14-15-15-15 cm from marker, adjust so that next round is last round in A.4, inc 1 repetition of A.2 in 8th-9th-9th-10th-11th-13th repetition in ch-space as follows: Work 2 ch, 1 dc in ch-space, 2 ch, 1 tr in same ch-space, 2 ch, 1 dc in same ch-space. Work 14-16-19-20-22-25 repetitions of A.2, in next repetition of A.2 inc the same way. Then continue as before = 32-36-39-42-46-53 repetitions of A.2 in width. Fasten off when piece measures 34-34-36-35-37-37 cm from marker, adjust to finish with next to last round in A.4, piece measures 56-58-60-62-64-66 cm in total. SLEEVE: Sleeve is worked in the round, top down. Insert a marker, now measure piece from here! Beg by working mid under sleeve as follows: Work 1 dc in 5th ch of the 8 ch work in armhole on body, 3 ch (= 1 tr), work 1 tr in each of the next 3 ch, 1 tr in every tr over sleeve, then work 1 tr in each of the remaining 4 ch under sleeve = 60-64-64-68-72-76 tr. Insert 1 marker mid under sleeve. Continue to work as follows: 1 tr in each of the first 11-11-11-13-13-15 tr AT THE SAME TIME dec 1 tr (= 10-10-10-12-12-14 tr), A.1, A.2 8-9-9-9-10-10 times in width, A.3, work 1 tr in each of the last 10-10-10-12-12-14 tr. Continue with 1 tr in each of the 20-20-20-24-24-28 tr mid under sleeve and A.1-A.3 over sleeve. When A.1-A.3 have been worked 1 time vertically, repeat A.4 vertically until finished measurements. Continue this pattern AT THE SAME TIME when piece measures 4 cm, dec 1 tr on each side of marker - Remember DECREASE TIP. Repeat dec every 3½-3½-3½-2½-2½-2 cm 9-9-9-11-11-13 more times. Now work only A.1-A.3 over sleeve. Fasten off when sleeve measures 43½-42½-42½-39½-40-38 cm, adjust to finish with next to last round in A.4 – NOTE – shorter measurements in the larger sizes because of wider neck and shoulders. Work the other the same way. DETACHABLE COLLAR: Worked in the round. Work 99 ch on hook size 4.5 mm with Merino Extra Fine and form a ring with 1 sl st in 1st ch. Work 3rd row in A.1, 3rd row in A.2 23 times and 3rd row in A.3. Repeat A.4 vertically until finished measurements. When piece measures 8 cm, adjust so that next round is last round in A.4, inc 1 repetition of A.2 in each side of piece as follows: Work A.1, then work first A.2 as follows: Work 2 ch, 1 dc in ch-space, 2 ch, 1 tr in same ch-space, 2 ch, 1 dc in same ch-space. Work as before until 1 repetition of A.2 remains before A.3, in next repetition of A.2 inc the same way. Then work as before (= 25 repetitions of A.2 in width) until piece measures approx. 20 cm, adjust to finish with next to last row in A.4. Fasten off. |
||||||||||||||||||||||
Diagram explanations |
||||||||||||||||||||||
|
||||||||||||||||||||||
|
||||||||||||||||||||||
|
||||||||||||||||||||||
Have you finished this pattern?Tag your pictures with #dropspattern #yesterdaysweater or submit them to the #dropsfan gallery. Do you need help with this pattern?You'll find 12 tutorial videos, a Comments/Questions area and more by visiting the pattern on garnstudio.com. © 1982-2025 DROPS Design A/S. We reserve all rights. This document, including all its sub-sections, has copyrights. Read more about what you can do with our patterns at the bottom of each pattern on our site. |
||||||||||||||||||||||


With over 40 years in knitting and crochet design, DROPS Design offers one of the most extensive collections of free patterns on the internet - translated to 17 languages. As of today we count 314 catalogues and 11821 patterns translated into English (UK/cm).
We work hard to bring you the best knitting and crochet have to offer, inspiration and advice as well as great quality yarns at incredible prices! Would you like to use our patterns for other than personal use? You can read what you are allowed to do in the Copyright text at the bottom of all our patterns. Happy crafting!
Post a comment to pattern DROPS 156-18
We would love to hear what you have to say about this pattern!
If you want to leave a question, please make sure you select the correct category in the form below, to speed up the answering process. Required fields are marked *.