DROPS Merino Extra Fine
100% Wool
from 3.50 £ /50g
Get the yarn to make this pattern from 49.00£.

The yarn cost is calculated from the pattern’s smallest size and the yarn’s cheapest product type. Looking for an even better price? You might find it on the DROPS Deals!

DROPS SS24

Yesterday

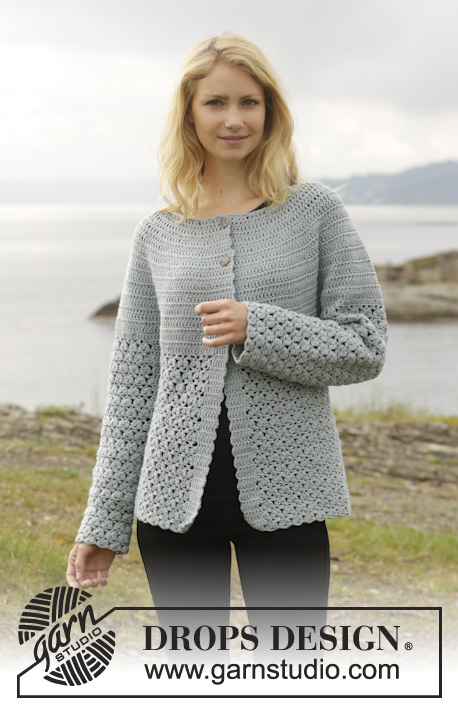
Crochet DROPS jumper with lace pattern, round yoke and detachable collar, worked top down in ”Merino Extra Fine”. Size: S - XXXL.

DROPS 156-18
DROPS design: Pattern no me-071
Yarn group B
-----------------------------------------------------------
Size: S - M - L - XL - XXL - XXXL
Materials:
DROPS MERINO EXTRA FINE from Garnstudio
700-800-850-950-1000-1100 g (incl detachable collar) colour no 15, light greyish green
(Detachable collar weighs approx. 100 g)

DROPS HOOK SIZE 4.5 mm - or size needed to get 16 tr x 9 rows = 10 x 10 cm, or A.2 = width 2.5 cm.

-------------------------------------------------------

Alternative Yarn – See how to change yarns here
Yarn Groups A to F – Use the same pattern and change the yarn here
Yarn usage using an alternative yarn – Use our yarn converter here

-------------------------------------------------------

DROPS Merino Extra Fine
100% Wool
from 3.50 £ /50g
Get the yarn to make this pattern from 49.00£.

The yarn cost is calculated from the pattern’s smallest size and the yarn’s cheapest product type. Looking for an even better price? You might find it on the DROPS Deals!

Pattern instructions

NOTE: This pattern is written in British English. All measurements in charts are in cm. For conversion from cm to inches - click here. There are different terms for crocheting in British and American English. If this pattern includes crochet, click for "crochet terms" here. For this pattern in American English, please click here.
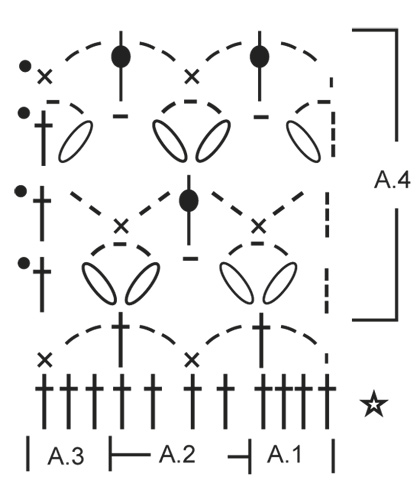
PATTERN:
See diagrams A.1-A.4.

CROCHET INFO:
Replace first tr on every round with 3 ch. Finish every tr round with 1 sl st in 3rd ch from beg of round.
Replace first dc on every round with 1 ch.
Finish every dc round with 1 sl st in 1st ch on round.

INCREASE TIP:
Inc 1 st by working 2 tr in 1 tr, first on one side of all markers on round, next time on the other side of all markers on round, continue inc like this.

DECREASE TIP:
Work 1 tr but wait with last pull through (= 2 sts on hook), then work next tr but on last pull through, pull yarn through all sts on hook = 1 tr dec.
----------------------------------------------------------

BODY:
The piece is worked top down. Worked in the round from mid back. Work 93-98-103-113-118-128 ch on hook size 4.5 mm with Merino Extra Fine and form a ring with 1 sl st in first ch. Work next round as follows: 1 ch, 1 dc in first ch, 1 dc in each of the next 2 ch, * skip 1 ch, 1 dc in each of the next 4 ch *, repeat from *-* = 76-80-84-92-96-104 dc – READ CROCHET INFO.
Then work an elevation in the back of neck as follows:
ROUND 1 (= RS): Beg mid back, work 1 ch, 1 dc in 1st dc, * 1 ch, skip 1 dc, 1 dc in next dc *, repeat from *-* around the neck AT THE SAME TIME insert 1 marker after 38-40-42-46-48-52 sts (= mid front), turn piece.
ROW 2 (= WS): Work 1 dc in every ch and 1 ch over every dc around the neck until 28-30-32-36-38-42 sts remain until marker, turn piece.
ROW 3: Work 1 dc in every ch and 1 ch over every dc until 28-30-32-36-38-42 sts remain until marker, turn piece.
ROW 4: Work 1 dc in every ch and 1 ch over every dc around the neck until 22-24-26-30-32-36 sts remain until marker, turn piece.
ROW 5: Work 1 dc in every ch and 1 ch over every dc around the neck until 22-24-26-30-32-36 sts remain until marker, turn piece.
ROW 6: Work 1 dc in every ch and 1 ch over every dc around the neck until 16-18-20-24-26-30 sts remain until marker, turn piece.
ROW 7: Work 1 dc in every ch and 1 ch over every dc until 16-18-20-24-26-30 sts remain until marker, turn and work back to mid back.

Then work in the round with tr AT THE SAME TIME on 1st round insert 19-20-21-23-24-26 markers in piece as follows: Insert 1st marker at beg of round (= mid back), then insert 18-19-20-22-23-25 markers 4 tr apart, after last marker there are 4 tr. Work in the round with tr AT THE SAME TIME inc 1 tr at all markers as follows: Inc every other round 5-6-6-5-5-6 times, and every 4th round 2-2-2-3-3-3 times - READ INCREASE TIP = 209-240-252-276-288-338 tr. Work a round while at the same time inc 14-7-7-7-19-5 tr evenly = 223-247-259-283-307-343 tr. REMEMBER THE CROCHET TENSION! On next round work as follows from mid back: 30-34-37-41-45-52 tr, 8 ch (under sleeve), skip 52-56-56-60-64-68 tr from previous round (to be used for sleeve later), 60-68-74-82-90-104 tr (front piece), 8 ch (under sleeve), skip 52-56-56-60-64-68 tr from previous round (to be used for sleeve later) and 29-33-36-40-44-51 tr = 135-151-163-179-195-223 tr/ch. Insert a marker, now measure piece from here! Work 1 tr in every tr/ch AT THE SAME TIME dec 8-8-8-12-12-12 sts evenly – READ DECREASE TIP = 127-143-155-167-183-211 tr.

Continue to work as follows: Work A.1, A.2 30-34-37-40-44-51 repetitions in total in width, finish with A.3. Continue pattern like this. When A.1-A.3 have been worked 1 time vertically, repeat A.4 vertically until finished measurements.

When piece measures 14-14-14-15-15-15 cm from marker, adjust so that next round is last round in A.4, inc 1 repetition of A.2 in 8th-9th-9th-10th-11th-13th repetition in ch-space as follows: Work 2 ch, 1 dc in ch-space, 2 ch, 1 tr in same ch-space, 2 ch, 1 dc in same ch-space. Work 14-16-19-20-22-25 repetitions of A.2, in next repetition of A.2 inc the same way. Then continue as before = 32-36-39-42-46-53 repetitions of A.2 in width. Fasten off when piece measures 34-34-36-35-37-37 cm from marker, adjust to finish with next to last round in A.4, piece measures 56-58-60-62-64-66 cm in total.
SLEEVE:
Sleeve is worked in the round, top down. Insert a marker, now measure piece from here! Beg by working mid under sleeve as follows: Work 1 dc in 5th ch of the 8 ch work in armhole on body, 3 ch (= 1 tr), work 1 tr in each of the next 3 ch, 1 tr in every tr over sleeve, then work 1 tr in each of the remaining 4 ch under sleeve = 60-64-64-68-72-76 tr. Insert 1 marker mid under sleeve.
Continue to work as follows: 1 tr in each of the first 11-11-11-13-13-15 tr AT THE SAME TIME dec 1 tr (= 10-10-10-12-12-14 tr), A.1, A.2 8-9-9-9-10-10 times in width, A.3, work 1 tr in each of the last 10-10-10-12-12-14 tr. Continue with 1 tr in each of the 20-20-20-24-24-28 tr mid under sleeve and A.1-A.3 over sleeve. When A.1-A.3 have been worked 1 time vertically, repeat A.4 vertically until finished measurements. Continue this pattern AT THE SAME TIME when piece measures 4 cm, dec 1 tr on each side of marker - Remember DECREASE TIP. Repeat dec every 3½-3½-3½-2½-2½-2 cm 9-9-9-11-11-13 more times. Now work only A.1-A.3 over sleeve. Fasten off when sleeve measures 43½-42½-42½-39½-40-38 cm, adjust to finish with next to last round in A.4 – NOTE – shorter measurements in the larger sizes because of wider neck and shoulders.
Work the other the same way.

DETACHABLE COLLAR:
Worked in the round. Work 99 ch on hook size 4.5 mm with Merino Extra Fine and form a ring with 1 sl st in 1st ch. Work 3rd row in A.1, 3rd row in A.2 23 times and 3rd row in A.3. Repeat A.4 vertically until finished measurements. When piece measures 8 cm, adjust so that next round is last round in A.4, inc 1 repetition of A.2 in each side of piece as follows: Work A.1, then work first A.2 as follows: Work 2 ch, 1 dc in ch-space, 2 ch, 1 tr in same ch-space, 2 ch, 1 dc in same ch-space. Work as before until 1 repetition of A.2 remains before A.3, in next repetition of A.2 inc the same way. Then work as before (= 25 repetitions of A.2 in width) until piece measures approx. 20 cm, adjust to finish with next to last row in A.4. Fasten off.

Diagram

symbols = chain stitch (ch) – NOTE: if chain stitch is worked at the end of hook it will become too tight. 1 chain should be the same length as the width of a double crochet.
symbols = double crochet (dc)
symbols = treble (tr) in stitch
symbols = 1 slip stitch (sl st) in 3rd/1st chain at beginning of round
symbols = treble crochet around stitch
symbols = work 3 trebles into 1 treble in same stitch as follows: Work 1 treble but wait with last pull through (= 2 strands on hook), work 1 treble the same way, then work next treble but on last pull through, pull yarn through all stitches on hook
symbols = 1st round is explained in pattern
diagram
diagram
Do you have a question? See a list of frequently asked questions (FAQ)

Knitting tension is what determines the final measurements of your work, and is usually measured per 10 x 10 cm. It is provided like so: number of stitches in width x number of rows in height - eg: 19 stitches x 26 rows = 10 x 10 cm.

The knitting tension is very individual; some people knit/crochet loosely while others work tightly. You adjust the knitting tension with the needle size, which is why the suggested needle size is only meant as a guide! You need to adjust this (up or down) to ensure that YOUR knitting tension matches the knitting tension provided in the pattern. If you work with a different knitting tension than provided you will have a different yarn consumption, and your work will have different measurements than what the pattern suggests.

The knitting tension also determines which yarns can replace each other. As long as you achieve the same knitting tension you can replace one yarn with another.

See DROPS lesson: How to measure your tension/gauge

See DROPS video: How to make a gauge tension swatch

The required amount of yarn is provided in grams, eg: 450 g. To calculate how many balls you’ll need you first need to know how many grams are in 1 ball (25g, 50g or 100g). This information is available if you click on the individual yarn quality on our pages. Divide the amount required with the amount of each ball. For example, if each ball is 50g (the most common amount), the calculation will be as follows: 450 / 50 = 9 balls.

The important thing when changing from one yarn to another is that the knitting/crochet tension remains the same. This is so that the measurements of the finished piece will be the same as on the sketch provided. It is easier to achieve the same knitting tension using yarns from the same yarn group. It is also possible to work with multiple strands of a thinner yarn to achieve the knitting tension of a thicker one. Please try our yarn converter. We recommend you to always work a test swatch.

Please NOTE: when changing yarn the garment might have a different look and feel to the garment in the photo, due to individual properties and qualities of each yarn.

See DROPS lesson: Can I use a different yarn than the one mentioned in the pattern?

All our yarns are categorised into yarn groups (from A to F) according to thickness and knitting tension – group A contains the thinnest yarns and group F the thickest. This makes it easier for you to find alternative yarns to our patterns, should you wish to switch yarn. All yarns within the same group have a similar knitting tension and can easily replace each other. However, different yarn qualities have different structures and properties which will give the finished work a unique look and feel.

Click here for an overview of the yarns in each yarn group

At the top of all our patterns you’ll find a link to our yarn calculator, which is a helpful tool should you wish to use a different yarn than suggested. By filling in the yarn quality you wish to replace, the amount (in your size) and number of strands, the calculator will present good alternative yarns with the same knitting tension. Additionally it will tell you how much you’ll require in the new qualities and whether you’ll need to work with multiple strands. Most skeins are 50g (some are 25g or 100g).

If the pattern is worked with multiple colours, every colour will have to be calculated separately. Similarly, if the pattern is worked with several strands of different yarns (for example 1 strand Alpaca and 1 strand Kid-Silk) you will have to find alternatives for each, individually.

Click here to see our yarn calculator

Since different yarns have different qualities and textures we have chosen to keep the original yarn in our patterns. However, you can easily find options among our available qualities by using our yarn calculator, or simply pick a yarn from the same yarn group.

It is possible that some retailers still have discontinued yarns in stock, or that someone has a few skeins at home that they would like to find patterns for.

The yarn calculator will provide both alternative yarn as well as required amount in the new quality.

If you think it's hard to decide what size to make, it can be a good idea to measure a garment you own already and like the size of. Then you can pick the size by comparing those measures with the ones available in the pattern's size chart.

You'll find the size chart at the bottom of the pattern.

See DROPS lesson: How to read size chart

The needle size provided in the pattern serves only as a guide, the important thing is to follow the knitting tension. And since knitting tension is very individual, you will have to adjust the needle size to ensure that YOUR tension is the same as in the pattern – maybe you’ll have to adjust 1, or even 2 needle sizes, up or down to achieve the correct tension. For this, we recommend that you work test swatches.

Should you work with a different knitting tension than the one provided, the measurements of the finished garment might deviate from the measurement sketch.

See DROPS lesson: How to measure your tension/gauge

See DROPS video: How to make a tension/gauge swatch

Working a garment top-down provides more flexibility and room for personal adjustment. For example it is easier to try the garment on while working, as well as making adjustments to length of yoke and shoulder caps.

The instructions are carefully explaining every step, in the correct order. Diagrams are adjusted to the knitting direction and are worked as usual.

The diagram depicts all rows/rounds, and every stitch seen from the right side. It is read from bottom to top, from right to left. 1 square = 1 stitch.

When working back and forth, every other row is worked from the right side and every other row is worked from the wrong side. When working from the wrong side, the diagram will have to be worked reversed: from left to right, knit stitches are purled, purl stitches are knit etc.

When working in the round every round is worked from the right side and the diagram are worked from right to left on all rounds.

See DROPS lesson: How to read knitting diagrams

The diagram depicts all rows/rounds, and every stitch seen from the right side. It is worked from bottom to top, from right to left.

When working back and forth every other row is worked from the right side: from right to left and every other row is worked from the wrong side: from left to right.

When working in the round, every row in the diagram are worked from the right side, from right to left.

When working a circular diagram you start in the middle and work your way outwards, counter clockwise, row by row.

The rows usually start with a given number of chain stitches (equivalent to the height of the following stitch), this will either be depicted in the diagram or explained in the pattern.

See DROPS lesson: How to read crochet diagrams

Instructions for working several diagrams after each other on the same row/round, will often be written like so: “work A.1, A.2, A.3 a total of 0-0-2-3-4 times". This means you work A.1 once, then A.2 is worked once, and A.3 is repeated (in width) the number of times provided for your size – in this case like so: S = 0 times, M = 0 times, L=2 times, XL= 3 times and XXL = 4 times.

The diagrams are worked as usual: begin with the first row in A.1, then work the first row in A.2 etc.

See DROPS lesson: How to read knitting diagrams

See DROPS lesson: How to read crochet diagrams

The total width of the garment (from wrist-to-wrist) will be larger in the larger sizes, despite the actual sleeves being shorter. The larger sizes have longer sleeve caps and wider shoulders, so there will be a good fit in all sizes.

The measurement sketch/schematic drawing provides information regarding the full length of the garment. If it’s a jumper or a jacket the length is measured from the highest point on the shoulder closest to the neckline, and straight down to the bottom of the garment. It is NOT measured from the tip of shoulder. Similarly, the length of yoke is measured from the highest point on the shoulder and down to where yoke is split into body and sleeves.

On a jacket measures are never taken along bands, unless specifically stated. Always measure inside band stitches when measuring the length.

See DROPS lesson: How to read a schematic drawing

Diagrams are often repeated on the round or in height. 1 repeat is the diagram the way it appears in the pattern. If it says to work 5 repeats of A.1 in the round, then you work A.1 a total of 5 times after/next to each other in the round. If it says to work 2 repeats of A.1 vertically/in height you work the entire diagram once, then begin again at the start and work the entire diagram one more time.

Chain stitches are slightly narrower than other stitches and to avoid working the cast-on edge too tight, we simply chain more stitches to begin with. The stitch count will be adjusted on the following row to fit the pattern and measurement sketch.

The rib edge is more elastic and will contract slightly compared to, for example, stocking stitch. By increasing before the rib edge, you avoid a visible difference in width between the rib edge and the rest of the body.

It’s very easy to cast off too tightly, and by making yarn overs while casting off (and simultaneously casting these off) you avoid a too tight cast off edge.

See DROPS video: How to bind off with yarn overs (yo)

To achieve an even increase (or decrease) you can increase on, for example: every 3rd and 4th row alternately, like so: work 2 rows and increase on the 3rd row, work 3 rows and increase on the 4th. Repeat this until the increase is complete.

See DROPS lesson: Increase or decrease 1 st on every 3rd and 4th row alternately

Should you prefer to work in the round instead of back and forth, you may of course adjust the pattern. You’ll need to add steeks mid-front (usually 5 stitches), and follow the instructions. When you would normally turn and work from the wrong side, simply work across the steek and continue in the round. At the end you’ll cut the piece open, pick up stitches to work bands, and cover the cut edges.

See DROPS video: How to knit steeks and cut open

Should you prefer to work back and forth instead of in the round, you may of course adjust the pattern so you work the pieces separately and then assemble them at the end. Divide the stitches for the body in 2, add 1 edge stitch in each side (for sewing) and work the front and back pieces separately.

See DROPS lesson: Can I adapt a pattern for circular needles into straight needles?

Pattern repeats can vary slightly in the different sizes, in order to get the correct proportions. If you’re not working the exact same size as the garment in the photo, yours might deviate slightly. This has been carefully developed and adjusted so that the complete impression of the garment is the same in all sizes.

Make sure to follow instructions and diagrams for your size!

If you have found a pattern you like which is available in women’s size it’s not very difficult to convert it to men’s size. The biggest difference will be the length of sleeves and body. Start working on the women size that you think would fit across the chest. The additional length will be worked right before you cast off for the armhole/sleeve cap. If the pattern is worked top-down you can add the length right after the armhole or before the first decrease on sleeve.

Regarding additional yarn amount, this will depend on how much length you add, but it is better with a skein too many than too few.

All yarns will have excess fibres (from production) that might come off as lint or shedding. Brushed yarns (ie hairier yarns) have more of these loose, excess fibres, causing more shedding.

Shedding also depends on what is worn under or over the garment, and whether this pulls at the yarn fibres. It’s therefore not possible to guarantee that there will be no shedding

Below are some tips on how to get the best result when working with hairier yarns:

1. When the garment is finished (before you wash it) shake it vigorously so the looser hairs come off. NOTE: do NOT use a lint roller, brush or any method that pulls at the yarn.

2. Place the garment in a plastic bag and put it in your freezer - the temperature will cause the fibres to become less attached to each other, and excess fibres will come off easier.

3. Leave in the freezer for a few hours before taking it out and shaking it again.

4. Wash the garment according to the instructions on the yarn label.

Pilling is a natural process that happens to even the most exclusive of fibers. It's a natural sign of wear and tear that is hard to avoid, and that is most visible in high friction areas of your garment like a sweater's arms and cuffs.

You can make your garment look as new by removing the pilling, using a fabric comb or a pill/lint remover.

Still can't find the answer you need? Then scroll down and leave your question so one of our experts can try to help you. This will be done normally within 5 to 10 working days.
In the meantime, you can read the questions and answers that others have left to this pattern or join the DROPS Workshop on Facebook to get help from fellow knitters/crocheters!

You might also like...

Post a comment to pattern DROPS 156-18

We would love to hear what you have to say about this pattern!

If you want to leave a question, please make sure you select the correct category in the form below, to speed up the answering process. Required fields are marked *.

Comments / Questions (68)

country flag Ivana wrote:

Vorrei sapere alla fine della riga 5 quanti punti in totale devono rimanere. Io ho la taglia XL e mi restano 92 punti ma riesco a mettere solo 19 segnapunti. Grazie

05.01.2021 - 11:24

DROPS Design answered:

Buongiorno Ivana, durante la lavorazione dei ferri accorciati non varia il numero di maglie. Buon lavoro!

05.01.2021 - 11:37

country flag Leeuwerink wrote:

Ik zie dat de vraag al eerder is gesteld maar zie geen antwoord. Mijn probleem doet zich voor bij het haken van de losse kraag. Bij de tweede toer wordt de kraag heel smal. Wat doe ik fout? Hoor graag. Groet Josine Leeuwerink

22.07.2020 - 13:15

DROPS Design answered:

Dag Leeuwerink,

Er stond een fout in het patroon bij de kraag; dat is nu aangepast. Na het sluiten van de ring van lossen begin je gelijk met de 3e toer in het telpatroon.

19.11.2020 - 12:09

country flag Kim wrote:

I figured out the answer to my previous question, but I am having trouble understanding the increase every other round 6 times and every 4th round 2 times. How do I do that?

28.09.2019 - 03:06

DROPS Design answered:

Dear Kim, you will work as follows: 1 round with increases, 1 round without increases; repeat these 2 rounds a total of 5 times, then work 1 round with increases (= every other round 6 times), and then work 3 rounds without increases, work 1 round with increases and repeat these 4 rounds a total of 2 times (= every 4th round 2 times). Happy crocheting!

30.09.2019 - 08:30

country flag Kim wrote:

In the very beginning on the repeat it says skip ch1, 1sc in each of the next 4sc. Am I doing a ch 1 between the sets of 4sc or am I just skipping a stitch? Also when I am counting the stitches in round 1 to place my marker, am I counting the ch 1 as a stitch or just the sc?

27.09.2019 - 21:56

DROPS Design answered:

Dear Kim, the fundation chain is most ofen tighter than the first row so that you first cast on more chain stitches and skip some chains evenly on first row to get the correct number of stitches (and width) - if your chain stitches are large enough (as 1 sc) you can then cast on the number of stitches required on first row. Happy crocheting!

30.09.2019 - 08:19

country flag Petra wrote:

Ik ben nu al voor de 3e x begonnen aan toer 1-7. Ik zet en steekmarkeerder op st 36. Dan keer ik het werk tot ik weer 36 st heb voor de markeerder. Keer weer het werk tot 30 st voor de markeerder. Nu krijg ik als ik doorga aan 1 kant en verhoging een aan de andere zijde loopt de toer schuin af. Klopt dit, vindt het er beetje vreemd uitzien.

14.07.2019 - 19:40

DROPS Design answered:

Dag Petra

Als het goed is haak je aan beide kanten 2 keer tot er 36 steken over zijn en aan beide kanten 1 keer tot er 30 steken over zijn voor de markeerdraad midden voor, voordat je keert en terug haakt. Dan zou het toch aan beide kanten gelijk moeten zijn?

15.07.2019 - 14:39

country flag Audrey Duchene wrote:

Oui j’ai le bon échantillon. Mais si je fais comme vous au 1er tour il est impossible de passer la tête. J’ai déjà réalisé le pull et tout convient. Je ne vois pas pourquoi ça changerai pour le tout de cou alors que j’utilise le même crochet et la même laine.

19.02.2019 - 10:44

DROPS Design answered:

Bonjour Mme Duchene, votre remarque va être transmise à nos stylistes, essayez d'ajouter quelques mailles en l'air dès le départ pour ajuster le col la la largeur souhaitée (4 mailles en plus par motif de A.2 en largeur en plus). Bon crochet!

19.02.2019 - 12:36

country flag Audrey Duchene wrote:

Bonjour. Je ne comprends pas pour le col. J’ai suivi vos explications et rien que pour le début ça ne va pas. J’ai dû rajouter 2ml entre chaque br et chaque ms pour avoir la largeur nécessaire pour passer la tête. J’ai fait l’augmentation nécessaire à 8cm et continuer jusqu’à ce que le col fasse 20cm. Mais je n’ai pas cet effet large comme sur votre photo. Faut il faire d’autres augmentations? Merci de votre aide

18.02.2019 - 16:21

DROPS Design answered:

Bonjour Mme Duchene, avez-vous bien le bon échantillon? Vous devez avoir 16 brides = 10 cm de large, et ainsi un total de 15 motifs en largeur (15 x A.2) + A.1 et A.3. Le tour de cou sera plus serré en haut (côté visage) et plus large en bas. Bon crochet!

19.02.2019 - 08:59

country flag Alice wrote:

Salve. È possibile che per fare questa maglia ci vogliono ben 850gr di lana per una taglia L? Ho già fatto un'altra maglia, nemmeno 500gr, e un cardigan, che non arriva ai 700gr. Mi sembrano eccessivi 850gr...o è a "causa" del motivo che viene un tale peso? Grazie

02.12.2017 - 18:37

DROPS Design answered:

Buongiorno Alice. La quantità di lana indicata comprende anche la lana necessaria per realizzare il collo staccato, che di fatto è uno scaldacollo. Buon lavoro!

02.12.2017 - 19:54

Angela Gibson wrote:

Hi, are there any corrections for this lovely design yet? For Rows 2-7 it would be far easier to put markers in foundation row & just say how many stitches to make than to count backwards from a marker (which does not specify if front or back even).

20.07.2017 - 10:44

DROPS Design answered:

Dear Mrs Gibson, there are no correction to this pattern. You are working lace pattern in the round, A.1 shows how to start the rounds, repeat then A.2 and finish with A.3 - feel free to add as many markers as you need to be sure lace pattern works in the round. After diagram has been worked 1 time in height, repeat A.4 in height. Happy crocheting!

20.07.2017 - 15:19

country flag Anna Hayward wrote:

The instructions for the sleeves make no sense, bearing in mind that the sleeves are worked in an openwork pattern. Decreasing one treble in a row (as instructed) is not possible. Instead, I had to calculate how to decrease sections of the pattern every few rows, to shape the sleeve.

18.06.2017 - 14:10

DROPS Design answered:

Dear Mrs Hayward, you are working tr mid under arm (= 20-24-28 tr (see your size) mid under arm) and lace pattern on remaining sts around, so that you can dec the tr mid under arm without decreasing lace pattern. Happy crocheting!

19.06.2017 - 09:12