DROPS Delight
DROPS Delight
75% Wool, 25% Polyamide
Discontinued
find alternatives
DROPS Alpaca
DROPS Alpaca
100% Alpaca
from 3.40 £ /50g
DROPS SS24

Blue Maze

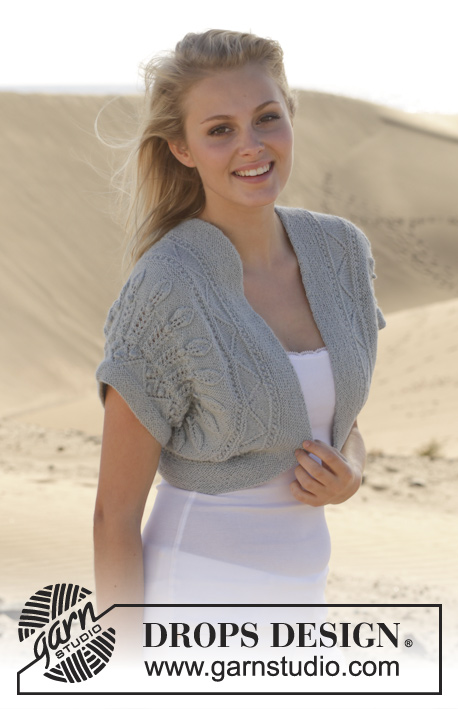
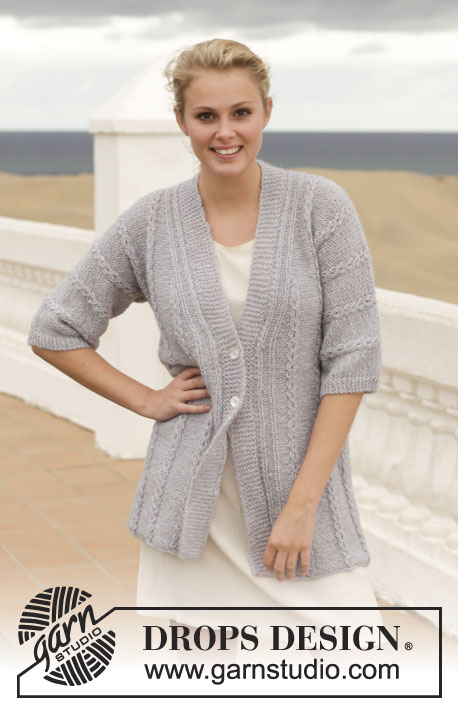
Knitted DROPS jacket in garter st with shawl collar in ”Delight” and "Alpaca". Size: S - XXXL.

DROPS 153-13
DROPS design: Pattern no de-119
Yarn group A
-----------------------------------------------------------
Size: S - M - L - XL - XXL - XXXL
Materials:
DROPS DELIGHT from Garnstudio
250-250-300-300-350-350 g colour no 07, beige/blue
And use:
DROPS ALPACA from Garnstudio
250-250-300-300-350-350 g colour no 8105, light steel blue

DROPS DOUBLE POINTED NEEDLES AND CIRCULAR NEEDLE (40 and 80 cm) SIZE 3.5 mm - or size needed to get 23 sts x 45 rows in garter st = 10 x 10 cm.

-------------------------------------------------------

Alternative Yarn – See how to change yarns here
Yarn Groups A to F – Use the same pattern and change the yarn here
Yarn usage using an alternative yarn – Use our yarn converter here

-------------------------------------------------------

DROPS Delight
DROPS Delight
75% Wool, 25% Polyamide
Discontinued
find alternatives
DROPS Alpaca
DROPS Alpaca
100% Alpaca
from 3.40 £ /50g

Pattern instructions

NOTE: This pattern is written in British English. All measurements in charts are in cm. For conversion from cm to inches - click here. There are different terms for crocheting in British and American English. If this pattern includes crochet, click for "crochet terms" here. For this pattern in American English, please click here.
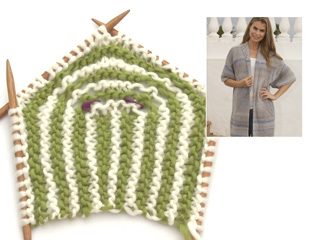
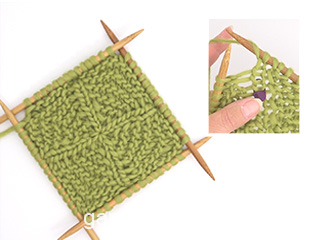
GARTER ST (back and forth on needle):
K all rows. 1 ridge = 2 rows K.

GARTER ST (in the round):
* K 1 round and P 1 round *, repeat from *-*. 1 ridge = 2 rounds.

STRIPES:
*1 ridge Delight, 1 ridge Alpaca *, repeat from *-* the entire piece.

MEASURING TIP:
Measure piece when held up.
----------------------------------------------------------

JACKET:
Back piece is worked from mid back in a square. Then work at the top of yoke and at the bottom of back piece. Front piece is worked the same way but as half of back piece. I.e. half a square but with band and collar in addition. Work sleeves at the end.

BACK PIECE:
Cast on 8 sts with Delight and divide them on 4 double pointed needles size 3.5 mm (= 2 sts on every needle). Work in the round in GARTER ST and STRIPES - see explanation above.
ROUND 1: K all sts.
ROUND 2: P and insert marker in the first, third, fifth and seventh st (= 4 markers).
ROUND 3: K and inc with YOs on each side of every marker the entire round.
ROUND 4: P all sts and YOs = 16 sts.
ROUND 5: Now displace beg of round with 1 st to get the colour change in one corner of piece so that it looks nice. Move first st on round on to right needle without working it, this st is now last st on round. Then K with YOs on each side of every marker the entire round.
ROUND 6: P all sts and YOs = 24 sts.
Then repeat 5th and 6th round, distribute sts on needle to make it easier to work and switch to circular needle when needed.
Continue working like this until there are 456-496-536-568-624-680 sts on needle (= 56-61-66-70-77-84 inc and 114-124-134-142-156-170 sts along each side). On next round with P work as follows: P 114-124-134-142-156-170, cast off the next 114-124-134-142-156-170 sts (= side of jacket), work the next 114-124-134-142-156-170 sts and slip them on 1 stitch holder (= bottom edge on jacket) and cast off the next 114-124-134-142-156-170 sts (= side of jacket). Work in garter st and stripes back and forth over the 114-124-134-142-156-170 sts on needle for yoke. When piece measures 59-62-65-68-72-76 cm - READ MEASURING TIP ABOVE, cast off the middle 14-14-16-16-18-18 sts for neck and finish each shoulder separately. Then cast off at beg of every row from neck as follows: Cast off 1 st 2 times = 48-53-57-61-67-74 sts remain on shoulder.
Continue until piece measures 61-64-67-70-74-78 cm and cast off. Insert 2 markers in the piece; insert a marker on each of the long sides 26-27-29-30-31-32 cm down from each shoulder, use markers for assembly. Slip the 114-124-134-142-156-170 sts from stitch holder in bottom edge back on circular needle size 3.5 mm and work in garter st and stripes back and forth until piece measures 72-74-76-78-80-82 cm from shoulder, loosely cast off.

RIGHT FRONT PIECE:
Loosely cast on 12 sts with Delight on double pointed needles size 3.5 mm. Switch to Alpaca and work 1 ridge, switch to Delight and work 1 ridge. Switch to Alpaca and K 1 row, turn piece clockwise and pick up 4 sts along the side of ridges. Turn piece again and pick up 12 sts on the under side of cast-on edge = 28 sts on needle. K 1 row over all sts. Insert a marker in the 13th and 16th st. Then work in garter st and stripes AT THE SAME TIME inc with 1 YO on each side of 13th and 16th st on every row from RS (=4 sts inc), K YOs to make a small hole. Switch to circular needle when needed. Continue to inc this way until inc has been done 56-61-66-70-77-84 times in total and there are 252-272-292-308-336-364 sts on needle. On next row from WS K the first 69-74-79-83-90-97 and then slip them on 1 stitch holder (= bottom edge of jacket), cast off the next 114-124-134-142-156-170 sts (= side of jacket). Work in garter st and stripes back and forth over the last 69-74-79-83-90-97 sts on needle for yoke, work until piece measures 61-64-67-70-74-78 cm. On next row from WS cast off the first 48-53-57-61-67-74 sts. Insert 1 marker in the piece; insert a marker on the long side 26-27-29-30-31-32 cm down from shoulder, use marker when sewing in sleeve. 21-21-22-22-23-23 sts remain on needle for collar. Then continue in garter st and stripes back and forth over these sts AT THE SAME TIME work short rows as follows: Beg from WS towards shoulder. * K 1 row over all sts, work 1 ridge (2 rows) over only the outermost 12 sts from mid front, K 1 row over all sts, switch colour *, repeat from *-* onwards. There is 1 ridge on the inside and 2 ridges at the edge in the same colour consecutively on collar. Work until collar measures approx. 5-5-5.5-5.5-6-6 cm on the inside on the most narrow part and cast off. Slip the 69-74-79-83-90-97 sts on stitch holder back on needle and work in garter st back and forth until piece measures 72-74-76-78-80-82 cm from shoulder, loosely cast off.

LEFT FRONT PIECE:
Work as right but reversed until inc has been done 56-61-66-70-77-84 times in total and there are 252-272-292-308-336-364 sts on needle.
K the first 69-74-79-83-90-97 sts from RS and then slip them on 1 stitch holder (= bottom edge of jacket), cast off the next 114-124-134-142-156-170 sts (= side of jacket). Work in garter st back and forth over the last 69-74-79-83-90-97 sts on needle for yoke, work until piece measures 61-64-67-70-74-78 cm. On next row from RS cast off the first 48-53-57-61-67-74 sts, work the last 21-21-22-22-23-23 sts. Insert 1 marker in the piece; insert a marker on the long side 26-27-29-30-31-32 cm down from shoulder, use marker when sewing in sleeve. Then continue in garter st back and forth over these sts AT THE SAME TIME work short rows as follows: Turn piece and beg from WS towards mid front. * Work 1 ridge (2 rows) over the outermost 12 sts from mid front, work 1 ridge (2 rows) over all sts, switch colour *, repeat from *-* onwards. There is 1 ridge on the inside and 2 ridges at the edge in the same colour consecutively on collar. Work until collar measures approx. 5-5-5.5-5.5-6-6 cm on the inside on the most narrow part and cast off. Slip the 69-74-79-83-90-97 sts on stitch holder back on needle and work in garter st back and forth until piece measures 72-74-76-78-80-82 cm from shoulder, loosely cast off.

SLEEVE:
Worked back and forth on circular needle from shoulder.
Cast on 122-126-132-136-140-146 sts on circular needle size 3.5 mm with Delight and work in garter st and stripes back and forth on needle as before until piece measures approx. 2 cm. Dec 1 st inside 1 edge st in each side by K 2 sts tog. Repeat approx. every cm 13 more times (= 14 times in total) = 94-98-104-108-112-118 sts. Work until piece measures 17 cm and loosely cast off. Knit another sleeve the same way.

ASSEMBLY:
Sew in outer loops of edge sts to avoid a chunky seam. Sew the shoulder seams. Sew in sleeves between markers in the sides. Sew underarm and side seams in one. Sew collar tog mid back (seam should be out on RS so that when collar is folded, the edge will be under collar and be invisible). Sew collar to neckline in the back of neck. Fasten off.

Diagram

diagram measurements

Each of our patterns has specific tutorial videos to help you.

Do you have a question? See a list of frequently asked questions (FAQ)

Knitting tension is what determines the final measurements of your work, and is usually measured per 10 x 10 cm. It is provided like so: number of stitches in width x number of rows in height - eg: 19 stitches x 26 rows = 10 x 10 cm.

The knitting tension is very individual; some people knit/crochet loosely while others work tightly. You adjust the knitting tension with the needle size, which is why the suggested needle size is only meant as a guide! You need to adjust this (up or down) to ensure that YOUR knitting tension matches the knitting tension provided in the pattern. If you work with a different knitting tension than provided you will have a different yarn consumption, and your work will have different measurements than what the pattern suggests.

The knitting tension also determines which yarns can replace each other. As long as you achieve the same knitting tension you can replace one yarn with another.

See DROPS lesson: How to measure your tension/gauge

See DROPS video: How to make a gauge tension swatch

The required amount of yarn is provided in grams, eg: 450 g. To calculate how many balls you’ll need you first need to know how many grams are in 1 ball (25g, 50g or 100g). This information is available if you click on the individual yarn quality on our pages. Divide the amount required with the amount of each ball. For example, if each ball is 50g (the most common amount), the calculation will be as follows: 450 / 50 = 9 balls.

The important thing when changing from one yarn to another is that the knitting/crochet tension remains the same. This is so that the measurements of the finished piece will be the same as on the sketch provided. It is easier to achieve the same knitting tension using yarns from the same yarn group. It is also possible to work with multiple strands of a thinner yarn to achieve the knitting tension of a thicker one. Please try our yarn converter. We recommend you to always work a test swatch.

Please NOTE: when changing yarn the garment might have a different look and feel to the garment in the photo, due to individual properties and qualities of each yarn.

See DROPS lesson: Can I use a different yarn than the one mentioned in the pattern?

All our yarns are categorised into yarn groups (from A to F) according to thickness and knitting tension – group A contains the thinnest yarns and group F the thickest. This makes it easier for you to find alternative yarns to our patterns, should you wish to switch yarn. All yarns within the same group have a similar knitting tension and can easily replace each other. However, different yarn qualities have different structures and properties which will give the finished work a unique look and feel.

Click here for an overview of the yarns in each yarn group

At the top of all our patterns you’ll find a link to our yarn calculator, which is a helpful tool should you wish to use a different yarn than suggested. By filling in the yarn quality you wish to replace, the amount (in your size) and number of strands, the calculator will present good alternative yarns with the same knitting tension. Additionally it will tell you how much you’ll require in the new qualities and whether you’ll need to work with multiple strands. Most skeins are 50g (some are 25g or 100g).

If the pattern is worked with multiple colours, every colour will have to be calculated separately. Similarly, if the pattern is worked with several strands of different yarns (for example 1 strand Alpaca and 1 strand Kid-Silk) you will have to find alternatives for each, individually.

Click here to see our yarn calculator

Since different yarns have different qualities and textures we have chosen to keep the original yarn in our patterns. However, you can easily find options among our available qualities by using our yarn calculator, or simply pick a yarn from the same yarn group.

It is possible that some retailers still have discontinued yarns in stock, or that someone has a few skeins at home that they would like to find patterns for.

The yarn calculator will provide both alternative yarn as well as required amount in the new quality.

If you think it's hard to decide what size to make, it can be a good idea to measure a garment you own already and like the size of. Then you can pick the size by comparing those measures with the ones available in the pattern's size chart.

You'll find the size chart at the bottom of the pattern.

See DROPS lesson: How to read size chart

The needle size provided in the pattern serves only as a guide, the important thing is to follow the knitting tension. And since knitting tension is very individual, you will have to adjust the needle size to ensure that YOUR tension is the same as in the pattern – maybe you’ll have to adjust 1, or even 2 needle sizes, up or down to achieve the correct tension. For this, we recommend that you work test swatches.

Should you work with a different knitting tension than the one provided, the measurements of the finished garment might deviate from the measurement sketch.

See DROPS lesson: How to measure your tension/gauge

See DROPS video: How to make a tension/gauge swatch

Working a garment top-down provides more flexibility and room for personal adjustment. For example it is easier to try the garment on while working, as well as making adjustments to length of yoke and shoulder caps.

The instructions are carefully explaining every step, in the correct order. Diagrams are adjusted to the knitting direction and are worked as usual.

The diagram depicts all rows/rounds, and every stitch seen from the right side. It is read from bottom to top, from right to left. 1 square = 1 stitch.

When working back and forth, every other row is worked from the right side and every other row is worked from the wrong side. When working from the wrong side, the diagram will have to be worked reversed: from left to right, knit stitches are purled, purl stitches are knit etc.

When working in the round every round is worked from the right side and the diagram are worked from right to left on all rounds.

See DROPS lesson: How to read knitting diagrams

The diagram depicts all rows/rounds, and every stitch seen from the right side. It is worked from bottom to top, from right to left.

When working back and forth every other row is worked from the right side: from right to left and every other row is worked from the wrong side: from left to right.

When working in the round, every row in the diagram are worked from the right side, from right to left.

When working a circular diagram you start in the middle and work your way outwards, counter clockwise, row by row.

The rows usually start with a given number of chain stitches (equivalent to the height of the following stitch), this will either be depicted in the diagram or explained in the pattern.

See DROPS lesson: How to read crochet diagrams

Instructions for working several diagrams after each other on the same row/round, will often be written like so: “work A.1, A.2, A.3 a total of 0-0-2-3-4 times". This means you work A.1 once, then A.2 is worked once, and A.3 is repeated (in width) the number of times provided for your size – in this case like so: S = 0 times, M = 0 times, L=2 times, XL= 3 times and XXL = 4 times.

The diagrams are worked as usual: begin with the first row in A.1, then work the first row in A.2 etc.

See DROPS lesson: How to read knitting diagrams

See DROPS lesson: How to read crochet diagrams

The total width of the garment (from wrist-to-wrist) will be larger in the larger sizes, despite the actual sleeves being shorter. The larger sizes have longer sleeve caps and wider shoulders, so there will be a good fit in all sizes.

The measurement sketch/schematic drawing provides information regarding the full length of the garment. If it’s a jumper or a jacket the length is measured from the highest point on the shoulder closest to the neckline, and straight down to the bottom of the garment. It is NOT measured from the tip of shoulder. Similarly, the length of yoke is measured from the highest point on the shoulder and down to where yoke is split into body and sleeves.

On a jacket measures are never taken along bands, unless specifically stated. Always measure inside band stitches when measuring the length.

See DROPS lesson: How to read a schematic drawing

Diagrams are often repeated on the round or in height. 1 repeat is the diagram the way it appears in the pattern. If it says to work 5 repeats of A.1 in the round, then you work A.1 a total of 5 times after/next to each other in the round. If it says to work 2 repeats of A.1 vertically/in height you work the entire diagram once, then begin again at the start and work the entire diagram one more time.

Chain stitches are slightly narrower than other stitches and to avoid working the cast-on edge too tight, we simply chain more stitches to begin with. The stitch count will be adjusted on the following row to fit the pattern and measurement sketch.

The rib edge is more elastic and will contract slightly compared to, for example, stocking stitch. By increasing before the rib edge, you avoid a visible difference in width between the rib edge and the rest of the body.

It’s very easy to cast off too tightly, and by making yarn overs while casting off (and simultaneously casting these off) you avoid a too tight cast off edge.

See DROPS video: How to bind off with yarn overs (yo)

To achieve an even increase (or decrease) you can increase on, for example: every 3rd and 4th row alternately, like so: work 2 rows and increase on the 3rd row, work 3 rows and increase on the 4th. Repeat this until the increase is complete.

See DROPS lesson: Increase or decrease 1 st on every 3rd and 4th row alternately

Should you prefer to work in the round instead of back and forth, you may of course adjust the pattern. You’ll need to add steeks mid-front (usually 5 stitches), and follow the instructions. When you would normally turn and work from the wrong side, simply work across the steek and continue in the round. At the end you’ll cut the piece open, pick up stitches to work bands, and cover the cut edges.

See DROPS video: How to knit steeks and cut open

Should you prefer to work back and forth instead of in the round, you may of course adjust the pattern so you work the pieces separately and then assemble them at the end. Divide the stitches for the body in 2, add 1 edge stitch in each side (for sewing) and work the front and back pieces separately.

See DROPS lesson: Can I adapt a pattern for circular needles into straight needles?

Pattern repeats can vary slightly in the different sizes, in order to get the correct proportions. If you’re not working the exact same size as the garment in the photo, yours might deviate slightly. This has been carefully developed and adjusted so that the complete impression of the garment is the same in all sizes.

Make sure to follow instructions and diagrams for your size!

If you have found a pattern you like which is available in women’s size it’s not very difficult to convert it to men’s size. The biggest difference will be the length of sleeves and body. Start working on the women size that you think would fit across the chest. The additional length will be worked right before you cast off for the armhole/sleeve cap. If the pattern is worked top-down you can add the length right after the armhole or before the first decrease on sleeve.

Regarding additional yarn amount, this will depend on how much length you add, but it is better with a skein too many than too few.

All yarns will have excess fibres (from production) that might come off as lint or shedding. Brushed yarns (ie hairier yarns) have more of these loose, excess fibres, causing more shedding.

Shedding also depends on what is worn under or over the garment, and whether this pulls at the yarn fibres. It’s therefore not possible to guarantee that there will be no shedding

Below are some tips on how to get the best result when working with hairier yarns:

1. When the garment is finished (before you wash it) shake it vigorously so the looser hairs come off. NOTE: do NOT use a lint roller, brush or any method that pulls at the yarn.

2. Place the garment in a plastic bag and put it in your freezer - the temperature will cause the fibres to become less attached to each other, and excess fibres will come off easier.

3. Leave in the freezer for a few hours before taking it out and shaking it again.

4. Wash the garment according to the instructions on the yarn label.

Pilling is a natural process that happens to even the most exclusive of fibers. It's a natural sign of wear and tear that is hard to avoid, and that is most visible in high friction areas of your garment like a sweater's arms and cuffs.

You can make your garment look as new by removing the pilling, using a fabric comb or a pill/lint remover.

Still can't find the answer you need? Then scroll down and leave your question so one of our experts can try to help you. This will be done normally within 5 to 10 working days.
In the meantime, you can read the questions and answers that others have left to this pattern or join the DROPS Workshop on Facebook to get help from fellow knitters/crocheters!

You might also like...

Post a comment to pattern DROPS 153-13

We would love to hear what you have to say about this pattern!

If you want to leave a question, please make sure you select the correct category in the form below, to speed up the answering process. Required fields are marked *.

Comments / Questions (61)

country flag Donatella wrote:

Buongiorno, sto iniziando la parte destra davanti e vedo scritto che i gettati devono essere lavorati a dir., mentre per il dietro io li ho lavorati tutti a rov. E' giusto così o ho sbagliato io ad interpretare? Grazie anticipatamente buona giornata.

03.10.2017 - 23:46

DROPS Design answered:

Buongiorno Donatella. Sì è corretto. Buon lavoro!

04.10.2017 - 09:20

country flag Patrizia wrote:

Non ho avuto il piacere di un vostro chiarimento, ma non importa, facendo prove su prove ci sono arrivata da sola. Tengo comunque a precisare che le istruzioni riguardo il "ripetere il 5° e 6° giro" per me non sono molto chiare. Bastava scrivere: ripetere il 5° e 6° giro fino a quando ci sono 456 maglie. Io avevo inteso che ogni volta si doveva ripartire dal giro 1. Mi scuso, probabilmente non sono molto perspicace e per questo non ho meritato risposta. Buona giornata. Patrizia

26.09.2017 - 12:16

DROPS Design answered:

Buongiorno Patrizia. Rispondiamo a tutti i quesiti e cerchiamo di farlo il prima possibile. Non sempre ci è possibile farlo in tempi rapidissimi e ci dispiace per l’inconveniente. La traduzione in italiano deve seguire le caratteristiche del testo originale. Ci riscriva se ci sono altri punti che non le sono chiari. Buon lavoro!

26.09.2017 - 14:24

country flag Patrizia wrote:

Grazie per la risposta innanzitutto. Un'altra cosa le chiederei cortesemente. Ho ben interpretato che il giro 5 e 6 lo devo fare due volte consecutive? Ovvero la serie completa non è di 6 giri ma di 8? Ho un po' di perplessità su questo punto. Grazie e buona giornata!

25.09.2017 - 17:07

DROPS Design answered:

Buongiorno Patrizia. Deve ripetere i giri 5 e 6 finché sui ferri non ci sono le maglie indicate per la sua taglia. Buon lavoro!

26.09.2017 - 14:30

country flag Patrizia wrote:

Mi sto cimentando nella mia prima maglia modelli drops e sono molto soddisfatta. Una cosa vorrei chiederle gentilmente: al giro 5 spostando la maglia iniziale devo spostare tutti i segnapunti messi precedentemente (1°-3°-5°-7°)? Forse è una domanda sciocca ma praticamente il segnapunto messo alla maglia 1° come pure gli altri 3 restano sempre dove li avevo messi all'inizio??? Mi scusi per il disturbo buona giornata. Patrizia

24.09.2017 - 23:01

DROPS Design answered:

Buongiorno Patrizia. Deve spostare solo la maglia iniziale, ma I segnapunti restano nelle stesse maglie. Buon lavoro!

25.09.2017 - 06:48

country flag Federica wrote:

OK però la mia maglia iniziale non è quella col segnapunti perché ho già fatto un aumento, quindi la maglia col segnapunti è diventata la 2°. Spostando la prima maglia a destra mi rimane come prima maglia quella col segnapunti iniziale. Quindi io inizio a fare i gettati da questa ma mi domando come venga la diagonale...... Scusi il disturbo e spero di essere stata chiara.

24.09.2017 - 15:52

DROPS Design answered:

Buonasera Federica. Chiediamo scusa. Abbiamo fatto un piccolo campione. Le diagonali vengono da sole, per come è costruito il modello, aumentando prima e dopo le maglie con i segnapunti. La maglia va spostata la prima volta che lavora il ferro 5, così il cambio colore è nell'angolo. Chiederemo di modificare le istruzioni. Grazie e buon lavoro!

24.09.2017 - 17:29

country flag Federica wrote:

Spero di non disturbarla ancora, ma le chiedo un'ultima cosa. Ripetendo il 5° e 6° giro devo quindi spostare ancora una volta la maglia iniziale rifacendo il 5°giro, giusto?

24.09.2017 - 14:50

DROPS Design answered:

Buongiorno Federica. Sì, ogni volta che ripete il giro 5 sposta la maglia iniziale. Buon lavoro!

24.09.2017 - 15:40

country flag Federica wrote:

OK grazie mille. Quindi ogni volta devo ripetere anche il 5° e 6° giro, giusto? Grazie per la cortese attenzione!!

24.09.2017 - 10:44

DROPS Design answered:

Buongiorno Federica. Sì esatto, ripete i giri 5 e 6 finché non ha raggiunto il numero di maglie indicato per la sua taglia. Buon lavoro!

24.09.2017 - 11:37

country flag Federica wrote:

Buongiorno, non ho ancora iniziato ma sto leggendo le istruzioni. Mi domandavo: al 5° giro dove c'è da spostare una maglia è da fare solo all'inizio oppure ad ogni ripetizione? Non mi è molto chiaro. Grazie e cordiali saluti

23.09.2017 - 21:49

DROPS Design answered:

Buongiorno Federica. La maglia va spostata ogni volta che si ripete il quinto giro. Buon lavoro!

24.09.2017 - 08:18

country flag Karolina wrote:

Hi, Please could u tell me, how many pairs of double pointed needles do I need? Do I need 2 pairs for each size? Sorry I have never used double pointed needles, except circular ones. Many thanks Karolina

18.09.2016 - 10:10

DROPS Design answered:

Dear Karolina, for this pattern, you have to use a set of 5 double pointed needles. Happy knitting!

18.09.2016 - 23:34

country flag Ulrike wrote:

Frage zum Kragen: Wenn ich der Anleitung zum rechten Vorderteil folge, verschiebt sich der Farbwechsel von vorher innen zur Schulter hin. Der Kragen wird als "Rück-Seite" gestrickt und wird erst durch das spätere Umschlagen zur Vorderen. verstanden! Nur: wenn ich der Anleitung für das linke Vorderteil folge, sehe ich genau dies nicht: der Farbwechsel bleibt wo er war (innen) und somit ergibt sich für den Kragen dieselbe Vor- und Rückseite wie für den Rest des Strickteils. wie ist es richtig ?

29.07.2016 - 08:30

DROPS Design answered:

Liebe Ulrike, ich bin nicht sicher, ob ich Ihre Frage richtig verstanden habe. Der Kragen ist beim rechten und linken Vorderteil gleich. Auf dem ersten Modellfoto sehen Sie, dass die Rückseite nach aussen umgeschlagen wird.

08.08.2016 - 09:52