DROPS Fabel
DROPS Fabel
75% Wool, 25% Polyamide
from 2.30 £ /50g
Get the yarn to make this pattern from 27.60£.

The yarn cost is calculated from the pattern’s smallest size and the yarn’s cheapest product type. Looking for an even better price? You might find it on the DROPS Deals!

DROPS SS24

Beren

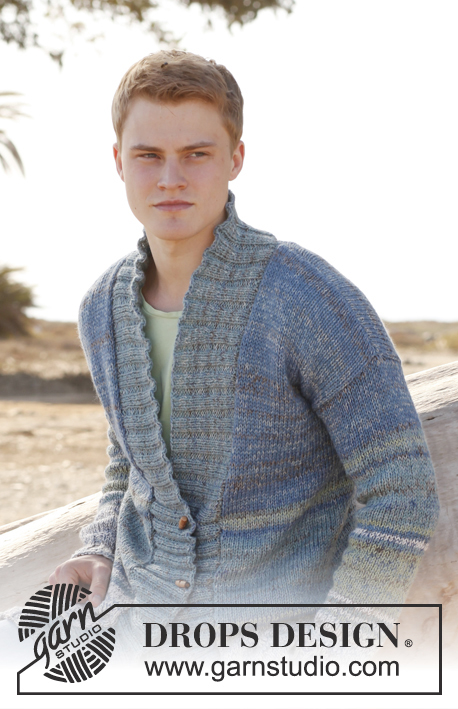
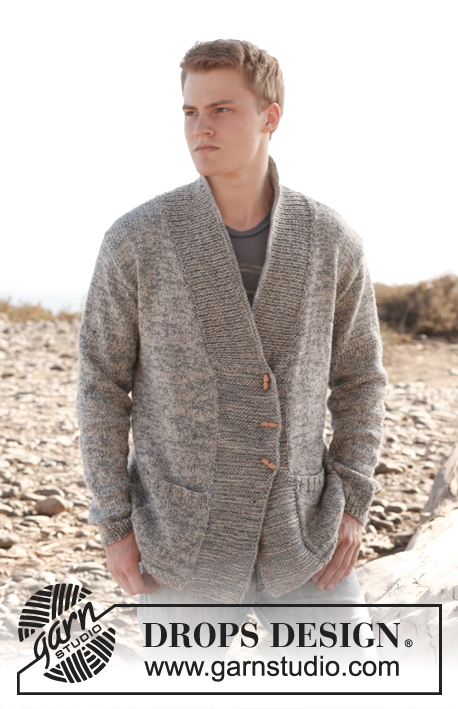
Men's jacket, knitted in 2 threads DROPS Fabel or DROPS Flora, with with shawl collar. Size: S to XXXL.

DROPS Extra 0-897
DROPS design: Pattern no fa-231
Yarn group A + A
----------------------------------------------------------
Size: S - M - L - XL - XXL - XXXL
Materials: DROPS FABEL from Garnstudio
Colour no 800, off white/beige:
300-350-400-400-450-500 g
Colour no 804, blue/grey:
300-350-400-400-450-500 g

Or use:
DROPS FLORA from Garnstudio
Colour no 07, beige:
300-350-400-400-450-500 g
Colour no 14, ice blue:
300-350-400-400-450-500 g

DROPS CIRCULAR NEEDLE SIZE 5 mm (80 cm) - or size needed to get 17 sts x 22 rows in stocking st with 2 threads Fabel or Flora = 10 x 10 cm.
DROPS CIRCULAR NEEDLE SIZE 4.5 mm (80 cm) - for rib
DROPS WOOD BUTTONS DUFFLE NO 520: 3 piece for all sizes

-------------------------------------------------------

Alternative Yarn – See how to change yarns here
Yarn Groups A to F – Use the same pattern and change the yarn here
Yarn usage using an alternative yarn – Use our yarn converter here

-------------------------------------------------------

DROPS Fabel
DROPS Fabel
75% Wool, 25% Polyamide
from 2.30 £ /50g
Get the yarn to make this pattern from 27.60£.

The yarn cost is calculated from the pattern’s smallest size and the yarn’s cheapest product type. Looking for an even better price? You might find it on the DROPS Deals!

Pattern instructions

NOTE: This pattern is written in British English. All measurements in charts are in cm. For conversion from cm to inches - click here. There are different terms for crocheting in British and American English. If this pattern includes crochet, click for "crochet terms" here. For this pattern in American English, please click here.
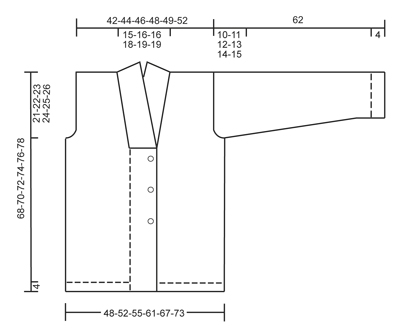
GARTER ST:
K back and forth on all rows.

SHORT ROWS:
Work short rows every 5 cm vertically until finished measurements as follows:
Work 20 band sts in garter st from RS, turn piece, tighten thread and K back from WS. Then work over all sts as before from RS, turn piece and work 20 band sts in garter st from WS, turn piece, tighten thread and K back from RS. Then work over all sts from WS as before.

BUTTONHOLES:
Cast off for 3 buttonholes from RS on right band. 1 buttonhole = work the first 4 sts from mid front, cast off next st and cast on 1 new st over this st on next row. Cast off for buttonholes when piece measures:
SIZE S: 26, 33 and 40 cm
SIZE M: 27, 34 and 41 cm
SIZE L: 28, 35 and 42 cm
SIZE XL: 29, 36 and 43 cm
SIZE XXL: 30, 37 and 44 cm
SIZE XXXL: 31, 38 and 45 cm
1 cm should remain before casting off on band.

DECREASE TIP (applies to neck dec mid front):
Dec from RS inside 1 edge st in garter st.
Dec AFTER 1 edge st as follows: Slip 1 st as if to K, K 1, psso.
Dec BEFORE 1 edge st as follows: K 2 tog.

INCREASE TIP:
Inc 1 st by making 1 YO inside 1 edge st in each side. On next row work YO twisted to avoid holes.
----------------------------------------------------------

BODY:
Worked back and forth on circular needle from mid front. Cast on 205-217-229-249-269-289 sts (incl 20 band sts in each side towards mid front) on circular needle size 4.5 mm with 1 thread of each colour in Fabel or Flora. Work rib as follows (1st row = RS): 20 band sts in GARTER ST - see explanation above - * K 1, P 1 *, repeat from *-* until 20 sts remain, work these band sts in garter st. Continue with rib and 20 band sts in garter st in each side. When piece measures 4 cm, switch to circular needle size 5 mm, work next row from RS as follows: Work the first 20 band sts in garter st, in stocking st over the middle sts - at the same time dec 1 st, finish with 20 band sts in garter st = 204-216-228-248-268-288 sts on row. Continue in stocking st with 20 band sts in garter st in each side. When piece measures 5 cm, work SHORT ROWS - see explanation above. When piece measures 26-27-28-29-30-31 cm, cast off for BUTTONHOLE on right band - Read explanation above. REMEMBER THE KNITTING TENSION! READ ALL OF THE FOLLOWING 2 SECTIONS BEFORE CONTINUING.
When piece measures 41-42-43-44-45-46 cm, insert 1 marker 61-64-67-72-77-82 sts in from each side ( = 82-88-94-104-114-124 sts between each marker on back piece), move the marker upwards when working. On the beg of the next 2 rows, cast off the first 19 sts = 166-178-190-210-230-250 sts remain, then insert 1 marker at beg and end of row (marks where to start knitting up the collar). On next row from RS, dec 1 st from neck in each side - SEE DECREASE TIP! Repeat dec every 4th row 13-14-14-15-16-16 more times (14-15-15-16-17-17 times in total) - AT THE SAME TIME when piece measures 47-48-49-50-51-52 cm, cast off 3 sts on each side of each marker (= 6 dec sts in each side) for armholes. Now divide the piece and finish each part separately.

LEFT FRONT PIECE:
Continue in stocking st and with neck dec mid front - AT THE SAME TIME cast off for armhole at the beg of every row from RS as follows: 3 sts 0-0-0-1-1-1 times, 2 sts 0-1-1-1-3-4 times and 1 st 2-2-3-3-3-4 times. After all cast offs and dec are done, 23-23-25-26-26-28 sts remain on shoulder. Cast off all sts when piece measures 68-70-72-74-76-78 cm.

RIGHT FRONT PIECE:
Work as left front piece but reversed.

BACK PIECE:
= 76-82-88-98-108-118 sts. Continue in stocking st while at the same time casting off for armholes at the beg of every row in each side as on front piece = 72-74-78-82-84-88 sts. When piece measures 66-68-70-72-74-76 cm, cast off the middle 22-24-24-26-28-28 sts for neck and finish each shoulder separately. At beg of next row from neck, cast off 2 sts = 23-23-25-26-26-28 sts remain on shoulder. Cast off all sts when piece measures 68-70-72-74-76-78 cm.

SLEEVE:
Worked back and forth on needle. Cast on 40-42-44-46-48-50 sts (incl 1 edge st in each side) on circular needle size 4.5 mm with 1 thread of each colour in Fabel or Flora. Work rib as follows (1st row = RS): 1 edge st in garter st, * K 1, P 1 *, repeat from *-* and finish with 1 edge st in garter st.
When piece measures 4 cm, switch to circular needle size 5 mm, work in stocking st with 1 edge st in garter st in each side. When piece measures 8 cm, inc 1 st in each side - READ INCREASE TIP! Repeat inc every 3½-3½-3-2½-2½-2 cm 11-11-13-14-15-16 more times (12-12-14-15-16-17 times in total) = 64-66-72-76-80-84 sts. When piece measures 52-51-50-49-48-47 cm (shorter measurements in the larger sizes because of longer sleeve cap and broader shoulder width) cast off for sleeve cap at beg of every row in each side: 3 sts 1-1-1-2-2-2 times, 2 sts 1-2-2-2-4-4 times and 1 st 1-2-2-3-3-4 times. Then cast off 2 sts in each side until piece measures 61 cm, then cast off 3 sts 1 time in each side. Cast off all sts, piece measures approx. 62 cm in all sizes.

ASSEMBLY:
Sew the shoulder seams. Sew in sleeves and sew sleeve seams inside 1 edge st.

SHAWL COLLAR:
Worked back and forth on needle. Knit up inside 1 edge st on circular needle size 4.5 mm with 1 thread of each colour in Fabel or Flora: Beg mid front at the marker on right front piece, knit up approx. 60 to 70 sts up to shoulder, then approx. 40 to 50 sts around the neck, and approx. 60 to 70 sts down along left front piece until marker = approx. 160 to 190 sts. K 1 row from WS while AT THE SAME TIME adjusting no of sts to 153-159-163-169-175-181. On next row from RS work rib as follows: 1 st in garter st, * K 1, P 1 *, repeat from *-* and finish with K 1 and 1 st in garter st. Continue rib until collar measures approx. 6 cm. On next row from RS inc 1 P st in each of the middle 12-13-13-14-13-14 P-sections (= back of neck) = 165-172-176-183-188-195 sts. Continue rib until collar measures approx. 10 cm (finish with 1 row from RS). K 3 rows over all sts, then loosely cast off all sts with K from RS. Neatly fasten collar at the bottom in each side towards band with stitches – sew edge to edge to avoid a chunky seam. Sew the buttons on to the left band.

POCKET:
Cast on 30 sts with 1 thread of each colour in Fabel or Flora on needle size 5 mm, work in stocking st until pocket measures 16 cm. Then switch to needle size 4.5 mm and work rib as follows: * K 2, P 2 *, repeat from *-*. Continue rib until pocket measures 18 cm, loosely cast off with K over K and P over P. Knit another pocket the same way. Sew pockets on jacket towards band mid front and down to rib at the bottom.

Diagram

diagram measurements
Do you have a question? See a list of frequently asked questions (FAQ)

Knitting tension is what determines the final measurements of your work, and is usually measured per 10 x 10 cm. It is provided like so: number of stitches in width x number of rows in height - eg: 19 stitches x 26 rows = 10 x 10 cm.

The knitting tension is very individual; some people knit/crochet loosely while others work tightly. You adjust the knitting tension with the needle size, which is why the suggested needle size is only meant as a guide! You need to adjust this (up or down) to ensure that YOUR knitting tension matches the knitting tension provided in the pattern. If you work with a different knitting tension than provided you will have a different yarn consumption, and your work will have different measurements than what the pattern suggests.

The knitting tension also determines which yarns can replace each other. As long as you achieve the same knitting tension you can replace one yarn with another.

See DROPS lesson: How to measure your tension/gauge

See DROPS video: How to make a gauge tension swatch

The required amount of yarn is provided in grams, eg: 450 g. To calculate how many balls you’ll need you first need to know how many grams are in 1 ball (25g, 50g or 100g). This information is available if you click on the individual yarn quality on our pages. Divide the amount required with the amount of each ball. For example, if each ball is 50g (the most common amount), the calculation will be as follows: 450 / 50 = 9 balls.

The important thing when changing from one yarn to another is that the knitting/crochet tension remains the same. This is so that the measurements of the finished piece will be the same as on the sketch provided. It is easier to achieve the same knitting tension using yarns from the same yarn group. It is also possible to work with multiple strands of a thinner yarn to achieve the knitting tension of a thicker one. Please try our yarn converter. We recommend you to always work a test swatch.

Please NOTE: when changing yarn the garment might have a different look and feel to the garment in the photo, due to individual properties and qualities of each yarn.

See DROPS lesson: Can I use a different yarn than the one mentioned in the pattern?

All our yarns are categorised into yarn groups (from A to F) according to thickness and knitting tension – group A contains the thinnest yarns and group F the thickest. This makes it easier for you to find alternative yarns to our patterns, should you wish to switch yarn. All yarns within the same group have a similar knitting tension and can easily replace each other. However, different yarn qualities have different structures and properties which will give the finished work a unique look and feel.

Click here for an overview of the yarns in each yarn group

At the top of all our patterns you’ll find a link to our yarn calculator, which is a helpful tool should you wish to use a different yarn than suggested. By filling in the yarn quality you wish to replace, the amount (in your size) and number of strands, the calculator will present good alternative yarns with the same knitting tension. Additionally it will tell you how much you’ll require in the new qualities and whether you’ll need to work with multiple strands. Most skeins are 50g (some are 25g or 100g).

If the pattern is worked with multiple colours, every colour will have to be calculated separately. Similarly, if the pattern is worked with several strands of different yarns (for example 1 strand Alpaca and 1 strand Kid-Silk) you will have to find alternatives for each, individually.

Click here to see our yarn calculator

Since different yarns have different qualities and textures we have chosen to keep the original yarn in our patterns. However, you can easily find options among our available qualities by using our yarn calculator, or simply pick a yarn from the same yarn group.

It is possible that some retailers still have discontinued yarns in stock, or that someone has a few skeins at home that they would like to find patterns for.

The yarn calculator will provide both alternative yarn as well as required amount in the new quality.

If you think it's hard to decide what size to make, it can be a good idea to measure a garment you own already and like the size of. Then you can pick the size by comparing those measures with the ones available in the pattern's size chart.

You'll find the size chart at the bottom of the pattern.

See DROPS lesson: How to read size chart

The needle size provided in the pattern serves only as a guide, the important thing is to follow the knitting tension. And since knitting tension is very individual, you will have to adjust the needle size to ensure that YOUR tension is the same as in the pattern – maybe you’ll have to adjust 1, or even 2 needle sizes, up or down to achieve the correct tension. For this, we recommend that you work test swatches.

Should you work with a different knitting tension than the one provided, the measurements of the finished garment might deviate from the measurement sketch.

See DROPS lesson: How to measure your tension/gauge

See DROPS video: How to make a tension/gauge swatch

Working a garment top-down provides more flexibility and room for personal adjustment. For example it is easier to try the garment on while working, as well as making adjustments to length of yoke and shoulder caps.

The instructions are carefully explaining every step, in the correct order. Diagrams are adjusted to the knitting direction and are worked as usual.

The diagram depicts all rows/rounds, and every stitch seen from the right side. It is read from bottom to top, from right to left. 1 square = 1 stitch.

When working back and forth, every other row is worked from the right side and every other row is worked from the wrong side. When working from the wrong side, the diagram will have to be worked reversed: from left to right, knit stitches are purled, purl stitches are knit etc.

When working in the round every round is worked from the right side and the diagram are worked from right to left on all rounds.

See DROPS lesson: How to read knitting diagrams

The diagram depicts all rows/rounds, and every stitch seen from the right side. It is worked from bottom to top, from right to left.

When working back and forth every other row is worked from the right side: from right to left and every other row is worked from the wrong side: from left to right.

When working in the round, every row in the diagram are worked from the right side, from right to left.

When working a circular diagram you start in the middle and work your way outwards, counter clockwise, row by row.

The rows usually start with a given number of chain stitches (equivalent to the height of the following stitch), this will either be depicted in the diagram or explained in the pattern.

See DROPS lesson: How to read crochet diagrams

Instructions for working several diagrams after each other on the same row/round, will often be written like so: “work A.1, A.2, A.3 a total of 0-0-2-3-4 times". This means you work A.1 once, then A.2 is worked once, and A.3 is repeated (in width) the number of times provided for your size – in this case like so: S = 0 times, M = 0 times, L=2 times, XL= 3 times and XXL = 4 times.

The diagrams are worked as usual: begin with the first row in A.1, then work the first row in A.2 etc.

See DROPS lesson: How to read knitting diagrams

See DROPS lesson: How to read crochet diagrams

The total width of the garment (from wrist-to-wrist) will be larger in the larger sizes, despite the actual sleeves being shorter. The larger sizes have longer sleeve caps and wider shoulders, so there will be a good fit in all sizes.

The measurement sketch/schematic drawing provides information regarding the full length of the garment. If it’s a jumper or a jacket the length is measured from the highest point on the shoulder closest to the neckline, and straight down to the bottom of the garment. It is NOT measured from the tip of shoulder. Similarly, the length of yoke is measured from the highest point on the shoulder and down to where yoke is split into body and sleeves.

On a jacket measures are never taken along bands, unless specifically stated. Always measure inside band stitches when measuring the length.

See DROPS lesson: How to read a schematic drawing

Diagrams are often repeated on the round or in height. 1 repeat is the diagram the way it appears in the pattern. If it says to work 5 repeats of A.1 in the round, then you work A.1 a total of 5 times after/next to each other in the round. If it says to work 2 repeats of A.1 vertically/in height you work the entire diagram once, then begin again at the start and work the entire diagram one more time.

Chain stitches are slightly narrower than other stitches and to avoid working the cast-on edge too tight, we simply chain more stitches to begin with. The stitch count will be adjusted on the following row to fit the pattern and measurement sketch.

The rib edge is more elastic and will contract slightly compared to, for example, stocking stitch. By increasing before the rib edge, you avoid a visible difference in width between the rib edge and the rest of the body.

It’s very easy to cast off too tightly, and by making yarn overs while casting off (and simultaneously casting these off) you avoid a too tight cast off edge.

See DROPS video: How to bind off with yarn overs (yo)

To achieve an even increase (or decrease) you can increase on, for example: every 3rd and 4th row alternately, like so: work 2 rows and increase on the 3rd row, work 3 rows and increase on the 4th. Repeat this until the increase is complete.

See DROPS lesson: Increase or decrease 1 st on every 3rd and 4th row alternately

Should you prefer to work in the round instead of back and forth, you may of course adjust the pattern. You’ll need to add steeks mid-front (usually 5 stitches), and follow the instructions. When you would normally turn and work from the wrong side, simply work across the steek and continue in the round. At the end you’ll cut the piece open, pick up stitches to work bands, and cover the cut edges.

See DROPS video: How to knit steeks and cut open

Should you prefer to work back and forth instead of in the round, you may of course adjust the pattern so you work the pieces separately and then assemble them at the end. Divide the stitches for the body in 2, add 1 edge stitch in each side (for sewing) and work the front and back pieces separately.

See DROPS lesson: Can I adapt a pattern for circular needles into straight needles?

Pattern repeats can vary slightly in the different sizes, in order to get the correct proportions. If you’re not working the exact same size as the garment in the photo, yours might deviate slightly. This has been carefully developed and adjusted so that the complete impression of the garment is the same in all sizes.

Make sure to follow instructions and diagrams for your size!

If you have found a pattern you like which is available in women’s size it’s not very difficult to convert it to men’s size. The biggest difference will be the length of sleeves and body. Start working on the women size that you think would fit across the chest. The additional length will be worked right before you cast off for the armhole/sleeve cap. If the pattern is worked top-down you can add the length right after the armhole or before the first decrease on sleeve.

Regarding additional yarn amount, this will depend on how much length you add, but it is better with a skein too many than too few.

All yarns will have excess fibres (from production) that might come off as lint or shedding. Brushed yarns (ie hairier yarns) have more of these loose, excess fibres, causing more shedding.

Shedding also depends on what is worn under or over the garment, and whether this pulls at the yarn fibres. It’s therefore not possible to guarantee that there will be no shedding

Below are some tips on how to get the best result when working with hairier yarns:

1. When the garment is finished (before you wash it) shake it vigorously so the looser hairs come off. NOTE: do NOT use a lint roller, brush or any method that pulls at the yarn.

2. Place the garment in a plastic bag and put it in your freezer - the temperature will cause the fibres to become less attached to each other, and excess fibres will come off easier.

3. Leave in the freezer for a few hours before taking it out and shaking it again.

4. Wash the garment according to the instructions on the yarn label.

Pilling is a natural process that happens to even the most exclusive of fibers. It's a natural sign of wear and tear that is hard to avoid, and that is most visible in high friction areas of your garment like a sweater's arms and cuffs.

You can make your garment look as new by removing the pilling, using a fabric comb or a pill/lint remover.

Still can't find the answer you need? Then scroll down and leave your question so one of our experts can try to help you. This will be done normally within 5 to 10 working days.
In the meantime, you can read the questions and answers that others have left to this pattern or join the DROPS Workshop on Facebook to get help from fellow knitters/crocheters!

You might also like...

Post a comment to pattern DROPS Extra 0-897

We would love to hear what you have to say about this pattern!

If you want to leave a question, please make sure you select the correct category in the form below, to speed up the answering process. Required fields are marked *.

Comments / Questions (29)

country flag Stephanie wrote:

Bonjour ! J’étudie ce patron avant de me lancer et je me demande ce que vous entendez par « section » (Au rang suivant sur l'endroit, augmenter 1 m env dans chacune des 12-13-13-14-13-14 sections envers au milieu) lors du tricot de l’encolure? Merci beaucoup :)

11.02.2021 - 23:16

DROPS Design answered:

Bonjour Stephanie, il s'agit des mailles envers des côtes, vous tricotez d'abord en côtes 1 m end/1 m env, mais pour que le col soit plus joli, on augmentera au niveau du col pour avoir 1 m end/2 m env à ce niveau, et toujours 1 m end/1 m env ailleurs. Bon tricot!

12.02.2021 - 08:02

country flag Veronique wrote:

Bonjour A quoi servent les rangs raccourcis dans ce modèle ? Merci par avance

17.01.2021 - 19:16

DROPS Design answered:

Bonjour Veronique, c'est pour que les bordures devant ne resserent pas l'ouvrage en hauteur. La longueur des bordures devant devrait etre la meme que le reste de la veste. Bon tricot!

18.01.2021 - 09:51

country flag Daniel Rodrigues wrote:

Olá, estou em dúvida com as DIMINUIÇÕES, a partir de 42cm aproximadamente, arrematamos 19pts em cada lado da peça e depois fazemos UMA diminuição a cada 4 carreiras (no tamanho M 14 diminuições totais)... Como ficam essas diminuições? Começamos pelo DIREITO e se fizermos as 4 carreiras que se pedem a próxima diminuição seria pelo AVESSO. Ou a carreira da diminuição conta como a 1ª das 4?

24.12.2020 - 06:53

DROPS Design answered:

Bom dia, As diminuições são feitas sempre pelo direito da peça. Assim, fazemos a 1.ª diminuição numa carreira do direito, depois, contamos 4 carreiras (incluindo a 1.ª carreira), e fazemos a 2.ª diminuição na 5.ª carreira (do direito). Esperamos ter ajudado. Qualquer dúvida, pode sempre deixar um comentário. Bons tricôs!

21.01.2021 - 10:42

country flag Dorothea wrote:

Leider gibt es die Farben 800 und 804 Fabel nicht mehr. Könnten Sie mir eine Alternative in der gleichen Farbzusammenstellung vorschlagen? Vielen Dank

26.04.2020 - 09:40

DROPS Design answered:

Liebe Dorothea, hier finden Sie alle Farben DROPS Fabel, gerne wird Ihnen Ihr DROPS Laden neuen Farben empfehlen. Viel Spaß beim stricken!

27.04.2020 - 09:04

country flag Anneke wrote:

De armsgaten zo als ik lees moet ik de eerste 3 keer dan1keer 2 ste dan 2keer 1 st Eerst 0-0-0-1-1-1 keer 3st 0-1-1-1-3-4- keer 2st 2-2-3-3-3-4 keer 1 ? In heb de tweede maat mv groet anneke

12.12.2019 - 14:33

DROPS Design answered:

Dag Anneke,

Voor maat M moet je 1 keer 2 steken en 2 keer 1 steek afkanten voor de armsgaten.

16.12.2019 - 15:42

country flag Sabine wrote:

Hallo, sehe ich das richtig, dass mit doppeltem Faden gestrickt wird, also JE ein Faden von jeder Farbe???

30.11.2019 - 10:45

DROPS Design answered:

Liebe Sabine, ja genau, Sie stricken hier entweder mit 2 Fäden Fabel (= 1 Farbe Nr 800 + 1 Farbe Nr 804) oder mit 2 Fäden Flora (= 1 Farbe Nr 07 + 1 Farbe Nr 14). Viel Spaß beim stricken!

02.12.2019 - 08:56

country flag Wetzel wrote:

"Se tricotent en allers et retours sur aiguille circulaire à partir du milieu devant." vous pouvez m'expliqué comment faire merci

24.05.2019 - 13:27

DROPS Design answered:

Bonjour Mme Wetzel, merci de bien vouloir nous indiquer si la réponse précédente ne vous a pas aidé. Bon tricot!

24.05.2019 - 14:04

country flag Wetzel wrote:

Bonjour que veut dire "Se tricotent en allers et retours sur aiguille circulaire à partir du milieu devant." c'est la 1ere fois que je lis sa et je ne comprend pas comment faire merci

24.05.2019 - 13:26

DROPS Design answered:

Bonjour Mme Wetzel, on tricote le dos et les deux devants en une seule pièce en commençant par un devant (= devant droit, sur l'endroit) et en terminant par l'autre (= devant gauche, sur l'endroit). On utilise une aiguille circulaire pour avoir suffisamment de place pour y loger toutes les mailles - vous trouverez ici plus d'infos sur les aiguilles circulaires. Bon tricot!

24.05.2019 - 14:03

Johana wrote:

Hola porfavor me explicas a que se refiere cuando en la explicación aparece rem. (Casi siempre es cuando habla de los ojales)\r\nGracias

08.06.2018 - 16:03

DROPS Design answered:

Hola Johana. rem = rematar, cerrar. Normalmente usamos este termino al finalizar el trabajo ( cerrar los puntos y asegurar los hilos) y a veces para trabajar los ojales.

10.06.2018 - 10:05

country flag Alice De Bellis wrote:

I'm running into a problem at the beginning of the shaping of the front of the cardigan. The pattern says, "On the beg of the next 2 rows, bind off the first 19 sts ..." Is this right? It looks blocky and angular. I've studied the pattern, and the only thing that makes sense is that the disconnected bands are sewn together when the sweater is finished. In the photo, it looks like that might be the case, but I can't find it in the pattern directions either. Please help me!

14.03.2018 - 01:51

DROPS Design answered:

Dear Mrs De Bellis, yes that's right you will bind off the first 19 sts at the beg of next 2 rows (= 19 sts on right front piece and 19 sts on left front piece). You will then afterwards knit collar (picking up sts along neck) then sew it on each side at the bottom of these 19 sts bound off, see at the end of SHAWL COLLAR. Happy knitting!

14.03.2018 - 09:49