
Popular categories
Looking for a yarn?


Comments / Questions (20)
![]() Gitte Andersen wrote:
Gitte Andersen wrote:
Hej jeg skal til at tage de to masker ind i hver side men er lidt i tvivl om hvor de skal sidde . Der står den først skal være efter 28 masker men hvor starter jeg på runden er det ikke på siden af hælen hvor mit mærke er .Mvh Gitte
03.04.2024 - 09:30DROPS Design answered:
Hei Gitte. Vi skal hjelpe deg så godt vi kan. Men hvilken sokk strikker du (sokk 1, 2 eller 3)? Og hvilken str str. du? mvh DROPS Design
08.04.2024 - 12:46
![]() Pilar wrote:
Pilar wrote:
Hola, uso vuestra página desde hace años. Es una verdadera maravilla. Me voy a iniciar con un patrón para calcetines, la pregunta puede ser una tonteria, pero... la cantidad de lana a usar que facilitais es para cada pieza o para el par de calcetines? Muchas gracias!! Saludos Pilar
25.11.2022 - 19:27DROPS Design answered:
Hola Pilar, las cantidades indicadas son para un par de calcetines.
27.11.2022 - 13:12
![]() Paulette wrote:
Paulette wrote:
Hi, I started doing sock 4, ( grey with pattern on leg) but the chart is a 12 stitch repeat, I have 42 stitches? How is this going to work? Thanks
05.02.2021 - 13:57DROPS Design answered:
Dear Paulette, A.4 is actually worked over 6 sts but shown in the diagram over 6 sts. repeat the 12 stiches in A.4 a total of 3 times and finish round with the first 6 stitches. Happy knitting!
05.02.2021 - 15:08
![]() Loredana wrote:
Loredana wrote:
Buongiorno,è possibile utilizzare i mini circolari per la gamba e passare ai ferri doppia punta per il resto? Grazie Loredana
28.03.2020 - 10:14DROPS Design answered:
Buongiorno Loredana. Può usare i mini circolari e passare ai ferri a doppia punta quando le è più comodo. Buon lavoro!
30.03.2020 - 12:34
![]() Betty wrote:
Betty wrote:
Salve ho notato che tutte le calze sono lavorate con i ferri a doppia punta, ma se le volessi fare con i ferri dritti?
16.12.2019 - 18:41DROPS Design answered:
Buonasera Betty, i ferri a doppia punta vengono utilizzati per lavorare le piccole circonferenze, che con i ferri dritti non si possono lavorare. In alternativa può usare un ferro circolare con il cavo lungo e la tecnica del magic loop. Buon lavoro!
18.12.2019 - 18:38
![]() Camila wrote:
Camila wrote:
Hei, jeg strikker sokk A1. Har gjort mønster til hælkappen, deretter glastrikk og hælfelling. Nå står det at jeg skal ta opp masker med grått og fortsette med både glasstrikk og A1 men det står ikke spesifisert hvor jeg strikker glasstrikk. Jeg har forstått det slik at jeg strikker glasstrikk under foten. Men i så fall hvordan fortsetter jeg med mønster, altså den hvite tråden over til begynnelsen. Må jeg klippe tråden for hver runde?
15.12.2019 - 13:29DROPS Design answered:
Hej Camilla, jo men du strikker hele foden i glatstrik ifølge diagrammet. God fornøjelse!
17.12.2019 - 14:07
![]() Hannah wrote:
Hannah wrote:
Hej! Jag får inte måtten att stämma efter minskningarna som görs vartannat varv i totalt 4 varv efter att man plockat upp 11+11 maskor på sidan av hällappen. Det står att man då ska ha 4 cm kvar att sticka för att det ska mäta 14 cm från stickmarkören. Dock så mäter min stickning bara 3 cm från stickmarkören när jag gjort minskningarna. Troligtvis har jag placerat markören fel? Finns det någon annan hållpunkt jag kan mäta ifrån? Tack på förhand!
06.10.2019 - 12:14DROPS Design answered:
Hei Hannah. Litt vanskelig å gi et godt svar, da det ikke skrives hvilken størrelse eller hvilken av de 4 sokkene/mønstrene du strikker. Men om du prøver sokken på, passer den, evnt kan du strikke uten fellinger til sokken måler 4 cm og deretter fortsette etter oppskriften? Mvh DROPS design
07.10.2019 - 14:35
![]() Turid wrote:
Turid wrote:
Hvordan få mønsteret jevnt i "skjøten"? Har lært tipset hvordan strikke striper uten hakk ved å hente maska under, men gjelder dette også hvis stripa kun har 1 omg? Og skal man bruke samme prinippet på mønsteret?
21.08.2019 - 04:45DROPS Design answered:
Hei Turid. Det vil ikke få samme pene effekten når stripen kun har 1 omgang, vedr mønster bør man følge diagrammet. Henter man masken under kan mønstret få feil farge og mønstret blir ikke 100%. God Fornøyelse!
09.09.2019 - 10:42
![]() Anna Vohs wrote:
Anna Vohs wrote:
Hvis jeg vælger at lave en hæl som den fra opskriften på Baby Booties skal jeg så stadig strikke de 5 1/2 cm før hæl indtagning? (Str 38/40)
16.08.2019 - 22:51DROPS Design answered:
Hej Anna, du er nødt til at følge målene for hælen i opskriften som du strikker efter, ellers kan den let blive for lille. God fornøjelse!
10.09.2019 - 15:27
![]() Fabienne wrote:
Fabienne wrote:
Relever 9m chaque côté du talon (18) puis les 18m en attente = (36) et non 44 comme vœu l'indiquez. Merci pour tous ses beaux ouvrages !
15.01.2019 - 17:19DROPS Design answered:
Bonjour Fabienne, dans la 1ère taille, il reste 8 m pour le talon + 9 m x 2 relevées de chaque côté + les 18 m en attente pour le dessus du pied soit 8 + 18+ 18 = on a bien 44 m pour le pied. Bon tricot!
16.01.2019 - 09:17
|
||||||||||
Twinkle Toes#twinkletoessocks |
||||||||||
 |
 |
|||||||||
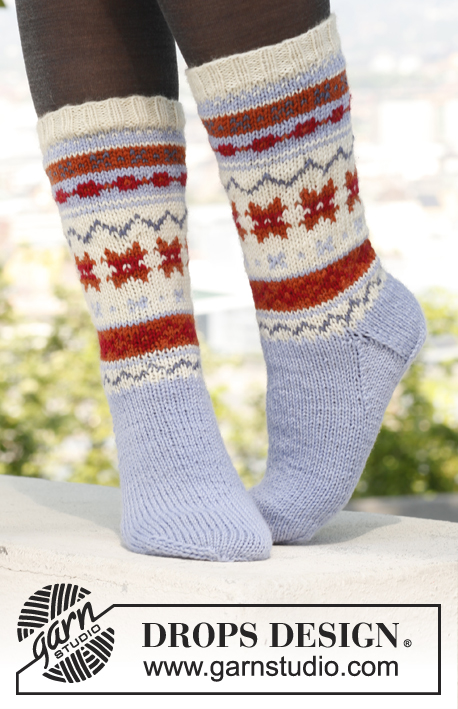
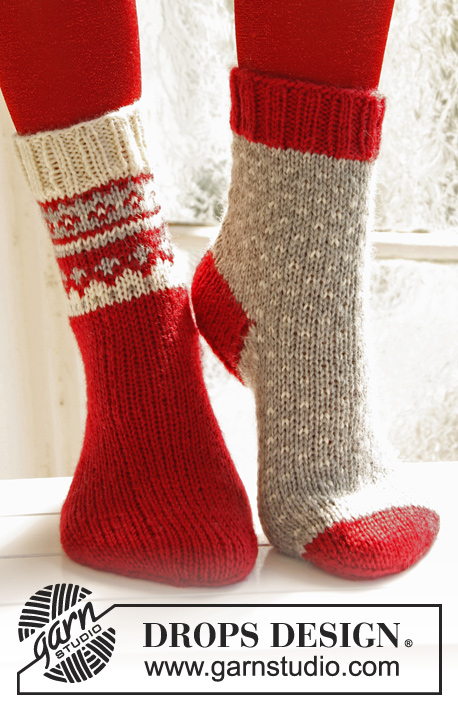
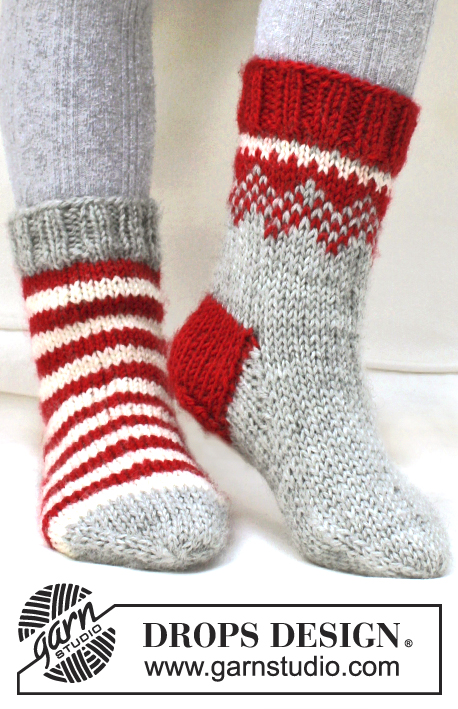
Knitted socks for baby, children and adults in DROPS Karisma. Piece is worked with Nordic pattern. Size 22 - 43. Theme: Christmas
DROPS Extra 0-865 |
||||||||||
|
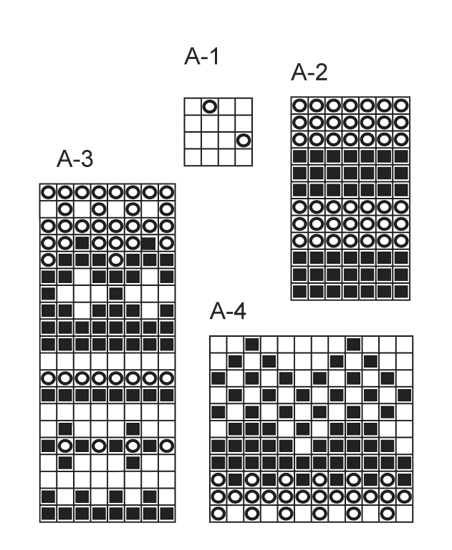
PATTERN: See diagrams A-1 to A-4. Work entire pattern in stocking st. DECREASE TIP: Dec as follows before marker: K 2 tog. Dec as follows after marker: Slip 1 st as if to K, K 1, psso. HEEL DECREASE: Row 1 (= RS): Work until (6-6-6-7-7) 8-9-9 sts remain, slip 1 st as if to K, K 1, psso, turn piece. Row 2 (= WS): Work until (6-6-6-7-7) 8-9-9 sts remain, slip 1 st as if to P, P 1, psso, turn piece. Row 3 (= RS): Work until (5-5-5-6-6) 7-8-8 sts remain, slip 1 st as if to K, K 1, psso, turn piece. Row 4 (= WS): Work until (5-5-5-6-6) 7-8-8 sts remain, slip 1 st as if to P, P 1, psso, turn piece. Continue dec like this with 1 st less before every dec until (8-10-10-10-10) 10-10-12 sts remain on needle. -------------------------------------------------------- SOCK 1 (grey with dots): Worked in the round on double pointed needles. Cast on (40-44-44-48-48) 52-56-60 sts on double pointed needles size 3.5 mm with wine red. K 1 round, continue in rib = P 2/K 2. Work rib for (3-3-3-3-3) 4-4-4 cm, then switch to light grey and K 1 round while dec 4 sts evenly = (36-40-40-44-44) 48-52-56 sts. Then work diagram A-1. When piece measures 11-11-12-12-13 (14-15-15) cm, keep the first (18-20-20-22-22) 24-26-28 sts on needle for heel, and slip the remaining (18-20-20-22-22) 24-26-28 sts on a stitch holder (= mid on top of foot). Work in stocking st back and forth on heel sts with wine red for (4-4½-4½-5-5) 5-5½-6 cm. Insert a marker. Then work HEEL DECREASE - see explanation above! After heel decrease, knit up (9-9-10-10-10) 10-11-11 sts on each side of heel with light grey and slip the (18-20-20-22-22) 24-26-28 sts from the stitch holder back on needle = (44-48-50-52-52) 54-58-62 sts. Continue to work in stocking st in the round and diagram A-1 - AT THE SAME TIME dec in each side as follows: K tog the first 2 sts after the (18-20-20-22-22) 24-26-28 sts on upper foot and K twisted tog the last 2 sts before the (18-20-20-22-22) 24-26-28 sts on upper foot (i.e. work in back loop of sts instead of front). Repeat dec every other round 3 more times = (36-40-42-44-44) 46-50-54 sts. Continue until piece measures (10-11-13-14-16) 18-20-22 cm from marker on heel (= approx. (3-4-4-4-4) 4-4-5 cm remain). Now insert a marker in each side so that there are (18-20-21-22-22) 23-25-27 sts both on top of foot and under foot. Continue in stocking st with wine red - AT THE SAME TIME dec 1 st on each side of both markers for toe - READ DECREASE TIP: Repeat dec every other round (2-3-3-2-2) 3-3-4 more times and then every round a total of (2-2-2-4-4) 5-6-6 times = (16-16-18-16-16) 10-10-10 sts remain on needle. On next round K all sts tog 2 by 2. Cut the thread and pull it through the remaining sts, tighten tog and fasten. SOCK 2 (wine red and off white stripes): Worked in the round on double pointed needles. Cast on (40-44-44-48-48) 52-56-60 sts on double pointed needles size 3.5 mm with light grey. K 1 round, continue in rib = P 2/K 2. Work rib for (3-3-3-3-3) 4-4-4 cm, then K 1 round while dec 4 sts evenly = (36-40-40-44-44) 48-52-56 sts. Continue with diagram A-2. When piece measures 11-11-12-12-13 (14-15-15) cm (stop after 3 rounds with wine red), keep the first (18-20-20-22-22) 24-26-28 sts on needle for heel, and slip the remaining (18-20-20-22-22) 24-26-28 sts on a stitch holder (= mid on top of foot). Work in stocking st back and forth over heel sts with light grey for (4-4½-4½-5-5) 5-5½-6 cm. Insert a marker. Then work HEEL DECREASE - see explanation above! After heel decrease, knit up (9-9-10-10-10) 10-11-11 sts with off white on each side of heel and slip the (18-20-20-22-22) 24-26-28 sts from the stitch holder back on needle = (44-48-50-52-52) 54-58-62 sts. Continue to work in stocking st in the round and diagram A-2 - AT THE SAME TIME dec in each side as follows: K tog the first 2 sts after the (18-20-20-22-22) 24-26-28 sts on upper foot and K twisted tog the last 2 sts before the (18-20-20-22-22) 24-26-28 sts on upper foot (i.e. work in back loop of sts instead of front). Repeat dec every other round 3 more times = (36-40-42-44-44) 46-50-54 sts. Continue until piece measures (10-11-13-14-16) 18-20-22 cm from marker on heel (= approx. (3-4-4-4-4) 4-4-5 cm remain). Now insert a marker in each side so that there are (18-20-21-22-22) 23-25-27 sts both on top of foot and under foot. Continue in stocking st with light grey - AT THE SAME TIME dec 1 st on each side of both markers for toe - READ DECREASE TIP: Repeat dec every other round (2-3-3-2-2) 3-3-4 more times and then every round a total of (2-2-2-4-4) 5-6-6 times = (16-16-18-16-16) 10-10-10 sts remain on needle. On next round K all sts tog 2 by 2. Cut the thread and pull it through the remaining sts, tighten tog and fasten. SOCK 3 (wine red with pattern on the leg): Worked in the round on double pointed needles. Cast on (40-44-44-48-48) 52-56-60 sts on double pointed needles size 3.5 mm with off white. K 1 round, continue in rib = P 2/K 2. Work rib for (3-3-3-3-3) 4-4-4 cm, then K 1 round while dec 4 sts evenly = (36-40-40-44-44) 48-52-56 sts. Continue with diagram A-3. When A-3 has been worked, finish the sock in wine red. When piece measures 11-11-12-12-13 (14-15-15) cm, keep the first (18-20-20-22-22) 24-26-28 sts on needle for heel, and slip the remaining (18-20-20-22-22) 24-26-28 sts on a stitch holder (= mid on top of foot). Work in stocking st back and forth on heel sts for (4-4½-4½-5-5) 5-5½-6 cm. Insert a marker. Then work HEEL DECREASE - see explanation above! After heel decrease, knit up (9-9-10-10-10) 10-11-11 sts on each side of heel and slip the (18-20-20-22-22) 24-26-28 sts from the stitch holder back on needle = (44-48-50-52-52) 54-58-62 sts. Continue to work in stocking st in the round while AT THE SAME TIME dec in each side as follows: K tog the first 2 sts after the (18-20-20-22-22) 24-26-28 sts on upper foot and K twisted tog the last 2 sts before the (18-20-20-22-22) 24-26-28 sts on upper foot (i.e. work in back loop of sts instead of front). Repeat dec every other round 3 more times = (36-40-42-44-44) 46-50-54 sts. Continue until piece measures (10-11-13-14-16) 18-20-22 cm from marker on heel (= approx. (3-4-4-4-4) 4-4-5 cm remain). Now insert a marker in each side so that there are (18-20-21-22-22) 23-25-27 sts both on top of foot and under foot. Continue in stocking st - AT THE SAME TIME dec 1 st on each side of both markers for toe - READ DECREASE TIP: Repeat dec every other round (2-3-3-2-2) 3-3-4 more times and then every round a total of (2-2-2-4-4) 5-6-6 times = (16-16-18-16-16) 10-10-10 sts remain on needle. On next round K all sts tog 2 by 2. Cut the thread and pull it through the remaining sts, tighten tog and fasten. SOCK 4 (grey with pattern on the leg): Worked in the round on double pointed needles. Cast on (40-44-44-48-48) 52-56-60 sts on double pointed needles size 3.5 mm with wine red. K 1 round, continue in rib = P 2/K 2. Work rib for (3-3-3-3-3) 4-4-4 cm, then K 1 round while dec (4-2-2-6-6) 4-2-0 sts evenly = (36-42-42-42-42) 48-54-60 sts. Continue with diagram A-4. When diagram A-4 has been worked, continue with light grey, AT THE SAME TIME adjust no of sts to (36-40-40-44-44) 48-52-56. When piece measures 11-11-12-12-13 (14-15-15) cm, keep the first (18-20-20-22-22) 24-26-28 sts on needle for heel, and slip the remaining (18-20-20-22-22) 24-26-28 sts on a stitch holder (= mid on top of foot). Work in stocking st back and forth on heel sts with wine red for (4-4½-4½-5-5) 5-5½-6 cm. Insert a marker. Then work HEEL DECREASE - see explanation above! After heel decrease, knit up (9-9-10-10-10) 10-11-11 sts on each side of heel with light grey and slip the (18-20-20-22-22) 24-26-28 sts from the stitch holder back on needle = (44-48-50-52-52) 54-58-62 sts. Continue to work in stocking st in the round with light grey - AT THE SAME TIME dec in each side as follows: K tog the first 2 sts after the (18-20-20-22-22) 24-26-28 sts on upper foot and K twisted tog the last 2 sts before the (18-20-20-22-22) 24-26-28 sts on upper foot (i.e. work in back loop of sts instead of front). Repeat dec every other round 3 more times = (36-40-42-44-44) 46-50-54 sts. Continue until piece measures (10-11-13-14-16) 18-20-22 cm from marker on heel (= approx. (3-4-4-4-4) 4-4-5 cm remain). Now insert a marker in each side so that there are (18-20-21-22-22) 23-25-27 sts both on top of foot and under foot. Continue in stocking st - AT THE SAME TIME dec 1 st on each side of both markers for toe - READ DECREASE TIP: Repeat dec every other round (2-3-3-2-2) 3-3-4 more times and then every round a total of (2-2-2-4-4) 5-6-6 times = (16-16-18-16-16) 10-10-10 sts remain on needle. On next round K all sts tog 2 by 2. Cut the thread and pull it through the remaining sts, tighten tog and fasten. |
||||||||||
Diagram explanations |
||||||||||
|
||||||||||
|
||||||||||
Have you finished this pattern?Tag your pictures with #dropspattern #twinkletoessocks or submit them to the #dropsfan gallery. Do you need help with this pattern?You'll find 20 tutorial videos, a Comments/Questions area and more by visiting the pattern on garnstudio.com. © 1982-2025 DROPS Design A/S. We reserve all rights. This document, including all its sub-sections, has copyrights. Read more about what you can do with our patterns at the bottom of each pattern on our site. |
||||||||||


With over 40 years in knitting and crochet design, DROPS Design offers one of the most extensive collections of free patterns on the internet - translated to 17 languages. As of today we count 314 catalogues and 11822 patterns translated into English (UK/cm).
We work hard to bring you the best knitting and crochet have to offer, inspiration and advice as well as great quality yarns at incredible prices! Would you like to use our patterns for other than personal use? You can read what you are allowed to do in the Copyright text at the bottom of all our patterns. Happy crafting!
Post a comment to pattern DROPS Extra 0-865
We would love to hear what you have to say about this pattern!
If you want to leave a question, please make sure you select the correct category in the form below, to speed up the answering process. Required fields are marked *.