DROPS Karisma
DROPS Karisma
100% Wool
from 2.30 £ /50g
Get the yarn to make this pattern from 6.90£.

The yarn cost is calculated from the pattern’s smallest size and the yarn’s cheapest product type. Looking for an even better price? You might find it on the DROPS Deals!

DROPS SS24

Twinkle Toes

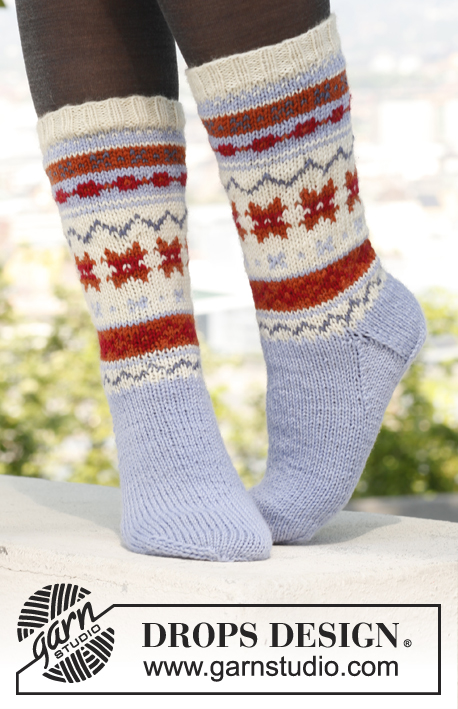
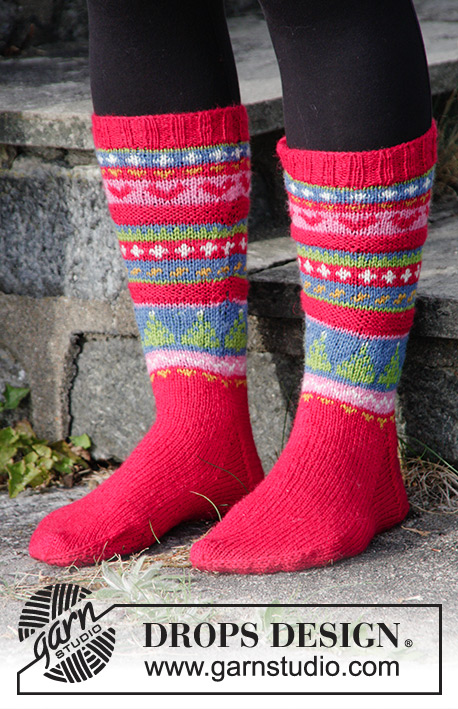
Knitted socks for baby, children and adults in DROPS Karisma. Piece is worked with Nordic pattern. Size 22 - 43. Theme: Christmas

DROPS Extra 0-865
DROPS design: Pattern no u-667
Yarn group B
-----------------------------------------------------------
Size: (22/23 - 24/25 - 26/28 - 29/31 - 32/34) 35/37 - 38/40 - 41/43
Foot length: (13-15-17-18-20) 22-24-27 cm
Sock height: (15-16-17-17-18) 19-21-21 cm

Materials: DROPS KARISMA from Garnstudio

SOCK 1:
50-50-50-50-100-100-100-100 g colour no 44, light grey
50 g for all sizes in colour no 01, off white
50 g for all sizes in colour no 48, wine red

SOCK 2:
50-50-50-50-50-100-100-100 g colour no 48, wine red
50-50-50-50-50-100-100-100 g colour no 01, off white
50 g for all sizes in colour no 44, light grey

SOCK 3:
50-50-50-50-100-100-100-100 g colour no 48, wine red
50 g for all sizes in colour no 44, light grey
50 g for all sizes in colour no 01, off white

SOCK 4:
50-50-50-50-100-100-100-100 g colour no 44, light grey
50 g for all sizes in colour no 48, wine red
50 g for all sizes in colour no 01, off white

DROPS DOUBLE POINTED NEEDLES SIZE 3.5 mm - or size needed to get 23 sts x 32 rows in pattern = 10 x 10 cm.

-------------------------------------------------------

Alternative Yarn – See how to change yarns here
Yarn Groups A to F – Use the same pattern and change the yarn here
Yarn usage using an alternative yarn – Use our yarn converter here

-------------------------------------------------------

DROPS Karisma
DROPS Karisma
100% Wool
from 2.30 £ /50g
Get the yarn to make this pattern from 6.90£.

The yarn cost is calculated from the pattern’s smallest size and the yarn’s cheapest product type. Looking for an even better price? You might find it on the DROPS Deals!

Pattern instructions

NOTE: This pattern is written in British English. All measurements in charts are in cm. For conversion from cm to inches - click here. There are different terms for crocheting in British and American English. If this pattern includes crochet, click for "crochet terms" here. For this pattern in American English, please click here.
PATTERN:
See diagrams A-1 to A-4. Work entire pattern in stocking st.

DECREASE TIP: Dec as follows before marker: K 2 tog.
Dec as follows after marker: Slip 1 st as if to K, K 1, psso.

HEEL DECREASE:
Row 1 (= RS): Work until (6-6-6-7-7) 8-9-9 sts remain, slip 1 st as if to K, K 1, psso, turn piece.
Row 2 (= WS): Work until (6-6-6-7-7) 8-9-9 sts remain, slip 1 st as if to P, P 1, psso, turn piece.
Row 3 (= RS): Work until (5-5-5-6-6) 7-8-8 sts remain, slip 1 st as if to K, K 1, psso, turn piece.
Row 4 (= WS): Work until (5-5-5-6-6) 7-8-8 sts remain, slip 1 st as if to P, P 1, psso, turn piece.
Continue dec like this with 1 st less before every dec until (8-10-10-10-10) 10-10-12 sts remain on needle.
--------------------------------------------------------

SOCK 1 (grey with dots):
Worked in the round on double pointed needles. Cast on (40-44-44-48-48) 52-56-60 sts on double pointed needles size 3.5 mm with wine red. K 1 round, continue in rib = P 2/K 2. Work rib for (3-3-3-3-3) 4-4-4 cm, then switch to light grey and K 1 round while dec 4 sts evenly = (36-40-40-44-44) 48-52-56 sts. Then work diagram A-1. When piece measures 11-11-12-12-13 (14-15-15) cm, keep the first (18-20-20-22-22) 24-26-28 sts on needle for heel, and slip the remaining (18-20-20-22-22) 24-26-28 sts on a stitch holder (= mid on top of foot). Work in stocking st back and forth on heel sts with wine red for (4-4½-4½-5-5) 5-5½-6 cm. Insert a marker. Then work HEEL DECREASE - see explanation above! After heel decrease, knit up (9-9-10-10-10) 10-11-11 sts on each side of heel with light grey and slip the (18-20-20-22-22) 24-26-28 sts from the stitch holder back on needle = (44-48-50-52-52) 54-58-62 sts. Continue to work in stocking st in the round and diagram A-1 - AT THE SAME TIME dec in each side as follows: K tog the first 2 sts after the (18-20-20-22-22) 24-26-28 sts on upper foot and K twisted tog the last 2 sts before the (18-20-20-22-22) 24-26-28 sts on upper foot (i.e. work in back loop of sts instead of front). Repeat dec every other round 3 more times = (36-40-42-44-44) 46-50-54 sts. Continue until piece measures (10-11-13-14-16) 18-20-22 cm from marker on heel (= approx. (3-4-4-4-4) 4-4-5 cm remain). Now insert a marker in each side so that there are (18-20-21-22-22) 23-25-27 sts both on top of foot and under foot. Continue in stocking st with wine red - AT THE SAME TIME dec 1 st on each side of both markers for toe - READ DECREASE TIP: Repeat dec every other round (2-3-3-2-2) 3-3-4 more times and then every round a total of (2-2-2-4-4) 5-6-6 times = (16-16-18-16-16) 10-10-10 sts remain on needle. On next round K all sts tog 2 by 2. Cut the thread and pull it through the remaining sts, tighten tog and fasten.

SOCK 2 (wine red and off white stripes):
Worked in the round on double pointed needles. Cast on (40-44-44-48-48) 52-56-60 sts on double pointed needles size 3.5 mm with light grey. K 1 round, continue in rib = P 2/K 2. Work rib for (3-3-3-3-3) 4-4-4 cm, then K 1 round while dec 4 sts evenly = (36-40-40-44-44) 48-52-56 sts. Continue with diagram A-2. When piece measures 11-11-12-12-13 (14-15-15) cm (stop after 3 rounds with wine red), keep the first (18-20-20-22-22) 24-26-28 sts on needle for heel, and slip the remaining (18-20-20-22-22) 24-26-28 sts on a stitch holder (= mid on top of foot). Work in stocking st back and forth over heel sts with light grey for (4-4½-4½-5-5) 5-5½-6 cm. Insert a marker. Then work HEEL DECREASE - see explanation above! After heel decrease, knit up (9-9-10-10-10) 10-11-11 sts with off white on each side of heel and slip the (18-20-20-22-22) 24-26-28 sts from the stitch holder back on needle = (44-48-50-52-52) 54-58-62 sts. Continue to work in stocking st in the round and diagram A-2 - AT THE SAME TIME dec in each side as follows: K tog the first 2 sts after the (18-20-20-22-22) 24-26-28 sts on upper foot and K twisted tog the last 2 sts before the (18-20-20-22-22) 24-26-28 sts on upper foot (i.e. work in back loop of sts instead of front). Repeat dec every other round 3 more times = (36-40-42-44-44) 46-50-54 sts. Continue until piece measures (10-11-13-14-16) 18-20-22 cm from marker on heel (= approx. (3-4-4-4-4) 4-4-5 cm remain). Now insert a marker in each side so that there are (18-20-21-22-22) 23-25-27 sts both on top of foot and under foot. Continue in stocking st with light grey - AT THE SAME TIME dec 1 st on each side of both markers for toe - READ DECREASE TIP: Repeat dec every other round (2-3-3-2-2) 3-3-4 more times and then every round a total of (2-2-2-4-4) 5-6-6 times = (16-16-18-16-16) 10-10-10 sts remain on needle. On next round K all sts tog 2 by 2. Cut the thread and pull it through the remaining sts, tighten tog and fasten.

SOCK 3 (wine red with pattern on the leg):
Worked in the round on double pointed needles. Cast on (40-44-44-48-48) 52-56-60 sts on double pointed needles size 3.5 mm with off white. K 1 round, continue in rib = P 2/K 2. Work rib for (3-3-3-3-3) 4-4-4 cm, then K 1 round while dec 4 sts evenly = (36-40-40-44-44) 48-52-56 sts. Continue with diagram A-3. When A-3 has been worked, finish the sock in wine red. When piece measures 11-11-12-12-13 (14-15-15) cm, keep the first (18-20-20-22-22) 24-26-28 sts on needle for heel, and slip the remaining (18-20-20-22-22) 24-26-28 sts on a stitch holder (= mid on top of foot). Work in stocking st back and forth on heel sts for (4-4½-4½-5-5) 5-5½-6 cm. Insert a marker. Then work HEEL DECREASE - see explanation above! After heel decrease, knit up (9-9-10-10-10) 10-11-11 sts on each side of heel and slip the (18-20-20-22-22) 24-26-28 sts from the stitch holder back on needle = (44-48-50-52-52) 54-58-62 sts. Continue to work in stocking st in the round while AT THE SAME TIME dec in each side as follows: K tog the first 2 sts after the (18-20-20-22-22) 24-26-28 sts on upper foot and K twisted tog the last 2 sts before the (18-20-20-22-22) 24-26-28 sts on upper foot (i.e. work in back loop of sts instead of front). Repeat dec every other round 3 more times = (36-40-42-44-44) 46-50-54 sts. Continue until piece measures (10-11-13-14-16) 18-20-22 cm from marker on heel (= approx. (3-4-4-4-4) 4-4-5 cm remain). Now insert a marker in each side so that there are (18-20-21-22-22) 23-25-27 sts both on top of foot and under foot. Continue in stocking st - AT THE SAME TIME dec 1 st on each side of both markers for toe - READ DECREASE TIP: Repeat dec every other round (2-3-3-2-2) 3-3-4 more times and then every round a total of (2-2-2-4-4) 5-6-6 times = (16-16-18-16-16) 10-10-10 sts remain on needle. On next round K all sts tog 2 by 2. Cut the thread and pull it through the remaining sts, tighten tog and fasten.


SOCK 4 (grey with pattern on the leg):
Worked in the round on double pointed needles. Cast on (40-44-44-48-48) 52-56-60 sts on double pointed needles size 3.5 mm with wine red. K 1 round, continue in rib = P 2/K 2. Work rib for (3-3-3-3-3) 4-4-4 cm, then K 1 round while dec (4-2-2-6-6) 4-2-0 sts evenly = (36-42-42-42-42) 48-54-60 sts. Continue with diagram A-4. When diagram A-4 has been worked, continue with light grey, AT THE SAME TIME adjust no of sts to (36-40-40-44-44) 48-52-56. When piece measures 11-11-12-12-13 (14-15-15) cm, keep the first (18-20-20-22-22) 24-26-28 sts on needle for heel, and slip the remaining (18-20-20-22-22) 24-26-28 sts on a stitch holder (= mid on top of foot). Work in stocking st back and forth on heel sts with wine red for (4-4½-4½-5-5) 5-5½-6 cm. Insert a marker. Then work HEEL DECREASE - see explanation above! After heel decrease, knit up (9-9-10-10-10) 10-11-11 sts on each side of heel with light grey and slip the (18-20-20-22-22) 24-26-28 sts from the stitch holder back on needle = (44-48-50-52-52) 54-58-62 sts. Continue to work in stocking st in the round with light grey - AT THE SAME TIME dec in each side as follows: K tog the first 2 sts after the (18-20-20-22-22) 24-26-28 sts on upper foot and K twisted tog the last 2 sts before the (18-20-20-22-22) 24-26-28 sts on upper foot (i.e. work in back loop of sts instead of front). Repeat dec every other round 3 more times = (36-40-42-44-44) 46-50-54 sts. Continue until piece measures (10-11-13-14-16) 18-20-22 cm from marker on heel (= approx. (3-4-4-4-4) 4-4-5 cm remain). Now insert a marker in each side so that there are (18-20-21-22-22) 23-25-27 sts both on top of foot and under foot. Continue in stocking st - AT THE SAME TIME dec 1 st on each side of both markers for toe - READ DECREASE TIP: Repeat dec every other round (2-3-3-2-2) 3-3-4 more times and then every round a total of (2-2-2-4-4) 5-6-6 times = (16-16-18-16-16) 10-10-10 sts remain on needle. On next round K all sts tog 2 by 2. Cut the thread and pull it through the remaining sts, tighten tog and fasten.

Diagram

symbols = light grey
symbols = off white
symbols = wine red
diagram

Each of our patterns has specific tutorial videos to help you.

Do you have a question? See a list of frequently asked questions (FAQ)

Knitting tension is what determines the final measurements of your work, and is usually measured per 10 x 10 cm. It is provided like so: number of stitches in width x number of rows in height - eg: 19 stitches x 26 rows = 10 x 10 cm.

The knitting tension is very individual; some people knit/crochet loosely while others work tightly. You adjust the knitting tension with the needle size, which is why the suggested needle size is only meant as a guide! You need to adjust this (up or down) to ensure that YOUR knitting tension matches the knitting tension provided in the pattern. If you work with a different knitting tension than provided you will have a different yarn consumption, and your work will have different measurements than what the pattern suggests.

The knitting tension also determines which yarns can replace each other. As long as you achieve the same knitting tension you can replace one yarn with another.

See DROPS lesson: How to measure your tension/gauge

See DROPS video: How to make a gauge tension swatch

The required amount of yarn is provided in grams, eg: 450 g. To calculate how many balls you’ll need you first need to know how many grams are in 1 ball (25g, 50g or 100g). This information is available if you click on the individual yarn quality on our pages. Divide the amount required with the amount of each ball. For example, if each ball is 50g (the most common amount), the calculation will be as follows: 450 / 50 = 9 balls.

The important thing when changing from one yarn to another is that the knitting/crochet tension remains the same. This is so that the measurements of the finished piece will be the same as on the sketch provided. It is easier to achieve the same knitting tension using yarns from the same yarn group. It is also possible to work with multiple strands of a thinner yarn to achieve the knitting tension of a thicker one. Please try our yarn converter. We recommend you to always work a test swatch.

Please NOTE: when changing yarn the garment might have a different look and feel to the garment in the photo, due to individual properties and qualities of each yarn.

See DROPS lesson: Can I use a different yarn than the one mentioned in the pattern?

All our yarns are categorised into yarn groups (from A to F) according to thickness and knitting tension – group A contains the thinnest yarns and group F the thickest. This makes it easier for you to find alternative yarns to our patterns, should you wish to switch yarn. All yarns within the same group have a similar knitting tension and can easily replace each other. However, different yarn qualities have different structures and properties which will give the finished work a unique look and feel.

Click here for an overview of the yarns in each yarn group

At the top of all our patterns you’ll find a link to our yarn calculator, which is a helpful tool should you wish to use a different yarn than suggested. By filling in the yarn quality you wish to replace, the amount (in your size) and number of strands, the calculator will present good alternative yarns with the same knitting tension. Additionally it will tell you how much you’ll require in the new qualities and whether you’ll need to work with multiple strands. Most skeins are 50g (some are 25g or 100g).

If the pattern is worked with multiple colours, every colour will have to be calculated separately. Similarly, if the pattern is worked with several strands of different yarns (for example 1 strand Alpaca and 1 strand Kid-Silk) you will have to find alternatives for each, individually.

Click here to see our yarn calculator

Since different yarns have different qualities and textures we have chosen to keep the original yarn in our patterns. However, you can easily find options among our available qualities by using our yarn calculator, or simply pick a yarn from the same yarn group.

It is possible that some retailers still have discontinued yarns in stock, or that someone has a few skeins at home that they would like to find patterns for.

The yarn calculator will provide both alternative yarn as well as required amount in the new quality.

If you think it's hard to decide what size to make, it can be a good idea to measure a garment you own already and like the size of. Then you can pick the size by comparing those measures with the ones available in the pattern's size chart.

You'll find the size chart at the bottom of the pattern.

See DROPS lesson: How to read size chart

The needle size provided in the pattern serves only as a guide, the important thing is to follow the knitting tension. And since knitting tension is very individual, you will have to adjust the needle size to ensure that YOUR tension is the same as in the pattern – maybe you’ll have to adjust 1, or even 2 needle sizes, up or down to achieve the correct tension. For this, we recommend that you work test swatches.

Should you work with a different knitting tension than the one provided, the measurements of the finished garment might deviate from the measurement sketch.

See DROPS lesson: How to measure your tension/gauge

See DROPS video: How to make a tension/gauge swatch

Working a garment top-down provides more flexibility and room for personal adjustment. For example it is easier to try the garment on while working, as well as making adjustments to length of yoke and shoulder caps.

The instructions are carefully explaining every step, in the correct order. Diagrams are adjusted to the knitting direction and are worked as usual.

The diagram depicts all rows/rounds, and every stitch seen from the right side. It is read from bottom to top, from right to left. 1 square = 1 stitch.

When working back and forth, every other row is worked from the right side and every other row is worked from the wrong side. When working from the wrong side, the diagram will have to be worked reversed: from left to right, knit stitches are purled, purl stitches are knit etc.

When working in the round every round is worked from the right side and the diagram are worked from right to left on all rounds.

See DROPS lesson: How to read knitting diagrams

The diagram depicts all rows/rounds, and every stitch seen from the right side. It is worked from bottom to top, from right to left.

When working back and forth every other row is worked from the right side: from right to left and every other row is worked from the wrong side: from left to right.

When working in the round, every row in the diagram are worked from the right side, from right to left.

When working a circular diagram you start in the middle and work your way outwards, counter clockwise, row by row.

The rows usually start with a given number of chain stitches (equivalent to the height of the following stitch), this will either be depicted in the diagram or explained in the pattern.

See DROPS lesson: How to read crochet diagrams

Instructions for working several diagrams after each other on the same row/round, will often be written like so: “work A.1, A.2, A.3 a total of 0-0-2-3-4 times". This means you work A.1 once, then A.2 is worked once, and A.3 is repeated (in width) the number of times provided for your size – in this case like so: S = 0 times, M = 0 times, L=2 times, XL= 3 times and XXL = 4 times.

The diagrams are worked as usual: begin with the first row in A.1, then work the first row in A.2 etc.

See DROPS lesson: How to read knitting diagrams

See DROPS lesson: How to read crochet diagrams

The total width of the garment (from wrist-to-wrist) will be larger in the larger sizes, despite the actual sleeves being shorter. The larger sizes have longer sleeve caps and wider shoulders, so there will be a good fit in all sizes.

The measurement sketch/schematic drawing provides information regarding the full length of the garment. If it’s a jumper or a jacket the length is measured from the highest point on the shoulder closest to the neckline, and straight down to the bottom of the garment. It is NOT measured from the tip of shoulder. Similarly, the length of yoke is measured from the highest point on the shoulder and down to where yoke is split into body and sleeves.

On a jacket measures are never taken along bands, unless specifically stated. Always measure inside band stitches when measuring the length.

See DROPS lesson: How to read a schematic drawing

Diagrams are often repeated on the round or in height. 1 repeat is the diagram the way it appears in the pattern. If it says to work 5 repeats of A.1 in the round, then you work A.1 a total of 5 times after/next to each other in the round. If it says to work 2 repeats of A.1 vertically/in height you work the entire diagram once, then begin again at the start and work the entire diagram one more time.

Chain stitches are slightly narrower than other stitches and to avoid working the cast-on edge too tight, we simply chain more stitches to begin with. The stitch count will be adjusted on the following row to fit the pattern and measurement sketch.

The rib edge is more elastic and will contract slightly compared to, for example, stocking stitch. By increasing before the rib edge, you avoid a visible difference in width between the rib edge and the rest of the body.

It’s very easy to cast off too tightly, and by making yarn overs while casting off (and simultaneously casting these off) you avoid a too tight cast off edge.

See DROPS video: How to bind off with yarn overs (yo)

To achieve an even increase (or decrease) you can increase on, for example: every 3rd and 4th row alternately, like so: work 2 rows and increase on the 3rd row, work 3 rows and increase on the 4th. Repeat this until the increase is complete.

See DROPS lesson: Increase or decrease 1 st on every 3rd and 4th row alternately

Should you prefer to work in the round instead of back and forth, you may of course adjust the pattern. You’ll need to add steeks mid-front (usually 5 stitches), and follow the instructions. When you would normally turn and work from the wrong side, simply work across the steek and continue in the round. At the end you’ll cut the piece open, pick up stitches to work bands, and cover the cut edges.

See DROPS video: How to knit steeks and cut open

Should you prefer to work back and forth instead of in the round, you may of course adjust the pattern so you work the pieces separately and then assemble them at the end. Divide the stitches for the body in 2, add 1 edge stitch in each side (for sewing) and work the front and back pieces separately.

See DROPS lesson: Can I adapt a pattern for circular needles into straight needles?

Pattern repeats can vary slightly in the different sizes, in order to get the correct proportions. If you’re not working the exact same size as the garment in the photo, yours might deviate slightly. This has been carefully developed and adjusted so that the complete impression of the garment is the same in all sizes.

Make sure to follow instructions and diagrams for your size!

If you have found a pattern you like which is available in women’s size it’s not very difficult to convert it to men’s size. The biggest difference will be the length of sleeves and body. Start working on the women size that you think would fit across the chest. The additional length will be worked right before you cast off for the armhole/sleeve cap. If the pattern is worked top-down you can add the length right after the armhole or before the first decrease on sleeve.

Regarding additional yarn amount, this will depend on how much length you add, but it is better with a skein too many than too few.

All yarns will have excess fibres (from production) that might come off as lint or shedding. Brushed yarns (ie hairier yarns) have more of these loose, excess fibres, causing more shedding.

Shedding also depends on what is worn under or over the garment, and whether this pulls at the yarn fibres. It’s therefore not possible to guarantee that there will be no shedding

Below are some tips on how to get the best result when working with hairier yarns:

1. When the garment is finished (before you wash it) shake it vigorously so the looser hairs come off. NOTE: do NOT use a lint roller, brush or any method that pulls at the yarn.

2. Place the garment in a plastic bag and put it in your freezer - the temperature will cause the fibres to become less attached to each other, and excess fibres will come off easier.

3. Leave in the freezer for a few hours before taking it out and shaking it again.

4. Wash the garment according to the instructions on the yarn label.

Pilling is a natural process that happens to even the most exclusive of fibers. It's a natural sign of wear and tear that is hard to avoid, and that is most visible in high friction areas of your garment like a sweater's arms and cuffs.

You can make your garment look as new by removing the pilling, using a fabric comb or a pill/lint remover.

Still can't find the answer you need? Then scroll down and leave your question so one of our experts can try to help you. This will be done normally within 5 to 10 working days.
In the meantime, you can read the questions and answers that others have left to this pattern or join the DROPS Workshop on Facebook to get help from fellow knitters/crocheters!

You might also like...

Twinkle toes

Lisbeth, Norway

Twinkle toes

Valgerður, Iceland

Post a comment to pattern DROPS Extra 0-865

We would love to hear what you have to say about this pattern!

If you want to leave a question, please make sure you select the correct category in the form below, to speed up the answering process. Required fields are marked *.

Comments / Questions (20)

country flag Gitte F. Rasmussen wrote:

Jeg strikker sok nr. 2. Jeg vil gerne beholde maskerne til hæl fra pind 1 og 4 i stedet for pind 1 og 2, så samlingerne fra striberne kommer bagpå sokken. Hvordan klarer jeg det?

15.03.2018 - 08:49

DROPS Design answered:

Hej Gitte, jeg er ikke sikker på jeg forstår dit spørgsmål... du kan beholde de masker du vil på pinden til hæl, kan du evt strikke en halv omgang til inden du sætter resten på en tråd?

16.03.2018 - 15:27

country flag Birgit Poppel wrote:

DROPS EXTRA 0-865 Sockenanleitung Diagramm Sorry - habe "falsch herum gedacht". Diagramm ist okay. Frohes Fest ☃☄

17.12.2017 - 21:51

country flag Birgit Poppel wrote:

DROPS Extra 0 865 Twinkle toes Socken Nr 3 Das Diagramm A3 steht auf dem Kopf. Die Socke beginnt nach dem Rippchenmuster mit weinrot - das Diagramm zeigt alle Muster aber in verkehrter Reihenfolge!

17.12.2017 - 20:18

country flag Barbara Jarman wrote:

I am knitting Sock 3 but don't understand the comment after the heal decrease and the decreasing until 54 sts (on the largest size) it then says continue until piece measures 22cm from marker on heal then the bit I don't understand - approx 4.5cm remain ??????????? what does this refer to?

15.11.2017 - 10:22

DROPS Design answered:

Dear Mrs Jarman, these 4.5 cm refers to the last cm before finished measurements, ie in this size sock will measure 22 cm (measurement from marker on heel) + 4.5 cm (= decreases for toe) = 26.5 cm total length for sock. Happy knitting!

15.11.2017 - 10:25

country flag Alma wrote:

Har beställt garn för att kunna sticka massa julstrumpor, men får inte alls till det med sticktätheten och storlekarna. På garnet jag har köpt, Karisma, står det att man ska använda strlk 4 för att få 21m x 28v. Ni skriver att man ska ha stickor 3,5 för att få 23m x 32v. Inte förrän med stickor 2,5 får jag till 23m på 10 cm. På bilderna ser garnet mycket tjockare ut. Har ni ändrat på garnet sen beskrivningen kom till? Känns som att jag måste skriva om hela beskrivningen.

18.10.2017 - 20:02

DROPS Design answered:

Hej, garnet är samma som förut. Vi har alla lite olika handlag då vi stickar och stickfastheten kan ibland variera ganska mycket. Ifall du tycker att resultatet med stickor 2,5 inte blir bra, kan du pröva någon av våra modeller utan mönsterstickning, där det inte är riktigt lika noga med stickfastheten. Du kan även pröva att sticka en storlek mindre än den du hade tänkt.

24.10.2017 - 14:28

country flag Susanne wrote:

I plan to make the A3 sock, however, the design repeat is 8 stitches and the number of stitches on the needles (cast on number minus the decreases to get the design area) is not divisible by 8. How does the design match up if I'm working on 56 stitches with an 8 stitch repeat?

19.03.2017 - 21:28

DROPS Design answered:

Dear Suzanne, working A.3 on 56 sts, you will repeat A.3 a total of 7 times in width: 8 sts x 7 = 56 sts. Happy knitting!

20.03.2017 - 10:07

country flag Susan wrote:

Which is sock 1,2,3 or 4? It's not left to right in the photos since sock 1 directions call for more grey yarn than red, and that sock is mostly red. I'm looking to make the sock on the left in the first photo (mostly red with the design just on the top) thanks.

24.06.2016 - 16:36

DROPS Design answered:

Dear Susan, you will find details for each socks under written pattern, ie "SOCK 1 (gray with dots)", "SOCK 2 (wine red and off white stripes)" etc. Happy knitting!

24.06.2016 - 17:18

Valeria wrote:

How many DPN's do we need for this pattern, 4 or 5?Thank you.

13.11.2014 - 21:05

DROPS Design answered:

Dear Valeria, you need a set of DPN, ie 5 double pointed needles, distributing sts on 4 needle and working with the 5th needle. Happy knitting!

14.11.2014 - 14:19

Sam wrote:

Is the yarn requirement per sock, or per pair of socks?

29.10.2014 - 17:59

DROPS Design answered:

Dear Sam, yarn requirement to each sock is for a pair in each of the colours. Happy knitting!

30.10.2014 - 09:43

Tammy wrote:

I'm doing sock 3 and I'm confused about the part where it says "Insert marker". It's so vague. Insert it where? For what purpose? If I was using circular needles I'd understand the need for it, but if I put it on DPN's it just falls off the end. Is it mean to go on a stitch to mark a certain spot on the sock rather than on the needle to mark a spot in the stitches?

27.12.2013 - 23:08

DROPS Design answered:

Dear Tammy, you insert a marker on row after decrease for heel, and you then measure from marker to check length for foot. Happy knitting!

30.12.2013 - 15:18