
Popular categories
Looking for a yarn?


Comments / Questions (66)
![]() Petra-Maria Hohendorf wrote:
Petra-Maria Hohendorf wrote:
Ich verstehe leider bei Diagram A1 nicht wie ich auf 170 Maschen komme wenn ich 190 aufgenommen habe. Herzliche Grüße Petra-Maria
27.08.2024 - 19:37DROPS Design answered:
Liebe Petra-Maria, in der Mitte von jedem A.1 wird man 2 Maschen abnehmen (siehe letztes Symbol), so stricken Sie insgesamt 10 Mal die 19 Maschen A.1, gleichzeitig nehmen Sie 2 Maschen bei der 1. Runde ab = so sind es nur noch 17 M in jedem A.1 x 10 = 170 Maschen. Viel Spaß beim Stricken!
28.08.2024 - 09:02
![]() Andrea wrote:
Andrea wrote:
Wenn ich an der Rechten Schulter vorne und hinten 2 cm Blende dazu stricke, ist die Seite um 2cm länger als die andere Seite. Was habe ich nicht verstanden?
16.02.2024 - 23:46DROPS Design answered:
Liebe Andrea, die Blende über die rechte Schulter am Rückenteil ist nicht extra gestrickt, dh beide Schulter am Rücktenteil sind genauso lang, nur die Blende beim rechten Vorderteil wird länger, so kann man die Knopflöcher stricken und diese Blende kommt über die Blende vom Rückenteil. Viel Spaß beim stricken!
19.02.2024 - 07:46
![]() Kari Bølling Thorne wrote:
Kari Bølling Thorne wrote:
Forstår ikke helt lengden på denne, i mønsteret står det i str 3/4 år at arbeidet skal måle 38 cm når det skal skilles til erme/for og bakstykke. Men på tegningen nederst i oppskriften står det 52+5 cm. Dette forstår jeg ikke noe av.
06.11.2023 - 19:42DROPS Design answered:
Hei Kari, 52 cm er hele lengden fra skulderen. Ermehullene strikkes når kjolen er 38 cm, og er 14 cm i høyde. Til sammen blir dette 52 cm. God fornøyelse!
07.11.2023 - 06:58
![]() Isabelle wrote:
Isabelle wrote:
How do we get from 16 st on the left shoulder to 14? On what side of the left shoulder do we add the 1 st? Neck side?
16.07.2023 - 16:17DROPS Design answered:
Dear Isabelle, when you have 52sts, you work as follows: When piece measures 60 cm, cast off the middle 20 sts for neck (= 32 stitches remain, 16 for each shoulder). Now finish each shoulder separately. Then cast off on every row from neck as follows: 1 st 2 times = 14 sts remain on shoulder. You can increase the stitch wherever you want; we just need to increase the number of stitches to have an uneven amount of stitches for the rib. Happy knitting!
17.07.2023 - 11:41
![]() Rasha wrote:
Rasha wrote:
Thank you from the bottom of my heart for all the beautiful patterns you shared, I’ve been using your patterns for 2 years I knitted many beautiful clothes for my children and my nieces
24.06.2023 - 05:50
![]() Maria wrote:
Maria wrote:
Come faccio ad intrecciare 4 maglie da ogni lato prima e dopo i segnapunti per ottenere la divisione da il davanti e il dietro?
04.12.2022 - 22:17DROPS Design answered:
Buonasera Maria, deve chiudere le maglie come indicato. Buon lavoro!
05.12.2022 - 21:44
![]() Susanne wrote:
Susanne wrote:
Wenn ich die Blende nach Anleitung stricke ist dann nicht die linke Seite 2 cm länger? Die Blende hat ja je 2 cm Länge von beiden Seiten.
21.10.2022 - 13:27
![]() Elena wrote:
Elena wrote:
Salve, volevo sapere se questo modello si può eseguire con un filato di cotone e quale usare, se si può sostituire il filato devo seguire le stesse indicazioni circa il numero delle maglie aumenti e diminuzioni? Grazie
15.03.2021 - 11:17DROPS Design answered:
Buonasera Elena, in alternativa può utilizzare Cotton Merino, Muskat, Cotton Light, controllando che il suo campione corrisponda a quello indicato. Buon lavoro!
15.03.2021 - 23:17
![]() Bożena Schröder wrote:
Bożena Schröder wrote:
Dziewczynka, 128, szczupła..ile wełny na sukienkę bez rękawów jak na stronie? Pozdro Bozena?
22.10.2020 - 21:03DROPS Design answered:
Witaj Bożeno, potrzebujesz 7 motków włóczki DROPS Karisma. Miłej pracy!
23.10.2020 - 12:45
![]() Leah Ilanah wrote:
Leah Ilanah wrote:
Nein, ich habe versehentlich auf das falsche Muster geklickt. Ich stricke Twirly Girlie, Drops Children 23-2.
19.08.2020 - 16:43
|
||||||||||||||||
Bluebelle#bluebelledress |
||||||||||||||||
 |
 |
|||||||||||||||
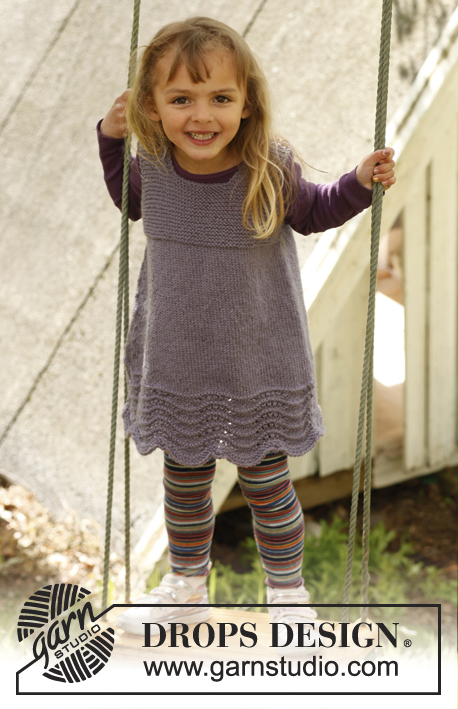
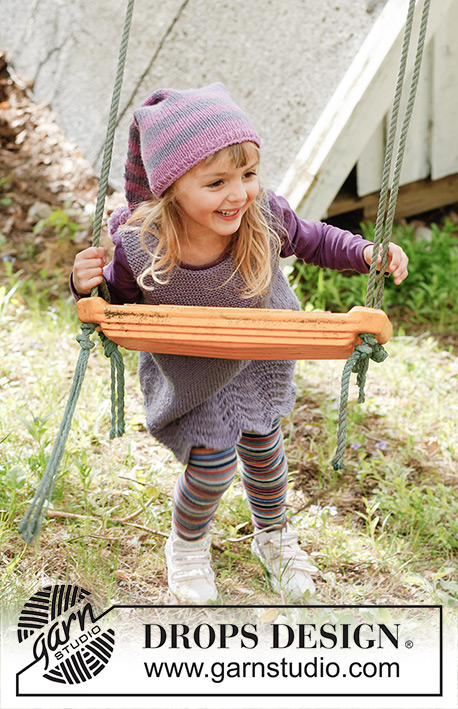
Knitted dress with lace pattern in DROPS Karisma. Size children 3 to 12 years
DROPS Children 23-1 |
||||||||||||||||
|
GARTER ST (in the round on circular needle): * K 1 round and P 1 round *, repeat from *-*. GARTER ST (back and forth on needle): K all rows. PATTERN: See diagrams A-1 and A-2. Diagrams show pattern from RS. DECREASE TIP 1 (applies to body): Dec 1 st on each side of marker as follows: Work until 2 sts remain before marker, slip 1 st as if to K, K 1, psso, (marker), K tog the next 2 sts. DECREASE TIP 2 (applies to armholes and neck line on front piece): All dec are done from RS! Dec 1 st at beg of row as follows: K 2, K the next 2 sts tog. Dec 1 st at end of row as follows: Work until 4 sts remain on needle, K the next 2 sts tog, K 2. BUTTON HOLES: 1 BUTTON HOLE = K 2 sts tog and make 1 YO. Cast off for 3 button holes evenly on band on left shoulder. MEASURING TIP: Because of the garter st all measurements must be done by holding the piece up otherwise the garment will be too long when worn. --------------------------------------------------------- BODY: Worked in the round on circular needle. Cast on 190-209-228-228-247 sts on circular needle size 4.5 mm with grey purple. Work 2 rounds in GARTER ST - Read explanation above. Then work A-1 over all sts 1 time vertically = 170-187-204-204-221 sts (= 10-11-12-12-13 repetitions). Then work A-2 over all sts until piece measures approx. 9-9-10-10-11 cm. K next round while AT THE SAME TIME dec 2-11-16-4-9 sts evenly on round = 168-176-188-200-212 sts. Then work in stocking st. REMEMBER THE KNITTING TENSION! When piece measures 10-10-11-11-12 cm, insert a marker at beg of round and a marker after 84-88-94-100-106 sts (= middle of sides), and move the marker upwards when working. On next round, dec 1 st on each side of every marker - READ DECREASE TIP 1 = 4 sts dec on round. Repeat dec every 2½-2½-3-3½-3½ cm a total of 10 times = 128-136-148-160-172 sts. When piece measures 33-37-40-44-47 cm (all dec should now be done), switch to circular needle size 4 mm and continue in garter st over all sts until finished measurements - READ MEASURING TIP! When piece measures 38-42-46-50-54 cm, cast off 4-4-5-5-6 sts for armholes on each side of both markers (= 8-8-10-10-12 cast off sts in each side). Finish each part separately. BACK PIECE: = 56-60-64-70-74 sts. Continue in garter st back and forth on circular needle size 4 mm - AT THE SAME TIME dec 1 st in each side of piece for armholes - READ DECREASE TIP 2. Repeat dec on every row from RS a total of 6-6-6-7-7 times = 44-48-52-56-60 sts remain. When piece measures 50-55-60-65-70 cm, cast off the middle 16-18-20-22-24 sts for neck. Now finish each shoulder separately. Then cast off on every row from neck as follows: 1 st 2 times = 12-13-14-15-16 sts remain on shoulder. When piece measures 52-57-62-67-72 cm, cast off sts on right shoulder, and then work a band on left shoulder. BAND - AT THE BACK: Work a band over sts on left shoulder as follows: On first row from WS, inc 1-0-1-0-1 st = 13-13-15-15-17 sts. Then work rib on next row from RS as follows: * K 1, P 1 *, repeat from *-* the entire row. When rib measures 2 cm, loosely cast off all sts with K over K and P over P. FRONT PIECE: = 56-60-64-70-74 sts. Continue in garter st back and forth on circular needle size 4 mm and dec for armholes as on back piece. AT THE SAME TIME when piece measures 45-49-53-57-61 cm, cast off the middle 14-14-16-16-18 sts for neck line. Now finish each shoulder separately. Then dec on every row from RS as follows: 1 st 3-4-4-5-5 times - READ DECREASE TIP 2 = 12-13-14-15-16 sts remain on shoulder. When piece measures 52-57-62-67-72 cm - READ MEASURING TIP - cast off on right shoulder. Work the left shoulder the same way as the right shoulder until piece measures 52-57-62-67-72 cm. Work now BAND – AT THE FRONT as explained below. BAND - AT THE FRONT: Work a band over sts on left shoulder as follows: On first row from WS, inc 1-0-1-0-1 st = 13-13-15-15-17 sts. Then work rib on next row from RS as follows: * K 1, P 1 *, repeat from *-* the entire row. On next row from RS, cast off for 3 button holes evenly - read explanation above. When rib measures 2 cm, loosely cast off all sts with K over K and P over P. ASSEMBLY: Sew right shoulder seam. Sew the buttons on to band on left back piece. |
||||||||||||||||
Diagram explanations |
||||||||||||||||
|
||||||||||||||||

|
||||||||||||||||

|
||||||||||||||||
Have you finished this pattern?Tag your pictures with #dropspattern #bluebelledress or submit them to the #dropsfan gallery. Do you need help with this pattern?You'll find 16 tutorial videos, a Comments/Questions area and more by visiting the pattern on garnstudio.com. © 1982-2025 DROPS Design A/S. We reserve all rights. This document, including all its sub-sections, has copyrights. Read more about what you can do with our patterns at the bottom of each pattern on our site. |
||||||||||||||||


With over 40 years in knitting and crochet design, DROPS Design offers one of the most extensive collections of free patterns on the internet - translated to 17 languages. As of today we count 314 catalogues and 11822 patterns translated into English (UK/cm).
We work hard to bring you the best knitting and crochet have to offer, inspiration and advice as well as great quality yarns at incredible prices! Would you like to use our patterns for other than personal use? You can read what you are allowed to do in the Copyright text at the bottom of all our patterns. Happy crafting!
Post a comment to pattern DROPS Children 23-1
We would love to hear what you have to say about this pattern!
If you want to leave a question, please make sure you select the correct category in the form below, to speed up the answering process. Required fields are marked *.