
Popular categories
Looking for a yarn?


Comments / Questions (72)
![]() Adeli wrote:
Adeli wrote:
No entiendo bien cómo se pueden hacer los aumentos del cuerpo y las mangas al mismo tiempo que el dibujo del raglán. Si para el raglán hay que echar dos hebras en la aguja, hay que echar otra hebra más para los aumentos del cuerpo y las mangas?
10.12.2024 - 16:35
![]() Victoria wrote:
Victoria wrote:
Muy difícil entender la explicación. Esa parte de los ojales medida del cuello hacia abajo: Talla S: 2,11,21, 30 y 40 cm, que significan??? Y Talla M: 2, 22,32,42 cm. ??? No entiendo.
26.10.2024 - 10:03DROPS Design answered:
Hola Victoria, quiere decir, que, cuando alcances esas medidas en la labor, medidas desde el cuello, cerrarás para 1 ojal (es decir, a cuántos cm desde el cuello trabajas cada ojal). En el texto te explican que trabajarás los ojales en la cenefa derecha.
27.10.2024 - 13:53
![]() Betty wrote:
Betty wrote:
Danke für die Antwort, aber ich habe nut zwei Zöpfe und nicht vier. Wo soll ich die anderen 8 Maschen denn abnehmen? Ich verstehe Sie nicht - danke
03.01.2022 - 10:24DROPS Design answered:
Liebe Betty, es sind insgesamt 4 Zöpfe, 1 für jede Raglan-Linie: A.1 über der 1. Markierung, A.2 über der 2. Markierung, A.1 über der 3. Markierung und A.2 über der 4. Markierung. Kann das Ihnen helfen?
03.01.2022 - 11:59
![]() Betty wrote:
Betty wrote:
Hallo nochmal, bitte entschuldigen Sie, ich glaub ich habe meine Frage falsch vormuliert. In der Jacke stricke ich rechts und links ein Zopf (A1 und A2). Ich habe jetzt 340 Maschen auf der Nadel und soll die Maschen im Zopf fortlaufend 2 zusammen stricken (4 Maschen pro Zopf abgenommen) dann hätte ich in der ganzen Reihe 8 Maschen abgenommen und würde auf 332 Maschen kommen und nicht auf 324 Maschen. bitte um Hilfe :) Danke Betty
01.01.2022 - 23:35
![]() Betty wrote:
Betty wrote:
Hallo, ich habe jetzt 340 Maschen auf der Nadel (Größe L). Habe ich richtig verstanden, dass ich jetzt über A1 und A2 NUR im Zopf 2 M zusammenstricken soll..... dann hätte ich 4M pro Zopf abgenommen (4M+4M=8 M abgenommen) da komme ich aber nicht auf 324 sondern 332. Wie komme ich auf die 324M?
30.12.2021 - 14:55DROPS Design answered:
Liebe Betty, 4 Maschen werden in jedem Zopf abgenommen: 4 Maschen in jedem A.1 und 4 Maschen in jedem A.2 = 340 Maschen - (4 Maschen x 4 Diagramme/Zöpfe) = 340-16=324 Maschen übrig. Viel Spaß beim stricken!
03.01.2022 - 10:10
![]() Inez wrote:
Inez wrote:
Patroon 142-26 eerste gedeelte van patroon prima. ik heb nu 92 st. op de naald (mt. XL) voor de raglan moet ik 36x 8st meerderen. 36x8 = 288st plus de 92 op de nld = 380 st. terwijl patroon aangeeft dat ik 364 st. zou hebben. wanneer en waar vinden de lijf meerderingen plaats?
05.10.2021 - 12:04DROPS Design answered:
Dag Inez,
Je mindert voor de raglan verschillend op de mouwen en het lijf. Op de mouwen meerder je 36 keer om de naald. Op het lijf meerder je 28 keer om de naald en daarna 4 keer elke naald, dus 32 keer in totaal op het lijf, daarmee kom je op 36 x 4 + 32 x 4 = 272 meerderingen, plus 92 steken die je al had = 364 steken.
12.10.2021 - 10:33
![]() Lorna Strombeck wrote:
Lorna Strombeck wrote:
Please help. Following the insertion of the markers I have increase to 92 stitches (L). A1 and A2, as I understand abut; 4 purl between Al and A2. However, the above increase changes this configuration to two extra stitches between the markers for the A1/A2 raglan. In addition, the pattern initially requires 2YO RS incr. before and after the raglan, progressively creating increment stitches between A1 and A2 pattern. Where am I going wrong? Ps, I've knitted X complex Gants successfully XX
08.03.2021 - 22:00DROPS Design answered:
Dear Mrs Strombeck, the stitches increased at the markers is to avoid that the cables A.1/A.2 will tighten piece, on next row from RS after the increased sts, work A.1/A.2 over the stitches at the markers: 6 sts of diagram before marker + 6 sts of diagram after marker and at the same time increase for the raglan before/after diagrams. In L you inc on every 2nd row 34 times on each sleeve and 22 times on every 2nd row + 6 times on every 4th row on body, this means you inc first 8 sts then alternately 4 and 8 sts (when you inc on every 2nd row for sleeves but every 4th row on body). Happy knitting!
09.03.2021 - 07:39
![]() Elisabeth Gustavsson wrote:
Elisabeth Gustavsson wrote:
Den här modellen stickas ju med rundsticka nu undrar jag hur räknar jag fram maskantal och mått om jag stickar med vanliga stickor Modellen jag frågade om igår har jag fått svar på men den var ju mycket enklare att räkna fram.
28.01.2021 - 16:59DROPS Design answered:
Hei Elisabeth. Om du ser i oppskriften etter fornøyningen, ser du maskeantallet som er til forstykkene, ermene og bakstykket. Da skal du regne det ut selv ut ifra den størrelsen du skal strikke. God Fornøyelse!
01.02.2021 - 12:00
![]() Pascale wrote:
Pascale wrote:
Bonjour Je souhaite adapter ce modèle pour une taille 4XL. Comment se calcule le nombre de mailles à ajouter pour modifier la taille ? Merci
31.12.2020 - 12:16DROPS Design answered:
Bonjour Pascale, nous ne sommes malheureusement pas en mesure de pouvoir ajuster chacun de nos modèles à chaque demande individuelle. Pour toute assistance complémentaire, vous pouvez vous adresser à votre magasin DROPS qui saura vous conseiller et vous renseigner. Bon tricot!
31.12.2020 - 18:08
![]() Ùna wrote:
Ùna wrote:
My problem with this pattern is where I actually knit the cable panels. The instructions say that the markers are in the middle of each cable. I find this confusing. Could you not tell me how many stitches to knit before I start the cables. I am an experienced knitter but this leaves me confused. Please tell me exactly where the cables should be placed, and where the raglan increases are in relation to the cable panels.
23.10.2020 - 22:32DROPS Design answered:
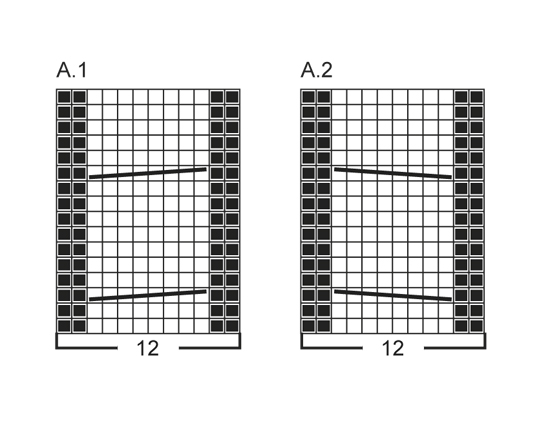
Dear Ùna, work until 6 sts remain before marker and work the diagram over the next 12 stitches (= 6 sts before marker + 6 sts after marker). Repeat on each marker. This means you wil work: first 6 sts A.1/A.2, marker, last 6 sts A.1/A.2. You will then increase before/after the cable panels/the diagram, but the raglan increases are worked on a different rythm on body and sleeves, you will sometimes increase 8 sts (= everywhere) or only 4 sts (only sleeves or only body) - see size. Hope this helps. Happy knititng!
26.10.2020 - 07:37
|
|||||||||||||
Paris weekend#parisweekendcardigan |
|||||||||||||
 |
 |
||||||||||||
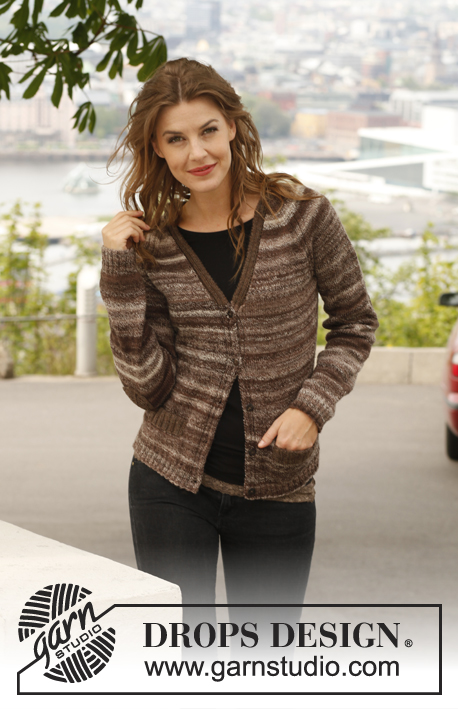
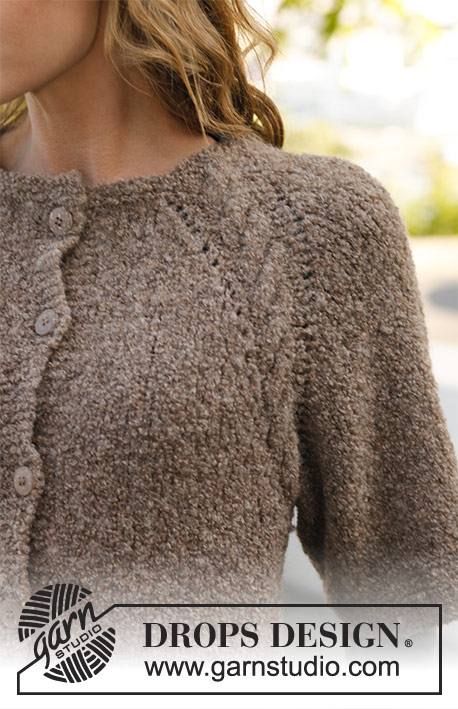
Knitted DROPS jacket with raglan and ¾ sleeves in ”Alpaca Bouclé”, worked top down. Size: S - XXXL.
DROPS 142-26 |
|||||||||||||
|
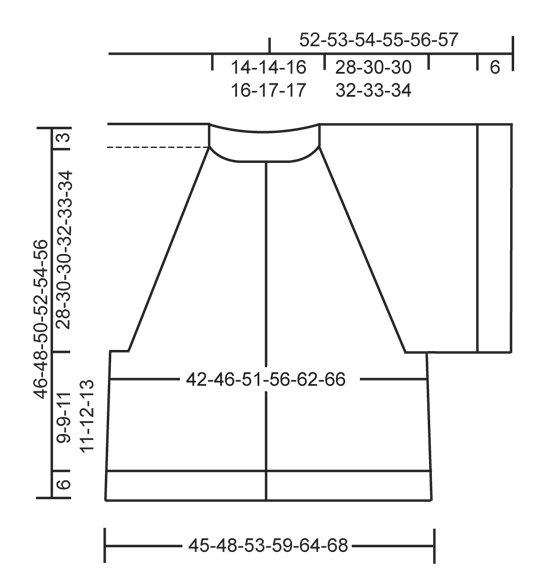
GARTER ST (back and forth on needle): K all rows. 1 ridge = 2 rows K. GARTER ST (in the round on circular needle): * K 1 round and P 1 round *, repeat from *-*. BUTTONHOLES: Cast off for buttonholes on right band. 1 buttonhole = K tog third and fourth st from edge and make 1 YO. Cast off for buttonholes when piece measures (measured from the neck and down): SIZE S: 2, 11, 21, 30 and 40 cm SIZE M: 2, 12, 22, 32 and 42 cm SIZE L: 2, 12, 23, 33 and 44 cm SIZE XL: 2, 10, 19, 28, 37 and 46 cm. SIZE XXL: 2, 12, 21, 30, 39 and 48 cm. SIZE XXXL: 2, 12, 21, 31, 40 and 50 cm. PATTERN: See diagrams A.1 and A.2. Diagrams show pattern from RS. RAGLAN: Beg 6 sts before marker: Make 2 YO on needle, work diagram A.1/A.2 (marker is in the middle of repetition), make 2 YO on needle. On next row slip one of the 2 YO before and after A.1/A.2 off the needle and work the other YO in stocking st (i.e. P from WS). INCREASE TIP (applies to body): Inc 1 st by making 1 YO. On next row work YO twisted to avoid holes. -------------------------------------------------------- JACKET: Worked back and forth on circular needle from neck and down. YOKE: LOOSELY cast on 72-72-76-76-83-83 sts (incl 6 band sts in each side towards mid front) on circular needle size 4.5 mm with Alpaca Bouclé. Work 6 rows in GARTER ST - see explanation above (1st row = RS). Switch to circular needle size 5 mm and work in stocking st AT THE SAME TIME work an elevation at the back of neck as follows (1st row = RS): Work until 16-16-18-18-19-19 sts remain, turn, tighten thread and work until 16-16-18-18-19-19 sts remain in the other side, turn, tighten thread and work until 22-22-24-24-26-26 sts remain, turn, tighten thread and work until 22-22-24-24-26-26 sts remain in the other side, turn, tighten thread and work until 28-28-30-30-33-33 sts remain, turn, tighten thread and work until 28-28-30-30-33-33 sts remain in the other side, turn, tighten thread and work the rest of row. Now insert 4 markers in the piece for raglan as follows (insert the markers in the piece without working the row): Insert 1st marker after 16-16-17-17-19-19 sts (= front piece), insert 2nd marker after 10-10-10-10-10-10 sts (= sleeve), insert 3rd marker after 20-20-22-22-25-25 sts (= back piece) and insert 4th marker after 10-10-10-10-10-10 sts (= sleeve). 16-16-17-17-19-19 sts remain on needle after last marker on front piece. READ ALL OF THE FOLLOWING SECTION BEFORE CONTINUING: P 1 row from WS (work bands in garter st), AT THE SAME TIME inc 2 sts on each side of the 4 markers by working 2 sts in each of the 2 sts on each side of all 4 markers (= 16 sts inc) = 88-88-92-92-99-99 sts. Then work in stocking st with 6 band sts in garter st in each side towards mid front (1st row = RS) – AT THE SAME TIME work a cable according to diagram A.1 over 1st and 3rd marker and a cable according to diagram A.2 over 2nd and 4th marker (markers are in the middle of each cable) - Remember BUTTONHOLES on right band - see explanation above. AT THE SAME TIME on first row from RS, beg inc for RAGLAN – see explanation above. NOTE: The inc on body and sleeves are uneven. REMEMBER THE KNITTING TENSION! INC AS FOLLOWS ON SLEEVES: Beg on 1st row from RS and inc on every other row (i.e. every row from RS) a total of 31-33-34-36-37-38 times. INC AS FOLLOWS ON BODY: Beg on 1st row from RS and inc every other row (i.e. every row from RS) a total of 13-17-22-28-33-38 times and then every 4th row (i.e. every other row from RS) a total of 9-8-6-4-2-0 times = 300-320-340-364-387-403 sts. Inc for raglan are now done. Work 1 row from WS as before. Then work 1 row from RS as before while AT THE SAME TIME K sts in cable in diagram A.1 tog 2 by 2 and K sts in cable in diagram A.2 twisted tog 2 by 2 (= 4 sts dec per cable) = 284-304-324-348-371-387 sts remain on needle. Work next row as follows from WS: Work until 1st marker, slip the 72-76-78-82-84-86 sts between 1st and 2nd marker on a stitch holder for sleeve, cast on 8-8-8-10-10-10 new sts over stitch holder, work until 3rd marker, slip the 72-76-78-82-84-86 sts between 3rd and 4th marker on a stitch holder for sleeve, cast on 8-8-8-10-10-10 new sts over stitch holder and work the rest of row = 156-168-184-204-223-235 sts on needle. BODY: NOW MEASURE PIECE FROM HERE! Continue back and forth in stocking st and 6 band sts in garter st in each side towards mid front. AT THE SAME TIME insert 1 marker in the middle of the 8-8-8-10-10-10 new sts in each side. When piece measures 4-4-5-5-5-6 cm, inc 1 st on each side of markers in each side - READ INCREASE TIP (= 4 sts inc). Repeat inc when piece measures 8-8-10-10-11-12 cm = 164-176-192-212-231-243 sts. Continue to work until piece measures 9-9-11-11-12-13 cm (piece measures approx. 40-42-44-46-48-50 cm from shoulder and down). Switch to circular needle size 4.5 mm and work in garter st back and forth for 6 cm, then LOOSELY cast off. Piece measures approx. 46-48-50-52-54-56 cm from shoulder and down. SLEEVE: Slip sts from one stitch holder on a short circular needle size 5 mm and cast in addition on 8-8-8-10-10-10 new sts under sleeve = 80-84-86-92-94-96 sts. NOW MEASURE PIECE FROM HERE! Work in stocking st in the round until sleeve measures 9-8-8-7-6-6 cm (shorter measurements in the larger sizes because of broader shoulder width and longer sleeve cap). Switch to circular needle size 4.5 mm and work in garter st in the round for 6 cm, then LOOSELY cast off. Work the other sleeve the same way. ASSEMBLY: Sew the openings under the sleeves. Sew on buttons. |
|||||||||||||
Diagram explanations |
|||||||||||||
|
|||||||||||||
|
|||||||||||||
|
|||||||||||||
Have you finished this pattern?Tag your pictures with #dropspattern #parisweekendcardigan or submit them to the #dropsfan gallery. Do you need help with this pattern?You'll find 17 tutorial videos, a Comments/Questions area and more by visiting the pattern on garnstudio.com. © 1982-2025 DROPS Design A/S. We reserve all rights. This document, including all its sub-sections, has copyrights. Read more about what you can do with our patterns at the bottom of each pattern on our site. |
|||||||||||||


With over 40 years in knitting and crochet design, DROPS Design offers one of the most extensive collections of free patterns on the internet - translated to 17 languages. As of today we count 314 catalogues and 11822 patterns translated into English (UK/cm).
We work hard to bring you the best knitting and crochet have to offer, inspiration and advice as well as great quality yarns at incredible prices! Would you like to use our patterns for other than personal use? You can read what you are allowed to do in the Copyright text at the bottom of all our patterns. Happy crafting!
Post a comment to pattern DROPS 142-26
We would love to hear what you have to say about this pattern!
If you want to leave a question, please make sure you select the correct category in the form below, to speed up the answering process. Required fields are marked *.