
Looking for a yarn?


Comments / Questions (33)
![]() Sue wrote:
Sue wrote:
Thanks SO much. I teach a beginners Crochet Class at the senior Center - and this will be a great project for them
16.06.2025 - 15:24
![]() Challe wrote:
Challe wrote:
Kan ni lägga in en bättre förklaring på hur den ska sys ihop? Gärna en video.
04.06.2025 - 10:29DROPS Design answered:
Hei Challe. Ta en titt på de videoen som allerede ligger under oppslkriften (klikk på VIDEOR). Evnt kan du ta en titt under Tips & Hjälp / Instruktionsvideor / Montering. mbh DROPS Design
10.06.2025 - 12:41
![]() Dia wrote:
Dia wrote:
Ik snap helemaal niets van de beschrijving van de schouderband , ook geen fotos of video te vinden . Ben best slim, haak al jaren :-) maar ik kom hier niet uit. Een cirkel maken van 5 lossen, dan 5 vasten haken en dan opeens 180 cm vasten haken? waar of hoe ?
23.09.2024 - 21:35
![]() Jane Ackroyd wrote:
Jane Ackroyd wrote:
I’ve made the bag and a shoulder strap 180cms long as in the pattern but I am unsure how to join together the ends. Not sure if the shoulder strap is single length or double
10.03.2024 - 15:25DROPS Design answered:
Dear Jane, since the pattern says "Thread the shoulder strap through both layers at the upper corner on one side of the bag and through both layers at the upper corner on the other side of bag. Sew ends on shoulder strap tog" this means that you have the strap double, and sewn together at the top. If you find it necessary, you can make the strao longer or shorter. Happy Crafting.
10.03.2024 - 22:03
![]() Gudrun wrote:
Gudrun wrote:
Hej, jag har beställt garn till detta mönster enligt vad som stå. Men det står 50-61, ljus persika, då får jag en senapsgul och enligt garnstudion så heter den gula 50-61 (står så även på nystat) blir ju naturligtvis inte helt som tänkt. Jag kunde skicka tillbaka nystat mot att jag betalade returfrakten, vilket inte kändes helt ok. Hoppas ni har blivit uppmärksammad så det inte händer fler.
04.11.2022 - 12:38
![]() Mirelha wrote:
Mirelha wrote:
Que signifie l’expression « crocheter en Paris » ? Merci !
01.08.2022 - 08:43DROPS Design answered:
Bonjour Mirelha, cela signifie que le sac est crochete avec la laine Drops Paris. Bon crochet!
01.08.2022 - 09:31
![]() Amalie wrote:
Amalie wrote:
Er en skrivefeil i slutten av oppskriften på hver rute. Står man skal avslutte med en kjm i 3. lm fra beg. av omg., men man starter omgangene med 3 luftmasker :-) Hadde en forvirret bestemor som trengte hjelp med det, hahah!
26.07.2022 - 15:36
![]() Victoria wrote:
Victoria wrote:
Si dice que las aplicaciones miden 12cm como dice que el bolso mide 30 x 30 cm
27.03.2022 - 11:28DROPS Design answered:
Hola Victoria, el tamaño es correcto. Debería ser aprox. 30 cm por la parte más ancha del bolso, tanto a lo vertical como a lo horizontal.
27.03.2022 - 23:01
![]() NURIA wrote:
NURIA wrote:
El hilo nº 61 melocotón claro NO EXISTE. El nº 61 es color LIMA
07.07.2021 - 14:28
![]() Rosaria wrote:
Rosaria wrote:
È un bel progetto! Sto provando a farla. Complimenti...ottima spiegazione
05.04.2021 - 21:50
|
|
Celebrating Spring#celebratingspringbag |
|
 |
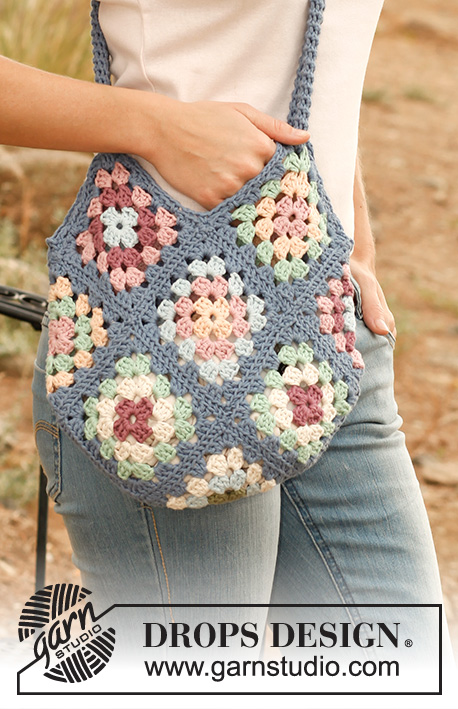 |
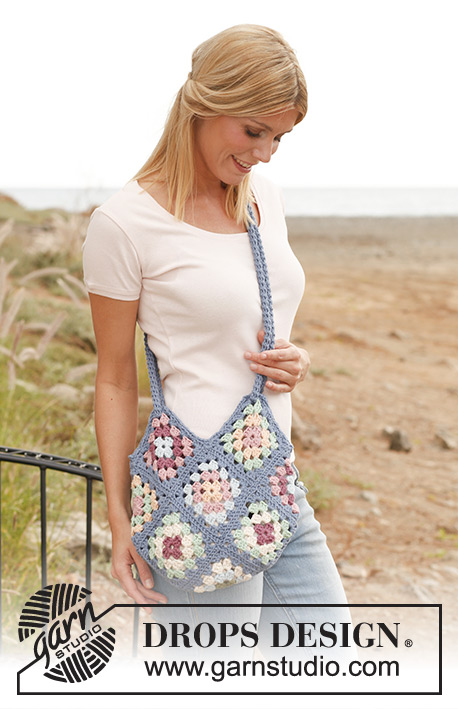
Crochet DROPS bag with granny squares in “Paris”.
DROPS 139-15 |
|
|
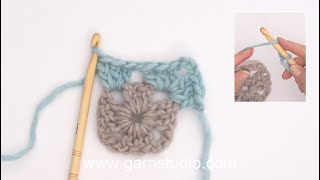
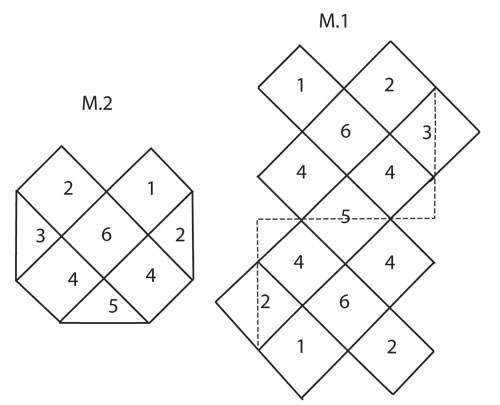
CROCHET TIP 1: Because we cut the yarn and change the color on every round, work first dc on every round as follows: Make 2 YO on hook, insert hook in last st from previous round, make 1 YO and pull through, make 1 YO and pull through 2 sts, make yet 1 more YO and pull through the last 2 sts. CROCHET TIP 2: Fasten the yarn end after every color change by letting the strand from previous row be worked into the piece a bit before cutting it off and fastening it (work with the new color around the previous color). SC IN A CIRCLE (applies to shoulder strap): After last sc on 1st round, work 1 sc in next sc (= 1st sc from beg of 1st round), then work in the round with 1 sc in every sc. COLOR OVERVIEW: Change color on every round. Color no 1 when beg + 1 round, then color no 2 on 2nd round, color no 3 on 3rd round and finally color no 4 on 4th round. Square 1: Color no 1: Powder pink Color no 2: Light peach Color no 3: Light mint green Color no 4: Denim blue Square 2: Color no 1: Light ice blue Color no 2: Dark old pink Color no 3: Powder pink Color no 4: Denim blue Square 3: Color no 1: Powder pink Color no 2: Light mint green Color no 3: Light peach Color no 4: Denim blue Square 4: Color no 1: Dark old pink Color no 2: Off white Color no 3: light mint green Color no 4: Denim blue Square 5: Color no 1: Dark old pink Color no 2: Light ice blue Color no 3: Off white Color no 4: Denim blue Square 6: Color no 1: Light peach Color no 2: Powder pink Color no 3: Light ice blue Color no 4: Denim blue -------------------------------------------------------- -------------------------------------------------------- Bag consist of 13 granny squares sewn tog according to fig. M.1. Squares 3 and 5 are worked 1 time, squares 1 and 6 are worked 2 times, square 2 is worked 3 times and square 4 is worked 4 times. GRANNY SQUARE: Read COLOR OVERVIEW. BEGINNING: Ch 6 on hook size 5 mm / H/8 and form a ring with 1 sl st in first ch. ROUND 1: ch 3, 2 dc in ch-ring, * ch 3, 3 dc in ch-ring *, repeat from *-* a total of 3 times and finish with ch 3 and 1 sl st in 3rd ch from beg of round. Cut the yarn and change color. Turn piece. ROUND 2: Read CROCHET TIP 1 and 2. Work 3 dc in first ch-space, ch 3, 3 dc in same ch-space, * ch 1, 3 dc in next ch-space, ch 3, 3 dc in same ch-space *, repeat from *-* a total of 3 times and finish with ch 1 and 1 sl st in first dc in beg of round. Cut the yarn and change color. Turn piece. ROUND 3: Work 3 dc in first ch-space, ch 1, * 3 dc in next ch-space, ch 3, 3 dc in same ch-space, ch 1, 3 dc in next ch-space, 1 ch *, repeat from *-* a total of 3 times, 3 dc in next ch-space, ch 3, 3 dc in same ch-space, 1 ch and finish with 1 sl st in first dc in beg of round. Cut the yarn and change color. Turn piece. ROUND 4: Work 3 dc in first ch-space, ch 1, * 3 dc in next ch-space, ch 3, 3 dc in same ch-space, ch 1, 3 dc in next ch-space, ch 1, 3 dc in next ch-space, 1 ch *, repeat from *-* a total of 3 times, 3 dc in next ch-space, ch 3, 3 dc in same ch-space, 1 ch and finish with 1 sl st in first dc in beg of round. Cut the yarn. ASSEMBLY: Sew squares tog with neat little stitches, follow fig. M.1. Fig. M.2 shows the bag when sewn tog. SHOULDER STRAP: Worked in the round. Ch 5 with denim blue and form a ring with 1 sl st in 1st ch. Work 1 sc in every ch = 5 sc. Then work SC IN A CIRCLE - Read explanation above- for approx. 180 cm / 70", fasten off. Thread the shoulder strap through both layers at the upper corner on one side of the bag and through both layers at the upper corner on the other side of bag. Sew ends on shoulder strap tog. |
|
|
|
Have you finished this pattern?Tag your pictures with #dropspattern #celebratingspringbag or submit them to the #dropsfan gallery. Do you need help with this pattern?You'll find 9 tutorial videos, a Comments/Questions area and more by visiting the pattern on garnstudio.com. © 1982-2025 DROPS Design A/S. We reserve all rights. This document, including all its sub-sections, has copyrights. Read more about what you can do with our patterns at the bottom of each pattern on our site. |
|


With over 40 years in knitting and crochet design, DROPS Design offers one of the most extensive collections of free patterns on the internet - translated to 17 languages. As of today we count 314 catalogs and 11822 patterns - 11812 of which are translated into English (US/in).
We work hard to bring you the best knitting and crochet have to offer, inspiration and advice as well as great quality yarns at incredible prices! Would you like to use our patterns for other than personal use? You can read what you are allowed to do in the Copyright text at the bottom of all our patterns. Happy crafting!
Post a comment to pattern DROPS 139-15
We would love to hear what you have to say about this pattern!
If you want to leave a question, please make sure you select the correct category in the form below, to speed up the answering process. Required fields are marked *.