
Popular categories
Looking for a yarn?


|
||||
Grey Gosling |
||||
 |
 |
|||
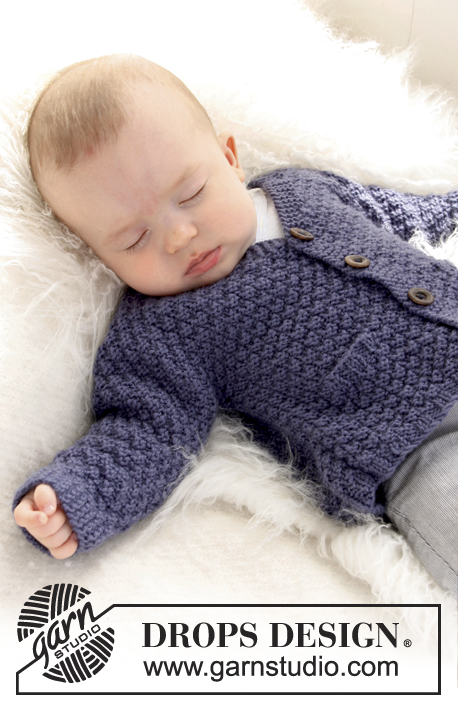
Knitted jacket worked sideways for baby and children in 2 threads DROPS Alpaca
DROPS Baby 21-39 |
||||
|
GARTER ST (back and forth on needle): K all rows. INCREASE TIP (applies to neck line): Inc by making 1 YO inside 2 edge sts in garter st. On next row K YO twisted (i.e. work in back loop of st instead of front to avoid holes). NOTE: Work the outermost st in neck line a little tight so that the edge looks nice BUTTON HOLES: 1 button hole = Cast off 1 st and make 1 YO on next row over the cast off st. ------------------------------------------------------- JACKET: Front and back piece is worked in one, sideways from arm to arm. RIGHT SLEEVE: Loosely cast on 26-28-28 (30-30) sts (= bottom of right sleeve) on needle size 5 mm with 2 threads Alpaca. Work in Garter St - see explanation above. When piece measures 5 cm, inc 1 st in each side, repeat inc every other cm a total of 6-6-8 (9-11) times = 38-40-44 (48-52) sts. When piece measures 17-18-20 (24-28) cm, loosely cast on 27-29-34 (39-42) new sts at beg and end of row for front and back piece = 92-98-112 (126-136) sts. Continue to work until piece measures 9-10-11 (12-13) cm from where the sts for front and back piece were cast on (piece measures 26-28-31 (36-41) cm from cast on edge at the bottom of sleeve). Work next row from RS as follows: K the first 46-49-56 (63-68) sts on needle (= front piece) and slip the remaining 46-49-56 (63-68) sts on a stitch holder (= back piece). Insert a marker in last row, now measure back piece from here. FRONT PIECE: = 46-49-56 (63-68) sts. Turn piece and cast off the first 6-6-6 (7-7) sts on row for neck. Then dec for neck line towards the neck every cm: 1 st 3 times in total = 37-40-47 (53-58) sts on needle. Work until width of front piece = 12.5-14-15.5 (17-18.5) cm. Now cast off for 5-5-5 (6-6) button holes evenly on next row – see explanation above, Note the hole at the top are cast off after 2 sts at neck edge. Then work 4 rows in garter stitch. Cast off. BACK PIECE: Slip the 46-49-56 (63-68) sts from stitch holder back on needle and K every row until piece measures 7-8-9 (10-11) cm from last marker. Put the piece aside and work left front piece. LEFT FRONT PIECE: Loosely cast on 37-40-47 (53-58) sts on needle size 5 mm with 2 threads Alpaca. K every row until piece measure 4-4.5-5 (5.5-6) cm. Now inc for neck line in the left side of piece on every cm 1 st a total of 3 times - see Inc.tips above. When piece measure 6-6.5-7 (7.5-8) cm cast on 6-6-6 (7-7) sts in left side = 46-49-56 (63-68) m. When all sts are inc for neck work pieces together - see BODY. BODY: Slip the 46-49-56 (63-68) sts from back piece on to same needle as left front piece = 92-98-112 (126-136) sts on needle. Insert a new marker in the piece - now measure piece from here! Work until piece measures 9-10-11 (12-13) cm. Loosely cast off at beg of the next 2 rows 27-29-34 (39-42) sts in each side = 38-40-44 (48-52) sts remain on needle for left sleeve – now measure piece from here. When piece measures 2-3-1 (3-3) cm, dec 1 st in each side, repeat every other cm a total of 6-6-8 (9-11) times = 26-28-28 (30-30) sts on needle. Loosely cast off when sleeve measures 17-18-20 (24-28) cm (piece measures approx. 59-64-71 (82-93) cm from arm to arm). NECK EDGE: From RS pick up approx 40 - 50 sts around neck with 2 strands on needles size 5 mm/US 8. K3 rows back and forth, then cast/bind off loosely. ASSEMBLY: Fold the piece double at the shoulders and sew sleeve and side seams in one in front loop of outermost st to avoid a chunky seam. Sew on buttons. |
||||
Diagram explanations |
||||
|
||||

|
||||
|
Have you made this or any other of our designs? Tag your pictures in social media with #dropsdesign so we can see them! Do you need help with this pattern?You'll find tutorial videos, a Comments/Questions area and more by visiting the pattern on garnstudio.com. © 1982-2024 DROPS Design A/S. We reserve all rights. This document, including all its sub-sections, has copyrights. Read more about what you can do with our patterns at the bottom of each pattern on our site. |
||||


With over 40 years in knitting and crochet design, DROPS Design offers one of the most extensive collections of free patterns on the internet - translated to 17 languages. As of today we count 304 catalogues and 11422 patterns - 11422 of which are translated into English (UK/cm).
We work hard to bring you the best knitting and crochet have to offer, inspiration and advice as well as great quality yarns at incredible prices! Would you like to use our patterns for other than personal use? You can read what you are allowed to do in the Copyright text at the bottom of all our patterns. Happy crafting!
Comments / Questions (109)
Ser at det er kommet svar på spørsmål om venstre erme. Ville spurt om det jeg også, men jeg har spørsmål til hvilken ene av strikketøyet skal settes sammen med bilen. Er det den siden hvor det ikke er økninger?
17.12.2021 - 08:39DROPS Design answered:
Hei Bjørg. Litt usikker om jeg skjønner spørsmålet dit helt, men de maskene du har økt på venstre forstykket (altså der det er økt 1 maske 3 ganger + lagt opp 6 eller 7 masker), dette er "hals-området". Dette skal være lik (speilvendt) på halsen på høyre side. Når du setter venstre forstykke sammen med bolen, er det den siden med økninger som settes sammen med ryggstykket (bolen). mvh DROPS Design
21.12.2021 - 09:48Hallo, ich bin den Anleitung bis Vorder- und Rückteil gefolgt und nun weiß ich nicht weiter. Lt. eurem Diagramm (wird hier das Rückteil gezeigt?) strickt man von links nach rechts. Aber lt. Anleitung strickt man doch erst den rechten Ärmel und das rechte Vorderteil, oder? Wenn ich eurer Anleitung folge, müsste ich das linke Vorderteil an ein halbes Rückteil stricken oder was habe ich nicht verstanden? Bitte um Hilfe! Leider kann man hier keine Bilder hochladen :( LG, Manu
23.05.2021 - 17:02DROPS Design answered:
Liebe Frau Schedel, die Jacke wird quer gestrickt, dh man schlägt die Maschen von der rechten Ärmel (wenn mann die Jacke strickt, dh auf den linken Seite wenn die Ärmel wie bei der Skizze liegt) bis zum linken Ärmel gestrickt. Viel Spaß beim stricken!
25.05.2021 - 09:45Bijhet linker voorpand moet je iedere cm een steek meerderen, je begint na 5 cm, dan kom ik uit op 8 cm na iedere meerdering. Maar in het patroon staat 6,5 cm, dan direct 6 steken erbij. Dit klopt dus niet. bij het rechter voorpand staat minderen voor de hals en dan vanaf daar meten, is 14 cm. Dit klopt dus niet met de vorige opmerking.
08.03.2021 - 09:34Hola no entiendo muy bien las notas de la parte del escote. Una vez rematados los seis primeros puntos, tengo que hacer una disminucion? Y despues de ahi, tejo pd hasta el final de la vuelta, y las siguientes disminuciones se hacen a un cm de la disminucion anterior, cuando vuelvo en la siguiente vuelta, o son disminuciones a un cm entre ellas en la misma primera vuelta? Me he atascado y no se seguir...
28.02.2021 - 00:01DROPS Design answered:
Hola Patri, las siguientes disminuciones se hacen a un cm de la disminucion anterior, cuando vuelves en la siguiente vuelta. Buen trabajo!
04.03.2021 - 16:13BONJOUR Pour le départ de la manche par le poignet, il n y a pas le nombre de mailles en centimètre. Pouvez vous répondre à cette question? Merci pour votre réponse
31.01.2021 - 19:12DROPS Design answered:
Bonjour Mme Dubois, la largeur du poignet est env. de 7,5-9 cm (selon la taille). La circonference du poignet est respectivement de 15 au 18 cm (env). Bon tricot!
31.01.2021 - 19:49Ich habe diese Babyjacke in Größe 74 gestrickt. Diese Mama des Babys ist so begeistert und hätte gerne die gleiche Jacke in Größe 42. können Sie mir bitte einen Tipp geben welche Jacke in ihren Sortiment diesem am ähnlichsten ist? Vielen Dank für Ihre Bemühungen
10.12.2020 - 09:37DROPS Design answered:
Liebe Elke, genau dieselbe Jacke haben wir nicht für Damen, aber hier finden Sie unsere Jacken-Modellen, die quer gestrickt sind. Bestimmt finden Sie eine Idee bzw Inspiration. Viel Spaß beim stricken!
10.12.2020 - 13:55Zoals eerder door iemand (jaren geleden al) is opgemerkt, klopt de beschrijving niet van de tweede mouw: bij de eerste mouw moet om de centimeter gemeerderd worden. Bij 'LIJF' wordt gemeld dat om de centimeter geminderd moet worden. Dit resulteert in twee ongelijke mouwen. Misschien toch de moeite waard om aan te passen of zie ik het toch verkeerd? Alvast dank!
06.12.2020 - 11:13DROPS Design answered:
Dag Marije,
Je hebt inderdaad gelijk, op de linker mouw moet ook om de 2 cm geminderd worden. Het is nu aangepast. Bedankt voor het doorgeven en veel breiplezier!
06.12.2020 - 14:15I have made this pattern about five times in different sizes for my grandchildren. My daughter loves the design and would like me to knit one for her in your boucle wool. Could give me a small adult size version of the same pattern.
04.11.2020 - 19:50DROPS Design answered:
Dear Karin, we do not have the exact same pattern in adult size, but you will find our jackets worked sideways here - hope this can help. Happy knitting!
05.11.2020 - 10:01Moet het achterland niet breder, want nu kom ik niet goed uit met voorhanden, Knoopsgaten komen niet in midden maar schuin
04.10.2020 - 07:38DROPS Design answered:
Dag Yolanda,
Als ik als voorbeeld even de kleinste maat neem dan wordt het voorpand 12,5 breed (+ nog eens stukje overlap voor de knoopbies). Het achterpand wordt eerst samen met het voorpand gebreid tot een breedte van 9 cm, dan brei je (bij de paragraaf over 'ACHTERPAND') er nog een stuk van 7 cm aan en op het moment dat het rechter voorpand mee gebreid wordt brei je er opnieuw een stuk van 9 cm aan. Daarmee kom je op een totaal van 25 cm voor het achterpand. Dit is ook de breedte van beide voorpanden samen. (De knoopbies reken je dan niet mee).
21.11.2020 - 18:12I am having an issue with the instructions of this pattern. I have read all the English comments and still am unable to figure out my next step. How do I attach the left front stitches to the back stitches? Do I attach at the neckline of the back stitches or at the bottom of the back stitches?
21.09.2020 - 00:01DROPS Design answered:
Dear Nancy, after you have worked left front piece, work the sts of left front piece from RS then at the end of this row (make sure it's on the same side where you cast on the new sts for neck on the left side of piece), work the stitches on back piece on same needle = 92-136 sts (see size) and now continue back and fort other all stitches for shoulder and cast off sts for front/back piece to work the 2nd sleeve. Happy knitting!
21.09.2020 - 15:31