DROPS Angora-Tweed
DROPS Angora-Tweed
70% Wool, 30% Angora,
Discontinued
find alternatives
DROPS SS24

DROPS 79-13

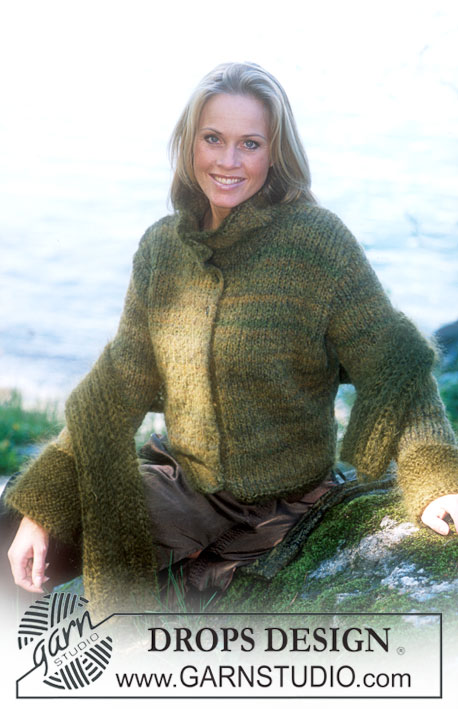
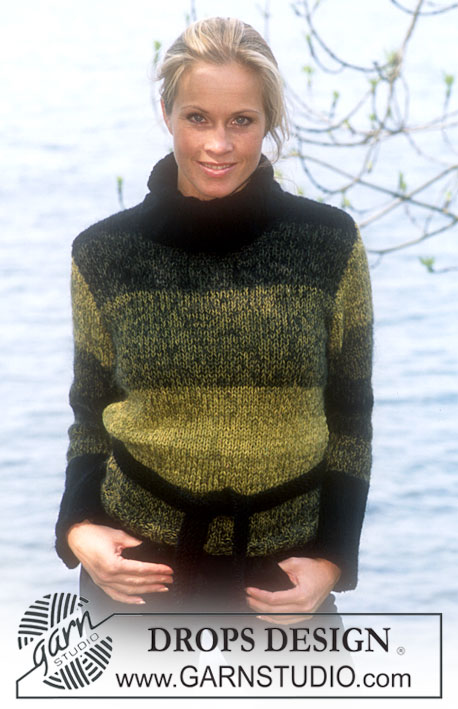
Pullover in DROPS Angora-Tweed or DROPS Soft Tweed, hat and scarf in seed-stitch in "Ull-Flamé" and "Cotton Viscose"

DROPS 79-13
Pullover:

Sizes: XS - S/M - M/L - XL
Finished measurements:
Bust: 88-98-110-120 cm
Waist: 70-82-92-104 cm
Hem: 88-98-110-120 cm
The pullover will be smaller than shown on the diagram before blocking, due to the rib pattern.

Materials: DROPS ANGORA-TWEED from Garnstudio
400-450-450-500 gr no 10, natural
or use:
DROPS SOFT TWEED from Garnstudio
450-550-550-600 gr no 01, off white

DROPS 3.5 mm circular and double-pointed needles, or size needed to obtain correct gauge.

-------------------------------------------------------

Alternative Yarn – See how to change yarns here
Yarn Groups A to F – Use the same pattern and change the yarn here
Yarn usage using an alternative yarn – Use our yarn converter here

-------------------------------------------------------

DROPS Angora-Tweed
DROPS Angora-Tweed
70% Wool, 30% Angora,
Discontinued
find alternatives

Pattern instructions

NOTE: This pattern is written in British English. All measurements in charts are in cm. For conversion from cm to inches - click here. There are different terms for crocheting in British and American English. If this pattern includes crochet, click for "crochet terms" here. For this pattern in American English, please click here.
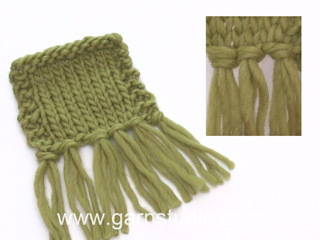
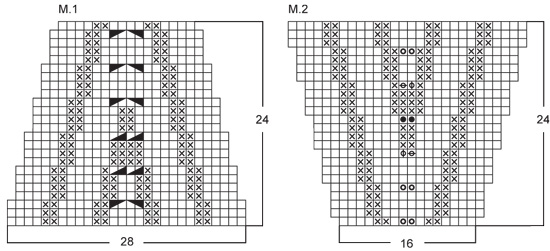
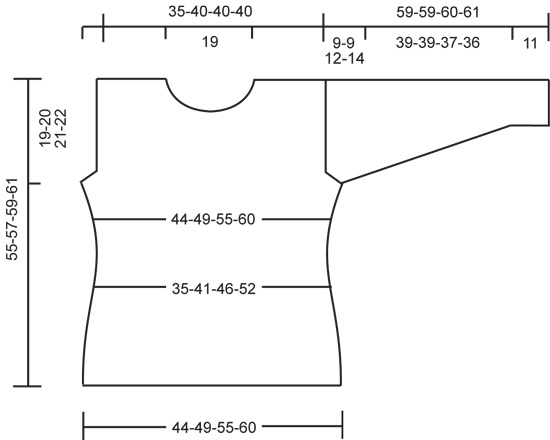
PULLOVER:

Gauge: 22 sts x 30 rows in stockinette st = 10 x 10 cm

Rib: * K 4, P 2 *, repeat from * - *.

Knitting tips (for armhole):
All decs are made from right side. Dec inside of 1 edge st + K 3, as follows:
Before 4 sts: K 2 tog
After 4 sts: Slip 1 st as if to knit, K 1, psso

Pattern: See charts. The pattern is seen from the right side.

Body:
Cast on 192-216-240-264 sts; join and place a marker at the join. Knit rib - start at the marker (side) with K 2 (this will make K 4 at each side - place another marker for the other side, there will be K2 on each side of each marker). Continue the rib as established. When the piece measures 9-10-11-12 cm knit the next row as follows:
Front: 10-16-22-22 sts in rib as established, Pattern 1 (= 28 sts), 20-20-20-32 sts in rib as established, Pattern 1 (= 28 sts) and 10-16-22-22 sts in rib as established, marker,
Back: 34-40-46-52 sts in rib as established, Pattern 1 (= 28 sts), 34-40-46-52 sts in rib as established.
Knit until Pattern 1 is complete, there are now 156-180-204-228 sts. Continue in rib as now established until the piece measures 23-24-25-26 cm. Then knit the next row as follows:
Front: 10-16-22-22 sts in rib as established, Pattern 2 (= 16 sts), 20-20-20-32 sts in rib as established, Pattern 2 (= 16 sts) and 10-16-22-22 sts in rib as established, marker,
Back: 34-40-46-52 sts in rib as established, Pattern 2 (= 16 sts), 34-40-46-52 sts in rib as established.
Knit until Pattern 2 is complete, there are now 192-216-240-264 sts on needles. When the piece measures 36-37-38-39 cm bind off 6 sts at each side for armhole (= 3 sts each side of each marker). Knit each piece separately.

Front: = 90-102-114-126 sts. Now dec 1 st for armhole every other row 6-6-12-18 times - see knitting tips = 78-90-90-90 sts. Continue the rib as established, keeping 1 edge st at each side in garter st. When the piece measures 48-50-52-54 cm put the center 20 sts on a st holder for the neck. Then bind off at each neck edge every other row: 3 sts 1 time, 2 sts 2 times and 1 st 4 times = 18-24-24-24 sts remain on each shoulder. Bind off when the piece measures 55-57-59-61 cm.

Back: = 90-102-114-126 sts. Bind off for armhole as on front = 78-90-90-90 sts. When the piece measures 53-55-57-59 cm bind off the center 38 sts for the neck. Then bind off 2 sts at each neck edge on the next row = 18-24-24-24 sts remain on each shoulder. Bind off when the piece measures 55-57-59-61 cm.

Sleeve: Cast on 60-60-72-72 sts on double-pointed needles; join and place a marker at the join. Knit rib - start with K 2. When the piece measures 3 cm knit Pattern 1 over the center 28 sts on sleeves (knit the remaining sts in rib as established). After Pattern 1 there are 48-48-60-60 sts. Continue in rib as now established. When the piece measures 11 cm inc 1 st at each side of the K 4 with marker in the center every other cm (approx. every 6 rows) 18 times - knit the increased sts into the rib as you go along (the 4 first sts knit, the next 2 sts purl).
After all incs there are 84-84-96-96 sts. When sleeve measures 50-50-48-47 cm bind off 4 sts each side of marker, and knit back and forth on needles.
Now bind off for sleeve cap at each side every other row: 3 sts 1 time, 2 sts 4-4-3-2 times, 1 st 3-3-9-13 times, then bind off 2 sts at each side until the piece measures 58-58-59-60 cm, then bind off 3 sts 1 time at each side. Bind off the remaining sts, the piece measures approx. 59-59-60-61 cm.

Assembly: Sew shoulder seams.
Collar: Pick up 96 or 108 sts (divisible by 12, incl. sts on st holder) around the neck on double-pointed needles. Knit rib - see that the rib follows the pattern on the body at center front and center back. When the collar measures approx. 12 cm bind off all sts in rib. Sew in sleeves using edge sts as seam allowance.


SCARF:

Measurements: approx 18 x 90 cm

Materials: DROPS ULL-FLAMÉ from Garnstudio
(or use DROPS Snow)
150 gr nr 01, natural

and use: DROPS COTTON-VISCOSE from Garnstudio
100 gr nr 02, natural

DROPS 10 mmneedles, or size needed to obtain correct gauge.

Gauge: 9 sts with 1 strand of each yarn in seed st = 10 cm wide.

Seed Stitch (on an even number of sts):
Row 1: * K 1, P 1 *
Row 2: * P 1, K 1 *
Repeat Rows 1 and 2.

Scarf: Cast on 16 sts with 1 strand of each yarn. Knit seed st - see instructions above. When the piece measures 12 cm put half the sts on a st holder. Continue with seed st over the other 8 sts until the piece measures 22 cm. Knit the other half separately until it is the same length. Then knit over all sts again until piece measures approx. 90 cm. Bind off in pattern.

Braided fringe: Make braided fringe at each end as follows: 1 fringe tuft = cut 14 strands (50 cm long) of Cotton Viscose. Fold in half and pull loop through edge of one end of scarf and then pull ends through loop.
Divide into 3 bundles as follows: 2 bundles with 9 strands each and 1 bundle with 10 strands. Then divide each of the 3 bundles into 3 new bundles. Braid each of the 3 bundles until braid measures approx. 13 cm, tie a knot at bottom. Make 5 of these tripled fringe tufts at each end of scarf.


HAT:

Sizes: S/M - L

Materials: DROPS ULL-FLAMÉ from Garnstudio
(or use DROPS SNOW)
50 gr nr 01, natural
and use: DROPS COTTON-VISCOSE from Garnstudio
50 gr nr 02, natural

DROPS 10 mm needles, or size needed to obtain correct gauge.

Gauge: 9 sts x 13 rows with 1 strand of each yarn in stockinette st = 10 x 10 cm.

Seed Stitch (on an even number of sts):
Row 1: * K 1, P 1 *
Row 2: * P 1, K 1 *
Repeat Rows 1 and 2.

Hat:
Loosely cast on 45-50 sts with 1 strand Ull-Flamé + 1 strand Cotton Viscose. Knit 1 row from wrong side and then K 1 row from right side, continue with seed st - see instructions above. When the piece measures 9 cm knit stockinette st to finished measurements. When the piece measures 12.5-13 cm put 5 markers in work, put the first after 1 st, then the following with 9-10 sts between each, after last marker there are 8-9 sts. On the next row, K 2 tog on left side of each marker, repeat decs every other row a total of 6-7 times = 15 sts, knit 3 rows stockinette st, then dec on left side of each marker 1 more time = 10 sts remain. Cut yarn and pull tight through the remaining sts, fasten neatly. Hat measures approx. 24-26 cm in height. Sew hat at center back.

Diagram

symbols = knit (as seen from the right side)
symbols = purl (as seen from the right side)
symbols = Slip 1 as if to knit, K 1, psso
symbols = K 2 tog.
symbols = P 2 tog
symbols = inc 1 st by pulling up a st from previous row; K both sts
symbols = inc 1 st by pulling up a st from previous row, K the pulled up st and P the st on needle
symbols = inc 1 st by pulling up a st from previous row, P the pulled up st and K the st on needle
symbols = inc 1 st by pulling up a st from previous row, P both sts.
diagram
diagram

Each of our patterns has specific tutorial videos to help you.

Do you have a question? See a list of frequently asked questions (FAQ)

Knitting tension is what determines the final measurements of your work, and is usually measured per 10 x 10 cm. It is provided like so: number of stitches in width x number of rows in height - eg: 19 stitches x 26 rows = 10 x 10 cm.

The knitting tension is very individual; some people knit/crochet loosely while others work tightly. You adjust the knitting tension with the needle size, which is why the suggested needle size is only meant as a guide! You need to adjust this (up or down) to ensure that YOUR knitting tension matches the knitting tension provided in the pattern. If you work with a different knitting tension than provided you will have a different yarn consumption, and your work will have different measurements than what the pattern suggests.

The knitting tension also determines which yarns can replace each other. As long as you achieve the same knitting tension you can replace one yarn with another.

See DROPS lesson: How to measure your tension/gauge

See DROPS video: How to make a gauge tension swatch

The required amount of yarn is provided in grams, eg: 450 g. To calculate how many balls you’ll need you first need to know how many grams are in 1 ball (25g, 50g or 100g). This information is available if you click on the individual yarn quality on our pages. Divide the amount required with the amount of each ball. For example, if each ball is 50g (the most common amount), the calculation will be as follows: 450 / 50 = 9 balls.

The important thing when changing from one yarn to another is that the knitting/crochet tension remains the same. This is so that the measurements of the finished piece will be the same as on the sketch provided. It is easier to achieve the same knitting tension using yarns from the same yarn group. It is also possible to work with multiple strands of a thinner yarn to achieve the knitting tension of a thicker one. Please try our yarn converter. We recommend you to always work a test swatch.

Please NOTE: when changing yarn the garment might have a different look and feel to the garment in the photo, due to individual properties and qualities of each yarn.

See DROPS lesson: Can I use a different yarn than the one mentioned in the pattern?

All our yarns are categorised into yarn groups (from A to F) according to thickness and knitting tension – group A contains the thinnest yarns and group F the thickest. This makes it easier for you to find alternative yarns to our patterns, should you wish to switch yarn. All yarns within the same group have a similar knitting tension and can easily replace each other. However, different yarn qualities have different structures and properties which will give the finished work a unique look and feel.

Click here for an overview of the yarns in each yarn group

At the top of all our patterns you’ll find a link to our yarn calculator, which is a helpful tool should you wish to use a different yarn than suggested. By filling in the yarn quality you wish to replace, the amount (in your size) and number of strands, the calculator will present good alternative yarns with the same knitting tension. Additionally it will tell you how much you’ll require in the new qualities and whether you’ll need to work with multiple strands. Most skeins are 50g (some are 25g or 100g).

If the pattern is worked with multiple colours, every colour will have to be calculated separately. Similarly, if the pattern is worked with several strands of different yarns (for example 1 strand Alpaca and 1 strand Kid-Silk) you will have to find alternatives for each, individually.

Click here to see our yarn calculator

Since different yarns have different qualities and textures we have chosen to keep the original yarn in our patterns. However, you can easily find options among our available qualities by using our yarn calculator, or simply pick a yarn from the same yarn group.

It is possible that some retailers still have discontinued yarns in stock, or that someone has a few skeins at home that they would like to find patterns for.

The yarn calculator will provide both alternative yarn as well as required amount in the new quality.

If you think it's hard to decide what size to make, it can be a good idea to measure a garment you own already and like the size of. Then you can pick the size by comparing those measures with the ones available in the pattern's size chart.

You'll find the size chart at the bottom of the pattern.

See DROPS lesson: How to read size chart

The needle size provided in the pattern serves only as a guide, the important thing is to follow the knitting tension. And since knitting tension is very individual, you will have to adjust the needle size to ensure that YOUR tension is the same as in the pattern – maybe you’ll have to adjust 1, or even 2 needle sizes, up or down to achieve the correct tension. For this, we recommend that you work test swatches.

Should you work with a different knitting tension than the one provided, the measurements of the finished garment might deviate from the measurement sketch.

See DROPS lesson: How to measure your tension/gauge

See DROPS video: How to make a tension/gauge swatch

Working a garment top-down provides more flexibility and room for personal adjustment. For example it is easier to try the garment on while working, as well as making adjustments to length of yoke and shoulder caps.

The instructions are carefully explaining every step, in the correct order. Diagrams are adjusted to the knitting direction and are worked as usual.

The diagram depicts all rows/rounds, and every stitch seen from the right side. It is read from bottom to top, from right to left. 1 square = 1 stitch.

When working back and forth, every other row is worked from the right side and every other row is worked from the wrong side. When working from the wrong side, the diagram will have to be worked reversed: from left to right, knit stitches are purled, purl stitches are knit etc.

When working in the round every round is worked from the right side and the diagram are worked from right to left on all rounds.

See DROPS lesson: How to read knitting diagrams

The diagram depicts all rows/rounds, and every stitch seen from the right side. It is worked from bottom to top, from right to left.

When working back and forth every other row is worked from the right side: from right to left and every other row is worked from the wrong side: from left to right.

When working in the round, every row in the diagram are worked from the right side, from right to left.

When working a circular diagram you start in the middle and work your way outwards, counter clockwise, row by row.

The rows usually start with a given number of chain stitches (equivalent to the height of the following stitch), this will either be depicted in the diagram or explained in the pattern.

See DROPS lesson: How to read crochet diagrams

Instructions for working several diagrams after each other on the same row/round, will often be written like so: “work A.1, A.2, A.3 a total of 0-0-2-3-4 times". This means you work A.1 once, then A.2 is worked once, and A.3 is repeated (in width) the number of times provided for your size – in this case like so: S = 0 times, M = 0 times, L=2 times, XL= 3 times and XXL = 4 times.

The diagrams are worked as usual: begin with the first row in A.1, then work the first row in A.2 etc.

See DROPS lesson: How to read knitting diagrams

See DROPS lesson: How to read crochet diagrams

The total width of the garment (from wrist-to-wrist) will be larger in the larger sizes, despite the actual sleeves being shorter. The larger sizes have longer sleeve caps and wider shoulders, so there will be a good fit in all sizes.

The measurement sketch/schematic drawing provides information regarding the full length of the garment. If it’s a jumper or a jacket the length is measured from the highest point on the shoulder closest to the neckline, and straight down to the bottom of the garment. It is NOT measured from the tip of shoulder. Similarly, the length of yoke is measured from the highest point on the shoulder and down to where yoke is split into body and sleeves.

On a jacket measures are never taken along bands, unless specifically stated. Always measure inside band stitches when measuring the length.

See DROPS lesson: How to read a schematic drawing

Diagrams are often repeated on the round or in height. 1 repeat is the diagram the way it appears in the pattern. If it says to work 5 repeats of A.1 in the round, then you work A.1 a total of 5 times after/next to each other in the round. If it says to work 2 repeats of A.1 vertically/in height you work the entire diagram once, then begin again at the start and work the entire diagram one more time.

Chain stitches are slightly narrower than other stitches and to avoid working the cast-on edge too tight, we simply chain more stitches to begin with. The stitch count will be adjusted on the following row to fit the pattern and measurement sketch.

The rib edge is more elastic and will contract slightly compared to, for example, stocking stitch. By increasing before the rib edge, you avoid a visible difference in width between the rib edge and the rest of the body.

It’s very easy to cast off too tightly, and by making yarn overs while casting off (and simultaneously casting these off) you avoid a too tight cast off edge.

See DROPS video: How to bind off with yarn overs (yo)

To achieve an even increase (or decrease) you can increase on, for example: every 3rd and 4th row alternately, like so: work 2 rows and increase on the 3rd row, work 3 rows and increase on the 4th. Repeat this until the increase is complete.

See DROPS lesson: Increase or decrease 1 st on every 3rd and 4th row alternately

Should you prefer to work in the round instead of back and forth, you may of course adjust the pattern. You’ll need to add steeks mid-front (usually 5 stitches), and follow the instructions. When you would normally turn and work from the wrong side, simply work across the steek and continue in the round. At the end you’ll cut the piece open, pick up stitches to work bands, and cover the cut edges.

See DROPS video: How to knit steeks and cut open

Should you prefer to work back and forth instead of in the round, you may of course adjust the pattern so you work the pieces separately and then assemble them at the end. Divide the stitches for the body in 2, add 1 edge stitch in each side (for sewing) and work the front and back pieces separately.

See DROPS lesson: Can I adapt a pattern for circular needles into straight needles?

Pattern repeats can vary slightly in the different sizes, in order to get the correct proportions. If you’re not working the exact same size as the garment in the photo, yours might deviate slightly. This has been carefully developed and adjusted so that the complete impression of the garment is the same in all sizes.

Make sure to follow instructions and diagrams for your size!

If you have found a pattern you like which is available in women’s size it’s not very difficult to convert it to men’s size. The biggest difference will be the length of sleeves and body. Start working on the women size that you think would fit across the chest. The additional length will be worked right before you cast off for the armhole/sleeve cap. If the pattern is worked top-down you can add the length right after the armhole or before the first decrease on sleeve.

Regarding additional yarn amount, this will depend on how much length you add, but it is better with a skein too many than too few.

All yarns will have excess fibres (from production) that might come off as lint or shedding. Brushed yarns (ie hairier yarns) have more of these loose, excess fibres, causing more shedding.

Shedding also depends on what is worn under or over the garment, and whether this pulls at the yarn fibres. It’s therefore not possible to guarantee that there will be no shedding

Below are some tips on how to get the best result when working with hairier yarns:

1. When the garment is finished (before you wash it) shake it vigorously so the looser hairs come off. NOTE: do NOT use a lint roller, brush or any method that pulls at the yarn.

2. Place the garment in a plastic bag and put it in your freezer - the temperature will cause the fibres to become less attached to each other, and excess fibres will come off easier.

3. Leave in the freezer for a few hours before taking it out and shaking it again.

4. Wash the garment according to the instructions on the yarn label.

Pilling is a natural process that happens to even the most exclusive of fibers. It's a natural sign of wear and tear that is hard to avoid, and that is most visible in high friction areas of your garment like a sweater's arms and cuffs.

You can make your garment look as new by removing the pilling, using a fabric comb or a pill/lint remover.

Still can't find the answer you need? Then scroll down and leave your question so one of our experts can try to help you. This will be done normally within 5 to 10 working days.
In the meantime, you can read the questions and answers that others have left to this pattern or join the DROPS Workshop on Facebook to get help from fellow knitters/crocheters!

You might also like...

Post a comment to pattern DROPS 79-13

We would love to hear what you have to say about this pattern!

If you want to leave a question, please make sure you select the correct category in the form below, to speed up the answering process. Required fields are marked *.

Comments / Questions (9)

country flag Nathalie Moreau wrote:

Je voulais dire X signifie 1m env et non une diminution. Désolée!

23.05.2016 - 07:24

country flag Nathalie Moreau wrote:

Bonjour, en essayant de faire le modèle 79-13, j'ai eu de la difficulté à comprendre les instructions en français en ce qui a trait aux diagrammes. J'ai dû essayer de co prendre celui en anglais pour corriger... il faudrait corriger la légende, entre autre le X qui signifie 1 m env et nous une diminution. Merci!

23.05.2016 - 07:18

DROPS Design answered:

Bonjour Mme Moreau, effectivement la légende du diagramme était un peu décalée, tout est de nouveau en ordre, merci. Bon tricot!

23.05.2016 - 10:17

country flag Trisha Cochrane wrote:

Thank you for all your help - that's all wonderfully clear now :)

01.03.2016 - 18:29

country flag Trisha Cochrane wrote:

Thank you - I am enjoying knitting the jumper. But I do not understand the knitting tips for decreasing at the armhole: Is it saying that I do not decrease at the edge, but 4 sts in? I'm not clear what that does to the rib pattern or why you would do that. And if it is the case, I still do not understand the 'before 4 sts' and 'after 4 sts' instructions. Many thanks for your help, Trisha

29.02.2016 - 20:08

DROPS Design answered:

Dear Mrs Cochrane, dec for armholes are done from RS inside 4 sts (1 edge st + K3), ie on front piece/back piece, work dec row from RS as follows: 1 edge st, K3, slip 1 as if to K, K1, psso, continue as before until 5 sts remain, K2 tog, and finish with K3, 1 edge st. Work next row from WS and repeat these dec how many times stated for your size. Happy knitting!

01.03.2016 - 09:04

country flag Trisha Cochrane wrote:

I would like to knit this jumper in Drops Lima. Do I need the same amount of yarn? (I presume Lima has a different length from the original Angora-Tweed which is now discontinued.) Best wishes, Trisha :)

05.01.2016 - 10:18

DROPS Design answered:

Dear Trisha, you will find here all informations to calculate new amount of yarn when using an alternative. Happy knitting!

06.01.2016 - 09:15

country flag Drops Design wrote:

I omg med du tager ind fra retsiden, så vil det blive efter de 4 m på det ene ærme og inden de 4 m på den andet ærme!

30.10.2009 - 14:47

country flag Henriette Vilhelmsen wrote:

Hej Garnstudio, Vil gerne bede om hjælp til strikketipset i denne opskrift: "Luk således før 4 m: 2 r sm Luk således efter 4 m: Tag 1 m løs af p som om den skulle strikkes r, 1 r, løft den løse m over." Hvordan skal det forstås? Er det valg mellem de to muligheder? Håber på hurtigt svar. Mvh. Henriette Vilhelmsen

29.10.2009 - 00:38

country flag K-v Olsen wrote:

Det er diagram nr. 3 til halstørklædet, jeg leder efter. VH K-V Olsen

02.03.2007 - 09:46

country flag K-v Olsen wrote:

Jeg leder efter diagrammerne til opskrift 79-13. Hvor finder jeg dem? Venlig hilsen K-V Olsen

02.03.2007 - 09:41