Comments / Questions (65)
![]() Hanna wrote:
Hanna wrote:
Hej! När jag ska göra tummen har jag märkt att; för mig blir ribbstickningen korrekt om totalresår till tummen ska vara 19m, men om den ska vara 21m som i strl L/XL så skulle jag behöva 23m för att hålla resåren (rm, am,rm,am osv). Tips? eller kan jag ha 23m? Mvh Hanna
13.01.2022 - 17:22
![]() Madame Claudine Céré wrote:
Madame Claudine Céré wrote:
Bonjour. Avez-vous une vidéo qui explique les augmentations (jetés) dans des côtes 1/1 en circulaire pour faire le pouce de cette mitaine? Merci à l'avance.
18.11.2021 - 16:04DROPS Design answered:
Bonjour Mme Céré, tricotez simplement les augmentations pour continuer les côtes, autrement dit de chaque côté de: 1 m end, 1 m env, tricotez vos augmentations ainsi (ex 3 augmentations): 3ème augm: à l'env, 2ème augm: à l'end, 1ère augm: à l'env (1 m end, 1 m env) 1ère augm: à l'end, 2ème augm: à l'env, 3ème augm: à l'end. Ainsi les côtes continuent sur le pouce sans interruption. Bon tricot!
18.11.2021 - 17:35
![]() Sara wrote:
Sara wrote:
I don't see any diagrams :( Tried on Chrome and on Firefox browsers. Also checked the Norwiegian version.
16.03.2021 - 15:33DROPS Design answered:
Dear Sara, We are experiencing issues with the loading of pictures on our site and are working to solve the problem. We hope to be back to normal soon! Thanks for your comprehension and patience.
16.03.2021 - 15:55
![]() Angela M wrote:
Angela M wrote:
Hola, quiero saber si los 4cm que se cuentan en el gorro para empezar a hacer los aumentos entre repeticiones, se cuentan teniendo en cuenta las 6 vueltas de pto resorte o sólo 4cm de tejido del diagrama M1. Gracias
23.12.2020 - 17:35DROPS Design answered:
Hola Angela. Las medidas se toman desde la fila del inicio, cuando no haya otra nota en el patrón sobre cómo tomar las medidas.
26.12.2020 - 18:41
![]() Aurora wrote:
Aurora wrote:
Sto facendo il basvo,viene molto bene, le spiegazioni sono buone ,ma io seguo anche all occhio,ingrandendo il basco nel immagine,mi aiuta molto .Grazie!❤️
17.12.2020 - 20:38
![]() Rita Sellitto wrote:
Rita Sellitto wrote:
Non ho ben capito il grafico gettata tra due maglie? Ma è riportata una sola maglia?grazie
21.01.2020 - 08:26DROPS Design answered:
Buongiorno Rita. Le due maglie fanno riferimento alla maglia che precede e a quella che segue la maglia gettata. Le alleghiamo un video che spiega come lavorare le maglie gettate. Buon lavoro!
21.01.2020 - 12:05
![]() Mimi Routh wrote:
Mimi Routh wrote:
OK, I think I've got it. Many thanks for your patience!
12.09.2019 - 05:32
![]() Mimi Routh wrote:
Mimi Routh wrote:
So do all the thumb increases grow from yarnovers made EVERY TIME to either side of the original #3 and #4, keeping the 1/1 rib consistent for the thumb and ignoring the ribbing on #1-2-5-6-7? Then when the thumb is put on hold, #1-2-5-6-7 (beginning and ending with a knit stitch) moves smoothly into the side of the index finger. [We are lying awake or giving up!] Thank you!
06.09.2019 - 22:11DROPS Design answered:
Dear Mrs Routh, the increases on each side of 3rd and 4th stitch will be worked in rib, ie the first inc will be worked; P, (K,P = 3rd +4th st), K, the next increase will be worked: K, P, (K,P), K, P and so on, so that all new stitches are worked in rib. Happy knitting!
09.09.2019 - 08:08
![]() Mimi Routh wrote:
Mimi Routh wrote:
Okay, I see others struggling with the thumb. My thumb is ugly. This is NOT what the clever Norwegians planned! I think that center stitch should always be a purl. Then the yarnover stitches become knit or purl to continue the rib pattern to either side of that central stitch. Is this right?
05.09.2019 - 23:54DROPS Design answered:
Dear Mimi Routh, there are 2 sts for thumb: the 3rd and 4th stitch, you then increase on either side of these 2 sts with a yarn over and the yarn overs are worked either K or P to keep the ribbing on thumb. Happy knitting!
06.09.2019 - 08:26
![]() Martha wrote:
Martha wrote:
I wish your patterns were downloadable in acrobat reader so I can view it easier and save it in a folder.
11.07.2019 - 05:01DROPS Design answered:
Dear Martha, you then just have to click on "print" then choose a virtual printer to save them as .PDF. Happy knitting!
11.07.2019 - 08:35
Purple Rhapsody |
|||||||||||||
|
|
|||||||||||||
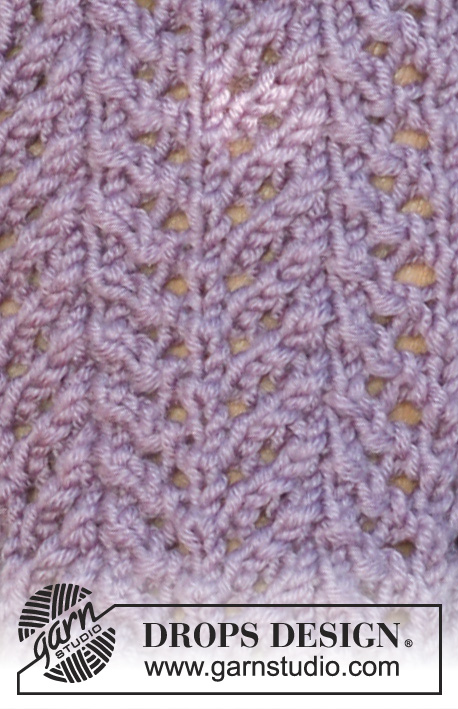
DROPS hat and fingerless gloves with lace pattern in ”MERINO EXTRA FINE”.
DROPS 115-12 |
|||||||||||||
|
PATTERN: See diagram M.1. Diagram shows the pattern from RS. HAT: Worked in the round. Cast on 106-112 sts on circular needle size 3 m with Merino. K 1 round and then work 6 rounds rib, K1 / P1. Now K 1 round, AT THE SAME TIME inc 6-7 sts evenly = 112-119 sts. Change to circular needle size 3.5 mm and continue in M.1 on all sts (= 16-17 repeats). REMEMBER THE KNITTING TENSION! AT THE SAME TIME when piece measures 4 cm inc 1 st between all the repeats of M.1 by making 1 YO. On next round K YO into back of loop to avoid a hole. Repeat the inc on every 4th round a total of 5 times (inc on the same side of the stocking sts each time) = 192-204 sts. When piece measures 14-15 cm dec 1 st between each repeat by K tog into back of loop the first 2 stocking sts (dec the same sts as inc before). Repeat the dec on every 4th round a total of 5 times = 112-119 sts (only pattern repeats left). When piece measures 22-23 cm K2 tog across the round = 56-60 sts. Continue in stocking st on all sts, and repeat this dec on every other round a total of 3 times = 14-15 sts. Cut the thread and pull it through remaining sts, tighten and fasten. Hat measures a total of approx 24-25 cm. -------------------------------------------------------- GLOVES: RIGHT GLOVE: Worked in the round on double pointed needles. Cast on 50-56 sts on double pointed needles size 3 mm with Merino. K 1 round and continue in rib, K1/P1. When piece measures 3 cm work next round as follows: rib, K1/P1, on the first 7 sts and stocking st on remaining sts, AT THE SAME TIME dec 8-7 sts evenly on stocking sts = 42-49 sts. Change to double pointed needles size 3.5 mm and continue as follows: rib, K1/P1, on the first 7 sts and M.1 on the next 35-42 sts. When piece measures 8 cm inc for thumb each side of 3rd and 4th rib-st (these 2 sts = thumb sts) – inc by making 1 YO, on next round work YO into back of loop and incorporate inc sts in rib as you go along. Repeat the inc on every other round a total of 6-7 times = 14-16 thumb sts (a total of 19-21 rib sts). When piece measures 13-14 cm slip the 14-16 thumb sts on a stitch holder, on next round cast on 2 new sts behind thumb sts = 42-49 sts. Continue in rib and pattern as before. When piece measures 17-18 cm - adjust to after 3rd row in M.1 – work 1 round stocking st, AT THE SAME TIME inc 8-7 sts evenly on M.1 = 50-56 sts. Change to double pointed needles size 3 mm and continue in rib, K1/P1, on all sts. When rib measures 3-4 cm cast off with K over K and P over P. Piece measures approx 20-22 cm. THUMB: Slip the 14-16 thumb sts on double pointed needles size 3 mm and pick up 4 sts in the edge behind these = 18-20 sts. Work rib, K1/ P1 in the round for approx 2-3 cm, cast off with K over K and P over P. LEFT GLOVE: Like right glove, but mirrored. |
|||||||||||||
Diagram explanations |
|||||||||||||
|
|||||||||||||

|
|||||||||||||
Have you finished this pattern?Tag your pictures with #dropspattern or submit them to the #dropsfan gallery. Do you need help with this pattern?You'll find 21 tutorial videos, a Comments/Questions area and more by visiting the pattern on garnstudio.com. © 1982-2025 DROPS Design A/S. We reserve all rights. This document, including all its sub-sections, has copyrights. Read more about what you can do with our patterns at the bottom of each pattern on our site. |
|||||||||||||


Post a comment to pattern DROPS 115-12
We would love to hear what you have to say about this pattern!
If you want to leave a question, please make sure you select the correct category in the form below, to speed up the answering process. Required fields are marked *.