
Popular categories
Looking for a yarn?


|
|
Domino Dancing |
|
 |
 |
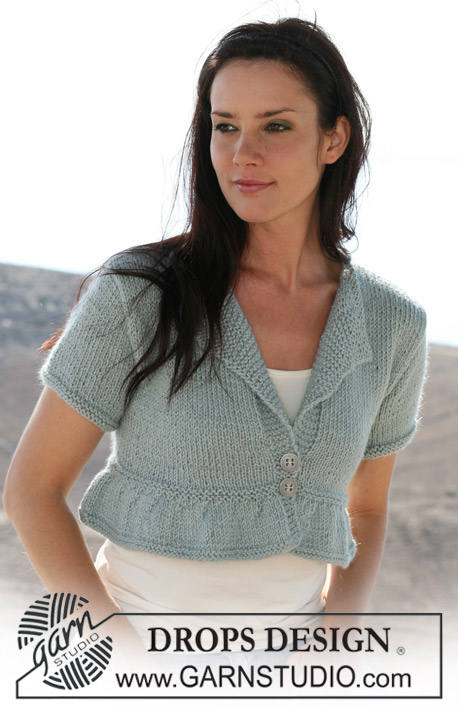
DROPS jacket in domino diamonds and stocking st in “Muskat Soft”. Size S – XXXL
DROPS 107-1 |
|
|
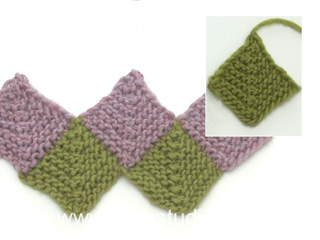
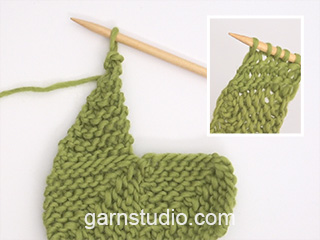
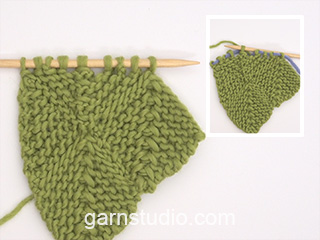
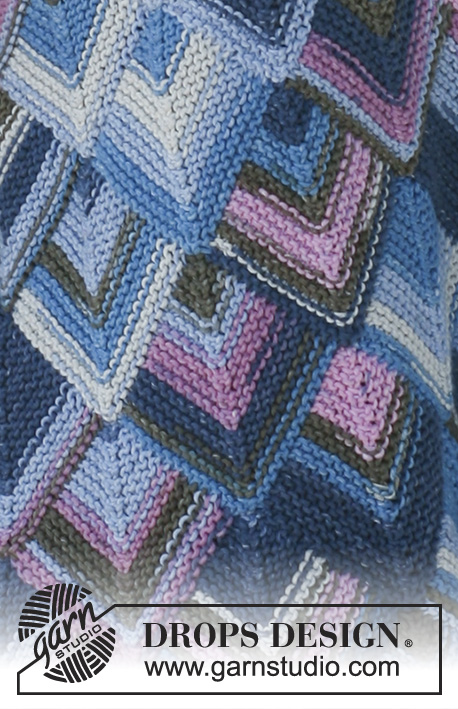
Garter st, back and forth on needle: K all rows Knitting tip-1: To avoid thread ends you may work each diamond in the first line of diamonds with a separate ball and let this follow the piece for the following lines instead of cutting the thread. Knitting tip-2: Always pick up sts from RS. Increasing tip: Inc inside 1 front band st towards mid front by making 1 yo. Work yo into back of st on return row to avoid a hole. Work inc sts in garter st. Half domino diamond (vertical): Work 6 front band sts in garter st throughout. Row 1 (= WS): K Row 2 (= RS): K row until 8 sts (including front band sts) left on row, K2 tog, work 6 front band sts. Mirror this on the other side of jacket, i.e. dec at beg of row. Repeat row 1 and 2, i.e. dec 1 st towards front band on every other row until 1 st + 6 front band sts left on row. Cut the thread and put 6 front band sts on a thread. Whole domino diamond : Insert a Marking Thread (MT) in the middle st. Row 1 (= WS): K Row 2 (= RS): K row until 1 st before MT, slip 1 st as if to K, K2 tog, psso, K to the end of row. Repeat row 1 and 2, i.e. dec 2 sts in the middle of diamond on every other row until 1 st left on row. Cut the thread and pull through st. Half domino diamond (horizontal): Like whole diamond, but in addition to dec in the middle of diamond, put the last st on a thread at the end of every row until 4-3-4-4-4 sts left on row. Continue as follows: Size S + L + XL/XXL + XXL/XXXL: 4 sts left on row. Work next row (= RS) as follows: slip 1 st as if to K, K2 tog, psso. Put the last st on row on thread at side (= 6-7-8-9 sts on thread each side). Cut the thread and pull through remaining st on needle. Size M: 3 sts left on row (6 sts on thread each side). K 1 row on 3 sts from WS. Work next row as follows from RS: slip 1 st as if to K, K2 tog, psso. Cut the thread and pull through remaining st on needle. Buttonholes: Make buttonholes on right front piece. 1 buttonhole = cast off third st from mid front, cast on 1 new st on return row. Make buttonholes when piece measures: Size S: 23, 31 and 39 cm. Size M: 26, 34 and 42 cm. Size L: 29, 37 and 45 cm. Size XL/XXL: 24, 32, 40 and 48 cm. Size XXL/XXXL: 30, 38, 46 and 54 cm. Jacket: Beg by casting on sts for the entire width of the piece. The diamonds are now worked 1 by 1, back and forth on circular needle in garter st. Line 1 with domino diamonds: Cast on 383-403-423-443-483 sts (includes 6 front band sts each side) on circular needle size 4mm. K 1 row from WS and work next row as follows from RS: 6 garter sts (= front band), K2 tog, *K 34-36-38-40-44 sts, slip 1 st as if to K, K2 tog, psso”, repeat from *-*a total of 9 times and finish with K 34-36-38-40-44 sts, K2 tog, 6 garter sts (= front band) = 363-383-403-423-463 sts. Work front bands in garter st throughout. Now work 1 half vertical domino diamond – see above – on the first 24-25-26-27-29 sts (includes 6 front band sts). Leave remaining sts on needle. See Knitting tip-1. Work 1 whole domino diamond on the next 35-37-39-41-45 sts. When the whole domino diamond is complete work on the next 35-37-39-41-45 sts in the same way, and continue like this until 24-25-26-27-29 sts left on row (= 9 ½ domino diamonds on row). Now work 1 half vertical domino diamond + front band. When the half diamond is complete and 6 sts have been put on thread there are 9 whole and 2 half domino diamonds on Line 1. Line 2 with domino diamonds: Pick up 17-18-19-20-22 sts along the side of the half diamond – see Knitting tip-2! Now pick up 1 st between the half diamond and the next diamond from Line 1 and pick up 17-18-19-20-22 sts along the side of the next diamond = 35-37-39-41-45 sts on row. Work whole domino diamond as before. When the diamond is complete pick up 35-37-39-41-45 sts between 2 diamonds from Line 1 and continue like this until there are 10 whole domino diamonds on Line 2. Line 3 with domino diamonds: Pick up 18-19-20-21-23 sts along the side of the last diamond from row 2 – remember Knitting tip-2 - and work the 6 front band sts left on row = 24-25-26-27-29 sts. K next row from WS, at the same time dec 3 sts evenly (do not dec on front band sts) = 21-22-23-24-26 sts. Now work 1 half vertical domino diamond – beg on row 2, + 6 front band sts. When the half diamond is complete and 6 front band sts have been put on thread pick up 17-18-19-20-22 sts along the side of each of the following 2 diamonds from Line 2 and pick up 1 st between the diamonds = 35-37-39-41-45 sts on row. K 1 row from WS, at the same time dec 6 sts evenly = 29-31-33-35-39 sts. Now work 1 whole domino diamond – beg on row 2. When diamond is complete pick up 35-37-39-41-45 sts between the next 2 diamonds from Line 2. NB! For all diamonds beg by K 1 row from WS, at the same time dec 6 sts evenly = 29-31-33-35-39 sts. Work 1 whole domino diamond – beg on row 2 and continue like this until there are 9 ½ diamonds on Line 3. Now pick up 18-19-20-21-23 sts along the side of the last diamond. K 1 row from WS, at the same time dec 3 sts evenly = 15-16-17-18-20 sts + 6 front band sts left on row = 21-22-23-24-26 sts. Work front band and 1 half vertical domino diamond – beg on row 2. When the half diamond is complete and 6 front band sts put on thread there are 9 whole diamonds and 2 half diamonds on Line 3. Line 4 with domino diamonds: Pick up 14-15-16-17-19 sts along the side of the half diamond and pick up 1 st between the half diamond and the next diamond from Line 3. Pick up 14-15-16-17-19 sts along the side of the next diamond = 29-31-33-35-39 sts on row. K 1 row from WS. Work whole domino diamond as before. When the diamond is complete pick up 29-31-33-35-39 sts between 2 diamonds from Line 3 and continue like this until there are 10 whole domino diamonds on Line 4. Line 5 with domino diamonds: NB! Remember buttonholes on right front band! Pick up 15-16-17-18-20 sts along the side of the last diamond from Line 4 – remember Knitting tip-2 - and work the 6 front band sts left on row = 21-22-23-24-26 sts. Work 1 half vertical domino diamond + front band. When the half diamond is completed and the 6 front band sts put on thread pick up 14-15-16-17-19 sts along the sides of each of the next 2 diamonds from Line 4 + 1 st between the diamonds = 29-31-33-35-39 sts on row. Work 1 whole domino diamond as before. When diamond is completed pick up 29-31-33-35-39 sts between 2 diamonds from Line 4, and continue like this until there are 9 ½ diamonds on Line 5. Now pick up 15-16-17-18-20 sts along the side of the last diamond. K 1 row from WS and work front band sts back on needle = 21-22-23-24-26 sts. Work front band + 1 half vertical domino diamond. When the half diamond is completed and the 6 front band sts put on thread there are 9 whole and 2 half diamonds on Line 5. Line 6 with domino diamonds: Work like Line 4. Line 7 with domino diamonds: Pick up 15-16-17-18-20 sts along the side of the last diamond from Line 6 and work the 6 front band sts left on row = 21-22-23-24-26 sts. K 1 row from WS, at the same time dec 2-2-2-1-1 sts evenly (do not dec on front band sts) = 19-20-21-23-25 sts. Now work 1 half vertical domino diamond, beg on row 2. When the half diamond is complete pick up 29-31-33-35-39 sts between 2 diamonds from Line 6. NB! For all diamonds beg by K 1 row from WS, at the same time dec 4-4-4-2-2 sts evenly = 25-27-29-33-37 sts. + front band. Now work 1 whole domino diamond, beg on row 2. Continue like this until there are 9 ½ diamonds on Line 7. Now pick up 15-16-17-18-20 sts along the side of the last diamond. K 1 row from WS, at the same time dec 2-2-2-1-1 sts evenly = 13-14-15-17-19 sts and work front band sts back on needle = 19-20-21-23-25 sts. Work front band + 1 half vertical domino diamond. When the half diamond is completed and the 6 front band sts put on thread there are 9 whole and 2 half diamonds on Line 7. Line 8, the last, with domino diamonds: Pick up 12-13-14-16-18 sts along the side of the half diamond and pick up 1 st between the half diamond and the next diamond from Line 7. Pick up 12-13-14-16-18 sts along the side of the next diamond = 25-27-29-33-37 sts on row. Work 1 horizontal half domino diamond – see above. When the diamond is complete pick up 25-27-29-33-37 sts between 2 diamonds from Line 7 and continue like this until there are 10 horizontal half domino diamonds on Line 8. Upper body piece: Beg from WS inside the 6 front band sts on right front piece and K 1 row from WS on the 6 front band sts. Continue as follows from RS: 6 front band sts, pick up 1 st between front band and sts on thread, *work the 6-6-7-8-9 sts from thread back on needle, pick up 3 sts between threads, work sts from thread back on needle, pick up 1 st between diamonds*, repeat from *-* and finish with working the other 6 front band sts back on needle = 173-173-193-213-233 sts. K 1 row from WS. K 1 row from RS, at the same time inc 7-27-23-31-31 sts evenly = 180-200-216-244-264 sts. Work 5 rows garter st. Piece now measures approx 41-43-47-50-55 cm. Insert a Marking Thread (MT) 48-53-57-64-69 sts in from each side (to mark the sides). Back piece = 84-94-102-116-126 sts. Continue in stocking st with front bands in garter st as before. Remember the knitting tension! At the same time inc for collar towards mid front – see Increasing tip: 1 st on every 2 cm a total of 12-13-13-14-14 times. For every inc also incorporate 1 st from body piece to collar, i.e 1 additional garter st and 1 less stocking st. At the same time when piece measures approx 8-7-6-6-6 cm from MT cast off 3 sts on each side of both MT for armhole and complete back and front pieces separately. Back piece: = 78-88-96-110120 sts. Continue in stocking st, at the same time dec to shape the armhole each side on every other row: 2 sts 0-1-3-5-7 times and 1 st 0-2-1-2-2 times = 78-80-82-86-88 sts. Continue in stocking st until piece measures 25-25-25-26-27 cm from MT and now cast off the middle 22-24-24-26-26 sts for neck. Dec 1 st on neckline on next row = 27-27-28-29-30 sts left on each shoulder. Cast off loosely when piece measures 27-27-27-28-29 cm from MT (piece measures approx 68-70-74-78-84 cm from bottom point). Left front piece: Continue in stocking st and dec to shape the armhole as described for back piece and continue inc for collar. When all dec and inc are complete there are 57-59-60-63-64 sts on row – 30-32-32-34-34 sts on collar and 27-27-28-29-30 sts on shoulder. Continue in stocking st until piece measures 27-27-27-28-29 cm from MT (piece measures approx 68-70-74-78-84 cm from bottom point) and now cast off the 27-27-28-29-30 sts on shoulder. Continue on the 30-32-32-34-34 collar sts with shortened rows as follows: *work 2 rows garter st on all sts, work 2 rows garter st on the outermost 17-18-18-19-19 sts towards mid front*, repeat from *-* until collar measures approx 5.5-6-6-6.5-6.5 cm (measured on the shorter side) from shoulder. Cast off. Right front piece: Work like left front piece, but mirrored. Sleeve: Worked back and forth on needle. Cast on 50-52-54-56-58 sts (includes 1 edge st each side) on needle size 4 mm and work 6 rows garter st. Continue in stocking st. When piece measures 8-5-5-5-8 cm inc 1 st each side on every 4-3.5-3-2.5-2 cm a total of 10-12-14-16-18 times = 70-76-82-88-94 sts. When piece measures 49-48-48-48-47 cm (less on the larger sizes because of larger sleeve cap and wider shoulder) cast off 4 sts each side and dec to shape the sleeve cap each side on every other row: 2 sts 3-4-4-4-5 times, 1 st 1-1-1-3-3 times, then dec 2 sts each side until piece measures 55-55-56-57-57 cm. Dec 4 sts each side 1 time and cast off remaining sts on next row. Piece measures approx 56-56-57-58-58 cm. Assembly: Sew shoulder seams. Sew tog collar mid back and sew collar to neckline. Sew sleeve seam and set in sleeves. Sew on buttons. |
|

|
|
|
Have you made this or any other of our designs? Tag your pictures in social media with #dropsdesign so we can see them! Do you need help with this pattern?You'll find tutorial videos, a Comments/Questions area and more by visiting the pattern on garnstudio.com. © 1982-2024 DROPS Design A/S. We reserve all rights. This document, including all its sub-sections, has copyrights. Read more about what you can do with our patterns at the bottom of each pattern on our site. |
|


With over 40 years in knitting and crochet design, DROPS Design offers one of the most extensive collections of free patterns on the internet - translated to 17 languages. As of today we count 304 catalogues and 11422 patterns - 11422 of which are translated into English (UK/cm).
We work hard to bring you the best knitting and crochet have to offer, inspiration and advice as well as great quality yarns at incredible prices! Would you like to use our patterns for other than personal use? You can read what you are allowed to do in the Copyright text at the bottom of all our patterns. Happy crafting!
Comments / Questions (148)
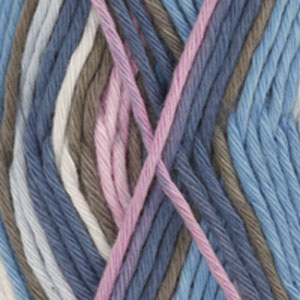
Bonjour Je voudrais bien commander le fil nécessaire pour faire ce gilet, mais je ne comprends pas où sont les indications pour le nombre de couleurs différentes. Sur la photo, il y en a beaucoup, mais je n'ai pas trouvé de renseignements dans les explications Bien cordialement J. Saturnini
28.02.2015 - 20:09DROPS Design answered:
Bonjour Mme Saturnini, DROPS Muskat Soft n'est désormais plus disponible - vous pouvez la remplacer par un autre fil du groupe B - cliquez ici pour calculer la quantité nécessaire dans une équivalence. Bon tricot!
02.03.2015 - 08:43Wil het graag breien, is heel mij ding maar vind lijk moelijk als ik het lees. Of is het toch gemakkelijk. Begrijp het ontwerp niet zo goed of gewoon aan beginnen
08.02.2015 - 08:41DROPS Design answered:
Hoi Nancy. Ik zou niet aan beginnen als u het patroon niet begrijpt. U kunt proberen om uitleg te krijgen bij onze verkooppunten en kijk in onze videobibliotheek hoe u een dominovierkantje breit. Maar ik zou nooit aan een patroon beginnen voordat ik de werkwijze begrijp.
09.02.2015 - 14:16El tipo de lana al que se hace referencia en los materiales (incluidas diferentes alternativas) es de un color y sin embargo en la foto del diseño la prenda se ve con varios colores. ¿Puede realizarse con alguna lana multicolor o para que quede como el diseño de la foto habría que trabajar con varios colores?
27.01.2015 - 08:47Can you tell me what sizes S-M-L-XL/XXL - XXXL are in actual measurements please?
29.08.2014 - 14:16DROPS Design answered:
Dear Ruth, you will find at the end of pattern a measurement chart with all measures for each size, measured flat from side to side. Compare these to a similar garment you like the shape to find out the matching size. Happy knitting!
01.09.2014 - 08:37Leuk vest! kan op de site geen link vinden om te bestellen. graag hoor ik hoe ik kan bestellen
27.03.2014 - 19:05DROPS Design answered:
Hoi Wendy. Deze kwaliteit is helaas niet meer verkrijgbaar, maar je kan een alternatief zoeken hier en je kan bestellen direct via de Deals op de kleurenkaart of zoek een winkel hier
28.03.2014 - 10:42Bij dit patroon staat geen prijsopgave voor de wol en is er geen linkje om te kunnen bestellen
25.02.2014 - 05:30DROPS Design answered:
Hoi Wendy. Dat is omdat Muskat Soft niet meer verkrijgbaar is. Maar je kan hier een alternatief kiezen.
26.02.2014 - 17:15Buonasera, non riesco a trovare il filato con cui è fatto questo modello, ne se è in cotone o lana. mi potete dare indicazioni e se possibile con un filato di lana con qesti colori/motivo. grazie e cordiali saluti.
15.11.2013 - 16:34DROPS Design answered:
Buonasera Ornella, le indicazioni relative ai filati da utilizzare nei nostri modelli, le può trovare in alto di fianco alla foto. In questo caso il modello è realizzato in cotone DROPS Muskat, se preferisce realizzarlo in lana, cliccando su filati alternativi, può trovare i filati con cui può sostituire quello proposto. Buon lavoro!!
15.11.2013 - 17:40Quel joli modèle, jusque là je ne connaissait que les modèles Anny Blatt pour avoir cette classe. Je suis sous le charme et je viens de commander la laine et l'aiguille pour le réaliser. Je conseille à toutes mes copines ce site magnifique. BRAVO BRAVO et MERCI.
09.05.2010 - 12:27Ja den blir 1/2 så stor!
21.04.2008 - 08:19Hei igjen! Da satser jeg på at jakka blir i rett størrelse til slutt. Jeg tenkte meg kanskje at rutene ville trekke den noe sammen. Men syns den er enorm nå, og den bør bli radikalt mindre.
18.04.2008 - 13:29