
Popular categories
Looking for a yarn?


Comments / Questions (50)
![]() Emma wrote:
Emma wrote:
Hej, hur får jag mönstret i pdf så jag kan skriva ut det åt min farmor som inte kan läsa mönster på telefonen?
21.11.2024 - 09:17DROPS Design answered:
Hej Emma. Om du inte har en skrivare så du kan skriva ut det själv hemma (eller bibliotek eller liknande) så vet jag att vissa av våra återförsäljare kan skriva ut det när du beställer garnet. Mvh DROPS Design
21.11.2024 - 12:13
![]() Eleonora wrote:
Eleonora wrote:
Buonasera nella descrizione del bordo davanti non capisco come fare a: cito dal testo " il filo segua il lavoro mentre continuate" . Grazie mille
16.10.2024 - 15:28DROPS Design answered:
Buongiorno Eleonora, può utilizzare dei gomitoli separati per la lavorazione del bordo e portare dietro i gomitoli durante la lavorazione. Buon lavoro!
02.11.2024 - 12:36
![]() Conny wrote:
Conny wrote:
Hallo, muss leider nochmals nachfragen. Vorderteile: beim Armloch die zusätzlichen M in jeder 4.R. 8x in Krausrippenmuster, ohne M zunehmen. Soll es bedeuten, dass man die Blende strickt und dann zusätzlich M vom Vorderteil in Krausrippe stricken muss? Danke für die Hilfe
13.11.2023 - 18:35DROPS Design answered:
Liebe Connie, die Zunahmen beim Vorderteil sind nicht für das Armloch, Armloch stricken sie genauso wie beim Rückenteil (aber nur an einer Seite = am Anfang einer RückReihe wird es beim rechten Vorderteil abgekettet), und dann wird die krausrechte Maschen für den Kragen zugenommen (am Anfang der HinReihe für rechtes Vorderteil), so wird die MaschenAnzahl von der Blende für den Kragen zugenommen. Viel Spaß beim stricken!
14.11.2023 - 10:12
![]() Conny wrote:
Conny wrote:
Ich verstehe das Abnehmen für das Armloch nicht richtig. Ist es so zu verstehen, dass ich in jeder 2.R., 3M 1x abnehmen, 2M 1-1-2 (2-2)x abnehmen und 1M3-4-3 (3-3)x abnehmen muss. Wobei ich die Angaben in Klammern nicht verstehen kann. Danke für Ihre Hilfe Conny
06.11.2023 - 16:17DROPS Design answered:
Liebe Conny, die Angaben in Klammern gelten für die 2 grösseren Größe, die 3 Maschen 1 x gelten für alle Größen. Viel Spaß beim stricken!
07.11.2023 - 08:01
![]() Eleni wrote:
Eleni wrote:
After the armhole decrease of 9 sts, I have 7 knit sts left & 13 garter sts for the collar… where did I go wrong
23.05.2023 - 01:47DROPS Design answered:
Dear Eleni, for size S work as follows: When piece measures 19 cm (you should have 30 stitches at this point) decrease for armhole on every other row as follows: 3 sts 1 time, 2 sts 1 time and 1 st 3 times, so you have decreased 8 stitches. 30-8=22 sts. At the same time as you are decreasing, start working some of the stitches towards the neck in garter stitch instead of in stocking stitch, 6 stitches in total. So, now you should have 7+6 = 13 stitches in garter sitch and 22-13= 9 stitches in stocking stitch for the shoulder. Happy knitting!
28.05.2023 - 17:52
![]() Linda Van Niekerk wrote:
Linda Van Niekerk wrote:
Hi, I have knitted this pattern Drops Baby 13/13. I Can't complete the jacket, I don't understand the Assembly at all. Sew collar mid back(stitches from thread) with neat sts and sew collar to back piece. This does not make sense to me..... I have always picked up stitches and knit to do a collar.... but this doesn't look right either. I feel so hopeless because I done all this knitting and can't assemble it. Please can you help me.
27.06.2022 - 16:58DROPS Design answered:
Dear Mrs Van Niekerk, at the end of right and left front pieces, you have worked short rows over the stitches for collar for 4,5 -5,5 cm. Sew the 13-15 remaining stitches on a thread on both front piece together and sew the shorter side of collar pieces along neckline on back piece. This video shows how to work an easy shawl collar, it's almost the same here, except that you worked short rows. Happy knitting!
28.06.2022 - 08:20
![]() Liina Kaev wrote:
Liina Kaev wrote:
Tere! Kui (suurusel 12/18 kuud) kõik seljaosa kahandused ära teen, jääb 47 mitte 43 silma 65-2-6-4-6=47? Kas saan millestki valesti aru? Tänud juba ette abi eest! Tervitan, Liina
09.01.2021 - 22:30DROPS Design answered:
Tere Liina! Mõlemas käeaugus kahandatakse 10 silmust. Teine mahakudumine on 2 s 2 korda mõlemal pool = 8 silmust, mitte 4. Head kudumist!
06.02.2021 - 01:19
![]() Sengier wrote:
Sengier wrote:
Bonjour, pour le col, après avoir fermé l'épaule, s'agit-il de rangs raccourcis tous les deux rangs, entre les **? Ce n'est pas clair pour moi. Merci de m'éclairer.
19.12.2020 - 10:13DROPS Design answered:
Bonjour Mme Sengier, tout à fait, vous tricotez maintenant des rangs raccourcis sur les mailles restantes du col pour former le col châle, autrement dit: 2 rangs sur toutes les mailles, 2 rangs sur les 7-8-9 mailles côté extérieur du col et répétez ces 4 rangs ainsi jusqu'à la hauteur indiquée. Bon tricot!
21.12.2020 - 07:26
![]() Liina Kaev wrote:
Liina Kaev wrote:
Tere! Parema hõlma esimesed 2 silmust on topeltlõngaga, kas ka vasakul hõlmal samamoodi? Tänud! Liina
20.10.2020 - 22:45DROPS Design answered:
Tere Liina! Jah ikka mõlemal esiserval. Aga kui ei soovi jämedat serva, võib kududa ilma lisalõngadeta. Head kudumist!
26.10.2020 - 14:36
![]() Milena Kirchenwitz wrote:
Milena Kirchenwitz wrote:
Hallo.was passiert mit alle maschen die auf hilfsnadel bleiben...rechte/linke vorderteil. Vielen Dank
05.10.2020 - 21:10DROPS Design answered:
Liebe Frau Kirchenwitz, die Maschen von den beiden Vorderteile werden zusammengenäht, dann am Halsausschnitt beim Rûckenteil angenäht. Dieses Video zeigt wie man so einen Kragen (ohne die verkürzten Reihen, aber die Technik ist hier gleich) annäht. Viel Spaß beim stricken!
06.10.2020 - 10:50
|
|
Little Alfred#littlealfredjacket |
|
 |
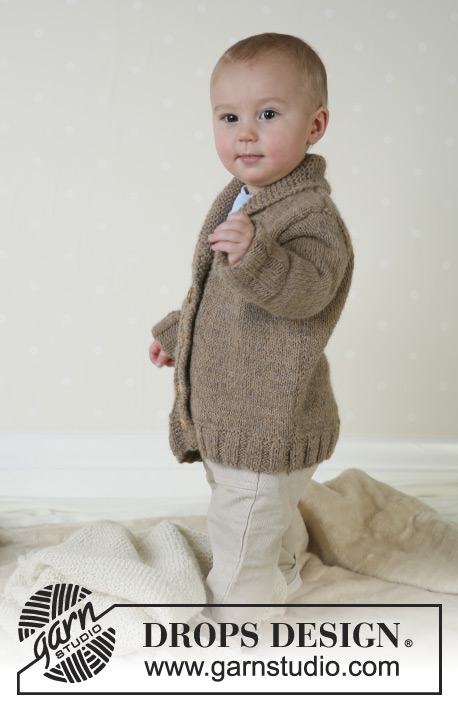 |
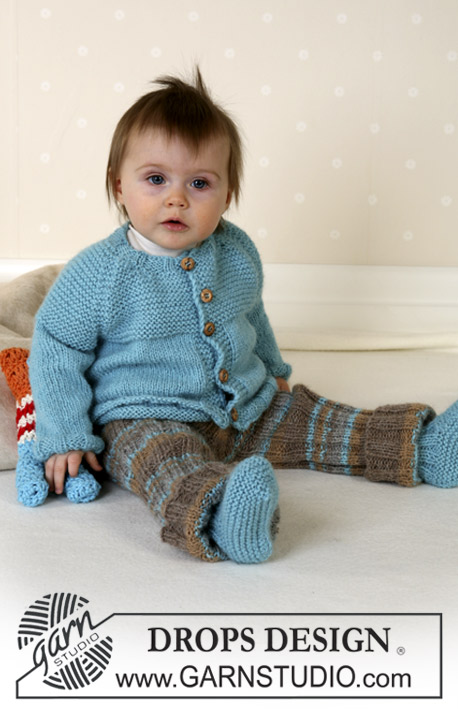
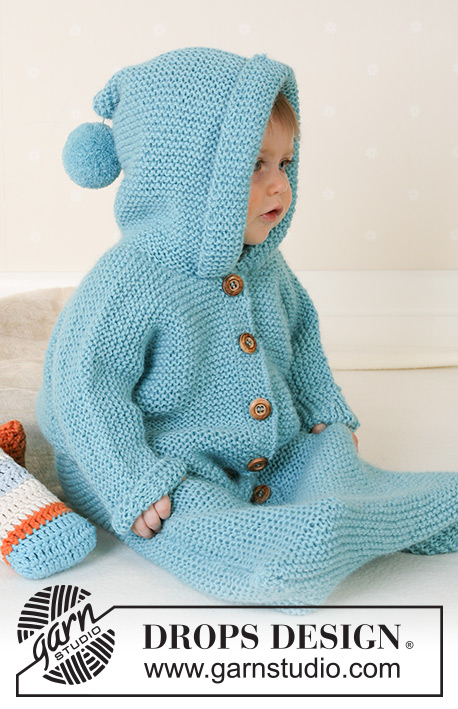
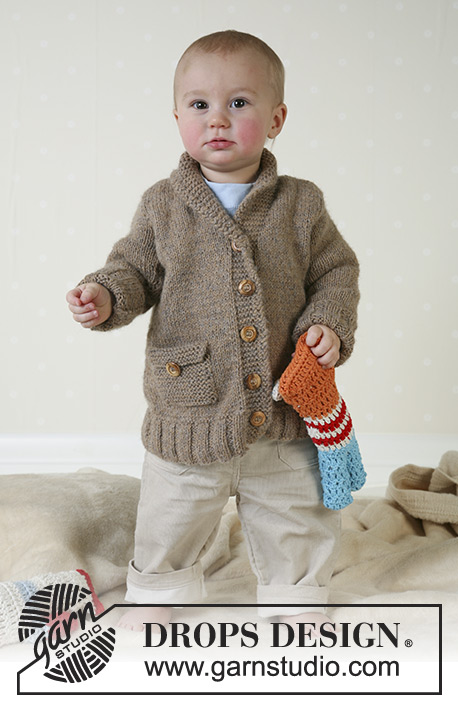
Jacket and soft toy in Alpaca
DROPS Baby 13-13 |
|
|
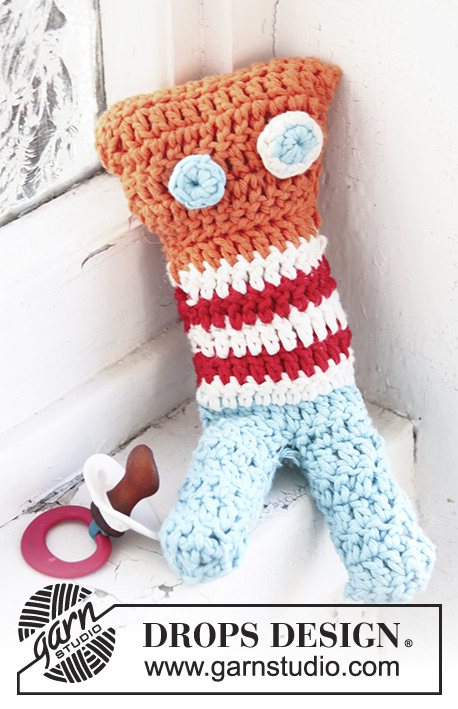
Knitting tension: 19 sts x 25 in garter sts with 2 strands of Alpaca in stocking sts on needle size 4mm = 10 x 10 cm. Rib: *K3, P3*, repeat from *-* Front edge: Knitted in garter sts until finished measurements. To ensure a neat finish, knit the edge a little tight and knit the first 2 sts towards mid front with 4 strands of Alpaca throughout (use a separate ball and let the thread follow the piece as you progress). Buttonhole: Make buttonholes on right front edge from mid front as follows: K2, K2 tog, yo, K3. Make buttonholes as follows: Size 1/3 months: 2, 7, 12 and 17 cm Size 6/9 months: 2, 7, 13, and 18 cm Size 12/18 months: 2, 9, 15 and 21 cm Size 2 years: 2, 8, 14, 20 and 25 cm Size 3/4 years: 2, 9, 16, 23 and 30 cm Back piece: Cast on 53-59-65 (71-77) sts (incl 1 edge st each side) with 1 strand of each Alpaca colour (= double thread) on needle size 3.5mm and knit 2 rows garter sts. Continue as follows from the right side: Size 1/3 months, 12/18 months, Size 3/4 years: 1 edge st, *K3, P3*, repeat from *-* and finish with K3, 1 edge st. Size 6/9 months, Size 2 years: 1 edge st, *P3, K3*, repeat from *-* and finish with P3, 1 edge st. When Rib measures 6 cm, knit 1 row from right side and knit 1 row from wrong side. Change to needle size 4mm and continue in stocking sts, at the same time on 1st row adjusting number of sts to 51-57-63 (69-75). When piece measures 19-20-23 (27-30) cm dec each side for armhole on every other row as follows: 3 sts 1 time, 2 sts 1-1-2 (2-2) times and 1 st 3-4-3 (3-3) times = 35-39-43 (49-55) sts. When piece measures 28-30-34 (39-43) cm cast off the middle 15-17-17 (19-19) sts for neck. On next row dec 1 st to shape the neckline = 9-10-12 (14-17) sts left on each shoulder. Cast off when piece measures 30-32-36 (41-45) cm. Right front: Cast on 32-35-38 (41-44) sts (incl 1 edge st at side and 7 front edge sts towards mid front) with 1 strand of each Alpaca colour (= double thread) on needle size 3.5mm and knit 2 rows garter sts. Note! Knit the 2 sts towards mid front with 4 strands – see above. Continue as follows: 7 front edge sts in garter sts, *K3, P3*, repeat from *-* and finish with 1 edge st. At the same time, when piece measures 2-2-2 (2-2) cm make a buttonhole – see above. When piece measures 6 cm knit 1 row from right side and knit 1 row from wrong side. Change to needle size 4mm and continue in stocking sts, at the same time on 1st row adjusting number of sts to 30-33-36 (39-42). When piece measures 19-20-23 (27-30) cm cast off at side for armhole as described for back piece. At the same time, inc number of sts in garter sts by 1 on every 4th row a total of 6-7-7 (8-8) times Note! Do NOT inc but knit an extra stocking st in garter st on every 4th row = 13-14-14 (15-15) sts in garter sts on front edge. When piece measures 30-32-36 (41-45) cm cast off the outermost 9-10-12 (14-17) for shoulder and continue in garter sts over remaining 13-14-14 (15-15) sts as follows: *2 rows garter sts over all sts, 2 rows garter sts over only the outermost 7-8-8 (9-9) sts*, repeat from *-* until collar measures approx 4.5-5-5 (5.5-5.5) cm from shoulder. Put sts on a thread. Left front: Cast on and knit as right front, but mirrored. NB! Do not make buttonholes! Sleeve: Cast on 32-38-38 (44-44) sts with 1 strand of each Alpaca colour (= double thread) on needle size 3.5mm and knit 2 rows garter sts. Continue in Rib with 1 edge st each side. When Rib measures 11 cm knit 1 row from right side and knit 1 row from wrong side. Change to needle size 4mm and continue in stocking sts. At the same time after the Rib inc 1 st each side on every 3-5-3 (5-3.5) cm a total of 4-3-5 (4-6) times = 40-44-48 (52-56) sts. When piece measures 22-24-25 (29-32) cm dec for sleeve cap each side on every other row: 3 sts 1 time, 2 sts 1-1-2 (2-3) times, 1 st 4-4-3 (3-2) times and 2 sts each side until piece measures 27-29-31 (35-38) cm. Now dec 3 sts 1 time and cast off remaining sts when piece measures 28-30-32 (36-39) cm. Pocket: Cast on 17-18-19 (20-22) sts with 1 strand of each Alpaca colour (= double thread) on needle size 4mm and knit 9-10-10 (11-12) cm garter sts. Cast off. Fold the upper 2 cm towards right side and sew on a button to keep the edge in place. Sew on the pocket on right front piece approx 8-8-9 (9-10) cm from lower edge. Assembly: Sew shoulder seams. Sew collar mid back (sts from thread) with neat sts and sew collar to back piece. Sew in sleeves and sew sleeve and side seams within 1 edge st. Sew on buttons. Fold Rib at sleeve edges. SOFT TOY: see pattern 13-08 |
|

|
|
Have you finished this pattern?Tag your pictures with #dropspattern #littlealfredjacket or submit them to the #dropsfan gallery. Do you need help with this pattern?You'll find 16 tutorial videos, a Comments/Questions area and more by visiting the pattern on garnstudio.com. © 1982-2025 DROPS Design A/S. We reserve all rights. This document, including all its sub-sections, has copyrights. Read more about what you can do with our patterns at the bottom of each pattern on our site. |
|


With over 40 years in knitting and crochet design, DROPS Design offers one of the most extensive collections of free patterns on the internet - translated to 17 languages. As of today we count 314 catalogues and 11822 patterns translated into English (UK/cm).
We work hard to bring you the best knitting and crochet have to offer, inspiration and advice as well as great quality yarns at incredible prices! Would you like to use our patterns for other than personal use? You can read what you are allowed to do in the Copyright text at the bottom of all our patterns. Happy crafting!
Post a comment to pattern DROPS Baby 13-13
We would love to hear what you have to say about this pattern!
If you want to leave a question, please make sure you select the correct category in the form below, to speed up the answering process. Required fields are marked *.