
Popular categories
Looking for a yarn?


|
|
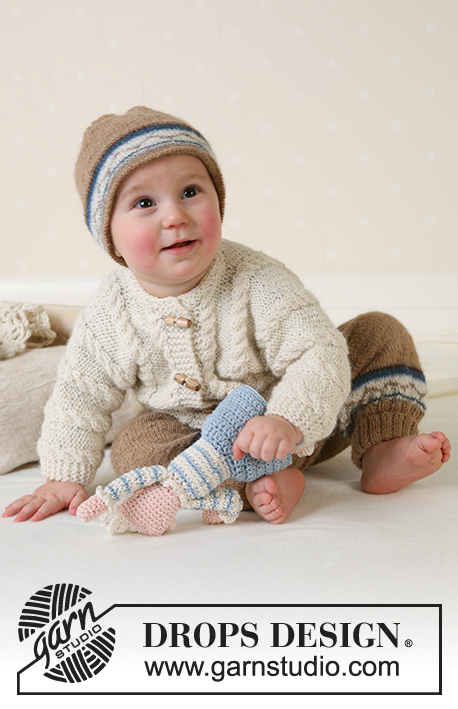
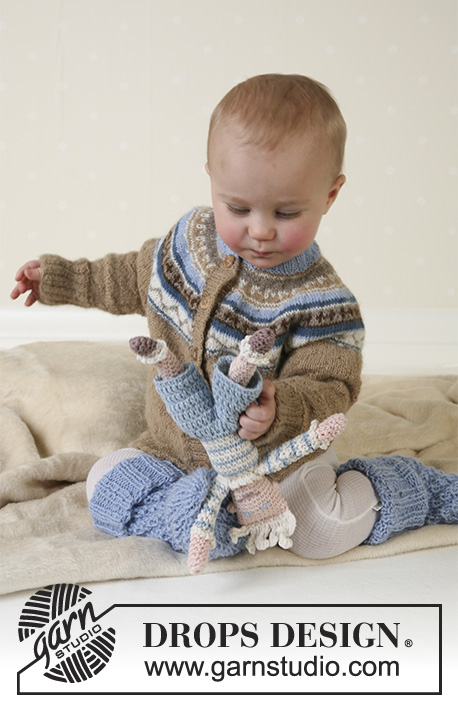
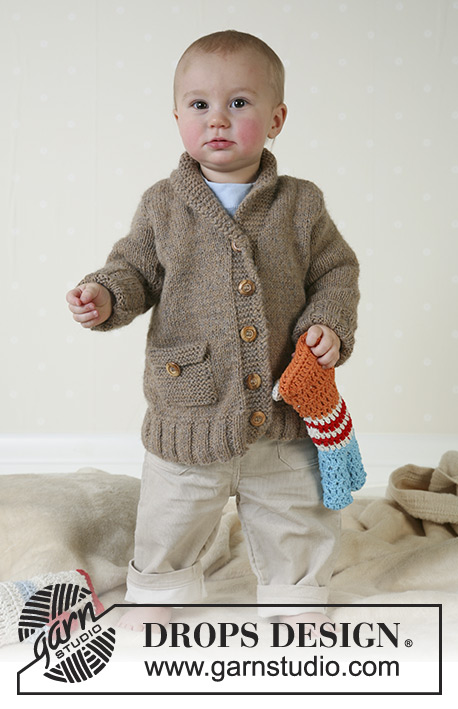
Little Alfred |
|
 |
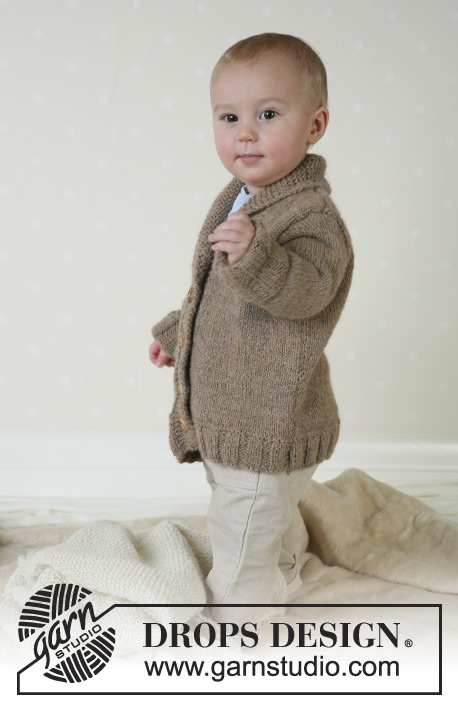 |
Jacket and soft toy in Alpaca
DROPS Baby 13-13 |
|
|
Knitting tension: 19 sts x 25 in garter sts with 2 strands of Alpaca in stocking sts on needle size 4mm = 10 x 10 cm. Rib: *K3, P3*, repeat from *-* Front edge: Knitted in garter sts until finished measurements. To ensure a neat finish, knit the edge a little tight and knit the first 2 sts towards mid front with 4 strands of Alpaca throughout (use a separate ball and let the thread follow the piece as you progress). Buttonhole: Make buttonholes on right front edge from mid front as follows: K2, K2 tog, yo, K3. Make buttonholes as follows: Size 1/3 months: 2, 7, 12 and 17 cm Size 6/9 months: 2, 7, 13, and 18 cm Size 12/18 months: 2, 9, 15 and 21 cm Size 2 years: 2, 8, 14, 20 and 25 cm Size 3/4 years: 2, 9, 16, 23 and 30 cm Back piece: Cast on 53-59-65 (71-77) sts (incl 1 edge st each side) with 1 strand of each Alpaca colour (= double thread) on needle size 3.5mm and knit 2 rows garter sts. Continue as follows from the right side: Size 1/3 months, 12/18 months, Size 3/4 years: 1 edge st, *K3, P3*, repeat from *-* and finish with K3, 1 edge st. Size 6/9 months, Size 2 years: 1 edge st, *P3, K3*, repeat from *-* and finish with P3, 1 edge st. When Rib measures 6 cm, knit 1 row from right side and knit 1 row from wrong side. Change to needle size 4mm and continue in stocking sts, at the same time on 1st row adjusting number of sts to 51-57-63 (69-75). When piece measures 19-20-23 (27-30) cm dec each side for armhole on every other row as follows: 3 sts 1 time, 2 sts 1-1-2 (2-2) times and 1 st 3-4-3 (3-3) times = 35-39-43 (49-55) sts. When piece measures 28-30-34 (39-43) cm cast off the middle 15-17-17 (19-19) sts for neck. On next row dec 1 st to shape the neckline = 9-10-12 (14-17) sts left on each shoulder. Cast off when piece measures 30-32-36 (41-45) cm. Right front: Cast on 32-35-38 (41-44) sts (incl 1 edge st at side and 7 front edge sts towards mid front) with 1 strand of each Alpaca colour (= double thread) on needle size 3.5mm and knit 2 rows garter sts. Note! Knit the 2 sts towards mid front with 4 strands – see above. Continue as follows: 7 front edge sts in garter sts, *K3, P3*, repeat from *-* and finish with 1 edge st. At the same time, when piece measures 2-2-2 (2-2) cm make a buttonhole – see above. When piece measures 6 cm knit 1 row from right side and knit 1 row from wrong side. Change to needle size 4mm and continue in stocking sts, at the same time on 1st row adjusting number of sts to 30-33-36 (39-42). When piece measures 19-20-23 (27-30) cm cast off at side for armhole as described for back piece. At the same time, inc number of sts in garter sts by 1 on every 4th row a total of 6-7-7 (8-8) times Note! Do NOT inc but knit an extra stocking st in garter st on every 4th row = 13-14-14 (15-15) sts in garter sts on front edge. When piece measures 30-32-36 (41-45) cm cast off the outermost 9-10-12 (14-17) for shoulder and continue in garter sts over remaining 13-14-14 (15-15) sts as follows: *2 rows garter sts over all sts, 2 rows garter sts over only the outermost 7-8-8 (9-9) sts*, repeat from *-* until collar measures approx 4.5-5-5 (5.5-5.5) cm from shoulder. Put sts on a thread. Left front: Cast on and knit as right front, but mirrored. NB! Do not make buttonholes! Sleeve: Cast on 32-38-38 (44-44) sts with 1 strand of each Alpaca colour (= double thread) on needle size 3.5mm and knit 2 rows garter sts. Continue in Rib with 1 edge st each side. When Rib measures 11 cm knit 1 row from right side and knit 1 row from wrong side. Change to needle size 4mm and continue in stocking sts. At the same time after the Rib inc 1 st each side on every 3-5-3 (5-3.5) cm a total of 4-3-5 (4-6) times = 40-44-48 (52-56) sts. When piece measures 22-24-25 (29-32) cm dec for sleeve cap each side on every other row: 3 sts 1 time, 2 sts 1-1-2 (2-3) times, 1 st 4-4-3 (3-2) times and 2 sts each side until piece measures 27-29-31 (35-38) cm. Now dec 3 sts 1 time and cast off remaining sts when piece measures 28-30-32 (36-39) cm. Pocket: Cast on 17-18-19 (20-22) sts with 1 strand of each Alpaca colour (= double thread) on needle size 4mm and knit 9-10-10 (11-12) cm garter sts. Cast off. Fold the upper 2 cm towards right side and sew on a button to keep the edge in place. Sew on the pocket on right front piece approx 8-8-9 (9-10) cm from lower edge. Assembly: Sew shoulder seams. Sew collar mid back (sts from thread) with neat sts and sew collar to back piece. Sew in sleeves and sew sleeve and side seams within 1 edge st. Sew on buttons. Fold Rib at sleeve edges. SOFT TOY: see pattern 13-08 |
|

|
|
|
Have you made this or any other of our designs? Tag your pictures in social media with #dropsdesign so we can see them! Do you need help with this pattern?You'll find tutorial videos, a Comments/Questions area and more by visiting the pattern on garnstudio.com. © 1982-2024 DROPS Design A/S. We reserve all rights. This document, including all its sub-sections, has copyrights. Read more about what you can do with our patterns at the bottom of each pattern on our site. |
|


With over 40 years in knitting and crochet design, DROPS Design offers one of the most extensive collections of free patterns on the internet - translated to 17 languages. As of today we count 304 catalogues and 11422 patterns - 11422 of which are translated into English (UK/cm).
We work hard to bring you the best knitting and crochet have to offer, inspiration and advice as well as great quality yarns at incredible prices! Would you like to use our patterns for other than personal use? You can read what you are allowed to do in the Copyright text at the bottom of all our patterns. Happy crafting!
Comments / Questions (48)
Hej\r\nJeg strikker LITTLE ALFRED og jeg mener, at der mangler forklaring på, hvad der skal ske med de 14 masker, man sætter på en tråd ved afslutningen af hvert forstykke - I monteringsanvisningen står der ikke noget om, hvad der skal ske med disse 14 masker, der er sat på tråd på hvert forstykke , og hvordan trøjen færdiggøres ved halsen - Jeg kan jo ikke bare sy trøjen sammen og lade 14 masker ligge på en tråd på hver forkant. Mange hilsner Hanne Christina
30.01.2020 - 16:04Buon giorno vorrei fare lo stesso modello pero colori sul blu qual colori dovrei mettere insieme per avere lo stesso risultato? cioe vorrei sapere i due colori sul blu del filato alpaca da unire insieme grazie per la vs risposta
09.12.2019 - 10:47DROPS Design answered:
Buongiorno Raffaella. la scelta dei colori è sempre molto personale. Le suggeriamo di rivolgersi al suo rivenditore Drops di fiducia che saprà aiutarla e consigliarla al meglio. Buon lavoro!
16.12.2019 - 14:59Volgens mij ontbreekt een gedeelte van het patroon bij het achterpand, omdat de naad middenachter sluiten onmogelijk is wegens gebrek aan gedeelte kraag als je het patroon volgt. Zelf heb ik een stukje van 5 cm moeten aanbreien aan het achterpand om de middenachternaad te kunnen sluiten
11.05.2019 - 11:34Hallo was ist mit "Krausrippe über alle M, 1 Kraussippe nur über die äussersten 7-8-8 (9-9)" gemeint? Danke, LG
11.04.2019 - 20:16DROPS Design answered:
Liebe Catherine, für den Kragen beim rechten Vorderteil beginnen die verkürzten Reihen mit einer Hinreihe = *2 Reihen über alle Maschen, 2 Maschen über die ersten 7-8-9 (siehe Grösse) Maschen*, diese 7-8-9 M sind die ersten Maschen der Hinreihe = Blende/Kragen die gegen die Jackeöffnung sind. Viel Spaß beim stricken!
12.04.2019 - 08:51Bonjour, Je souhaite réaliser ce modèle, mais je me demande pourquoi il n'y a pas le patron des mesures comme habituellement ? Merci pour votre partage, Maria
22.01.2019 - 08:51DROPS Design answered:
Bonjour Maria, le schéma des mesures va être ajouté, merci. Bon tricot!
23.01.2019 - 10:07Où puis je trouver l'explication pour le col et le bordure devant ?
15.03.2018 - 17:39DROPS Design answered:
Bonjour Mme Goosens, la bordure devant et le col se tricotent en même temps que le devant = 7 m de bordure devant en début de rang sur l'endroit pour le devant droit. Bon tricot!
16.03.2018 - 09:12Buenos dias. Por favor, podria explicar mejor la terminación o el cierre de los puntos del cuello? Porque aparentemente se dejan en una aguja auxiliar........No lo tengo muy claro. Vi el video de ustedes de "cuello chal facil" pero aunque es mas sencillo que el de este modelo, me gusta menos. Muchas Gracias!
21.09.2017 - 12:11DROPS Design answered:
Hola Maria. Los puntos del cuello se dejan en una aguja auxiliar para trabajar después la unión invisible ( tipo grafting).
24.09.2017 - 18:15Hej! När man ska maska av för ärmkullen på den minsta storleken stämmer inte beskrivningen, tror jag. Det står att man efter ett visst antal avmaskningar ska fortsätta att maska av med två i var sida tills arbetet mäter 27 cm. Innan man börjar med det mäter arbetet redan 27 cm, vilket leder till att det ju blir för många maskor kvar till den slutliga avmaskningen. Det går ju att fortsätta lite på måfå, men det skulle hjälpa om man visste hur många maskor man ska ha kvar inför sista avmaskning.
14.10.2016 - 23:50DROPS Design answered:
Hej Emelie. Ja, du sidder lige omkring de 27 cm med den rette strikkefasthed i den mindste störrelse, saa jeg ville springe dette over i den mindste str og gaa direkte til at lukke 3 m af i hver side.
20.10.2016 - 16:38Jag skulle vilja sticka den här modellen i storlek 5/6 år, ska jag öka med 6 maskor, som är det antal maskor mellan övriga storlekar. Till storlek 3/4 år behövs 400 g av Alpaca, hur mycket mer garn behöver jag köpa för storlek 5/6 år. Hälsningar Carina
13.06.2016 - 18:53DROPS Design answered:
Hej. Vi har dessvärre inte möjlighet att räkna ut mönster i fler än de storlekar som står. Du kan alltid se på våra barnmönster i alpaca som finns i storlek 5/6 för att se ungefär hur många maskor och garn du behöver. Lycka till!
01.07.2016 - 08:49Davanti: *2 f. a m. legaccio su tutte le m., 2 f. a m. legaccio solo sulle 7-8-8 (9-9) m. più esterne *, ripetere *-* fino a quando il colletto misura circa 4,5-5-5 (5,5-5,5) cm dalla spalla Quando faccio i due ferri con legaccio solo sulle 8 maglie le altre 6 maglie come le lavoro? Grazie mille Roberta
23.11.2015 - 23:27DROPS Design answered:
Buongiorno Roberta. Lavora 2 ferri su tutte le m, poi lavora il ferro successivo solo sulle prime 8 m (le rimanenti 6 m non devono essere lavorate), gira il lavoro e lavora di nuovo solo queste 8 m. Ripete poi: 2 ferri su tutte le m e 2 ferri solo su 8 m fino alla lunghezza indicata. Buon lavoro!
24.11.2015 - 15:45