DROPS Safran uni colour 100% Cotton |
1.30 £ /50g |
Order |
Clicking the ORDER button will redirect you to Wool Warehouse Direct Ltd website
The yarn cost is calculated from the pattern’s smallest size and the yarn’s cheapest product type. Looking for an even better price? You might find it on the DROPS Deals!
-------------------------------------------------------
Alternative Yarn – See how to change yarns here
Yarn Groups A to F – Use the same pattern and change the yarn here
Yarn usage using an alternative yarn – Use our yarn converter here
-------------------------------------------------------
DROPS Safran uni colour 100% Cotton 1.30 £ /50g Order |
Clicking the ORDER button will redirect you to Wool Warehouse Direct Ltd website
The yarn cost is calculated from the pattern’s smallest size and the yarn’s cheapest product type. Looking for an even better price? You might find it on the DROPS Deals!
= stockinette st/knit (as seen from the right side) | |
= reverse stockinette st/purl (as seen from the right side) | |
= P 2 tog | |
= Slip 2 sts, return to left hand needle 1 by 1, twisting each, then P 2 tog | |
= K 2 tog | |
= Slip 1 as if to knit, K 1, psso. | |
= Slip 1 as if to knit, K 2 tog, psso. | |
= on front and sleeves: yo on back: inc 1 st by pulling up a st from previous row and purl |
Each of our patterns has specific tutorial videos to help you.
These step-by-step tutorials might also help you:
Why is the knitting/crochet tension so important?
Knitting tension is what determines the final measurements of your work, and is usually measured per 10 x 10 cm. It is provided like so: number of stitches in width x number of rows in height - eg: 19 stitches x 26 rows = 10 x 10 cm.
The knitting tension is very individual; some people knit/crochet loosely while others work tightly. You adjust the knitting tension with the needle size, which is why the suggested needle size is only meant as a guide! You need to adjust this (up or down) to ensure that YOUR knitting tension matches the knitting tension provided in the pattern. If you work with a different knitting tension than provided you will have a different yarn consumption, and your work will have different measurements than what the pattern suggests.
The knitting tension also determines which yarns can replace each other. As long as you achieve the same knitting tension you can replace one yarn with another.
See DROPS lesson: How to measure your tension/gauge
See DROPS video: How to make a gauge tension swatch
How do I know how many balls of yarn I need?
The required amount of yarn is provided in grams, eg: 450 g. To calculate how many balls you’ll need you first need to know how many grams are in 1 ball (25g, 50g or 100g). This information is available if you click on the individual yarn quality on our pages. Divide the amount required with the amount of each ball. For example, if each ball is 50g (the most common amount), the calculation will be as follows: 450 / 50 = 9 balls.
Can I use a different yarn than what the pattern suggests?
The important thing when changing from one yarn to another is that the knitting/crochet tension remains the same. This is so that the measurements of the finished piece will be the same as on the sketch provided. It is easier to achieve the same knitting tension using yarns from the same yarn group. It is also possible to work with multiple strands of a thinner yarn to achieve the knitting tension of a thicker one. Please try our yarn converter. We recommend you to always work a test swatch.
Please NOTE: when changing yarn the garment might have a different look and feel to the garment in the photo, due to individual properties and qualities of each yarn.
See DROPS lesson: Can I use a different yarn than the one mentioned in the pattern?
What are the yarn groups?
All our yarns are categorised into yarn groups (from A to F) according to thickness and knitting tension – group A contains the thinnest yarns and group F the thickest. This makes it easier for you to find alternative yarns to our patterns, should you wish to switch yarn. All yarns within the same group have a similar knitting tension and can easily replace each other. However, different yarn qualities have different structures and properties which will give the finished work a unique look and feel.
How do I use the yarn calculator?
At the top of all our patterns you’ll find a link to our yarn calculator, which is a helpful tool should you wish to use a different yarn than suggested. By filling in the yarn quality you wish to replace, the amount (in your size) and number of strands, the calculator will present good alternative yarns with the same knitting tension. Additionally it will tell you how much you’ll require in the new qualities and whether you’ll need to work with multiple strands. Most skeins are 50g (some are 25g or 100g).
If the pattern is worked with multiple colours, every colour will have to be calculated separately. Similarly, if the pattern is worked with several strands of different yarns (for example 1 strand Alpaca and 1 strand Kid-Silk) you will have to find alternatives for each, individually.
Why do you show discontinued yarns in the patterns?
Since different yarns have different qualities and textures we have chosen to keep the original yarn in our patterns. However, you can easily find options among our available qualities by using our yarn calculator, or simply pick a yarn from the same yarn group.
It is possible that some retailers still have discontinued yarns in stock, or that someone has a few skeins at home that they would like to find patterns for.
The yarn calculator will provide both alternative yarn as well as required amount in the new quality.
What size should I knit?
If you think it's hard to decide what size to make, it can be a good idea to measure a garment you own already and like the size of. Then you can pick the size by comparing those measures with the ones available in the pattern's size chart.
You'll find the size chart at the bottom of the pattern.
See DROPS lesson: How to read size chart
Why do I get the wrong knitting tension with the suggested needle size?
The needle size provided in the pattern serves only as a guide, the important thing is to follow the knitting tension. And since knitting tension is very individual, you will have to adjust the needle size to ensure that YOUR tension is the same as in the pattern – maybe you’ll have to adjust 1, or even 2 needle sizes, up or down to achieve the correct tension. For this, we recommend that you work test swatches.
Should you work with a different knitting tension than the one provided, the measurements of the finished garment might deviate from the measurement sketch.
See DROPS lesson: How to measure your tension/gauge
See DROPS video: How to make a tension/gauge swatch
Why is the pattern worked top-down?
Working a garment top-down provides more flexibility and room for personal adjustment. For example it is easier to try the garment on while working, as well as making adjustments to length of yoke and shoulder caps.
The instructions are carefully explaining every step, in the correct order. Diagrams are adjusted to the knitting direction and are worked as usual.
How do I work according to a knitting diagram?
The diagram depicts all rows/rounds, and every stitch seen from the right side. It is read from bottom to top, from right to left. 1 square = 1 stitch.
When working back and forth, every other row is worked from the right side and every other row is worked from the wrong side. When working from the wrong side, the diagram will have to be worked reversed: from left to right, knit stitches are purled, purl stitches are knit etc.
When working in the round every round is worked from the right side and the diagram are worked from right to left on all rounds.
See DROPS lesson: How to read knitting diagrams
How do I work according to a crochet diagram?
The diagram depicts all rows/rounds, and every stitch seen from the right side. It is worked from bottom to top, from right to left.
When working back and forth every other row is worked from the right side: from right to left and every other row is worked from the wrong side: from left to right.
When working in the round, every row in the diagram are worked from the right side, from right to left.
When working a circular diagram you start in the middle and work your way outwards, counter clockwise, row by row.
The rows usually start with a given number of chain stitches (equivalent to the height of the following stitch), this will either be depicted in the diagram or explained in the pattern.
See DROPS lesson: How to read crochet diagrams
How do I work several diagrams simultaneously on the same row/round?
Instructions for working several diagrams after each other on the same row/round, will often be written like so: “work A.1, A.2, A.3 a total of 0-0-2-3-4 times". This means you work A.1 once, then A.2 is worked once, and A.3 is repeated (in width) the number of times provided for your size – in this case like so: S = 0 times, M = 0 times, L=2 times, XL= 3 times and XXL = 4 times.
The diagrams are worked as usual: begin with the first row in A.1, then work the first row in A.2 etc.
See DROPS lesson: How to read knitting diagrams
See DROPS lesson: How to read crochet diagrams
Why are the sleeves shorter in larger sizes?
The total width of the garment (from wrist-to-wrist) will be larger in the larger sizes, despite the actual sleeves being shorter. The larger sizes have longer sleeve caps and wider shoulders, so there will be a good fit in all sizes.
Where on the garment is the length measured?
The measurement sketch/schematic drawing provides information regarding the full length of the garment. If it’s a jumper or a jacket the length is measured from the highest point on the shoulder closest to the neckline, and straight down to the bottom of the garment. It is NOT measured from the tip of shoulder. Similarly, the length of yoke is measured from the highest point on the shoulder and down to where yoke is split into body and sleeves.
On a jacket measures are never taken along bands, unless specifically stated. Always measure inside band stitches when measuring the length.
See DROPS lesson: How to read a schematic drawing
What is a repeat?
Diagrams are often repeated on the round or in height. 1 repeat is the diagram the way it appears in the pattern. If it says to work 5 repeats of A.1 in the round, then you work A.1 a total of 5 times after/next to each other in the round. If it says to work 2 repeats of A.1 vertically/in height you work the entire diagram once, then begin again at the start and work the entire diagram one more time.
Why does the piece start with more chain stitches than it’s worked with?
Chain stitches are slightly narrower than other stitches and to avoid working the cast-on edge too tight, we simply chain more stitches to begin with. The stitch count will be adjusted on the following row to fit the pattern and measurement sketch.
Why increase before the rib edge when the piece is worked top-down?
The rib edge is more elastic and will contract slightly compared to, for example, stocking stitch. By increasing before the rib edge, you avoid a visible difference in width between the rib edge and the rest of the body.
Why increase in the cast-off edge?
It’s very easy to cast off too tightly, and by making yarn overs while casting off (and simultaneously casting these off) you avoid a too tight cast off edge.
See DROPS video: How to bind off with yarn overs (yo)
How do I increase/decrease on every 3rd and 4th row/round alternately?
To achieve an even increase (or decrease) you can increase on, for example: every 3rd and 4th row alternately, like so: work 2 rows and increase on the 3rd row, work 3 rows and increase on the 4th. Repeat this until the increase is complete.
See DROPS lesson: Increase or decrease 1 st on every 3rd and 4th row alternately
How can I work a jacket in the round instead of back and forth?
Should you prefer to work in the round instead of back and forth, you may of course adjust the pattern. You’ll need to add steeks mid-front (usually 5 stitches), and follow the instructions. When you would normally turn and work from the wrong side, simply work across the steek and continue in the round. At the end you’ll cut the piece open, pick up stitches to work bands, and cover the cut edges.
See DROPS video: How to knit steeks and cut open
Can I work a jumper back and forth instead of in the round?
Should you prefer to work back and forth instead of in the round, you may of course adjust the pattern so you work the pieces separately and then assemble them at the end. Divide the stitches for the body in 2, add 1 edge stitch in each side (for sewing) and work the front and back pieces separately.
See DROPS lesson: Can I adapt a pattern for circular needles into straight needles?
Why is the pattern slightly different than what I see in the photo?
Pattern repeats can vary slightly in the different sizes, in order to get the correct proportions. If you’re not working the exact same size as the garment in the photo, yours might deviate slightly. This has been carefully developed and adjusted so that the complete impression of the garment is the same in all sizes.
Make sure to follow instructions and diagrams for your size!
How do I make a women’s size garment into a men’s size one?
If you have found a pattern you like which is available in women’s size it’s not very difficult to convert it to men’s size. The biggest difference will be the length of sleeves and body. Start working on the women size that you think would fit across the chest. The additional length will be worked right before you cast off for the armhole/sleeve cap. If the pattern is worked top-down you can add the length right after the armhole or before the first decrease on sleeve.
Regarding additional yarn amount, this will depend on how much length you add, but it is better with a skein too many than too few.
How do I prevent a hairy garment from shedding?
All yarns will have excess fibres (from production) that might come off as lint or shedding. Brushed yarns (ie hairier yarns) have more of these loose, excess fibres, causing more shedding.
Shedding also depends on what is worn under or over the garment, and whether this pulls at the yarn fibres. It’s therefore not possible to guarantee that there will be no shedding
Below are some tips on how to get the best result when working with hairier yarns:
1. When the garment is finished (before you wash it) shake it vigorously so the looser hairs come off. NOTE: do NOT use a lint roller, brush or any method that pulls at the yarn.
2. Place the garment in a plastic bag and put it in your freezer - the temperature will cause the fibres to become less attached to each other, and excess fibres will come off easier.
3. Leave in the freezer for a few hours before taking it out and shaking it again.
4. Wash the garment according to the instructions on the yarn label.
Why does my garment pill?
Pilling is a natural process that happens to even the most exclusive of fibers. It's a natural sign of wear and tear that is hard to avoid, and that is most visible in high friction areas of your garment like a sweater's arms and cuffs.
You can make your garment look as new by removing the pilling, using a fabric comb or a pill/lint remover.
DROPS 74-7 |
|||||||||||||||||||||||||
|
|||||||||||||||||||||||||
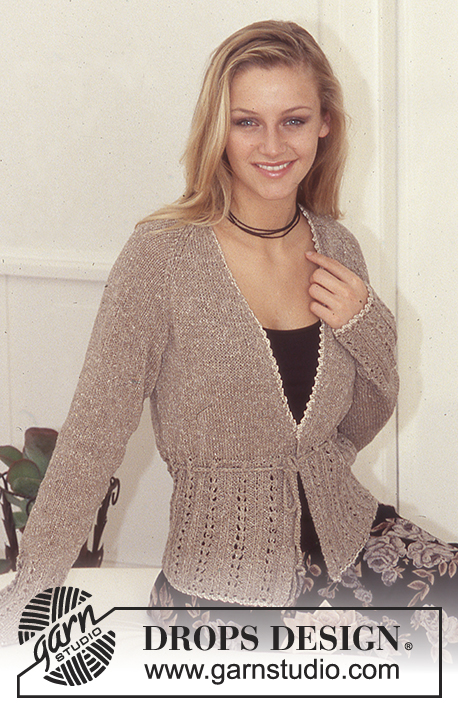
DROPS Ribbed Pullover in Safran
DROPS 74-7 |
|||||||||||||||||||||||||
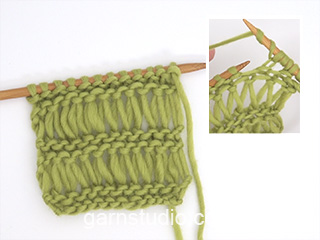
Gauge: 24 sts x 32 rows = 10 x 10 cm in stockinette st. Pattern: See charts. The pattern is seen from the right side. Rib-1: * K 2, P 2 *, repeat from * - *. Rib-2: * K 2, P 4 * , repeat from * - *. Knitting tips for decreasing (for raglan shaping on Body): Dec 1 st for raglan shaping inside 5 sts knit as follows from edge: K 1 (edge st), P 1, K 2 and P 1. On right side rows: After 5 sts: P 2 tog. Before 5 sts: Slip 2, return to left needle 1 by 1, twisting each st, P 2 tog. On wrong side rows: After 5 sts: Slip 1 st as if to knit, K 1, psso. Before 5 sts: K 2 tog. Tucked Ridges on sleeves: Knit first row as follows (right side row): * K 1, yo *, repeat from * - *, finish with K 1. Knit 4 rows stockinette st, letting yo loops drop on 1st row (long sts). Knit the next row (wrong side row) as follows: * pull up the top of sts from rows with long sts. Put loop on right needle, P 1, pull loop over purled st so that the loop binds the st off *, repeat from * - *. ____________________________________________________________________ Front: Cast on 108-120-132-144 sts. Establish pattern on the first row as follows: Rib-1 over 24-30-36-42 sts: Sizes S and L: start with P 2 Sizes M and XL: start with K 2 then (all sizes): Pattern 1 (30 sts), Pattern 2 (30 sts), and Rib-1 over 24-30-36-42 sts (starting with K 2). Continue in pattern as established until all the rows of Pattern 1 and Pattern 2 are complete – these sts are now in Rib-2. Continue until the piece measures 33-34-35-36 cm, then bind off 6 sts at each side for armhole = 96-108-120-132 sts. Read the entire next section before knitting: Raglan shaping: Dec for raglan inside 5 sts at each side - see knitting tips. Dec 1 st every other row 30-28-25-22 times and then 1 st every row until the neck shaping overlaps raglan shaping - NOTE: for size S the neck shaping will overlap the raglan while still decreasing every other row, so that you will not need to dec every row. Neck shaping: When the piece measures 38-39-41-42 cm purl and bind off the 2 center sts for the neck. Put left side on a st holder. Right side: Dec 1 st for the neck every other row until all sts are bound off - the neck shaping will overlap the raglan shaping. when all sts are bound off the piece measures approx. 51-53-55-57 cm. Left side: Put sts on st holder back on needles and knit the same as the right side, reversing all shaping - knit the 1st row from center front on wrong side row - start by picking up 1 st in the first bound-off st and knit together with 1st st on needles. Back: Cast on and knit the same as the front, but instead of yo in the pattern, inc by pulling up a st from the previous row (see «Pattern» symbol description). Shape raglan as on front as follows: dec 1 st every other row 30-28-25-22 times and then 1 st every row 0-8-17-26 times. Put the remaining 36 sts on a st holder, the piece measures approx. 51-53-55-57 cm. Sleeve: Cast on loosely 62-62-72-72 sts. Knit 1 row (wrong side row), on the next row begin Pattern 3, keeping 1 st at each edge in garter st throughout. Repeat pattern 3 times total. The piece measures approx. 13 cm. Knit 2 rows stockinette st. Then knit 1 tucked ridge - see instructions above, then 2 rows stockinette st, then knit 1 tucked ridge. The piece measures approx. 15 cm, continue with stockinette st to finished measurements. At the same time (after tucked ridges) inc 1 st at each side 16-18-15-18 times every 7-6-7-6 rows = 94-98-102-108 sts. When the piece measures 50 cm bind off 3 sts at each side for sleeve cap = 88-92-96-102 sts. Then dec 1 st at each edge every other row 25-26-27-27 times and then every row 7-8-9-12 times. Now dec 1 st every row at the side which will be seamed to the back 4 times and at the same time bind off 8 sts every other row 2 times at the side which will be seamed to the front, bind off remaining sts. Sleeve measures approx. 69-70-71-72 cm. Assembly: Sew raglan seams using edge sts as seam allowance (there will be 2 stockinette st sts at the raglan transition). Sew sleeve and side seams using edge sts as a seam allowance. Neckband: The neckband is knit in the round from center front. Pick up from center front, approx. 116-132 sts (divisible by 4) around the neck. K 1 row on wrong side row. Then knit rib-1 keeping 1 st in garter st + K 2 at each side at the center front. When neckband measures 2 cm bind off all sts in rib. Lay one side over the other at center front and stitch down. |
|||||||||||||||||||||||||
Diagram explanations |
|||||||||||||||||||||||||
|
|||||||||||||||||||||||||
Have you made this or any other of our designs? Tag your pictures in social media with #dropsdesign so we can see them! Do you need help with this pattern?You'll find tutorial videos, a Comments/Questions area and more by visiting the pattern on garnstudio.com. © 1982-2024 DROPS Design A/S. We reserve all rights. This document, including all its sub-sections, has copyrights. Read more about what you can do with our patterns at the bottom of each pattern on our site. |
With over 40 years in knitting and crochet design, DROPS Design offers one of the most extensive collections of free patterns on the internet - translated to 17 languages. As of today we count 304 catalogues and 11422 patterns - 11422 of which are translated into English (UK/cm).
We work hard to bring you the best knitting and crochet have to offer, inspiration and advice as well as great quality yarns at incredible prices! Would you like to use our patterns for other than personal use? You can read what you are allowed to do in the Copyright text at the bottom of all our patterns. Happy crafting!
Comments / Questions (34)
Karolien wrote:
Hallo, Dus op de patroontekeningen staan alleen de heengaande naalden getekend? Alvast bedankt voor het antwoord. Gr. Karolien
06.05.2021 - 18:15DROPS Design answered:
Dag Karolien,
Nee, op de telpatronen staan zowel de heengaande als de teruggaande naalden aangegeven. Bij telpatroon M.1 en M.2 brei je de naalden waarin steken worden samengebreid op de heengaande naald.
07.05.2021 - 10:07Kami wrote:
Bonjour! J'ai le problème suivant: après avoir tricoté M1 et M2 une fois en hauteur , j'ai toujours 30 mailles côtes 2/2 à droite et à gauche de mon devant. Hors cela ne correspond pas à la photo. Je suppose que je dois continuer les 2 diagrammes M1 et 2 mais je ne sais pas comment procéder. Pouvez vous m'aider? Merci d'avance!
02.05.2021 - 08:06DROPS Design answered:
Bonjour Kami, quand vous avez tricoté les diagrammes 1 fois en hauteur, continuez de la même façon, tricotez en côtes-1 jusqu'à ce qu'il reste 12 mailles avant la 1ère m du M.1 précédent, tricotez maintenant M.1 à partir d'ici de nouveau, et tricotez jusqu'à ce qu'il reste 18 m avant la 1ère m du M.2 précédent et commencez M.2 de nouveau à partir d'ici; vos deux diagonales vont se continuer ainsi en s'éloignant l'une de l'autre et en continuant vers les côtés, entre les diagrammes, le nombre de mailles tricotées en côtes-2 augmente. Bon tricot!
03.05.2021 - 08:29Bálint Gizella wrote:
Szeretném jelezni, hogy a magyar nyelvű leírásban több hiba is szerepel. Például a nyakkivágáshoz nem 48 cm-nél kell kezdeni. Az M1 és M2 mintát nem csak addig kell kötni, míg az összes sort lekötjük, hanem végig, amíg a széléig ki nem érünk...csak úgy lehet tovább haladni az egész soron végig a 2-es bordmintával. Kérem nézzék át és javítsák. Köszönöm!
08.03.2021 - 14:47Irene Peters wrote:
Beautiful pattern,allthough I do have a problem . Doing the sleeves,you have to bind off 3 stitches at each side forming the sleeve cap. At the front and back it says binding off 6 stitches at each side. So now I'm at the point of assembling,and it just doesn't fit! What am I doing wrong???
04.01.2021 - 07:27DROPS Design answered:
Dear Mrs Peters, the middle under arm should fit the seam on the side, then pin the sleeve cap around the armhole to make it fit, then you can sew the sleeve around. Happy knitting!
05.01.2021 - 10:19Manon wrote:
Bonjour, Pour le devant en taille M, j'ai terminé côtes 1 par 2 mailles endroit. Lorsque M1 et M2 sont terminés, je commence côtes 2 avec quelles mailles pour que ça fonctionne. Merci de vos précieux conseils.
22.11.2020 - 18:22DROPS Design answered:
Bonjour Manon, dites-nous si la réponse précédente a pu vous aider, merci! Bon tricot!
23.11.2020 - 09:36Manon wrote:
Bonjour, pour le devant lorsque l'on commence les côtes 2, est-ce bien sur un rang envers et est-ce que c'est seulement sur les mailles de M1 et M2 ou sur toutes les mailles. Merc
21.11.2020 - 22:22DROPS Design answered:
Bonjour Manon, le dernier rang de M.1/M.2 est sur l'endroit, donc, au rang suivant sur l'envers, tricotez les mailles comme elles se présentent = en côtes 2 mailles endroit/4 mailles envers (sur l'envers vous tricoterez 2 mailles envers/4 mailles endroit). Bon tricot!
23.11.2020 - 09:12Manon wrote:
Bonjour, j'aimerais avoir plus d'informations sur la façon de faire : glisser 2 m, puis les reprendre 1 par 1 avec l'aiguille gauche en les tournant l'une après l'autre, puis 2 m ens à l'envers Merci
18.11.2020 - 04:29DROPS Design answered:
Bonjour Manon, cette vidéo montre comment tricoter 2 mailles ensemble torse à l'envers et devrait vous permettre ainsi de réussir cette diminution. Bon tricot!
18.11.2020 - 08:13Aline THOMAS wrote:
Bonjour, je suis en train de réaliser le modèle 74-7. Mon problème concerne le point relief des manches, et plus particulièrement le 4ème rang qui dit "tirer le haut des mailles des rangs de mailles allongées, mettre la boucle sur l'aiguille de droite, 1 m env, tirer la boucle par dessus la m env pour que la boucle rabatte la maille". De quelles boucles s'agit-il? Je vous remercie d'avance
13.04.2020 - 17:29DROPS Design answered:
Bonjour Mme Thomas, au 1er rang vous tricotez (1 m end, 1 jeté) et au rang suivant vous lâchez les jetés (mailles allongées). Après 3 rangs jersey (= sur l'envers), vous attrapez le jeté lâché et vous le placez sur l'aiguille droite, tricotez 1 m envers et passez le jeté placé sur l'aiguille gauche par-dessus la maille envers que vous venez de tricoter. Bon tricot!
14.04.2020 - 13:09Angelini wrote:
Bonjour je suis en train de faire le modèle drops 74-7 et je dois suivre un diagramme mais est ce que une ligne du diagramme est équivalent à un rangs ou dois-je tricoter l'envers comme les mailles se présentent. Merci pour votre réponse
27.11.2019 - 10:39DROPS Design answered:
Bonjour Angelini, vous devez suivre tous les rangs du diagramme, en commençant en bas à droite sur l'endroit et de droite à gauche, puis de gauche à droite sur l'envers. Vous trouverez plus d'infos sur les diagrammes ici. Bon tricot!
27.11.2019 - 11:35Gillian Thompson wrote:
Hi On the charts M.1 and M.2, is the first row read from right to left or left to right please. Also do both charts show row 2 as being the wrong side of the pattern please. Bit confused whether chart is showing all rows or only right side of pattern row. Many thanks Jill Thompson
14.07.2019 - 16:39DROPS Design answered:
Dear Mrs Thompson, diagrams shows all rows, ie both RS and WS rows, read more about diagrams here, starting with row 1 from RS. Happy knitting!
15.07.2019 - 10:38