
Popular categories
Looking for a yarn?


|
||||||||||||||||
Beary Cute |
||||||||||||||||
 |
 |
|||||||||||||||
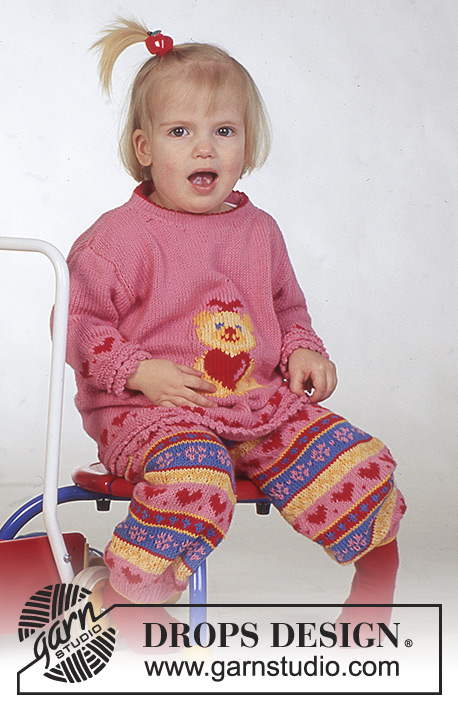
DROPS jumper with teddy motif and trousers in “Safran”.
DROPS Baby 4-6 |
||||||||||||||||
|
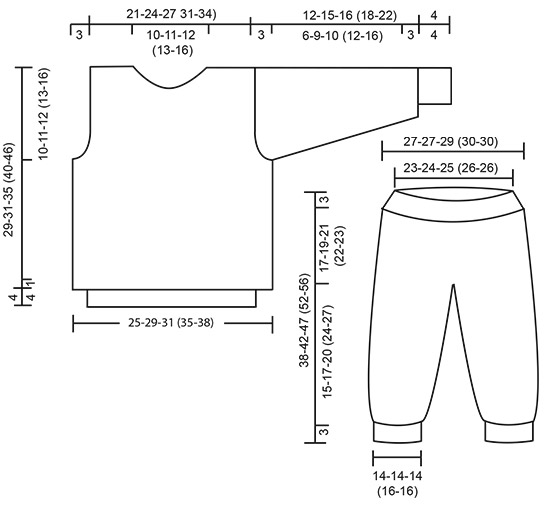
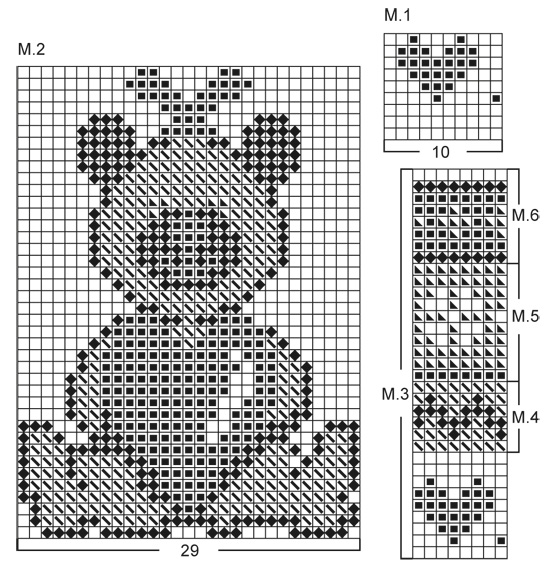
JUMPER: Knitting tension: 24 sts x 32 rows on needles size 3 mm in stocking sts = 10 x 10 cm. Garter st, on circular needle: K 1 round, P 1 round. Pattern: See diagram. The diagram shows the pattern from the RS. Front and back piece: Knitted in the round on circular needle. Cast on 120-140-150 (170-180) sts on circular needle size 3 mm with pink (mint) and knit 4 rounds garter st. Continue in M.1 and continue in pink (mint) until piece measures 9-10-11 (12-15). Now divide the piece as follows: 60-70-75 (85-90) sts = front piece and 60-70-75 (85-90) sts = back piece, at the same time inc 1 st each side on both pieces for seam, and complete front and back pieces separately. Front piece: = 62-72-77 (87-92) sts (incl 1 st each side for seam). Continue in pattern as follows: 17-22-24 (29-32) sts in pink (mint), M.2, 16-21-24 (29-31) sts in pink (mint). Remember the knitting tension. When piece measures 19-20-23 (27-30) cm dec each side for armhole on every other row as follows: 2 sts 2-3-2 (2-2) times, 1 st 2-1-2 (2-1) times = 50-58-65 (75-82) sts. After M.2, complete piece in pink (mint). When piece measures 24-26-30 (35-41) cm cast off the middle 8-10-13 (15-22) sts for neck and dec to shape the neckline on every other row as follows: 2 sts 3 times, 1 st 2 times. Cast off when piece measures 29-31-35 (40-46) cm. Back piece: = 62-72-77 (87-92) sts (incl 1 st each side for seam). Complete piece in pink (mint). Dec for armhole as described for front piece = 50-58-65 (75-82) sts. When piece measures 24-26-30 (35-41) cm divide piece for split as follows: Right side (with button): knit on the first 28-32-36 (41-44) sts with the 2 sts towards neckline in garter st. After 3 cm dec to shape the neckline on every other row as follows: 11-12-14 (15-18) sts 1 time, 2 sts 1 time and 1 st 2 times. Cast off when piece measures 29-31-35 (40-46) cm. Left side (with buttonhole): Inc 6-6-7 (7-6) sts towards the middle = 28-32-36 (41-44) sts and knit on all sts with the 2 sts towards neckline in garter st. After 2 cm make a buttonhole by casting off third and fourth st and casting on 2 new sts on return row. After 3 cm dec to shape the neckline on every other row as follows: 11-12-14 (15-18) sts 1 time, 2 sts 1 time and 1 st 2 times. Cast off when piece measures 29-31-35 (40-46) cm. Sleeve: Cast on 36-36-38 (40-40) sts on double pointed needles size 3 mm with pink (mint) and knit 4 rounds garter st. Continue in M.1 and after M.1 complete sleeve in pink (mint), at the same time when piece measures 3 cm, inc 2 sts mid under arm a total of 6-8-10 (11-18) times as follows: Size 3 + 12/18 months + 3/4 years: on every other and 3rd round alternately Size 6/9 months + 2 years: on every 3rd round = 48-52-58 (62-76) sts. When piece measures 9-12-13 (15-19) cm cast off 6 sts mid under arm and complete sleeve back and forth on needle. Dec to shape the sleeve cap each side on every other row: 4 sts 4 times. Cast off, sleeve measures approx 12-15-16 (18-22) cm. Assembly: Sew shoulder and side seams. Pick up approx 100 sts round neck on needle size 2.5 mm with pink (mint) and knit stocking st as follows: 2 cm, but after 0.5 cm make a buttonhole over the others on body piece. 1 buttonhole = cast of third and fourth st and cast on 2 new sts on return row, change to red (green), knit 2 rounds and knit next round as follows: *K2 tog, 1 yo*, repeat from *-* (= folding edge), change back to pink (mint) and knit 2 cm (remember buttonhole). Cast off, fold edge double towards WS and fasten. Crochet border: Crochet a border of 121-139-151 (169-181) dc (dividable by 6 +1 = 3 loops from first row) round bottom edge on jumper on crochet hook size 2.5 mm with pink (mint), turn the piece and continue as follows: Row 1: 3 ch, *2 ch, skip 1 dc, 1 tr in next dc*, repeat from *-* = 60-69-75 (84-90) loops, 1 ch, turn the piece Row 2: in the next 3 loops crochet as follows: *skip 1 loop, 3 tr in second loop, 3 ch, 3 tr in the same loop, skip third loop, 1 ch in fourth tr*, repeat from *-* and finish with 1 ch in third ch instead of fourth tr, 1 ch, turn the piece Row 3: 1 ch in first tr, *3 ch, 1 dc in first ch, 1 ch in second tr, 3 ch, 1 dc in first ch, 1 ch in loop, 3 ch, 1 dc in first loop, skip 1 tr, 1 ch in next tr, 1 ch in tr between loops*, repeat from *-*. Now crochet a row in the same row of dc on the outside of the crochet border as follows: *3 ch, 1 dc in the first ch, skip 1 dc, 1 ch*, repeat from *-*. Crochet a border of 37-37-37 (37-37) dc round sleeve edges on crochet hook size 2.5 mm with pink (mint) and crochet a border similar to the border on body piece. Set in sleeves and sew on buttons. TROUSERS: Size: 3 – 6/9 – 12/18 months (2 – 3/4) years DROPS circular needle and double pointed needles size 2 mm and 2.5 mm Knitting tension: 25 sts x 34 rows on needles size 2.5 mm in stocking sts = 10 x 10 cm. Rib: *K1, P1*, repeat from *-*. Pattern: see diagram. Right leg: Cast on 52-56-58 (62-62) sts on double pointed needles size 2 mm with yellow (navy blue) and knit 3 cm Rib, but after 1 round change to pink (mint). Change to double pointed needles size 2.5 mm and continue in M.3 and stocking st, at the same time inc 20-16-14 (18-18) sts evenly on first round = 72-72-72 (80-80) sts. Now inc on inside leg on every 3-3-4 (5-6) cm: 2 sts 4 times = 80-80-80 (88-88) sts. Remember the knitting tension. When piece measures 16-18-21 (25-28) cm divide piece at inside leg (= split) and complete piece back and forth on needle. Inc 1 st each side for seam = 82-82-82 (90-90) sts. When piece measures 18-20-23 (27-30) cm cast off 5 sts each side = 72-72-72 (80-80) sts. Put piece aside and knit the other leg. Left leg: knit as right leg. Trousers: Put left and right leg in on the same circular needle = 144-144-144 (160-160) sts. Knit 3 rounds and insert a MT mid front and mid back. Now inc mid back on both sides of MT, 1 st 4 times, and dec on both sides of MT, 1 st 8-8-4 (8-8) times mid front on every other row as follows: before MT: K2 tog, after MT: slip 1 st as if to knit, psso = 136-136-144 (152-152) sts. When piece measures 35-39-44 (49-53) cm change to needle size 2 mm, at the same time dec 16-12-14 (16-16) sts evenly on round = 120-124-130 (136-136). Knit 3 cm stocking st, P 1 round = folding edge, and knit 3 cm stocking st, cast off. Assembly: Sew tog split on inside of legs and sew tog the opening between legs from mid front to mid back. Fold edge double towards WS and fasten, leave an opening and pull through a ribbon. |
||||||||||||||||
Diagram explanations |
||||||||||||||||
|
||||||||||||||||
|
||||||||||||||||
|
||||||||||||||||
|
Have you made this or any other of our designs? Tag your pictures in social media with #dropsdesign so we can see them! Do you need help with this pattern?You'll find tutorial videos, a Comments/Questions area and more by visiting the pattern on garnstudio.com. © 1982-2024 DROPS Design A/S. We reserve all rights. This document, including all its sub-sections, has copyrights. Read more about what you can do with our patterns at the bottom of each pattern on our site. |
||||||||||||||||


With over 40 years in knitting and crochet design, DROPS Design offers one of the most extensive collections of free patterns on the internet - translated to 17 languages. As of today we count 304 catalogues and 11422 patterns - 11422 of which are translated into English (UK/cm).
We work hard to bring you the best knitting and crochet have to offer, inspiration and advice as well as great quality yarns at incredible prices! Would you like to use our patterns for other than personal use? You can read what you are allowed to do in the Copyright text at the bottom of all our patterns. Happy crafting!
Comments / Questions (1)
Hejsa til Drops designer Beary Cute jeg er faldet for denne gamle opskrift fra jer i Safran garn, der er flere mønstre i som kræver diagrammer, men jeg kan ikke se et eneste diagram, der hvor der skal være diagrammer, er der en firkant, med et kryds i. vil bare høre om det er en fejl på min pc eller i jeres opskrift, og så vil jeg høre om jeg kan finde / købe opskrift med alle diagrammer Hilsen Eva
28.10.2017 - 11:46DROPS Design answered:
Hei Eva. Her manglet den danske diagramteksten, så derfor viste ikke diagrammene. Det er nå ordnet, takk for at du gjorde oss oppmerksom på dette. Jeg ser også at diagrammene er gamle/utydelig. Jeg vil iløpet av kort tid oppdatere dem slik at det vil bli lettere å tyde dem. God Fornøyelse
31.10.2017 - 10:57