
Popular categories
Looking for a yarn?


Comments / Questions (7)
![]() Yvonne wrote:
Yvonne wrote:
Ik was begonnen met de maat M-L en volgens het patroon brei je met Safran de aantal steken tussen de haakjes dus ik ga er vanuit dat bij de maat L je uiteindelijk meerdert naar 339
29.11.2024 - 15:40
![]() Yvonne wrote:
Yvonne wrote:
Weet iemand hoe het patroon te volgen met Saffran 339 steken, ik kom er niet uit.
19.11.2024 - 13:51DROPS Design answered:
Dag Yvonne,
Als je op 339 steken bent plaats je markeerdraden zoals aangegeven, dus na 88 steken voor het voorpand, 163 steken voor het achterpand. Daarna volg je de volgende paragraaf, dus eerst 6 gerstekorrelsteken, dan M1 enz.
21.11.2024 - 20:09
![]() Yvonne wrote:
Yvonne wrote:
Kunt u me uitleggen wat er bedoeld wordt met brei het motief op deze manier? Ik snap de logica niet want als ik dat zou doen zoals het er staat zijn dat bij elkaar 207 steken en je hebt er 339
17.11.2024 - 21:32DROPS Design answered:
Dag Yvonne,
Vlak daarvoor staat aangegeven in welke volgorde je de telpatronen breit in de breedte. Deze volgorde houd je steeds aan. Van M.4 brei je meer herhalingen, zoals aangegeven per maat. Hoe kom je op 339 steken? Welke maat ben je aan het breien?
28.11.2024 - 20:35
![]() Valérie wrote:
Valérie wrote:
Bonjour je voudrais savoir comment ce tricote le point envers ?\r\nJe n’arrive pas à avoir le même rendu de la torsade en suivant les explications je ne sais pas quoi faire merci de votre réponse
14.09.2020 - 10:58DROPS Design answered:
Bonjour Valérie, lisez les rangs sur l'endroit de droite à gauche et ceux sur l'envers de gauche à droite, autrement dit, dans M.2, on va croiser les mailles tous les 8 rangs. Bon tricot!
14.09.2020 - 12:15
![]() Marianne Hansson wrote:
Marianne Hansson wrote:
Hvor ser jeg str på modellen jeg har brug for en str 48 Jeg syntes at der mange strikke modeller uden størrelser
29.05.2019 - 11:21DROPS Design answered:
Hej Marianne, nederst i hver opskrift finder du en måleskitse. Således læser du måleskitsen God fornøjelse!
29.05.2019 - 12:08
![]() Leonoor Bakker wrote:
Leonoor Bakker wrote:
Ik vind dit een erg leuk patroon maar het breien op een rondbreinaald zie ik niet zo zitten ,kan dit patroon ook met twee naalden gebreid worden en hoe doe ik dit dan.
08.08.2015 - 18:48DROPS Design answered:
Hoi Leonoor. Je kan het opdelen in voor- een achterpand. Zet daarbij 1 extra steken op aan beide zijkanten voor de naad. Meerder/minder aan de zijkanten en zorg ervoor dat de patronen goed kloppen.
11.08.2015 - 12:48
![]() Jacqueline wrote:
Jacqueline wrote:
Moeten de terug gaande naalden gewoon averecht gebreid worden of in patroon?
02.07.2012 - 19:58DROPS Design answered:
De tweede, vierde, zesde nld zijn de verkeerde kant. De teltekening geeft het motief aan van de goede kant, maar beide nld zijn weergegeven. Dus op de verkeerde kant wordt r av en av r. Ik heb de teltekening aangepast om dit duidelijker te laten zien.
03.07.2012 - 11:15
|
|||||||||||||
DROPS 33-4 |
|||||||||||||
 |
 |
||||||||||||
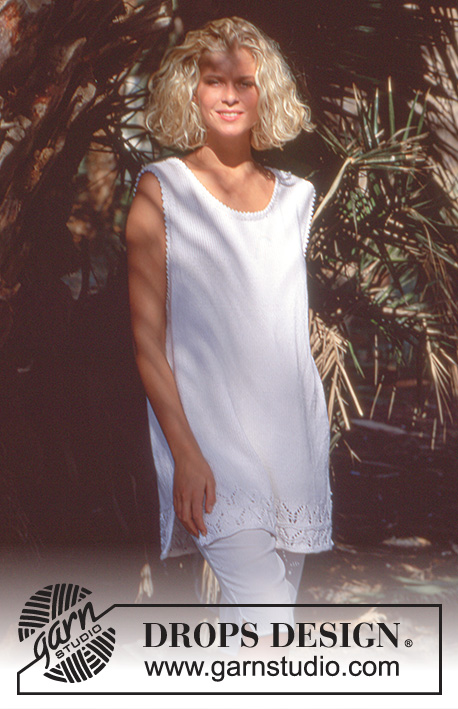
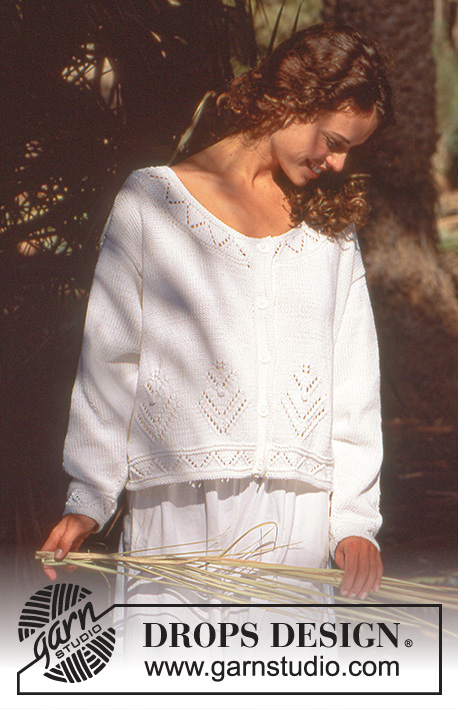
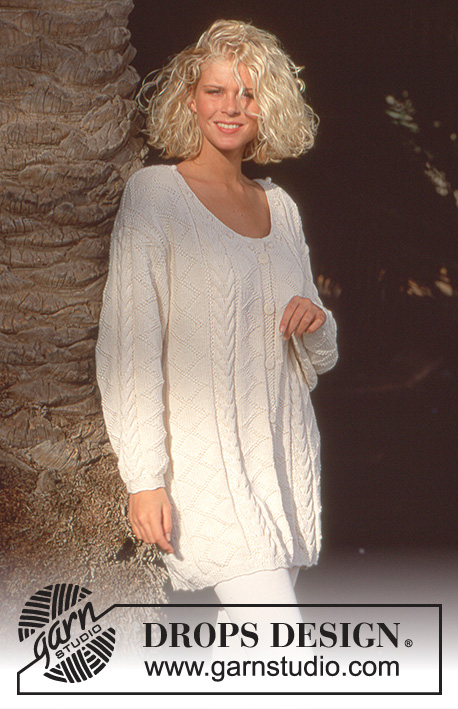
Drops jacket with textured pattern in “Muskat” or “Safran” Long or short version.
DROPS 33-4 |
|||||||||||||
|
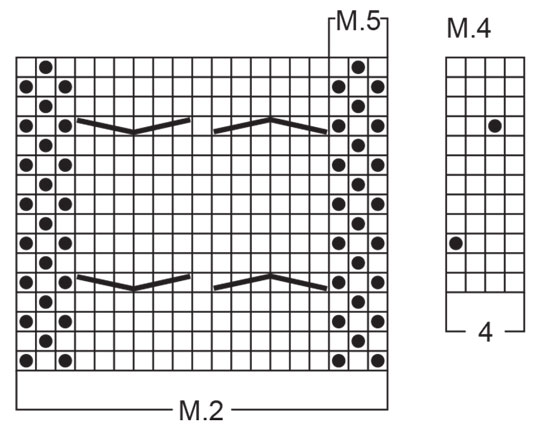
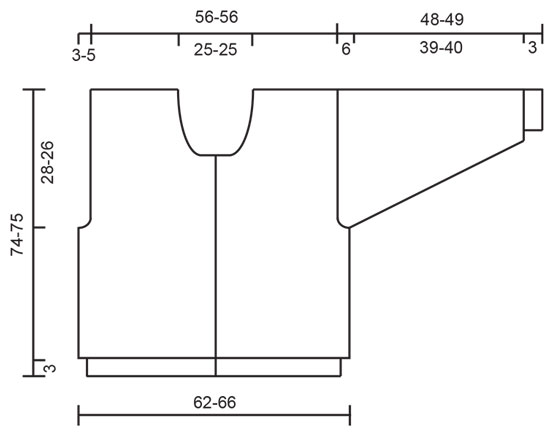
Knitting Tension: 20sts x 26 rows (23 sts and 30m rows) on needle size 4 (3.5) mm in stocking st = 10x10cm. Moss st: 1st row: K1, P1. 2nd row: Work K over P and P over K. Repeat rows 1 and 2. Bobble: Inc to 4 (5) sts in one st. Work 3 (5) rows across these 4 sts. 4th (6th row: K sts tog (1 st remains). Pattern: See diagram (1 diagram = 1 repeat). Pattern is seen from RS. Button hole: Muskat: Cast off 3rd st and make 1 new st on next row. Safran: Cast off 3rd and 4th st and make 2 new sts on next row. Short version: Body: Cast on 27 sts less and inc 27 sts more after the first 3cm. Measurement for arm hole, neck and casting off edge is reduced by 14 cm, finished length = 60-62 (60-62)) cm. Yarn requirement is reduced by 100 g. Body: Figures in ( ) = Safran. Jacket is worked back and forth on circ needle to arm hole. Cast on 231-240 (249-258) sts on long circ needle size 3 (3) mm with cream and work 3 cm as follows: *6 sts moss st, 3 sts stocking st*, the outer 6 sts each side = button band – these sts are worked in moss st till finished measurement. At the same time when work measures 1-1 (1-1), 10-11 (10-11), 20-21 (20-21), 30-31 (30-31), 40-41 (40-41), 50-51 (50-51) and 59-61 (59-61) cm, work button holes as described in description. Work 3 cm. Change to circ needle size 4 (3.5)mm and inc 52-59 (74-81) sts evenly on 1st row= 283-299 (323-339) sts. Put a marker thread each side (front = 74-78 (84-88) sts, back = 135-143(155-163) sts). Work next row as follows: 6 sts moss st, M.1, M.2, M.3, M.5, 27-35 (47-55) sts in M.4, M.5, M.1, M.2, M.3 (=centre back), M.2, M.1, M.5, 27-35 (47-55) sts in M.4, M.5, M.3, M.2, M.1, 6 sts in moss st. Tip: put a marker thread at beginning off each pattern. Continue in pattern, remember to check knitting tension. Continue until work measures 46-48 (46-48) cm. Cast off 4-4 (6-6) sts each side and finish back and fronts separately. Front: = 72-76 (81-85) sts. Dec for arm hole on every other row as follows: 2 sts 1-2 (1-1) times, 1 st 2-4 (2-6) times = 68-68 (77-77) sts. Continue until piece measures 60-62 (60-62) cm. Cast off for neck. Muskat: on every other row as follows: 12 sts once, 3 sts twice, 2 sts 3 times, 1 st 7 times. Safran: every other row: 14 sts once, 3 sts twice, 2 sts 4 times, then on every 4th row : 2 sts twice, 1 st 3 times. Continue until piece measures 74-76 (74-76) cm. Cast off. Back: = 131-139 (149-157) sts. Dec for arm hole as front = 123-123 (141-141) sts. Continue until piece measures 71-73 (71-73) cm. Cast off centre 41-41 (49-49) sts for neck, then dec on neck edge every other row as follows: 2 sts 2 (2) times. Continue until piece measures 74-76 (74-76) cm. Cast off. Sleeve: Cast on 45-45 (54-54) sts on double pointed needles size 3 (3) mm with cream. Work 3 cm as follows: *6 sts moss st, 3 sts stocking st*. Change to double pointed needles size 4 (3.5) mm, work stocking st and inc 14-14 (11-11) sts evenly on1st round = 59-59 (65-65) sts. Work next round as follows: Work 2 (5) sts in M.4, M.5, M.1, M.2, M.1, M.5, 2 (5) sts in M.4. Continue in pattern and at the same time inc underneath sleeve on every 3rd round as follows: 2 sts 30-30 (35-35) times =119-119 (135-135) sts. Work the inc sts into the M.4 pattern. Continue until piece measures 42-43 (42-43) cm. Cast off centre 8 (8) sts under arm and finish working back and forth on needle. Dec each side on every other row as follows: Muskat: 3 sts 7 times, Safran: 4 sts 8 times. Work measures 48-49 (48-49) cm. Cast off. Assembly: Sew shoulder seams. Pick up 123 or 132 (141 or 150) sts around neck on double pointed needles size 3 (3) mm and work back and forth on needle as follows: *6 sts moss st, 3 sts stocking st*, and at the same time on 1st row work bobble in the middle of the 3 stocking st sts (see explanation). Sew sleeves to body. Sew in buttons. |
|||||||||||||
Diagram explanations |
|||||||||||||
|
|||||||||||||

|
|||||||||||||
|
|||||||||||||
|
|||||||||||||
Have you finished this pattern?Tag your pictures with #dropspattern or submit them to the #dropsfan gallery. Do you need help with this pattern?You'll find 21 tutorial videos, a Comments/Questions area and more by visiting the pattern on garnstudio.com. © 1982-2025 DROPS Design A/S. We reserve all rights. This document, including all its sub-sections, has copyrights. Read more about what you can do with our patterns at the bottom of each pattern on our site. |
|||||||||||||


With over 40 years in knitting and crochet design, DROPS Design offers one of the most extensive collections of free patterns on the internet - translated to 17 languages. As of today we count 314 catalogues and 11822 patterns translated into English (UK/cm).
We work hard to bring you the best knitting and crochet have to offer, inspiration and advice as well as great quality yarns at incredible prices! Would you like to use our patterns for other than personal use? You can read what you are allowed to do in the Copyright text at the bottom of all our patterns. Happy crafting!
Post a comment to pattern DROPS 33-4
We would love to hear what you have to say about this pattern!
If you want to leave a question, please make sure you select the correct category in the form below, to speed up the answering process. Required fields are marked *.