
Popular categories
Looking for a yarn?


|
|||||||
Pale Blossom |
|||||||
 |
 |
||||||
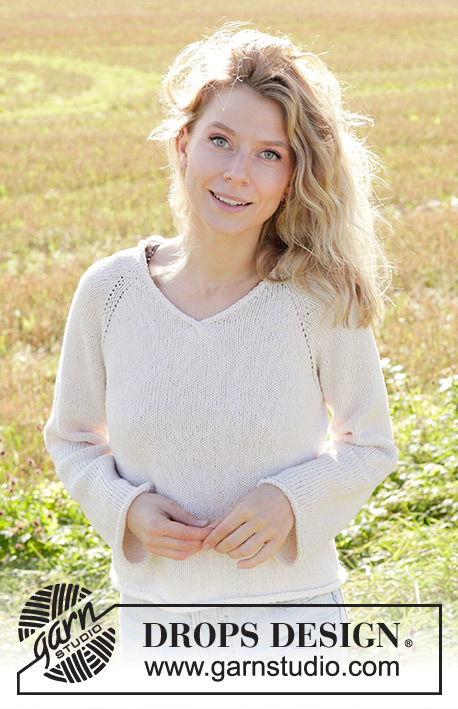
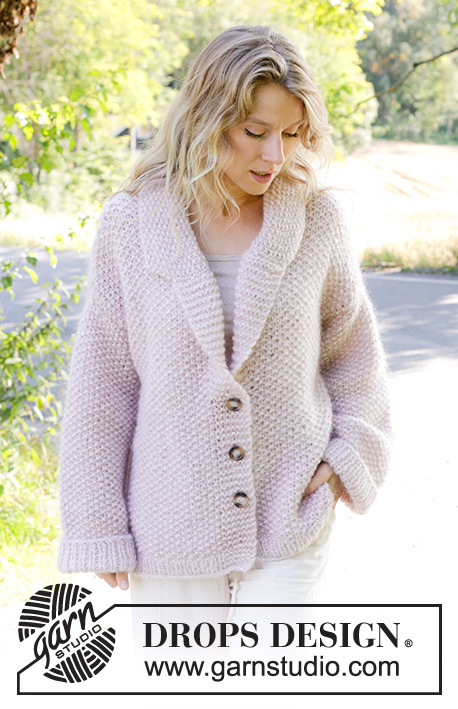
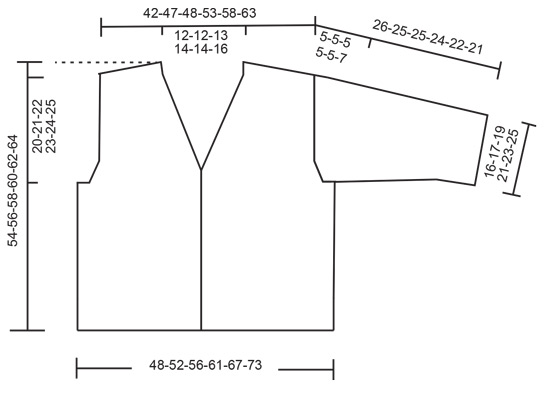
Knitted jacket in DROPS Alpaca and DROPS Kid-Silk. The piece is worked top down with European/diagonal shoulders, V-neck and I-cord. Sizes S - XXXL.
DROPS 248-35 |
|||||||
|
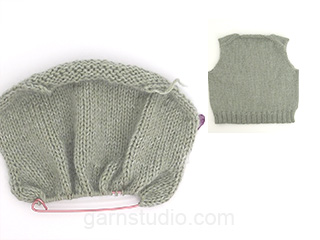
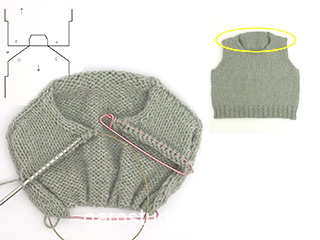
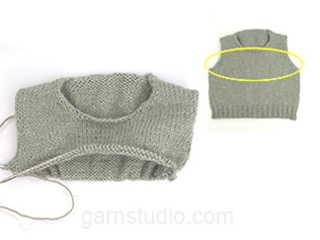
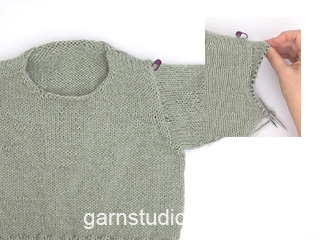
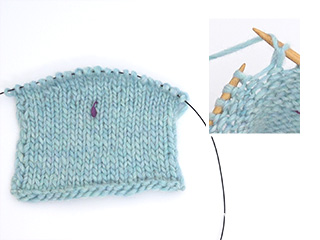
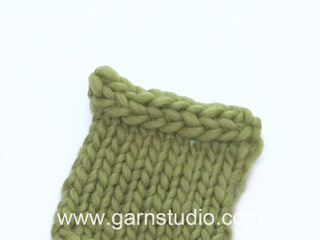
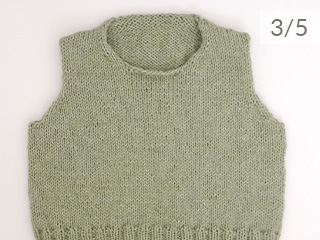
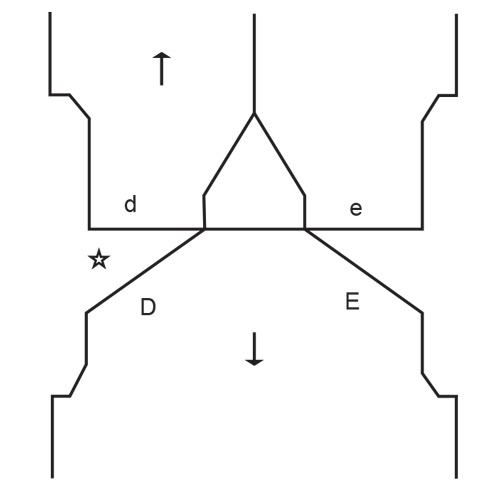
------------------------------------------------------- EXPLANATIONS FOR THE PATTERN: ------------------------------------------------------- GARTER STITCH (worked back and forth): Knit all rows. 1 ridge = knit 2 rows. INCREASE TIP-1 (from right side): Increase 1 stitch towards the left: Use the left needle to pick up the loop from the front between 2 stitches from the previous row and knit the back loop. Increase 1 stitch towards the right: Use the left needle to pick up the loop from behind between 2 stitches from the previous row and knit the front loop. INCREASE TIP-2 (from wrong side): Increase 1 stitch towards the left: Use the left needle to pick up the loop from behind between 2 stitches from the previous row and purl the front loop. Increase 1 stitch towards the right: Use the left needle to pick up the loop from the front between 2 stitches from the previous row and purl the back loop. TWO I-CORD EDGE-STITCHES, RIGHT FRONT PIECE: RIGHT SIDE: Work until there are 2 stitches left, slip 1 stitch purl-wise with the strand in front, knit 1. WRONG SIDE: Slip 1 stitch purl-wise with the strand in front, knit 1, work to end of row. TWO I-CORD EDGE-STITCHES, LEFT FRONT PIECE: RIGHT SIDE: Slip 1 stitch purl-wise with the strand in front, knit 1, work to end of row. WRONG SIDE: Work until there are 2 stitches left, slip 1 stitch purl-wise with the strand in front, knit 1. BUTTONHOLES: Work the buttonholes on the right band (when the garment is worn). Work from the right side when there are 4 stitches left on the row, make 1 yarn over, purl 2 together, 2 stitches I-cord. On the next row (wrong side) knit the yarn over to leave a hole. The first buttonhole is worked 1 cm = ⅜" after the final increase for the V-neck and the next 2 buttonholes with 6-6-6-7-7-7 cm = 2⅜"-2⅜"-2⅜"-2¾"-2¾"-2¾" between each one. I-CORD BIND-OFF (bottom edge of body, back of neck): ROW 1 (right side): Knit 2, knit 2 twisted together. ROW 2 (right side): Slip the 3 stitches from the right needle back onto the left needle, knit 2, knit 2 twisted together. Repeat ROW 2 until there are 3 stitches left on the right needle. Slip the 3 stitches from the right needle back onto the left needle. Bind off. Sew a small stitch joining the beginning and end of the I-cord to the garment. I-CORD BIND-OFF (sleeves): At the end of the round after the last stitch has been worked: Cast on 3 stitches on the right needle, from the right side. Slip the 3 new stitches from the right needle onto the left needle, with the working strand 3 stitches in on the left needle (when working, tighten the strand to form a small tube). ROW 1 (right side): Knit 2, knit 2 twisted together. ROW 2 (right side): Slip the 3 stitches from the right needle back onto the left needle, knit 2, knit 2 twisted together. Repeat ROW 2 until there are 3 stitches left on the right needle. Slip the 3 stitches from the right needle back onto the left needle. Bind off. Sew a small stitch joining the beginning and end of the I-cord. DECREASE TIP (for sleeves): Decrease 1 stitch on each side of the marker-thread as follows: Work until there are 3 stitches left before the marker-thread, knit 2 together, knit 2 (marker-thread sits between these 2 stitches), slip 1 stitch knit-wise, knit 1 and pass the slipped stitch over the knitted stitch. ------------------------------------------------------- START THE PIECE HERE: ------------------------------------------------------- JACKET – SHORT OVERVIEW OF THE PIECE: The pattern uses both long and short circular needles; start with the length which fits the number of stitches and change when necessary. The piece is started, working back and forth on the needle, casting on stitches for the back of the neck, working the back piece top down and increasing on each side for the shoulders which are slightly diagonal. Work as far as the armholes. The back piece then waits while the front pieces are worked, knitting up stitches along one shoulder, working and increasing for the neckline, then doing the same along the other shoulder and working as far as the armholes. The front and back pieces are placed on the same circular needle and the body continued back and forth. Stitches are knitted up around each armhole. The sleeve cap is worked back and forth with short rows, then the sleeve is continued in the round. An I-cord edge is worked at the back of the neck to finish. BACK PIECE: Cast on 24-24-26-28-28-30 stitches with circular needle size 4.5 MM = US 7 and 1 strand of each quality (2 strands). Purl 1 row from the wrong side. Read INCREASE TIP-1 and work as follows from the right side: Knit 3, increase towards the left, knit until there are 3 stitches left, increase towards the right, knit 3. Read INCREASE-TIP-2 and work as follows from the wrong side: Purl 3, increase towards the left, purl until there are 3 stitches left, increase towards the right, purl 3. REMEMBER THE KNITTING GAUGE! Continue increasing like this, both from the right and wrong side, a total of 26-30-30-34-38-42 times = 76-84-86-96-104-114 stitches. Insert 1 marker outermost on one side. The piece is now measured from here! Work stockinette stitch back and forth until the piece measures 12-13-13-13-14-15 cm = 4¾"-5⅛"-5⅛"-5⅛"-5½"-6" from the marker along the armhole. Work as follows from the right side: Knit 3, increase towards the left, knit until there are 3 stitches left, increase towards the right, knit 3 - remember INCREASE TIP-1. Increase like this on each row from the right side a total of 2-2-3-3-4-4 times = 80-88-92-102-112-122 stitches. Continue working until the piece measures 14-15-16-16-17-18 cm = 5½"-6"-6¼"-6¼"-6¾"-7" along the armhole. Finish with a row from the right side. Cut the strand, place the stitches on a stitch holder and work the front pieces. LEFT FRONT PIECE: Start with the left shoulder (when the garment is worn). Knit up 26-30-30-34-38-42 stitches inside the outermost stitch along the left back shoulder (knit up 1 stitch in each row from the top edge, see D in sketch). All measurements are taken from here. Purl 1 row from the wrong side, then work as follows from the right side: TWO I-CORD EDGE STITCHES – read description above, purl 2, stockinette stitch over the remaining stitches. Continue this pattern. When the piece measures 7 cm = 2¾", increase for the neckline, starting from the right side as follows: Work 4 stitches as before, increase towards the left, work to end of row – remember INCREASE TIP-1. Increase 1 stitch every 2nd row (each row from the right side) 10 times, then every 4th row 6-6-7-8-8-9 times (a total of 16-16-17-18-18-19 increases for the neckline). AT THE SAME TIME when the piece measures 24-25-25-27-28-29 cm = 9½"-9¾"-9¾"-10⅝"-11"-11⅜", work as follows from the right side: Work until there are 3 stitches left, increase towards the right, knit 3 – remember INCREASE TIP-1. Increase like this on each row from the right side a total of 2-2-3-3-3-3 times = 44-48-50-55-60-65 stitches. Continue working until the piece measures 26-27-28-30-31-32 cm = 10¼"-10⅝"-11"-11¾"-12¼"-12½", finishing with a row from the right side. Cut the strand, place the stitches on a stitch holder and work the right front piece. All increases for the V-neck should now be finished. RIGHT FRONT PIECE: Knit up 26-30-30-34-38-42 stitches inside the outermost stitch along the right back shoulder (knit up 1 stitch in each row from the top edge, see E in sketch). All measurements are taken from here. Purl 1 row from the wrong side, then work as follows from the right side: Work stockinette stitch until there are 4 stitches left, purl 2 and TWO I-CORD EDGE STITCHES – remember description above. When the piece measures 7 cm = 2¾", increase for the neckline starting from the right side as follows: Work until there are 4 stitches left, increase towards the right, work the last 4 stitches as before. Increase 1 stitch every 2nd row (each row from the right side) 10 times, then every 4th row 6-6-7-8-8-9 times (a total of 16-16-17-18-18-19 increases for the neckline). AT THE SAME TIME when the piece measures 24-25-25-27-28-29 cm = 9½"-9¾"-9¾"-10⅝"-11"-11⅜", work as follows from the right side: Work 3 stitches, increase towards the left, work to end of row – remember INCREASE TIP-1. Increase like this on each row from the right side a total of 2-2-3-3-3-3 times = 44-48-50-55-60-65 stitches. Continue working until the piece measures 26-27-28-30-31-32 cm = 10¼"-10⅝"-11"-11¾"-12¼"-12½", finishing with a row from the right side. Now work from the wrong side as follows: Work the 44-48-50-55-60-65 stitches from the right front piece, cast on 6-6-8-8-8-10 stitches (in side under sleeve), work the 80-88-92-102-112-122 stitches from the back piece, cast on 6-6-8-8-8-10 stitches (in side under sleeve), work the 44-48-50-55-60-65 stitches from the left front piece. BODY: = 180-196-208-228-248-272 stitches. Continue stockinette stitch back and forth with 2 edge stitches + purl 2 on each side, mid-front. Work until the piece measures 54-56-58-60-62-64 cm = 21¼"-22"-22¾"-23⅝"-24⅜"-25¼", from the top front shoulder. Bind off with I-CORD – read description above. SLEEVES: Lay the piece flat and insert 1 marker at the top of the armhole (NOTE! This is not where stitches were knitted up but approx. 6-7 cm = 2⅜"-2¾" down the front piece = mid-top of shoulder). Using circular needle size 4.5 MM = US 7, start in the middle of the cast-on stitches under the sleeve and knit up 78-82-88-90-94-100 stitches around the armhole – make sure you have equal numbers of stitches on each side of the marker. Work stockinette stitch back and forth with short rows for the sleeve cap (to give the sleeve a better fit). Start mid-under the sleeve. Row 1 (right side): work to 9-10-11-11-11-12 stitches past the marker, turn. Row 2 (wrong side): work 9-10-11-11-11-12 stitches past the marker, turn. Row 3 (right side): work to 5-5-5-5-6-4 stitches past the previous turn, turn. Row 4 (wrong side): work to 5-5-5-5-6-4 stitches past the previous turn, turn. Repeat rows 3 and 4 until you work 34-35-36-36-41-40 stitches past the marker (6-6-6-6-6-8 turns on each side). Work from the right side to the beginning of the row (mid-under sleeve). Insert 1 marker-thread here, which is used when decreasing under the sleeve. Allow the thread to follow your work onwards. Continue with stockinette stitch in the round. When the sleeve measures 7-7-7-7-7-9 cm = 2¾"-2¾"-2¾"-2¾"-2¾"-3½", from the knitted-up stitches (all lengths measured mid-top of sleeve), decrease 2 stitches under the sleeve – read DECREASE TIP. Decrease like this every 2nd round 2 times, then every 1½-1½-1½-2-2-2 cm = ½"-½"-½"-¾"-¾"-¾", 8-8-8-5-4-3 times (a total of 10-10-10-7-6-5 times) = 58-62-68-76-82-90 stitches. Work until the sleeve measures 26-25-25-24-22-21 cm = 10¼"-9¾"-9¾"-9½"-8¾"-8¼". Bind off with I-CORD – remember description above. I-CORD, BACK OF NECK: Use circular needle size 4.5 MM = US 7. Cast on 2 stitches with 1 strand of each quality, then knit up 24-24-26-28-28-30 stitches (inside 1 edge stitch, along the back neckline) from one shoulder-line to the other shoulder-line. Cut the strand. Start where the 2 stitches were cast on and bind off with I-CORD – remember description above. ASSEMBLY: Sew the buttons onto the left front piece. |
|||||||
Diagram explanations |
|||||||
|
|||||||
|
|||||||
|
|||||||
|
Have you made this or any other of our designs? Tag your pictures in social media with #dropsdesign so we can see them! Do you need help with this pattern?You'll find tutorial videos, a Comments/Questions area and more by visiting the pattern on garnstudio.com. © 1982-2024 DROPS Design A/S. We reserve all rights. This document, including all its sub-sections, has copyrights. Read more about what you can do with our patterns at the bottom of each pattern on our site. |
|||||||


With over 40 years in knitting and crochet design, DROPS Design offers one of the most extensive collections of free patterns on the internet - translated to 17 languages. As of today we count 304 catalogs and 11422 patterns - 11417 of which are translated into English (US/in).
We work hard to bring you the best knitting and crochet have to offer, inspiration and advice as well as great quality yarns at incredible prices! Would you like to use our patterns for other than personal use? You can read what you are allowed to do in the Copyright text at the bottom of all our patterns. Happy crafting!
Comments / Questions (7)
Fel i beskrivningen: höger framstycke. Ska väl stickas som vänster fast spegelvänt? Det står 'ökning varje varv', bör vara 'vart 4:e varv' för att stämma med vänster framstycke! Väl? Så har jag nu gjort...
16.04.2024 - 23:17Bonjour, j'aimerai beaucoup tricoter ce gilet mais avec des manches longues. Dans ce cas, combien me faudra t'il de pelotes supplémentaires en tout ? Merci pour votre réponse.
26.03.2024 - 08:36DROPS Design answered:
Bonjour Mme Lenhardt, comme ce modèle a été tricoté avec des manches 3/4, nous n'avons pas la quantité nécessaire pour manches longues - mais vous pouvez vous baser sur un modèle similaire de même tension avec des manches longues; votre magasin DROPS saura également vous conseiller, même par mail ou téléphone. Bon tricot!
02.04.2024 - 10:16Jag har en fråga om halsökningar vid framstycket storlek M. Det står i mönstret att vid 27 cm ska alla ökningar vid v-hals ska vara klara. När man ökar enligt mönstret så är ökningarna vid v- hals klara vid 20 cm. Jag förstår inte varför det blir fel. Masktätheten stämmer enligt beskrivningen. Tacksam för hjälp.
19.03.2024 - 21:32DROPS Design answered:
Hej Elis. Jag ser att det har blivit ett fel i den svenska översättningen. Det ska ökas först på vartannat varv och sedan på vart fjärde varv (inte varje varv). Ber om ursäkt för det och detta är nu rättat. Mvh DROPS Design
20.03.2024 - 07:08Brei het achterpand van boven naar beneden en minder aan elke kant voor de schouders welke ietwat diagonaal worden. dit is niet juist er wordt gemeerderd aan elke kant van de schouder
02.03.2024 - 17:50Stämmer verkligen ökningen av maskor vid halsringningen ” vartannat varv 10 ggr och varje varv 6ggr”? Det verkar inte stämma mot bilden på koftan.
23.02.2024 - 08:58DROPS Design answered:
Hej Inger, jo hvis du har 18 m x 24 varv på 10 cm, så kommer halsen til at se ud som på billedet hvis du følger udtagningerne ifølge opskriften :)
01.03.2024 - 13:57Hallo, ich stricke das Modell in Größe L. Ich habe eine Frage zu den Längen für das Rückenteil und die Vorderteile: das Rückenteil soll nach 16 cm Gesamtlänge stillgelegt werden, die beiden Vorderteile enden nach 28 cm, bevor Rückenteil und die Vorderteile zusammengelegt werden. Was habe ich falsch verstanden? Vielen Dank für Ihre Hilfe. Gruß Renate
18.02.2024 - 16:11DROPS Design answered:
Liebe Renate, die Schulter kommen bei diesen Modellen nicht genau an der Schulterlinie am Körper aber etwas hinten, so werden die Armlöcher kürzer beim Rückenteil (16 cm) als beim Vordeteil (28 cm), so sind es aber (16+28)/2 = 22 cm hoch, siehe Maßskizze - schauen Sie mal auch die Videos: Vorderteile, separat gestrickt und Vorderteil, zusammen gestrickt, so sieht man besser wie die Schulter ausssehen. Viel Spaß beim stricken!
19.02.2024 - 09:28Marshmallow dream
21.01.2024 - 17:56