DROPS Karisma
DROPS Karisma
100% Wool
from 2.30 £ /50g
Get the yarn to make this pattern from 34.50£.

The yarn cost is calculated from the pattern’s smallest size and the yarn’s cheapest product type. Looking for an even better price? You might find it on the DROPS Deals!

DROPS SS24

Boreal Circle

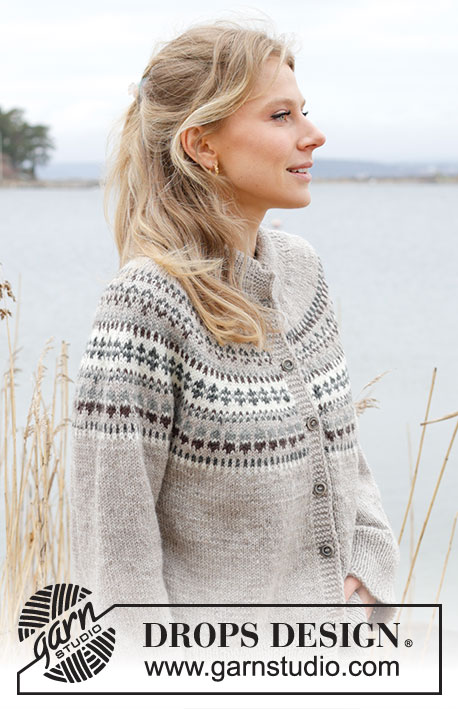
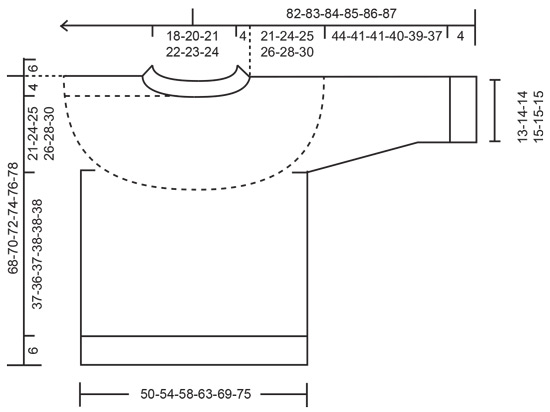
Knitted jumper for men in DROPS Karisma. The piece is worked top down with round yoke, Nordic pattern and double neck. Sizes S - XXXL.

DROPS 246-9
DROPS Design: Pattern u-973
Yarn group B
-------------------------------------------------------

SIZES:
S - M - L - XL - XXL - XXXL

YARN:
DROPS KARISMA from Garnstudio (belongs to yarn group B)
600-650-750-800-850-950 g colour 55, light beige brown
50-50-50-50-50-50 g colour 57, olive
50-50-50-50-50-50 g colour 56, dark brown
50-50-50-50-50-50 g colour 01, off white

NEEDLES:
DROPS CIRCULAR NEEDLES SIZE 4 MM: Length 40 cm and 80 cm.
DROPS CIRCULAR NEEDLES SIZE 3 MM: Length 40 cm and 80 cm.
DROPS DOUBLE POINTED NEEDLES SIZE 4 MM.
DROPS DOUBLE POINTED NEEDLES SIZE 3 MM.
The technique MAGIC LOOP can be used – you then only need 80 cm circular needle in each size.

KNITTING TENSION:
21 stitches in width and 28 rows in height with stocking stitch = 10 x 10 cm.
NOTE: Needle size is only a guide. If you get too many stitches on 10 cm, change to a larger needle size. If you get too few stitches on 10 cm, change to a smaller needle size.

-------------------------------------------------------

Alternative Yarn – See how to change yarns here
Yarn Groups A to F – Use the same pattern and change the yarn here
Yarn usage using an alternative yarn – Use our yarn converter here

-------------------------------------------------------

DROPS Karisma
DROPS Karisma
100% Wool
from 2.30 £ /50g
Get the yarn to make this pattern from 34.50£.

The yarn cost is calculated from the pattern’s smallest size and the yarn’s cheapest product type. Looking for an even better price? You might find it on the DROPS Deals!

Pattern instructions

NOTE: This pattern is written in British English. All measurements in charts are in cm. For conversion from cm to inches - click here. There are different terms for crocheting in British and American English. If this pattern includes crochet, click for "crochet terms" here. For this pattern in American English, please click here.
-------------------------------------------------------

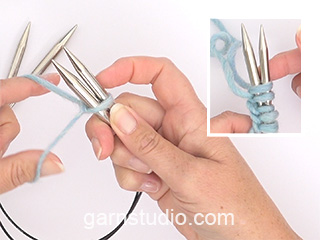
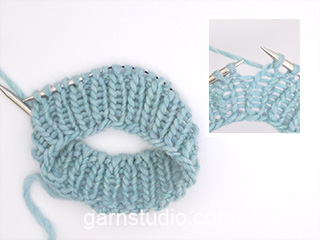
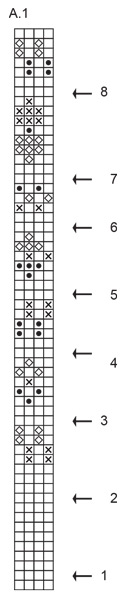
EXPLANATIONS FOR THE PATTERN:
-------------------------------------------------------

PATTERN:
See diagram A.1. The whole pattern is worked in stocking stitch.

INCREASE/DECREASE TIP (evenly spaced):
To work out how to increase/decrease evenly, count the total number of stitches on needle (e.g., 124 stitches) and divide by the number of increases/decreases to be made (e.g., 16) = 7.8. In this example, increase by making 1 yarn over after alternately each 7th and 8th stitch (approx.). On the next round knit the yarn overs twisted to avoid holes. When decreasing, knit together approx. each 7th and 8th stitch.
KNITTING TIP:
To avoid the knitting tension losing its elasticity when working pattern, it is important that the strands at the back are not tight. Use a size larger needle when working pattern if the piece becomes tight.

DECREASE TIP (for sleeves):
Decrease 1 stitch on each side of the marker-thread as follows: Work until there are 3 stitches left before the marker-thread, knit 2 together, knit 2 (marker-thread sits between these 2 stitches), slip 1 stitch knit-wise, knit 1 and pass the slipped stitch over the knitted stitch.

-------------------------------------------------------

START THE PIECE HERE:

-------------------------------------------------------

JUMPER – SHORT OVERVIEW OF THE PIECE:
The neck and yoke are worked in the round with circular needle, from mid back and top down. The yoke is divided for body and sleeves and the body is continued in the round with circular needle. The sleeves are worked in the round with short circular needle/double pointed needles.

DOUBLE NECK:
Cast on 124-132-136-144-148-152 with colour light beige brown DROPS Karisma, using short circular needle sizes 3 mm and 4 mm held together.
Remove the needle size 4 mm keeping stitches on needle size 3 mm (this gives you an elastic cast-on edge). Knit 1 round, then work rib in the round (knit 1, purl 1) for 12 cm. Knit 1 round and decrease 16-16-16-20-20-20 stitches evenly spaced - read INCREASE/DECREASE TIP = 108-116-120-124-128-132 stitches. Neck edge will be later folded down and sewn to get a double neck.

YOKE:
Change to circular needle size 4 mm. Work A.1 over all stitches - Read KNITTING TIP!
REMEMBER THE KNITTING TENSION!
On each row in the diagram with an arrow work as follows:
ARROW-1: Increase 24-28-28-32-36-40 stitches evenly spaced = 132-144-148-156-164-172 stitches.
ARROW-2: Increase 24-28-32-36-36-40 stitches evenly spaced = 156-172-180-192-200-212 stitches.
ARROW-3: Increase 24-28-32-36-36-40 stitches evenly spaced = 180-200-212-228-236-252 stitches.
ARROW-4: Increase 24-28-32-36-36-40 stitches evenly spaced = 204-228-244-264-272-292 stitches.
ARROW-5: Increase 28-28-32-36-40-40 stitches evenly spaced = 232-256-276-300-312-332 stitches.
ARROW-6: Increase 28-28-32-36-40-40 stitches evenly spaced = 260-284-308-336-352-372 stitches.
ARROW-7: Increase 28-32-32-36-40-44 stitches evenly spaced = 288-316-340-372-392-416 stitches.
ARROW-8: Increase 32-32-32-36-40-44 stitches evenly spaced = 320-348-372-408-432-460 stitches.

When A.1 is finished, continue with stocking stitch and colour light beige brown. When the yoke measures 21-24-25-26-28-30 cm from the neck, divide for the body and sleeves:
Knit 49-54-57-62-67-73 (half back piece), place the next 62-66-72-80-82-84 stitches on a thread for the sleeve, cast on 6-6-8-8-10-12 stitches (in side under sleeve), knit 98-108-114-124-134-146 (front piece), place the next 62-66-72-80-82-84 stitches on a thread for the sleeve, cast on 6-6-8-8-10-12 stitches (in side under sleeve), knit the last 49-54-57-62-67-73 stitches (half back piece). The body and sleeves are finished separately. The piece is now measured from here!

BODY:
BODY:
= 208- 228-244-264-288-316 stitches. Continue with stocking stitch in the round and colour light beige brown for a further 37-36-37-38-38-38 cm. Knit 1 round and increase 22- 22-24-26-30-32 stitches evenly spaced = 230- 250-268-290-318-348 stitches.
Change to circular needle size 3 mm. Work rib (knit 1, purl 1) for 6 cm. Cast off a little loosely. The jumper measures approx. 68-70-72-74-76-78 cm from the shoulder.

SLEEVES:
Place the 62-66-72-80-82-84 stitches from the thread on the one side of the piece on short circular needle/double pointed needles size 4 mm and knit up 1 stitch in each of the 6-6-8-8-10-12 stitches cast on under the sleeve = 68-72-80-88-92-96 stitches. Insert a marker-thread in the middle of the new stitches under the sleeve.
Start at the marker-thread and work stocking stitch in the round with colour light beige brown.
When the sleeve measures 3 cm, decrease 2 stitches mid under the sleeve – read DECREASE TIP. Decrease like this every 5-5-3½-2½-2½-2 cm a total of 8-8-11-14-15-16 times = 52-56-58-60-62-64 stitches. Continue working until the sleeve measures 44-41-41-40-39-37 cm from the division (or to desired length. There is approx. 4 cm left). Knit 1 round and increase 6-6-6-6-6-6 stitches evenly spaced = 58-62-64-66-68-70 stitches. Change to double pointed needles size 3 mm and work rib (knit 1, purl 1) for 4 cm. Cast off a little loosely. The sleeve measures approx. 48-45-45-44-43-41 cm.
Work the other sleeve in the same way.

ASSEMBLY:
Fold the neck double to the inside and sew down. To avoid the neck being tight and rolling outwards, it is important that the seam is elastic.

This pattern has been corrected.

Updated online: 11.01.2024
Pattern has been reviewed and updated. Change in the number of stitches on body, size M.

Diagram

symbols = light beige brown
symbols = off white
symbols = olive
symbols = dark brown
diagram
diagram

Each of our patterns has specific tutorial videos to help you.

Do you have a question? See a list of frequently asked questions (FAQ)

Knitting tension is what determines the final measurements of your work, and is usually measured per 10 x 10 cm. It is provided like so: number of stitches in width x number of rows in height - eg: 19 stitches x 26 rows = 10 x 10 cm.

The knitting tension is very individual; some people knit/crochet loosely while others work tightly. You adjust the knitting tension with the needle size, which is why the suggested needle size is only meant as a guide! You need to adjust this (up or down) to ensure that YOUR knitting tension matches the knitting tension provided in the pattern. If you work with a different knitting tension than provided you will have a different yarn consumption, and your work will have different measurements than what the pattern suggests.

The knitting tension also determines which yarns can replace each other. As long as you achieve the same knitting tension you can replace one yarn with another.

See DROPS lesson: How to measure your tension/gauge

See DROPS video: How to make a gauge tension swatch

The required amount of yarn is provided in grams, eg: 450 g. To calculate how many balls you’ll need you first need to know how many grams are in 1 ball (25g, 50g or 100g). This information is available if you click on the individual yarn quality on our pages. Divide the amount required with the amount of each ball. For example, if each ball is 50g (the most common amount), the calculation will be as follows: 450 / 50 = 9 balls.

The important thing when changing from one yarn to another is that the knitting/crochet tension remains the same. This is so that the measurements of the finished piece will be the same as on the sketch provided. It is easier to achieve the same knitting tension using yarns from the same yarn group. It is also possible to work with multiple strands of a thinner yarn to achieve the knitting tension of a thicker one. Please try our yarn converter. We recommend you to always work a test swatch.

Please NOTE: when changing yarn the garment might have a different look and feel to the garment in the photo, due to individual properties and qualities of each yarn.

See DROPS lesson: Can I use a different yarn than the one mentioned in the pattern?

All our yarns are categorised into yarn groups (from A to F) according to thickness and knitting tension – group A contains the thinnest yarns and group F the thickest. This makes it easier for you to find alternative yarns to our patterns, should you wish to switch yarn. All yarns within the same group have a similar knitting tension and can easily replace each other. However, different yarn qualities have different structures and properties which will give the finished work a unique look and feel.

Click here for an overview of the yarns in each yarn group

At the top of all our patterns you’ll find a link to our yarn calculator, which is a helpful tool should you wish to use a different yarn than suggested. By filling in the yarn quality you wish to replace, the amount (in your size) and number of strands, the calculator will present good alternative yarns with the same knitting tension. Additionally it will tell you how much you’ll require in the new qualities and whether you’ll need to work with multiple strands. Most skeins are 50g (some are 25g or 100g).

If the pattern is worked with multiple colours, every colour will have to be calculated separately. Similarly, if the pattern is worked with several strands of different yarns (for example 1 strand Alpaca and 1 strand Kid-Silk) you will have to find alternatives for each, individually.

Click here to see our yarn calculator

Since different yarns have different qualities and textures we have chosen to keep the original yarn in our patterns. However, you can easily find options among our available qualities by using our yarn calculator, or simply pick a yarn from the same yarn group.

It is possible that some retailers still have discontinued yarns in stock, or that someone has a few skeins at home that they would like to find patterns for.

The yarn calculator will provide both alternative yarn as well as required amount in the new quality.

If you think it's hard to decide what size to make, it can be a good idea to measure a garment you own already and like the size of. Then you can pick the size by comparing those measures with the ones available in the pattern's size chart.

You'll find the size chart at the bottom of the pattern.

See DROPS lesson: How to read size chart

The needle size provided in the pattern serves only as a guide, the important thing is to follow the knitting tension. And since knitting tension is very individual, you will have to adjust the needle size to ensure that YOUR tension is the same as in the pattern – maybe you’ll have to adjust 1, or even 2 needle sizes, up or down to achieve the correct tension. For this, we recommend that you work test swatches.

Should you work with a different knitting tension than the one provided, the measurements of the finished garment might deviate from the measurement sketch.

See DROPS lesson: How to measure your tension/gauge

See DROPS video: How to make a tension/gauge swatch

Working a garment top-down provides more flexibility and room for personal adjustment. For example it is easier to try the garment on while working, as well as making adjustments to length of yoke and shoulder caps.

The instructions are carefully explaining every step, in the correct order. Diagrams are adjusted to the knitting direction and are worked as usual.

The diagram depicts all rows/rounds, and every stitch seen from the right side. It is read from bottom to top, from right to left. 1 square = 1 stitch.

When working back and forth, every other row is worked from the right side and every other row is worked from the wrong side. When working from the wrong side, the diagram will have to be worked reversed: from left to right, knit stitches are purled, purl stitches are knit etc.

When working in the round every round is worked from the right side and the diagram are worked from right to left on all rounds.

See DROPS lesson: How to read knitting diagrams

The diagram depicts all rows/rounds, and every stitch seen from the right side. It is worked from bottom to top, from right to left.

When working back and forth every other row is worked from the right side: from right to left and every other row is worked from the wrong side: from left to right.

When working in the round, every row in the diagram are worked from the right side, from right to left.

When working a circular diagram you start in the middle and work your way outwards, counter clockwise, row by row.

The rows usually start with a given number of chain stitches (equivalent to the height of the following stitch), this will either be depicted in the diagram or explained in the pattern.

See DROPS lesson: How to read crochet diagrams

Instructions for working several diagrams after each other on the same row/round, will often be written like so: “work A.1, A.2, A.3 a total of 0-0-2-3-4 times". This means you work A.1 once, then A.2 is worked once, and A.3 is repeated (in width) the number of times provided for your size – in this case like so: S = 0 times, M = 0 times, L=2 times, XL= 3 times and XXL = 4 times.

The diagrams are worked as usual: begin with the first row in A.1, then work the first row in A.2 etc.

See DROPS lesson: How to read knitting diagrams

See DROPS lesson: How to read crochet diagrams

The total width of the garment (from wrist-to-wrist) will be larger in the larger sizes, despite the actual sleeves being shorter. The larger sizes have longer sleeve caps and wider shoulders, so there will be a good fit in all sizes.

The measurement sketch/schematic drawing provides information regarding the full length of the garment. If it’s a jumper or a jacket the length is measured from the highest point on the shoulder closest to the neckline, and straight down to the bottom of the garment. It is NOT measured from the tip of shoulder. Similarly, the length of yoke is measured from the highest point on the shoulder and down to where yoke is split into body and sleeves.

On a jacket measures are never taken along bands, unless specifically stated. Always measure inside band stitches when measuring the length.

See DROPS lesson: How to read a schematic drawing

Diagrams are often repeated on the round or in height. 1 repeat is the diagram the way it appears in the pattern. If it says to work 5 repeats of A.1 in the round, then you work A.1 a total of 5 times after/next to each other in the round. If it says to work 2 repeats of A.1 vertically/in height you work the entire diagram once, then begin again at the start and work the entire diagram one more time.

Chain stitches are slightly narrower than other stitches and to avoid working the cast-on edge too tight, we simply chain more stitches to begin with. The stitch count will be adjusted on the following row to fit the pattern and measurement sketch.

The rib edge is more elastic and will contract slightly compared to, for example, stocking stitch. By increasing before the rib edge, you avoid a visible difference in width between the rib edge and the rest of the body.

It’s very easy to cast off too tightly, and by making yarn overs while casting off (and simultaneously casting these off) you avoid a too tight cast off edge.

See DROPS video: How to bind off with yarn overs (yo)

To achieve an even increase (or decrease) you can increase on, for example: every 3rd and 4th row alternately, like so: work 2 rows and increase on the 3rd row, work 3 rows and increase on the 4th. Repeat this until the increase is complete.

See DROPS lesson: Increase or decrease 1 st on every 3rd and 4th row alternately

Should you prefer to work in the round instead of back and forth, you may of course adjust the pattern. You’ll need to add steeks mid-front (usually 5 stitches), and follow the instructions. When you would normally turn and work from the wrong side, simply work across the steek and continue in the round. At the end you’ll cut the piece open, pick up stitches to work bands, and cover the cut edges.

See DROPS video: How to knit steeks and cut open

Should you prefer to work back and forth instead of in the round, you may of course adjust the pattern so you work the pieces separately and then assemble them at the end. Divide the stitches for the body in 2, add 1 edge stitch in each side (for sewing) and work the front and back pieces separately.

See DROPS lesson: Can I adapt a pattern for circular needles into straight needles?

Pattern repeats can vary slightly in the different sizes, in order to get the correct proportions. If you’re not working the exact same size as the garment in the photo, yours might deviate slightly. This has been carefully developed and adjusted so that the complete impression of the garment is the same in all sizes.

Make sure to follow instructions and diagrams for your size!

If you have found a pattern you like which is available in women’s size it’s not very difficult to convert it to men’s size. The biggest difference will be the length of sleeves and body. Start working on the women size that you think would fit across the chest. The additional length will be worked right before you cast off for the armhole/sleeve cap. If the pattern is worked top-down you can add the length right after the armhole or before the first decrease on sleeve.

Regarding additional yarn amount, this will depend on how much length you add, but it is better with a skein too many than too few.

All yarns will have excess fibres (from production) that might come off as lint or shedding. Brushed yarns (ie hairier yarns) have more of these loose, excess fibres, causing more shedding.

Shedding also depends on what is worn under or over the garment, and whether this pulls at the yarn fibres. It’s therefore not possible to guarantee that there will be no shedding

Below are some tips on how to get the best result when working with hairier yarns:

1. When the garment is finished (before you wash it) shake it vigorously so the looser hairs come off. NOTE: do NOT use a lint roller, brush or any method that pulls at the yarn.

2. Place the garment in a plastic bag and put it in your freezer - the temperature will cause the fibres to become less attached to each other, and excess fibres will come off easier.

3. Leave in the freezer for a few hours before taking it out and shaking it again.

4. Wash the garment according to the instructions on the yarn label.

Pilling is a natural process that happens to even the most exclusive of fibers. It's a natural sign of wear and tear that is hard to avoid, and that is most visible in high friction areas of your garment like a sweater's arms and cuffs.

You can make your garment look as new by removing the pilling, using a fabric comb or a pill/lint remover.

Still can't find the answer you need? Then scroll down and leave your question so one of our experts can try to help you. This will be done normally within 5 to 10 working days.
In the meantime, you can read the questions and answers that others have left to this pattern or join the DROPS Workshop on Facebook to get help from fellow knitters/crocheters!

You might also like...

Post a comment to pattern DROPS 246-9

We would love to hear what you have to say about this pattern!

If you want to leave a question, please make sure you select the correct category in the form below, to speed up the answering process. Required fields are marked *.

Comments / Questions (3)

country flag Vera wrote:

Koko m. Kun lasken etukpl, takakpl, kainaloon lisätyt lukee 234silmukkaa, 108+108+6+6=228. Ei täsmää. Lisäksi hihasta tulossa m koossa vain 34cm leveä ylhäällä kun aletaan neuloa hihaa alaspäin, korkeus siinä on kuitenkin 24cm? 72s silmukkaa alussa, siitä tulee 34cm ympärys joka kuulostaa kovin pieneltä m kokoon.

18.01.2024 - 18:50

country flag Martine wrote:

Bonjour. J'ai déjà tricoté un autre modèle de pull nordique. Il y avait une possible réhausse dos, je l'ai faite et cela va très bien. Pour d'autres modèles dont celui-ci, il n'est pas indiqué cette possibilité. Puis-je en faire une quand même ou cela va-t-il déformer le tricot ? Merci. Martine

17.12.2023 - 18:34

DROPS Design answered:

Bonjour Martine, vous pouvez tout. fait ajouter des rangs raccourcis pour former une rehausse si vous le souhaitez. Tricotez ensuite comme indiqué dans les explications mais mesurez bien le long du milieu du devant (sans compter la rehausse, sinon le devant serait plus long). Bon tricot!

18.12.2023 - 09:05

country flag Kari Janne Berg wrote:

Jeg har 20 cm før jeg er ferdig med diagram A1. hva gjør jeg da?

18.11.2023 - 11:00

DROPS Design answered:

Hei Kari Janne. Er strikkefastheten i høyden overholdt og hvilken str. strikker du? Hvor er du i diagrammet når arbeidet måler 20 cm. Diagrammet består av 58 pinner og når A.1 er strikket skal arbeidet måle ca 21 cm (se oppgitt strikkefasthet). Strikker du den minste str, vil man da etter A.1 dele til bol og erme. mvh DROPS Design

20.11.2023 - 09:51