
Popular categories
Looking for a yarn?


Comments / Questions (35)
![]() Isabelle Malgrey wrote:
Isabelle Malgrey wrote:
Bonjour Je trouve les explications difficile à comprendre. Est ce bien traduit en français ?. Dans les explications difficile de comprendre la façon qu on progresser dans l ouvrage Merci Cldt
05.06.2025 - 14:16DROPS Design answered:
Bonjour Mme Maigrey, les explications sont peut être écrites de façon différente de celle dont vous avez l'habitude, mais si vous suivez bien les indications pas à pas, vous arriverez à les suivre. Lisez attentivement l'intégralité des explications, retrouvez sous les onglets Vidéos / Leçons (en haut de page) des astuces qui pourront éventuellement vous aider, et, si vous avez besoin de précision, n'hésitez pas à poser votre question dans cet espace, nous essaierons de vous aider. Bon tricot!
05.06.2025 - 15:28
![]() Kayley wrote:
Kayley wrote:
In der Anleitung zu den Beinen steht bei der Größe 1/3 steht dass man weiter stricken soll bis das Bein 15cm misst und dann zunehmen soll. Müsste es hier nicht mindestens 16 cm statt 15 cm heißen? Wenn man bei 2 cm beginnt und alle 2 cm insgesamt 7-mal abnimmt (2 + 2×7 = 16), ergibt das doch schon 16 cm?
29.05.2025 - 02:20DROPS Design answered:
Liebe Kayley, in die 2. Grösse wird man 2 Mal zunehmen, so stricken Sie die Zunahmen: die 1. nach 2 cm, die 2. nach 9 cm (2 cm+ 7 = 9 cm), dann weiterstricken bis der Bein 15 cm misst. Viel Spaß beim Stricken!
30.05.2025 - 08:40
![]() Olivia Racionzer wrote:
Olivia Racionzer wrote:
The sleeve cap is confusing me, it doesnt match the diagram. I made the sleeve 17cm , then split the stitches in half (29 and 29) and then went back and forth until it reached 20cm. The sleeve now has a step in it and doesnt match the armhole. Is there a way i can upload a photo, or whether someone has a photo of what it looks like before sewing together? Thanks!
06.05.2025 - 21:34DROPS Design answered:
Hi Olivia, The stitches are divided mid-under the sleeve (at the marker-thread) into one row (not 2) which is worked back and forth to finished length. So at the end of the last round, instead of continuing in the same direction, you turn at the marker-thread and work back from the wrong side to the marker-thread, then turn again and work from the right side. This gives you a split mid-under the sleeve. Regards, Drops Team.
07.05.2025 - 06:43
![]() Truus wrote:
Truus wrote:
Tip over de knoopsgaten. Met 76 st kom je precies goed uit. De knoopsgaten komen dan op de st 4-5, 20-21, 36-37, 52-53 en 68-69.
10.03.2025 - 16:17
![]() Sirpa wrote:
Sirpa wrote:
Etukappaleeseen luodut silmukat..,luodaanko ne jokatoisella kerroksella,esim 1silmukka joka 2. kerros,ja 2silmukkaa x3 joka 2.kerros
24.02.2025 - 11:14DROPS Design answered:
Kyllä, silmukat luodaan joka toisella kerroksella, eli ne luodaan jokaisen oikean puolen kerroksen loppuun.
24.02.2025 - 18:51
![]() Vicki L Pollock wrote:
Vicki L Pollock wrote:
What is meant by "divide the stitches at the stitch marker and finish off the sleeve cap"? I don't see anything in the pattern for making the sleeve cap.
19.01.2025 - 04:05DROPS Design answered:
Dear Vicky, when you kmit the sleeves and reach 13-17-19-22 (26-30) cm, you divide the stitches on the sleeve at the marker and continue to knit back and forth until the sleeve is 16-20-21-24 (28-32) cm. This part, that you've knitted back and forth will be acting as a "sleeve cap" the part that you will sew into the armhole. I hope this helps. Happy Crafting!
19.01.2025 - 14:00
![]() Natalie Edgley wrote:
Natalie Edgley wrote:
I can’t seem to find the diagram A.1 can someone please explain what the pattern is in the missing diagram
29.12.2024 - 01:36DROPS Design answered:
Hi, the diagram is quite small, just above the drawing. Repeat is 4 sts and 4 rows. You work 1st row: 2 sts purl from right side, knit from wrong side, 2 sts knit from right side, purl from wrong side. 2nd row is the same. 3rd row you change patterns, so knit 2 sts knit from right side, purl from wrong side, 2 sts purl from right side, knit from wrong side. 4th row is smae as 3rd row. Happy knitting!
29.12.2024 - 11:12
![]() Sophie wrote:
Sophie wrote:
Bei Größe 56/62: Nach der ersten Abnahme am Bein beidseitig des Markierers habe ich bis zur nächsten Abnahme (nach 7 cm) 50 Maschen - das bringt aber das Muster durcheinander. Wie soll ich bis zur nächsten Abnahme weiterstricken?
01.12.2024 - 20:51DROPS Design answered:
Liebe Sophie, Muster stricken Sie in der Höhe genauso wie zuvor, nun wird das Muster nicht bei der inneren Mitte (bei der Markierung) passen; aber über die restlichen Maschen sollen Sie genauso wie zuvor stricken. Viel Spaß beim Stricken!
02.12.2024 - 10:13
![]() Johanna wrote:
Johanna wrote:
Aber noch mal: ich habe 120 Maschen und stricke in Runden. 2R, 2L, also sind Maschen Nr 119+120 linke Maschen. Nach 2 Runden wechselt mein Muster auf 2L, 2R, also sind Maschen Nr 1+ 2 linke Maschen. Also stricke ich im Übergang von Runde 2 auf Runde 3 vier linke Maschen am Stück, oder? Und im Übergang von Runde 4 auf 5 vier rechte Maschen am Stück…?
06.11.2024 - 22:40DROPS Design answered:
Liebe Johanna, meinen Sie das nur beim Übergang zwischen Runden? Dann ja genau, um das etwas unsichtbar zu machen, können Sie versuchen, die Maschen/der Faden etwas zu ziehen damit die Maschen mehr nebeneinander sind. Viel Spaß beim Stricken!
07.11.2024 - 09:15
![]() Johanna wrote:
Johanna wrote:
Hallo, Noch mal zu meiner vorherigen Frage: aber wann mache ich dann denn den Wechsel? Wenn ich in Runden immer 2R2L über 120M stricke, bekomme ich doch ein Rippen-Muster. Irgendwo muss ich doch den Versatz machen von 2R2L zu 2L2R, oder nicht?
06.11.2024 - 11:41DROPS Design answered:
Liebe Johanna, das Muster sollen Sie wie zuvor weitersticken, dh abewchslungsweise 2 Reihen/Runden mit 2 L, 2 R und 2 R, 2 l genauso wie in A.1 gezeigt, damit kein Rippenmuster entsteht. Viel Spaß beim Stricken!
06.11.2024 - 12:20
|
||||||||||
Lili Rose#liliroseoverall |
||||||||||
 |
 |
|||||||||
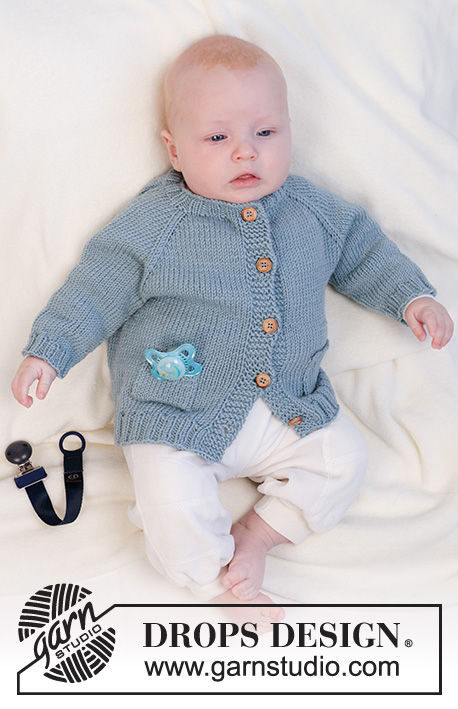
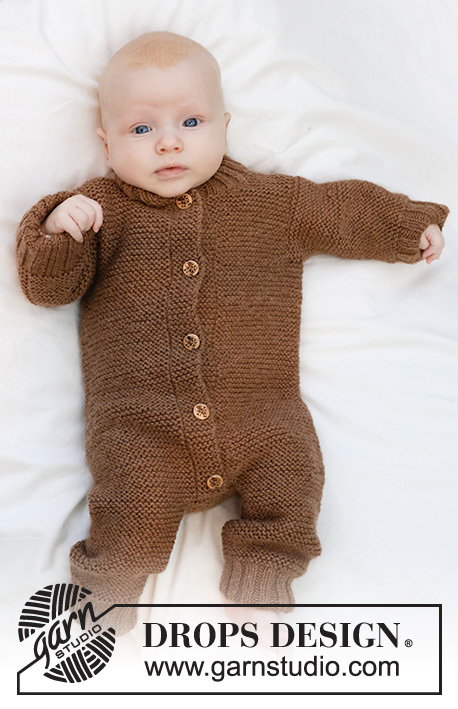
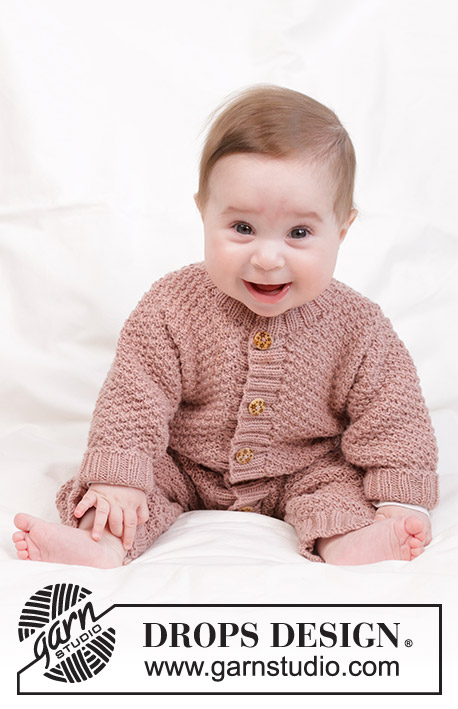
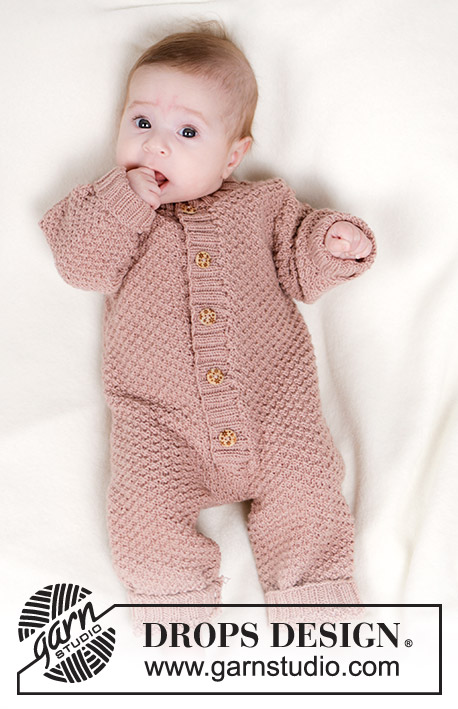
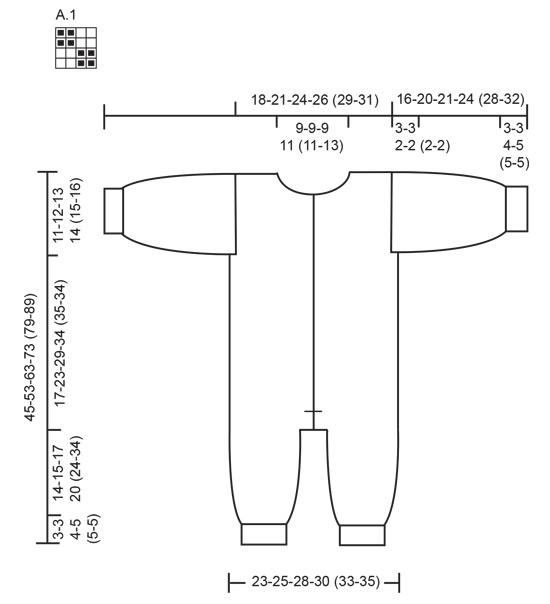
Knitted suit for babies in DROPS BabyMerino. The piece is worked top down with moss stitch. Sizes 0 – 4 years.
DROPS Baby 45-5 |
||||||||||
|
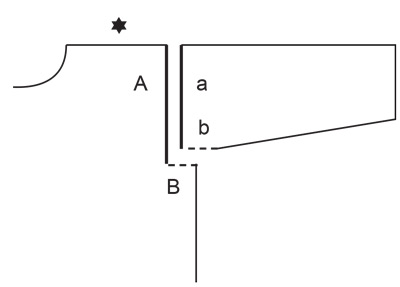
------------------------------------------------------- EXPLANATIONS FOR THE PATTERN: ------------------------------------------------------- GARTER STITCH (worked back and forth): Knit all rows. 1 ridge = knit 2 rows. PATTERN: See diagram A.1. The diagram shows all rows in the pattern from the right side. DECREASE TIP (inside leg): Start 2 stitches before the marker, knit 2 together, (marker), knit 2 twisted together. INCREASE TIP (for sleeves): Work until there is 1 stitch left before the marker thread, make 1 yarn over, knit 2 (marker thread sits between these stitches), 1 yarn over (2 increased stitches). On the next round knit the yarn overs twisted to avoid holes. Then work the new stitches into the pattern. ------------------------------------------------------- START THE PIECE HERE: ------------------------------------------------------- SUIT - SHORT OVERVIEW OF THE PIECE: The back and front pieces are worked separately, top down, then joined and continued back and forth with circular needle. Stitches are cast off for the crotch and the legs are finished in the round separately. The sleeves are worked in the round and sewn in. The bands and neck are worked to finish. BACK PIECE: Each shoulder is worked separately before being joined, and stitches cast on for the neck. RIGHT SHOULDER: Cast on 10-14-18-18 (22-22) stitches with circular needle size 3.5 mm and DROPS Baby Merino. Work the first row from the right side as follows: 1 edge stitch in GARTER STITCH – read description above, work pattern A.1 until there is 1 stitch left, 1 edge stitch in garter stitch. Continue this pattern. When the piece measures 2 cm, cast on 1 stitch for the neck at the end of the row from the wrong side = 11-15-19-19 (23-23) stitches. REMEMBER THE KNITTING TENSION! Lay the piece to one side. LEFT SHOULDER: Cast on and work in the same way as the right shoulder but cast on 1 stitch for the neck at the end of a row from the right side. Work 1 row from the wrong side. BACK PIECE: Work the left and right shoulders together from the right side as follows: Work the 11-15-19-19 (23-23) stitches from the left shoulder as before, cast on 20-20-20-24 (24-28) stitches for the neck, work the 11-15-19-19 (23-23) stitches from the right shoulder as before = 42-50-58-62 (70-74) stitches. Continue the pattern back and forth with 1 edge stitch in garter stitch on each side until the piece measures 11-12-13-14 (15-16) cm and the last row was from the wrong side. Lay the piece to one side. FRONT PIECE: Each front piece is worked separately and new stitches are cast on for the neck. The parts are then put together and the suit is continued in the round. RIGHT FRONT PIECE: Cast on 10-14-18-18 (22-22) stitches with circular needle size 3.5 mm and DROPS Baby Merino. Work the first row from the right side as follows: 1 edge stitch in garter stitch, work A.1 until there is 1 stitch left, 1 edge stitch in garter stitch. Continue this pattern. When the piece measures 3-3-4-4 (5-5) cm, cast on for the neck at the end of each row from the right side as follows: 1 stitch 2 times, then 2 stitches 3-3-3-4-4-5 times = 18-22-26-28 (32-34) stitches. Continue the pattern with 1 edge stitch in garter stitch on each side until the piece measures 11-12-13-14 (15-16) cm, with the last row from the wrong side (matches the back piece). Lay the piece to one side and work left front piece. LEFT FRONT PIECE: Cast on and work in the same way as the right front piece, casting on stitches for the neck at the end of each row from the wrong side. SUIT: Join all the pieces, working back and forth with needle size 3.5 mm as follows: Work the left front piece, cast on 14-10-10-10 (10-10) stitches for the armhole, work the back piece, cast on 14-10-10-10 (10-10) stitches for the armhole and work the right front piece = 106-114-130-138 (154-162) stitches. Continue the pattern with 1 edge stitch in garter stitch on each side until the piece measures 12-18-24-29 (30-29) cm from where the piece was put together under the sleeves. Cast off the edge stitches on the next 2 rows (start from the right side) = 104-112-128-136 (152-160) stitches. Now work for the crotch as follows: Work all stitches as before and cast on 8 stitches at the end of the row from the right side = 112-120-136-144 (160-168) stitches. Insert 1 marker-thread here – allow it to follow your work onwards. Continue in the round with pattern over all stitches, until the piece measures 17-23-29-34-35-34 cm from where the piece was joined after the armholes. Divide for the legs as follows: Start 6-8-10-10 (14-14) stitches before the marker-thread, cast off the next 4-8-12-12 (20-20) stitches, work the next 52-52-56-60 (60-64) stitches and place them on a thread/stitch-holder, cast off 4-8-12-12 (20-20) stitches, work the next 52-52-56-60 (60-64) stitches. Now work the right leg. LEGS: = 52-52-56-60 (60-64) stitches. Use double pointed needles size 3.5 mm. Insert a marker inside leg and continue A.1 in the round. When the leg measures 2 cm, decrease 1 stitch on each side of the marker – read DECREASE TIP. Decrease like this every 3-7-7-5 (10-15) cm a total of 4-2-2-4 (2-2) times = 44-48-52-52 (56-60) stitches. Continue working until the leg measures 14-15-17-20 (24-34) cm. Knit 1 round and increase 4-4-4-4 (8-12) stitches evenly spaced = 48-52-56-56 (64-72) stitches. Change to double pointed needles size 3 mm and work rib (knit 2, purl 2) for 3-3-4-5 (5-5) cm. Cast off with knit. The leg measures 17-18-21-25 (29-39) cm. Work the other leg in the same way. SLEEVES: Cast on 44-44-48-56 (56-60) stitches with double pointed needles size 3 mm and DROPS Baby Merino. Knit 1 round, then work rib (knit 2, purl 2) for 3-3-4-5 (5-5) cm. Change to double pointed needles size 3.5 mm. Insert 1 marker-thread at the beginning of the round = mid-under sleeve. Work A.1. When the sleeve measures 5-6-7-9 (9-10) cm, increase 1 stitch on each side of the marker-thread - read INCREASE TIP. Increase like this every 2-1½-1½-1½ (2-2½) cm a total of 4-7-7-6 (8-8) times = 52-58-62-68 (72-76) stitches. Work until the sleeve measures 13-17-19-22 (26-30) cm. Divide the sleeve at the marker thread and finish the sleeve cap back and forth. Cast off when the sleeve measures 16-20-21-24 (28-32) cm. Work the other sleeve in the same way. RIGHT BAND: Start from the right side, where stitches were cast on for the crotch. Use circular needle size 3 mm and knit up 48 to 96 stitches (stitch-count should be divisible by 4) inside the 1 edge stitch along the right front piece as far as the neck. Purl 1 row from the wrong side. Work rib as follows from the right side: 1 edge stitch in garter stitch, * knit 2, purl 2 *, work from *-* until there are 3 stitches left, knit 2 and 1 edge stitch in garter stitch. Continue this rib for 1 cm. Now work 5-5-5-6 (6-6) buttonholes evenly spaced. 1 buttonhole = cast off 2 stitches and cast on 2 stitches over the cast-off stitches on the next row - NOTE: It is neatest if you work the buttonholes in purled sections (seen from the right side). The bottom buttonhole is 3 cm from the bottom edge, the top buttonhole 1 cm from the top edge. Place the remaining buttonholes evenly spaced between these two. Continue working until the band measures 3 cm. Cast off. LEFT BAND: Start from the right side at the top of the left front piece. Use circular needle size 3 mm and knit up stitches in the same way as on the right front piece. Purl 1 row from the wrong side and work rib in the same way as on the right band – do not work buttonholes. NECK: Start mid-front from the right side and knit up 68 to 88 stitches (stitch-count should be divisible by 4) around the neck, with circular needle size 3 mm and DROPS Baby Merino. Work rib from the wrong side as follows: 1 edge stitch in garter stitch, purl 2, * knit 2, purl 2 *, work from *-* until there is 1 stitch left, 1 edge stitch in garter stitch. Work this rib for 2-2-3-3 (3-3) cm. Cast off with knit from the right side. ASSEMBLY: Sew the shoulder seams. Sew the sleeve cap to the armhole, then the top 3-3-2-2 (2-2) cm of the sleeve to the bottom of the armhole– see sketch. Sew the opening between the legs. Lay the right band over the left and fasten to the suit where stitches were cast on for the crotch. Sew the buttons onto the left band. The rib on the sleeves and legs can be folded up. |
||||||||||
Diagram explanations |
||||||||||
|
||||||||||
|
||||||||||
|
||||||||||
Have you finished this pattern?Tag your pictures with #dropspattern #liliroseoverall or submit them to the #dropsfan gallery. Do you need help with this pattern?You'll find 27 tutorial videos, a Comments/Questions area and more by visiting the pattern on garnstudio.com. © 1982-2025 DROPS Design A/S. We reserve all rights. This document, including all its sub-sections, has copyrights. Read more about what you can do with our patterns at the bottom of each pattern on our site. |
||||||||||


With over 40 years in knitting and crochet design, DROPS Design offers one of the most extensive collections of free patterns on the internet - translated to 17 languages. As of today we count 314 catalogues and 11822 patterns translated into English (UK/cm).
We work hard to bring you the best knitting and crochet have to offer, inspiration and advice as well as great quality yarns at incredible prices! Would you like to use our patterns for other than personal use? You can read what you are allowed to do in the Copyright text at the bottom of all our patterns. Happy crafting!
Post a comment to pattern DROPS Baby 45-5
We would love to hear what you have to say about this pattern!
If you want to leave a question, please make sure you select the correct category in the form below, to speed up the answering process. Required fields are marked *.