
Popular categories
Looking for a yarn?


|
|||||||||||||||||||
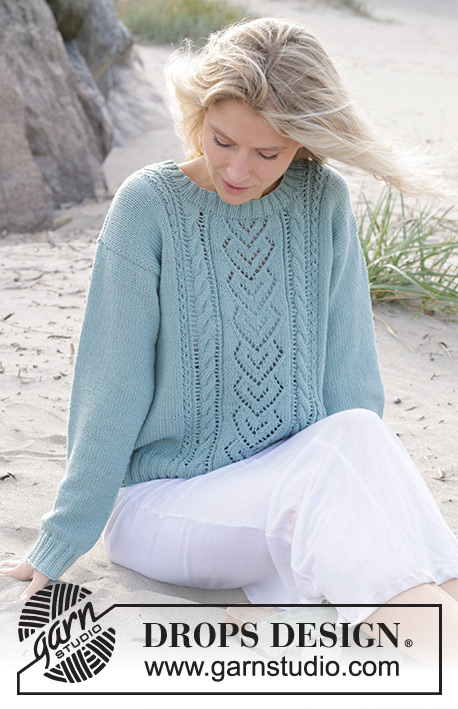
Hope Bay Top |
|||||||||||||||||||
 |
 |
||||||||||||||||||
Knitted short-sleeved jumper in DROPS Muskat. The piece is worked top down with double neck and wave-pattern on a round yoke. Sizes S - XXXL.
DROPS 241-32 |
|||||||||||||||||||
|
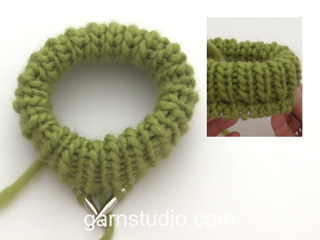
------------------------------------------------------- EXPLANATIONS FOR THE PATTERN: ------------------------------------------------------- PATTERN: See diagram A.1. Choose diagram for your size. INCREASE TIP: Increase 1 stitch by making 1 yarn over, which is worked twisted on the next row to avoid a hole. ELEVATION: To make the back of the neck slightly higher when working a round yoke, you can work an elevation as described here. Skip this section if you do not want an elevation. Insert 1 marker at the beginning of the round (mid-back). Start from the right side and knit 16-17-18-19-20-21 stitches past the marker, turn, tighten strand and purl 32-34-36-38-40-42 stitches back. Turn, tighten strand and knit 48-51-54-57-60-63 stitches, turn, tighten strand and purl 64-68-72-76-80-84 stitches back. Turn, tighten strand and knit 80-85-90-95-100-105 stitches, turn, tighten strand and purl 96-102-108-114-120-126 stitches. Turn, tighten the strand and knit to mid-back. DECREASE TIP (for sleeves): Decrease 1 stitch on either side of the marker-thread as follows: Work until there are 3 stitches left before the marker-thread, knit 2 together, knit 2 (marker-thread sits between these 2 stitches), slip 1 stitch as if to knit, knit 1 and pass the slipped stitch over the knitted stitch. ------------------------------------------------------- START THE PIECE HERE: ------------------------------------------------------- JUMPER – SHORT OVERVIEW OF THE PIECE: The neck and yoke are worked in the round with circular needle, from mid back and top down. An elevation can be worked mid-back of neck. The yoke is divided for body and sleeves and the body is continued in the round with circular needle. The sleeves are worked in the round with short circular needle/double pointed needles. DOUBLE NECK: Cast on 110-114-118-122-126-130 stitches with DROPS Muskat, using short circular needles size 3 mm and 4 mm held together. Remove the needle size 4 mm (this gives you an elastic cast-on edge) and keep the stitches on circular needle size 3 mm. Work rib in the round (knit 1, purl 1) for 9 cm. Fold the neck double to the inside and work 1 more round of rib, working every 2nd stitch together with its corresponding stitch on the cast-on edge. You now have a double neck. YOKE: Change to circular needle size 4 mm. Knit 1 round and increase 32-32-34-34-36-38 stitches evenly spaced – read INCREASE TIP = 142-146-152-156-162-168 stitches. Insert 1 marker in the middle of the round (mid-front) – this is used to measure the yoke You can now work an ELEVATION at the back of the neck – read description above. If you do not want an elevation continue below. Work stocking stitch until the yoke measures 3-4-5-5-5-6 cm from the marker. Increase 20-25-28-33-36-39 stitches evenly spaced = 162-171-180-189-198-207 stitches. When the piece measures 4-5-6-6-6-7 cm from the marker, work A.1,18-19-20-21-22-23 times around the yoke. Continue the pattern and increase as shown in the diagram. REMEMBER THE KNITTING TENSION! When A.1 is finished, the piece measures approx. 15-16-17-19-19-20 cm from the marker (measured to where the wave pattern arches up) and there are 306-323-340-399-418-437 stitches. Continue with stocking stitch and increase 6-17-24-1-6-15 stitches evenly on the first round = 312-340-364-400-424-452 stitches. When the piece measures 18-19-21-22-24-26 cm from the marker, divide for the body and sleeves: Work 47-52-55-60-65-71 stitches (half back piece), place the next 62-66-72-80-82-84 stitches on a thread for the sleeve, cast on 6-6-8-8-10-12 stitches (in side under sleeve), work 94-104-110-120-130-142 stitches (front piece), place the next 62-66-72-80-82-84 stitches on a thread for the sleeve, cast on 6-6-8-8-10-12 stitches (in side under sleeve), work the last 47-52-55-60-65-71 stitches (half back piece). The body and sleeves are finished separately. The piece is now measured from here! BODY: = 200-220-236-256-280-308 stitches. Continue with stocking stitch for a further 25-26-26-27-27-27 cm. Knit 1 round and increase 20-20-22-24-28-28 stitches evenly spaced = 220-240-258-280-308-336 stitches. Change to circular needle size 3 mm. Work rib (knit 1, purl 1) for 4 cm. Cast off a little loosely. The jumper measures approx. 52-54-56-58-60-62 cm from the shoulder. SLEEVES: Place the 62-66-72-80-82-84 stitches from the thread on the one side of the piece on short circular needle/double pointed needles size 4 mm and knit up 1 stitch in each of the new stitches cast on under the sleeve = 68-72-80-88-92-96 stitches. Insert a marker in the middle of the new stitches under the sleeve. Start at the marker-thread and work stocking stitch in the round. When the sleeve measures 2-2-2-2-1-1 cm from the division, decrease 2 stitches under the sleeve – read DECREASE TIP. Decrease like this every 4-3½-2-1-1-1 cm a total of 4-4-6-8-8-8 times = 60-64-68-72-76-80 stitches. Continue working until the sleeve measures 15-14-13-12-11-9 cm. Knit 1 round and increase 2 stitches evenly spaced = 62-66-70-74-78-82 stitches. Change to double pointed needles size 3 mm. Work rib (knit 1, purl 1) for 4 cm. Cast off a little loosely. The sleeve measures approx. 19-18-17-16-15-13 cm. Work the other sleeve in the same way. |
|||||||||||||||||||
Diagram explanations |
|||||||||||||||||||
|
|||||||||||||||||||

|
|||||||||||||||||||

|
|||||||||||||||||||
|
Have you made this or any other of our designs? Tag your pictures in social media with #dropsdesign so we can see them! Do you need help with this pattern?You'll find tutorial videos, a Comments/Questions area and more by visiting the pattern on garnstudio.com. © 1982-2024 DROPS Design A/S. We reserve all rights. This document, including all its sub-sections, has copyrights. Read more about what you can do with our patterns at the bottom of each pattern on our site. |
|||||||||||||||||||


With over 40 years in knitting and crochet design, DROPS Design offers one of the most extensive collections of free patterns on the internet - translated to 17 languages. As of today we count 304 catalogues and 11422 patterns - 11422 of which are translated into English (UK/cm).
We work hard to bring you the best knitting and crochet have to offer, inspiration and advice as well as great quality yarns at incredible prices! Would you like to use our patterns for other than personal use? You can read what you are allowed to do in the Copyright text at the bottom of all our patterns. Happy crafting!
Comments / Questions (10)
Ska det ökas maskor bara i kanten på diagram A1. På vissa rader är det omslag som gör att det blir fler maskor?? Är det 4 omslag på varv 3?? Modell r-809.
05.03.2024 - 07:06DROPS Design answered:
Hej Marita. Du gör omslag där det är inritat i diagrammet. På varv 3 är det 4 omslag och de yttersta ska stickas vridet så att det inte blir hål. På de varv där omlagen gör att det blir fler maskor är det för att det ska ökas maskor på de varven. Mvh DROPS Design
05.03.2024 - 07:22Can I buy this as a Kit? And choose colour?
06.02.2024 - 19:18DROPS Design answered:
Dear Mrs Jensen, please feel free to contact your DROPS store, see list for Canada here. Happy knitting!
07.02.2024 - 08:18STR.M.Strikk rundt bærestukket totalt 19 ganger A1.Fortsett med ønster og øk som vist i diagrammet.Sljønner ikke det med 19 ganger.
21.07.2023 - 12:10È possibile disfare una parte della maglia partendo dall\'inizio? Senza dover disfare tutto il lavoro?
11.07.2023 - 01:25DROPS Design answered:
Buongiorno Oretta, per un aiuto così personalizzato può rivolgersi al suo rivenditore DROPS di fiducia. Buon lavoro!
16.07.2023 - 13:32Ik heb de oplossing zelf gevonden. dus een antwoord is niet meer nodig
04.06.2023 - 09:28Ik moet aan het begin en eind 5x in patroon gedeelte A1 een steek meerderen, dus ik eindig het gedeelte met een meerderen, maar ik begin het patroon gedeelte ook met een meerdering. hoe maak ik twee meerderingen na elkaar?
31.05.2023 - 13:12Ik moet volgens patroon A1 aan het begin en eind van het patroongedeelte 1 steek meerderen, maar hoe meerder ik twee steken achterelkaar?
31.05.2023 - 12:56DROPS Design answered:
Dag Monica,
Ik zie niet in het patroon waar je 1 steek moet meerderen aan het eind van A.1 Je kunt gewoon patroon A.1 volgen en dan komen er automatisch meer steken bij. Deze zijn, namelijk al verwerkt in het telpatroon. Als je om een of andere reden toch 2 steken naast elkaar moet meerderen, dan kun je 2 omslagen achter elkaar maken.
04.06.2023 - 10:10Hello, The pattern chart shows 5 repeats, but the top in the photo shows 4. Am I reading the chart correctly?
09.05.2023 - 23:41DROPS Design answered:
Hello, yes, you read the pattern chart correctly. But it depends on the size - 4 repeats for smaller sizes (S-M-L), 5 repeats for larger sizes (XL-XXL-XXXL). Happy knitting!
10.05.2023 - 06:18The sky is the Limit
22.01.2023 - 23:22Spring violets
19.01.2023 - 07:28