
Popular categories
Looking for a yarn?


Comments / Questions (34)
![]() Natalia wrote:
Natalia wrote:
This pattern is so beautiful and so easy and quick to knit. I wanted it more fit to the body so decreased 8 stitches from the S size, it is perfect in gemstone colors.
18.05.2025 - 16:59
![]() Hanna wrote:
Hanna wrote:
Would recommend everyone to try on the top while working on the straps and measure! I had to make mine about twice as long (13 cm instead of 7), because otherwise it wouldn't fit over my head and it pinches a lot in the arms and neck/was almost impossible to wear. My gauge on I-cord edges might have been slightly smaller but I wouldn't know how to change that easily and even then I would have needed a bit more room. Otherwise lovely pattern and I'm really happy with the result!
16.05.2025 - 19:39
![]() Sylvie Tremblay wrote:
Sylvie Tremblay wrote:
Bonjour Je ne comprends pas comment tricoter la bretelle avec le devant Merci
07.05.2025 - 01:10DROPS Design answered:
Bonjour Mme Tremblay, dans cette vidéo, nous montrons comment rabattre les mailles de la bretelle tout en formant la bordure I-cord; les mailles de la bretelle sont les 3 premières mailles sur l'aiguille, tricotez 2 m endroit comme avant puis tricotez la dernière maille de la bretelle avec la première maille/la maille suivante du devant, continuez ainsi jusqu'à ce que toutes les mailles du devant ont été tricotées. Bon tricot!
07.05.2025 - 09:17
![]() Doris wrote:
Doris wrote:
Ich bin am ICord Rand des Rückenteils nachdem ich in der Hinreihe die letzte 2 Maschen Abnahme gemacht habe. Habe drei Maschen auf Nadel 3,5 mm angeschlagen. Ich verstehe nicht, wieso ich jetzt erst 1 Reihe links stricken soll und müssen auch die drei angeschlagenen Maschen links gestrickt werden? Wenn ich wende, verstehe ich nicht, welche letzte Masche (?) mit der ersten Masche (?) der Hinreihe zusammengestrickt wird? Muss die eine Reihe links nicht vor der 3 M Zunahme gestrickt werden?
18.04.2025 - 16:28DROPS Design answered:
Liebe Doris, die 1. Reihe solle eine Rückreihe sein, damit die 3. der 3 Maschen rechts zusammen (verschränkt) mit der 1. Masche vom Rückenteil gestrickt wird. Könnte Ihnen vielleicht dieses Video helfen? Viel Spaß beim Stricken!
22.04.2025 - 14:23
![]() Greta wrote:
Greta wrote:
Hallo, ich frage mich ob sich die beschriebene Maschenprobe aus der nadelstärke 5 oder 3,5 ergeben soll. Vielen Dank für eine Rückmeldung Greta
08.02.2025 - 19:05DROPS Design answered:
Liebe Greta, die Maschenprobe stricken Sie mit den grösseren Nadeln, dh mit Nadeln Nr 5. Viel Spaß beim Stricken!
10.02.2025 - 10:06
![]() Enriqueta Dominguez wrote:
Enriqueta Dominguez wrote:
Buen día . Me encanta su página . Tejer me apasiona . Pero … para hacer disminución o aumentos . No puedo y ahí queda sin terminar la prenda 🥺habrá otra manera de interpretar las instrucciones? Infinitas gracias 🙏
13.07.2024 - 22:28
![]() Emilia wrote:
Emilia wrote:
Witam, uprzejmie proszę o dodanie zdjęcia robótki z tyłu. Ułatwia to zdecydowanie pracę, szczególnie początkującym. Dziękuję !
16.06.2024 - 19:14
![]() Martine PONT wrote:
Martine PONT wrote:
Je tricote ce modèle pour quelqu'un d'autre que moi et je veux faire la surprise, je ne peux donc pas mesurer la bretelle. Pour une taille M de combien de centimètres dois-je tricoter les bretelles ?
16.06.2024 - 09:33DROPS Design answered:
Bonjour Mme Pont, les bretelles mesurent 7 cm - vérifiez la hauteur totale sur le schéma (une partie de la bretelle appartient au devant, l'autre au dos). Bon tricot!
17.06.2024 - 08:48
![]() Mathilde wrote:
Mathilde wrote:
Jeg er ikke sikker på, om opskriften siger at jeg i ribben skal strikke diagrammet på ret og vrang siden, eller kun på ret siden.?
07.05.2024 - 21:59DROPS Design answered:
Hej Mathilde, Hver 2.pind strikker du fra vrangen, det vil sige de sorte prikker strikker du ret fra vrangen og de hvide vrang fra vrangen (alle pinde fra retsiden strikkes ret) :)
08.05.2024 - 13:51
![]() Clara Sofie wrote:
Clara Sofie wrote:
Hej. Findes der et billede af ryggen?
15.04.2024 - 22:02DROPS Design answered:
Hej Clara, det har vi desværre ikke, men det strikkes som forstykket, så det skal se ud som det du ser :)
16.04.2024 - 07:25
|
|||||||
Miss Gardener#missgardener |
|||||||
 |
 |
||||||
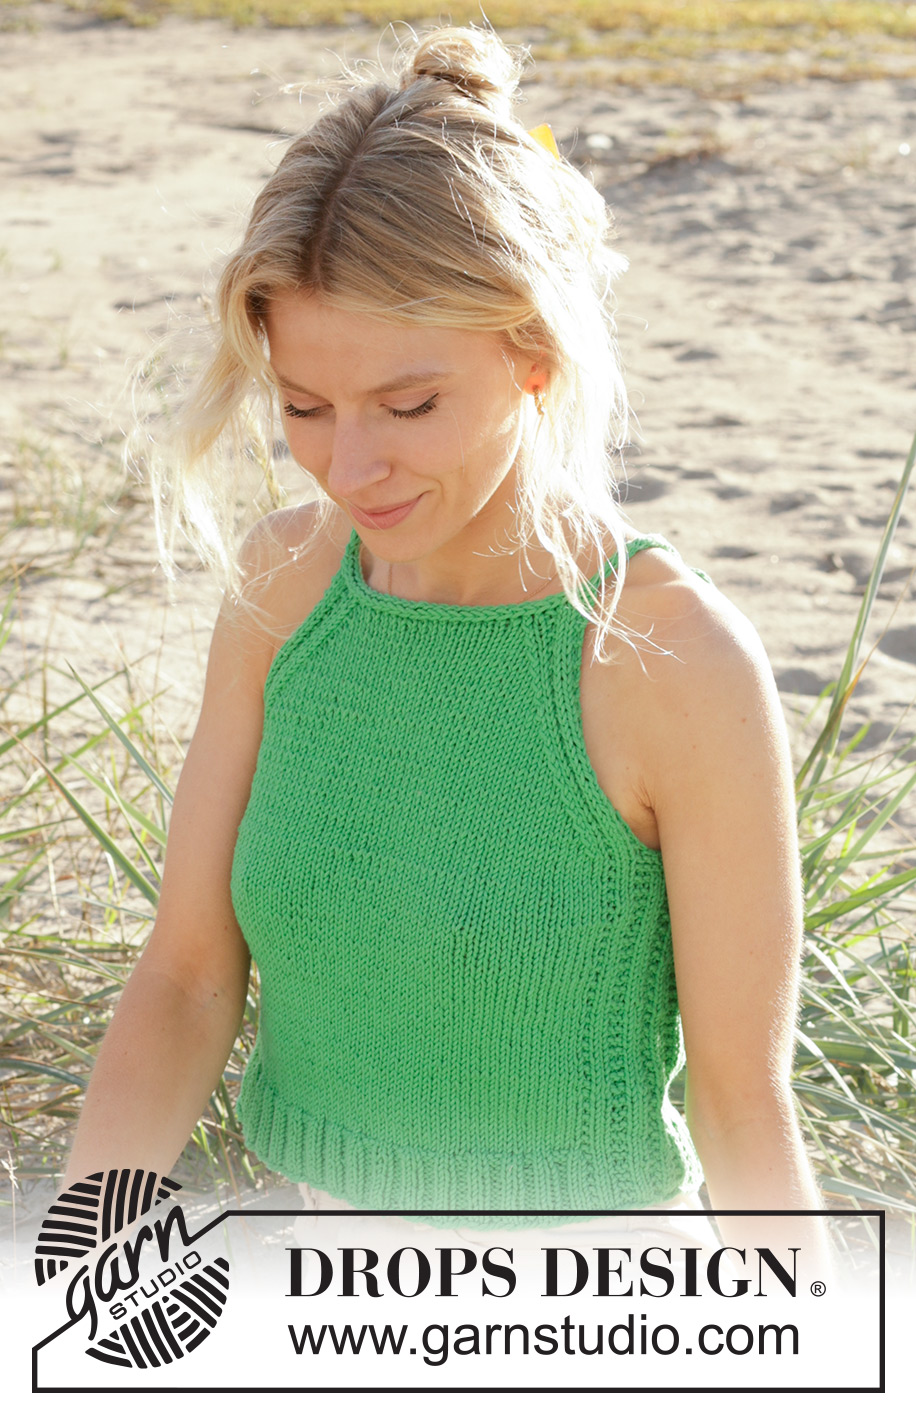
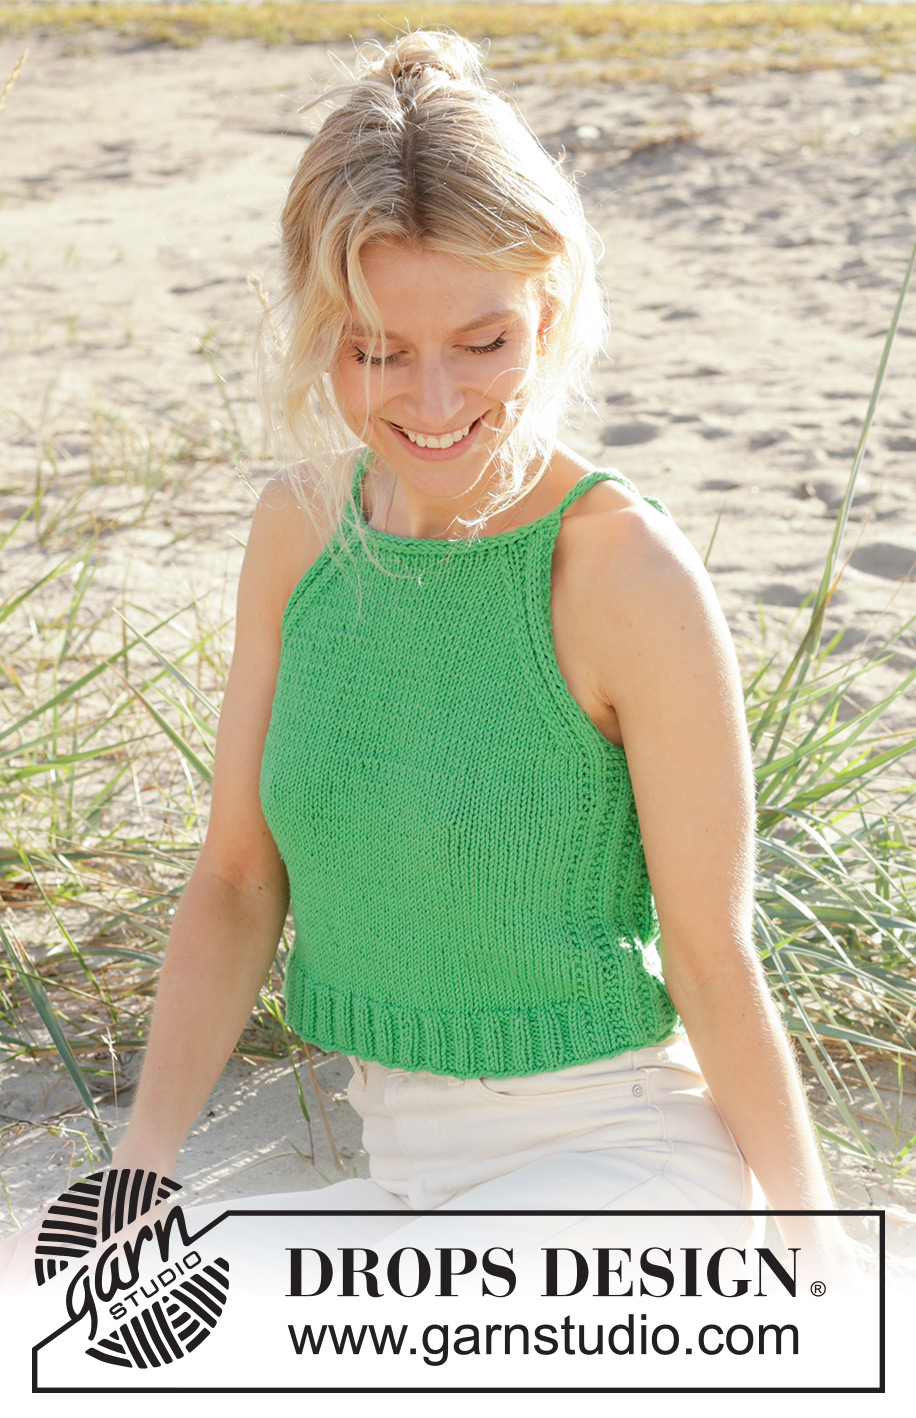
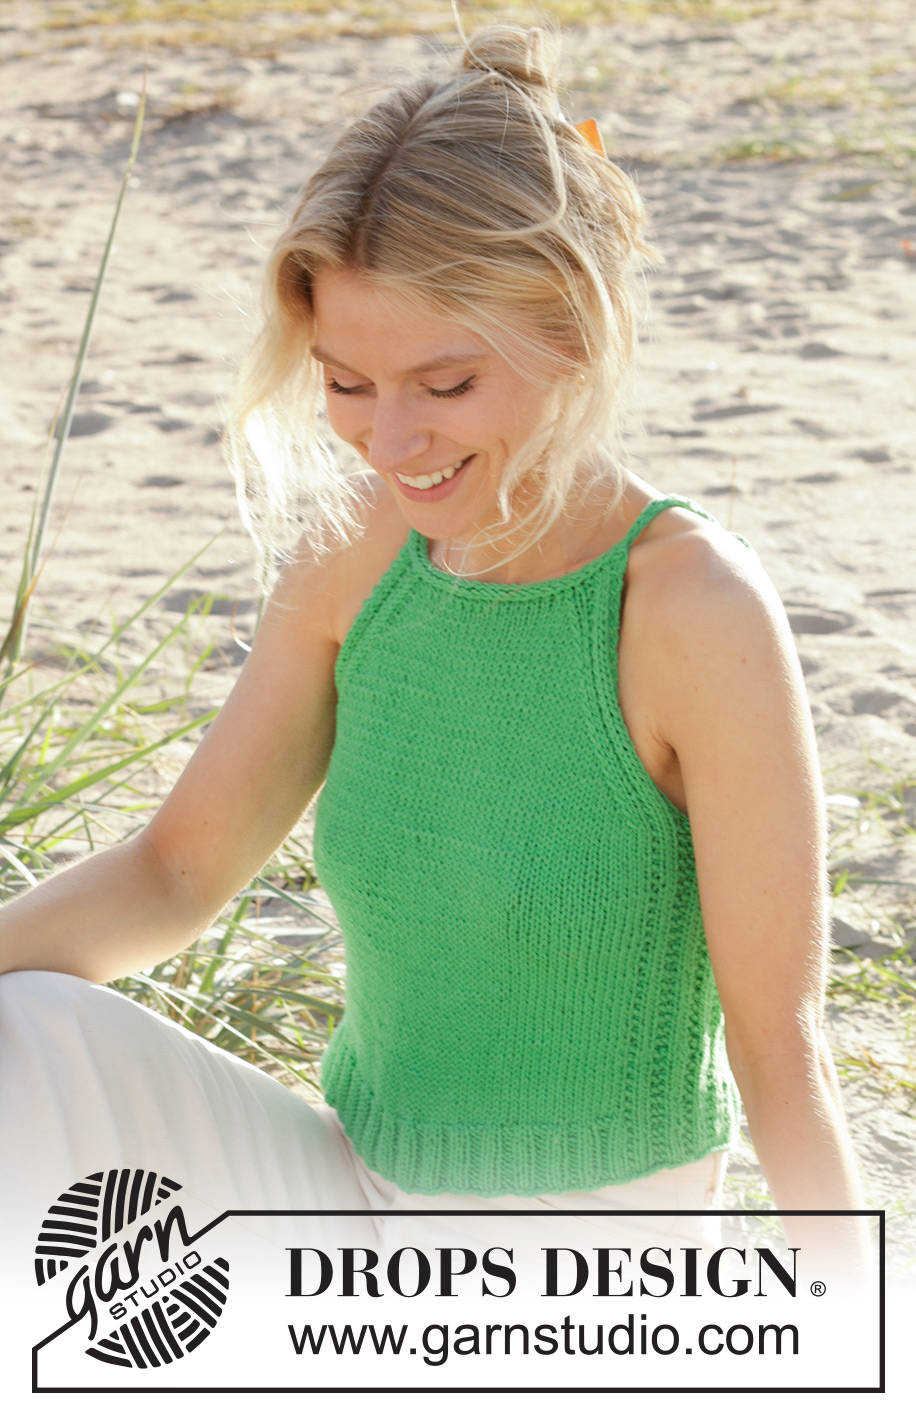
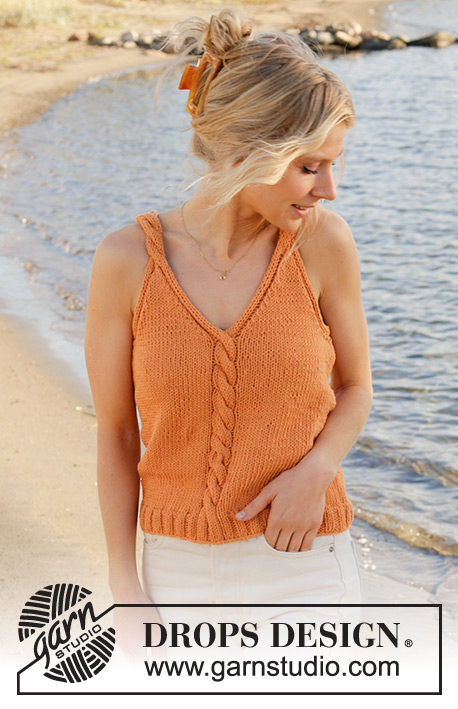
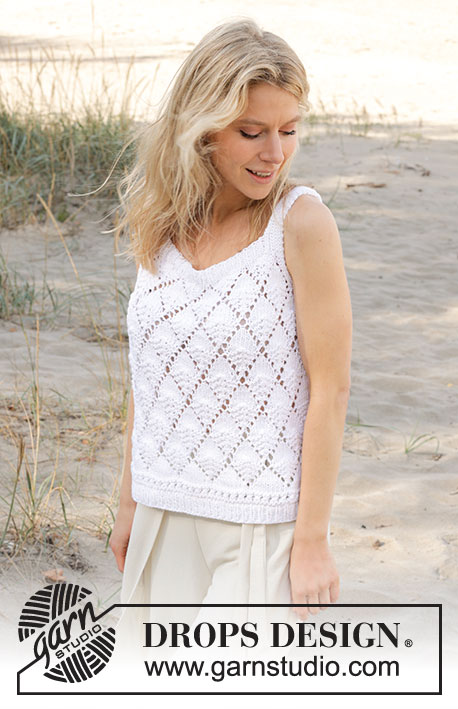
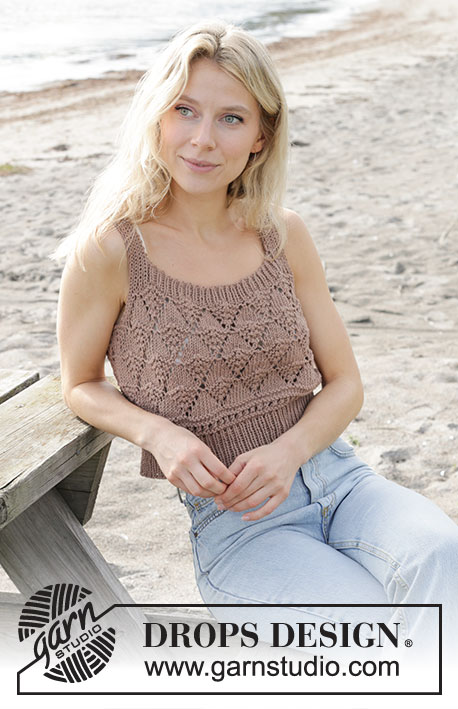
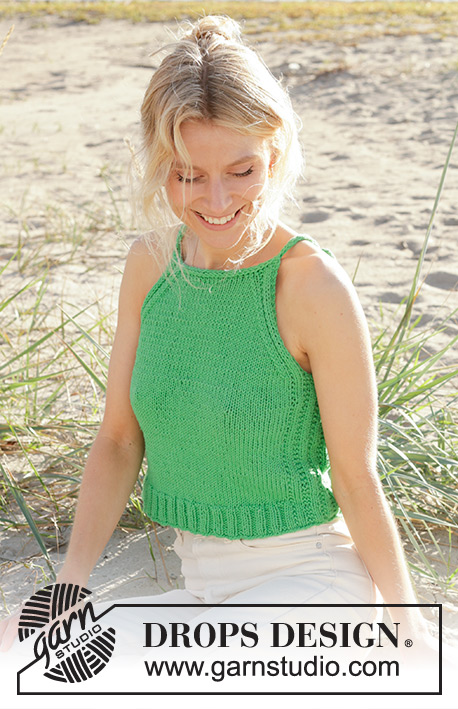
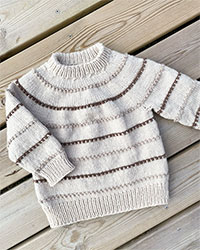
Knitted top/crop-top in DROPS Paris. The piece is worked bottom up in stocking stitch, with I-cord edges. Sizes S - XXXL.
DROPS 241-8 |
|||||||
|
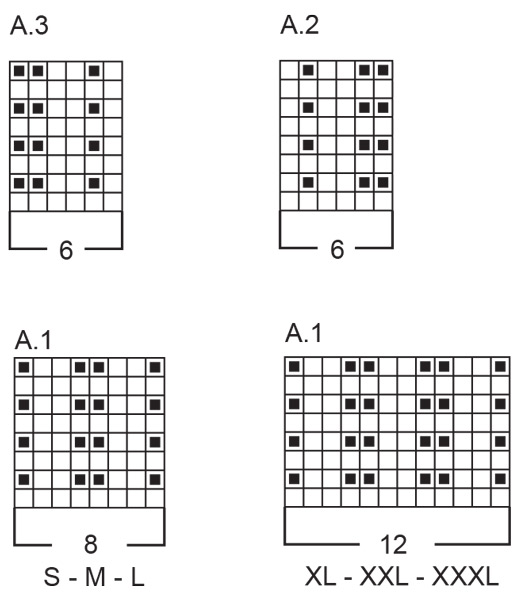
------------------------------------------------------- EXPLANATIONS FOR THE PATTERN: ------------------------------------------------------- RIDGE/GARTER STITCH (worked back and forth): Knit all rows. 1 ridge = knit 2 rows. PATTERN: See diagrams A.1 to A.3. Choose diagram for your size (applies to A.1). DECREASE TIP: All decreases are worked from the right side! Decrease inside 6 stitches: DECREASE 1 STITCH AT BEGINNING OF THE ROW: Work A.2, slip the next stitch as if to knit, knit 1 and pass the slipped stitch over the knitted stitch (1 stitch decreased). DECREASE 2 STITCHES AT BEGINNING OF THE ROW: Work A.2, slip the next stitch as if to knit, knit 2 together and pass the slipped stitch over the knitted together stitches (2 stitches decreased). DECREASE 1 STITCH AT END OF THE ROW: Work until there are 8 stitches left on the row, knit 2 together, work A.3 (1 stitch decreased). DECREASE 2 STITCHES AT END OF THE ROW: Work until there are 9 stitches left on the row, knit 3 together, work A.3 (2 stitches decreased). ------------------------------------------------------- START THE PIECE HERE: ------------------------------------------------------- TOP – SHORT OVERVIEW OF THE PIECE: The front and back pieces are worked separately, back and forth and bottom up. The piece is sewn together. The I-cord edge and tube-knitted shoulder straps are worked to finish. BACK PIECE: Cast on 78-86-94-106-118-130 stitches with needles size 3.5 mm and DROPS Paris. Purl 1 row from the wrong side. Work the next row as follows, from the right side: A.1, * knit 2, purl 2 *, work from *-* until there are 10-10-10-14-14-14 stitches left, knit 2 and work A.1. Continue this rib for 4 cm. Work the next row as follows, from the right side: Continue A.1 over the first 8-8-8-12-12-12 stitches, knit 62-70-78-82-94-106 and decrease 10-12-12-16-18-20 stitches evenly over these stitches, work A.1 as before over the last 8-8-8-12-12-12 stitches = 68-74-82-90-100-110 stitches. Change to needles size 5 mm. Continue with stocking stitch and A.1 on each side as before. REMEMBER THE KNITTING TENSION! When the piece measures 21-22-23-24-25-26 cm and next row should be worked from the wrong side, work 2 RIDGES – read description above, over the outermost 5-5-5-9-9-9 stitches on each side (the other stitches are worked as before). After the 2 ridges, cast off 3-3-3-7-7-7 stitches at the beginning of the next 2 rows for the armholes = 62-68-76-76-86-96 stitches. Work the next row as follows from the wrong side: 2 stitches in garter stitch, purl 2, 1 stitch in garter stitch, purl until there are 5 stitches left, 1 stitch in garter stitch, purl 2 and 2 stitches in garter stitch. Work the next row as follows, from the right side: A.2, decrease 1 stitch at the beginning of the row – read DECREASE TIP, knit until there are 8 stitches left, decrease 1 stitch at the end of the row – read DECREASE TIP, work A.3. Continue this pattern back and forth, decreasing in the same way for the armholes every 2nd row (each row from the right side) a total of 11-11-12-15-13-11 times. Then decrease 2 stitches on each side every 2nd row 3-4-5-3-6-9 times – read DECREASE TIP = 28-30-32-34-36-38 stitches. The piece measures approx. 35-37-39-41-43-45 cm from the cast-on edge. Leave the stitches on the needle and work an I-cord edge along the neck. I-CORD EDGE: Cast on 3 stitches with 1 double pointed needle size 3.5 mm and DROPS Paris. Purl these 3 stitches from the wrong side. Turn, * knit the first 2 stitches, then knit twisted together the last stitch and the first stitch on the back piece (from the right side), move the worked stitches back onto the left needle *, work from *-* until all the stitches from the back piece are cast off and you have 3 stitches left on the right needle. Cast off with purl from the wrong side. FRONT PIECE: Cast on and work in the same way as the back piece. Keep the stitches on the needle and work the straps and an I-cord edge along the neck. SHOULDER STRAPS AND I-CORD EDGE: Cast on 4 stitches with 1 double pointed needle size 3.5 mm and DROPS Paris. Work tube-knitting as follows: * Push the stitches back to the beginning of the needle, tighten the strand and knit the 4 stitches again from the right side *, work from *-* until the strap measures 7 cm (the strap should reach over the shoulder to the back piece; try the top on and work to desired length). Knit together the last 2 stitches = 3 stitches. Push the stitches back to the beginning of the needle, tighten but do not cut the strand. Work an i I-cord edge along the neck as follows: * Knit the first 2 stitches from the strap, knit twisted together the last stitch and the first stitch on the front piece, move the worked stitches back onto the left needle *, work from *-* until all the stitches from the front piece are cast off and you have 3 stitches left on the right needle, cast on 1 stitch at the end of the row = 4 stitches. Work tube-knitting over these stitches until the second strap matches the first in length. Cut the strand and pull it through the stitches, tighten and fasten well. ASSEMBLY: Sew the side seams in the outermost loop of the outermost stitch so the seam is flat. Sew the straps to the back piece, outermost on each side. |
|||||||
Diagram explanations |
|||||||
|
|||||||
|
|||||||

|
|||||||
Have you finished this pattern?Tag your pictures with #dropspattern #missgardener or submit them to the #dropsfan gallery. Do you need help with this pattern?You'll find 20 tutorial videos, a Comments/Questions area and more by visiting the pattern on garnstudio.com. © 1982-2025 DROPS Design A/S. We reserve all rights. This document, including all its sub-sections, has copyrights. Read more about what you can do with our patterns at the bottom of each pattern on our site. |
|||||||
With over 40 years in knitting and crochet design, DROPS Design offers one of the most extensive collections of free patterns on the internet - translated to 17 languages. As of today we count 314 catalogues and 11822 patterns translated into English (UK/cm).
We work hard to bring you the best knitting and crochet have to offer, inspiration and advice as well as great quality yarns at incredible prices! Would you like to use our patterns for other than personal use? You can read what you are allowed to do in the Copyright text at the bottom of all our patterns. Happy crafting!
Post a comment to pattern DROPS 241-8
We would love to hear what you have to say about this pattern!
If you want to leave a question, please make sure you select the correct category in the form below, to speed up the answering process. Required fields are marked *.