
Popular categories
Looking for a yarn?


Comments / Questions (12)
![]() Selena wrote:
Selena wrote:
Dlaczego nie ma wszystkiego w jednym filmiku ???
07.10.2024 - 18:09DROPS Design answered:
Witaj Seleno, większość naszych instrukcji dotyczy konkretnych ściegów / etapów wykonania wzoru. Świadomi zapotrzebowania na instrukcje video w stylu Jak wykonać dany wzór krok po kroku, w naszej bazie filmów znajdują się również takie video. W razie problemów z wykonywanym wzorem służę pomocą. Pozdrawiam!
08.10.2024 - 08:50
![]() Viktoribsn wrote:
Viktoribsn wrote:
Cinema
15.01.2024 - 02:11
![]() Davidcar wrote:
Davidcar wrote:
Coin
10.01.2024 - 13:20
![]() Viktorinkc wrote:
Viktorinkc wrote:
Cinema
09.01.2024 - 16:24
![]() Veronacuf wrote:
Veronacuf wrote:
Life
29.12.2023 - 12:14
![]() Sergfqj wrote:
Sergfqj wrote:
Novost
25.12.2023 - 08:24
![]() Igorijv wrote:
Igorijv wrote:
Ukraine
23.12.2023 - 13:23
![]() Susan Rüttgers wrote:
Susan Rüttgers wrote:
Hallo, bei dem abnehmen an der Spitze komme ich nicht zurecht. Wird vor u nach jedem markierer abgenommen od nur einmal nach einem markierer? Ich häkel Größe 39-40 u so wie sie gerechnet haben kommt es weder nach 4x abnehmen pro Reihe noch nach 2x abnehmen pro Reihe aus. Kann es sein das ihre Angaben nicht ganz stimmen od was mache ich falsch? Denn auch wenn nur 2x abgenommen wird komme ich nie am Ende auf 18 Restmaschen.
28.11.2023 - 07:38DROPS Design answered:
Liebe Frau Rüttgers, bei jeder Markierung (beidseitig der Spitze) wird man 3 feste Maschen zusammenhäkeln: die feste Masche vor der Masche mit der Markierung + die feste Masche mit der Markierung + die nächste feste Masche = so nimmt man 1 feste Masche beidseitig jeder Markierung - siehe auch vorrige Antwort. Viel Spaß beim häkeln!
28.11.2023 - 08:56
![]() Susan Rüttgers wrote:
Susan Rüttgers wrote:
Hallo,bei der Spitze bin ich sehr verwirrt. Muss ich vor u nach jedem markiere abnehmen oder nur pro markierer einmal. Rechnerisch kommt das bei Größe 39-40 weder beim ersten noch bei der zweiten Methode aus. Kann es sein das sie falsche Angaben gemacht haben od was mache ich falsch?mfg
27.11.2023 - 16:01DROPS Design answered:
Liebe Frau Rüttgers, es wird unter ABNAHMETIPP-1 erklärt, wie man abnehmen wird, dh es werden 2 feste Maschen bei jeder Markierung abgenommen = je 4 Maschen. Es sind 38 Maschen und es wird 2 Mal 4 Maschen in jeder 2. Runde und 3 Mal 4 Maschen in jeder Runde abgenommen = 38-8-12=18 feste Maschen übrig. Viel Spaß beim häkeln!
28.11.2023 - 08:25
![]() Lisbeth Bäckvik wrote:
Lisbeth Bäckvik wrote:
Kanintofflorna: Problem med öronen. När man ska börja virka runt, hur uppstår de 8 maskorna? Hur jag än gör har jag bara 4 fasta maskor och luftmaskorna i båda sidor. Är mönstret verkligen korrekt skrivet??
22.11.2023 - 23:50DROPS Design answered:
Hei Lisbeth. Når arbeidet ditt måler 9-10-10½-12 cm skal du på siste rad hekle 8-8-8-8 luftmasker (midt oppå foten). Her oppstår de 8 maskene. Ikke snu arbeidet, men brett arbeidet slik at det kan hekles direkte videre i første fastmaske fra den andre siden av arbeidet. Hekle tøffelen ferdig etter oppskriften. Ørene: Det hekles 2 ører i de 8-8-8-8 luftmaskene som ble heklet midt oppå tøffelen. Fremdeles problemer? Send et nytt spørsmål og HUSK oppgi hvilken str. du hekler etter. mvh DROPS Design
27.11.2023 - 07:34
|
|||||||
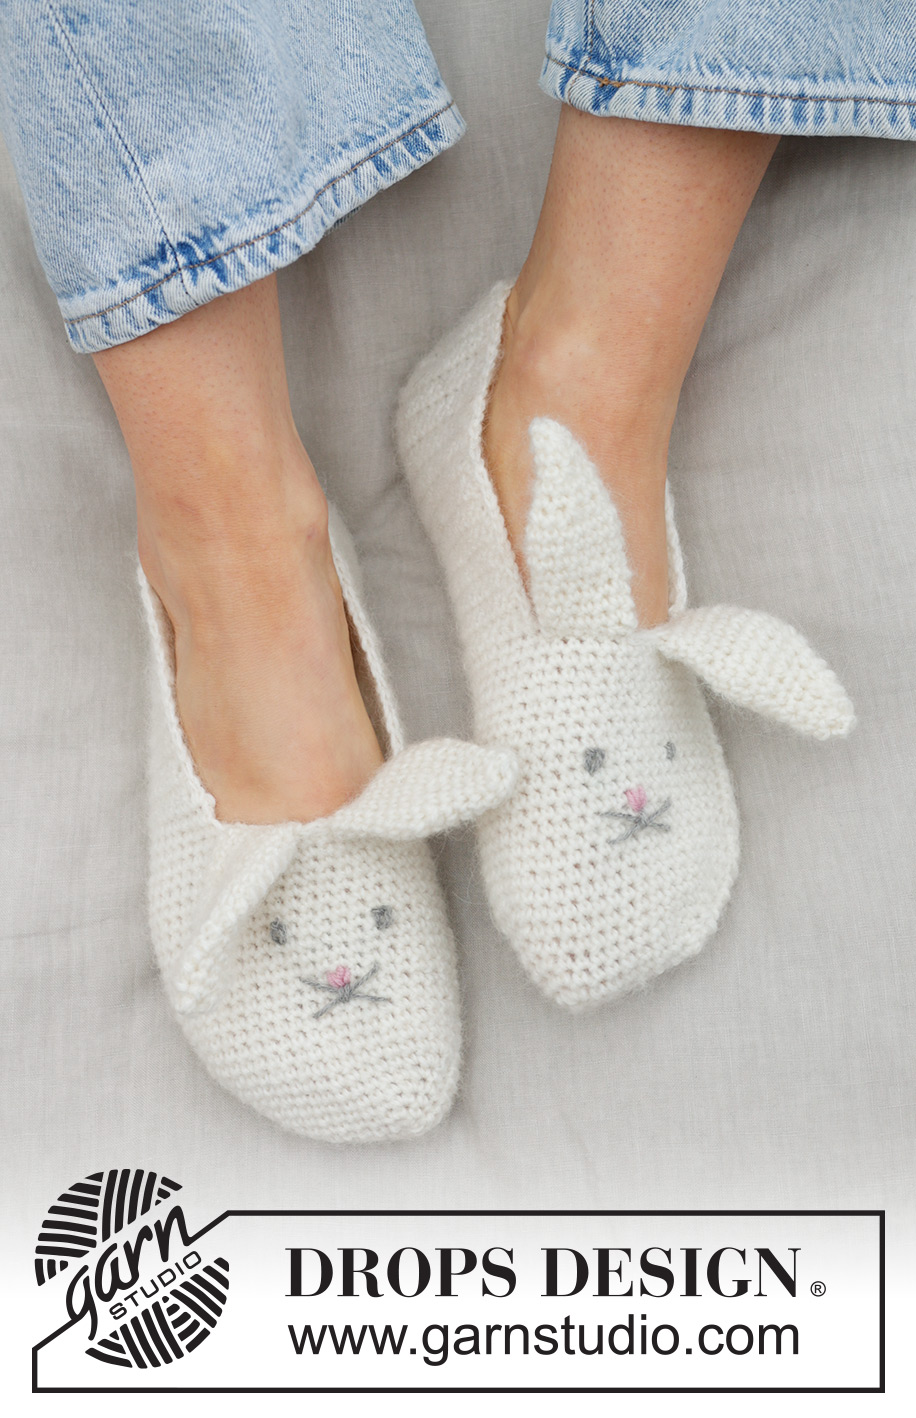
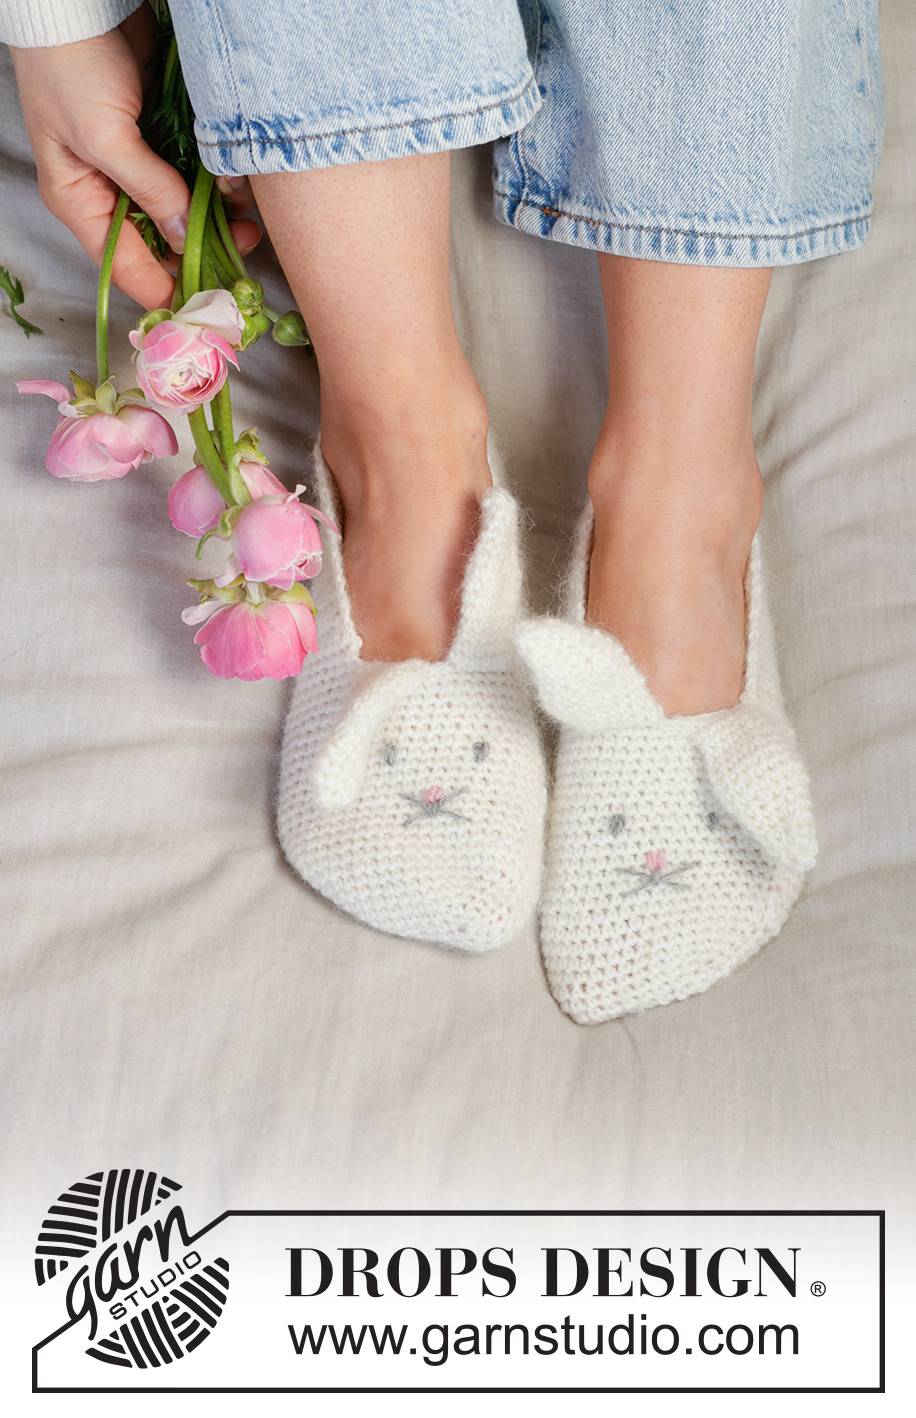
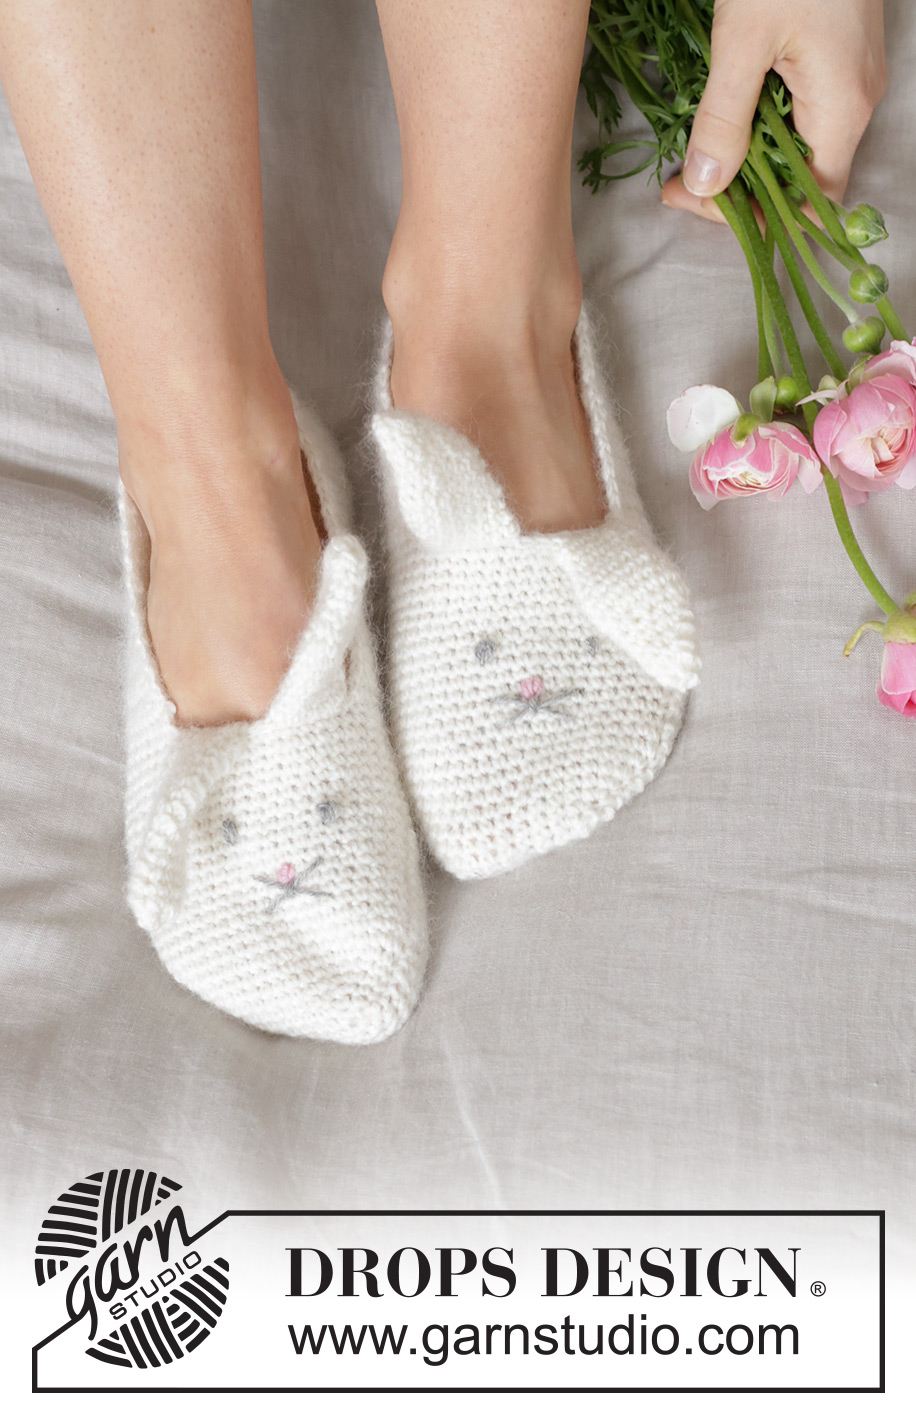
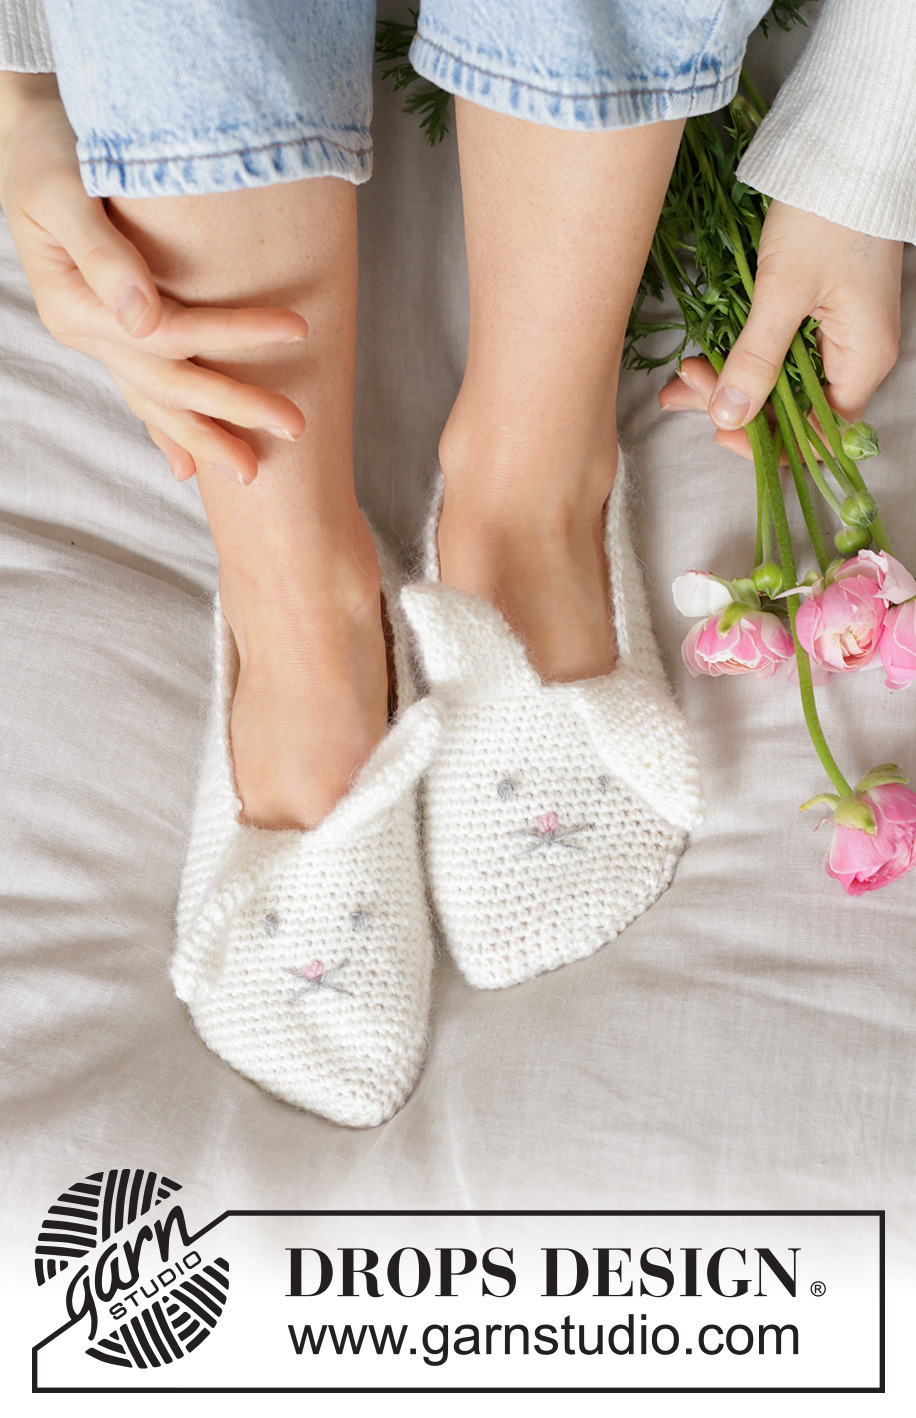
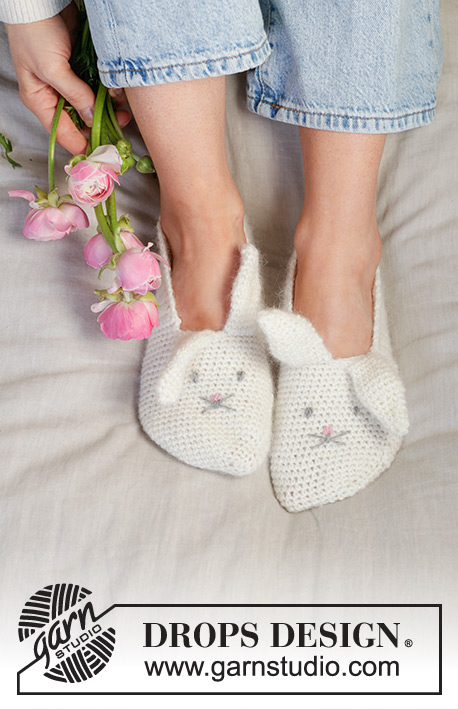
Bunny Ears Slippers#bunnyearsslippers |
|||||||
 |
 |
||||||
Crocheted bunny slippers for children and women in 2 strands DROPS Fabel and 1 strand DROPS Kid-Silk. The piece is worked from heel to toe, with crocheted ears and embroidered eyes and nose. Sizes 24 - 43. Theme: Easter.
DROPS 238-39 |
|||||||
|
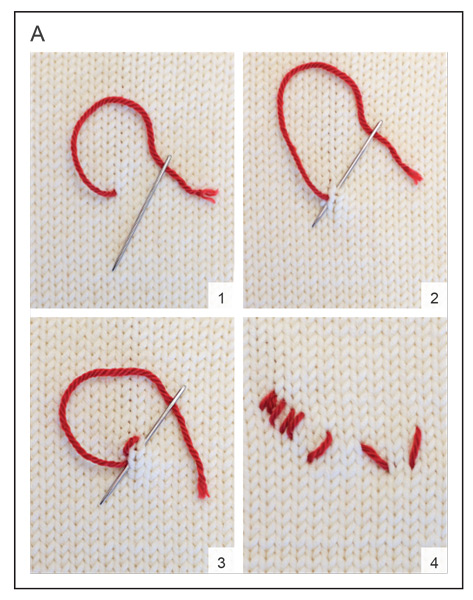
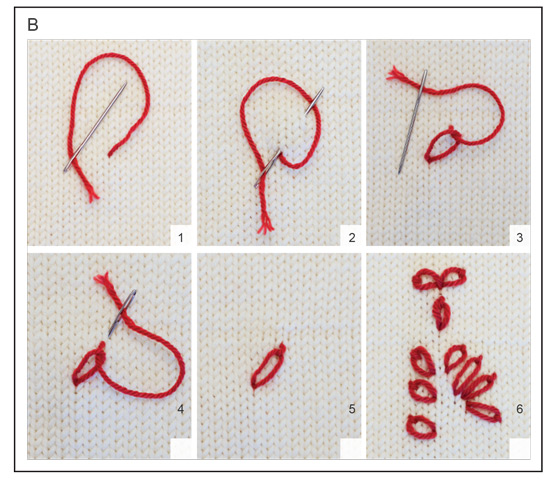
------------------------------------------------------- EXPLANATIONS FOR THE PATTERN: ------------------------------------------------------- CHAIN STITCH: If you work outermost on the hook the chain stitch will often be too tight; 1 chain stitch should be as long as 1 double crochet is wide. CROCHET INFORMATION: Each row starts with 1 chain stitch which does not replace the first double crochet. DECREASE TIP-1 (for toe): Work 1 double crochet in each double crochet until there is 1 stitch left before the marker-stitch: * Insert the hook in the next stitch, make 1 yarn over and pull it through the stitch *, work from *-* 2 more times (4 loops on hook), make 1 yarn over and pull it through all 4 loops on the hook. 2 stitches decreased. Repeat at the other marker = 4 stitches decreased on the round. Allow the markers to follow in the middle of the decrease onwards for the next decrease. INCREASE TIP: Work 2 double crochets in same stitch. DECREASE TIP-2: * Insert the hook in the next stitch, make 1 yarn over and pull it through the stitch *, work from *-* 1 more time (3 loops on hook), make 1 yarn over and pull it through all 3 loops,. 1 stitch decreased. ------------------------------------------------------- START THE PIECE HERE: ------------------------------------------------------- SLIPPERS - SHORT OVERVIEW OF THE PIECE: The slippers are worked back and forth from the heel, stitches are cast on for mid upper foot and the toe finished in the round. The heel is sewn together on mid back and the toe is sewn together. The ears are crocheted mid-top of foot and the eyes and nose embroidered to finish. HEEL: Use hook size 3.5 mm, 2 strands DROPS Fabel and 1 strand DROPS Kid-Silk (3 strands held together). Work 17-19-21-23 (23-25-27) chain stitches - read CHAIN STITCH and CROCHET INFORMATION. Work 1 double crochet in the 2nd chain stitch from the hook, then 1 double crochet in the remaining chain stitches = 16-18-20-22 (22-24-26) double crochets. Work 1 double crochet in each of the first 7-8-10-11 (11-12-13) stitches, 2 double crochets in each of the next 2 stitches (2 increased stitches), 1 double crochet in each of the remaining stitches = 18-20-22-24 (24-26-28) stitches. Work 1 double crochet in each stitch until the piece measures 9-10-10½-12 (13-13-13) cm – approx. 6-7-7½-8 (9-11-13) cm left to finished length. REMEMBER THE CROCHET TENSION! At the end of the next row work 8-8-8-8 (10-12-14) chain stitches (mid-top of foot), do not turn but continue with the first double crochet on the other side of the piece. FOOT: Continue in the round without finishing at the end of each round, i.e. continue with the first stitch on the next round. On the first round work 1 double crochet in each double crochet and in each chain stitch = 26-28-30-32 (34-38-42) stitches. Continue with 1 double crochet in each stitch until the piece measures 3-4-4½-5 (6-7½-9½) cm from where you started working in the round; approx. 3-3-3-3 (3-3½-3½) cm left to finished length – try the slipper on and work to desired length. TOE: Lay the piece flat with the 8-8-8-8 (10-12-14) chain stitches on top of the foot in the middle, insert a marker in each side (= 12-13-14-15 (16-18-20) stitches between the marker-stitches. Continue with double crochets but decreasing each side - read DECREASE TIP. Decrease every 2nd round 2-2-2-2 (2-2-2) times in total, then every round 2-2-2-2 (2-3-3) times = 10-12-14-16 (18-18-22) stitches. The slipper measures approx. 15-17-18-20 (22-24-26) cm from heel to toe. ASSEMBLY: Fold the piece so the markers are on each side. Sew the toe together, sewing the top stitches together with the bottom stitches – sew in the outermost loop of the outermost stitch so the seam is invisible. Sew the heel together, sewing in the outermost loop of the outermost stitch. EARS: Crochet 2 ears in the 8-8-8-8 (10-12-14) chain stitches mid-top of foot. FIRST EAR: Start from the right side: Fasten the strand with 1 slip stitch in the first chain stitch, then work 1 double crochet in the same stitch, work 2-2-2-2 (2-1-1) double crochets in the next chain stitch, 1 double crochet in each of the next 1-1-1-1 (2-3-4) chain stitches and work 1 chain stitch (side of ear). There are 5-5-5-5 (6-7-8) chain stitches left which are not worked. Turn to work in the 4-4-4-4 (5-5-6) stitches just worked. Work 1 double crochet in the back loop of each of the 4-4-4-4 (5-5-6) stitches and work 1 chain stitch (side of ear). Now work the 8-8-8-8 (10-10-12) double crochets and 2 chain stitches in the round as follows: ROUND 1: Work 1 double crochet in the front loop of the chain stitch and in each of the first 4-4-4-4 (5-5-6) double crochets, work 1 double crochet around the chain stitch on the side of the ear, work 1 double crochet through both loops in each of the next 4-4-4-4 (5-5-6) double crochets and 1 double crochet around the chain stitch on the side of the ear = 10-10-10-10 (12-12-14) double crochets. Continue working through both loops! ROUNDS 2-5: 1 double crochet in each double crochet. ROUND 6: Work double crochets and increase 3 stitches evenly spaced – read INCREASE TIP = 13-13-13-13 (15-15-17) double crochets. ROUNDS 7-9: 1 double crochet in each double crochet. ROUND 10: Work double crochets and decrease 5 stitches evenly spaced - read DECREASE TIP-2 = 8-8-8-8 (10-10-12) double crochets. ROUNDS 11-12: 1 double crochet in each double crochet. ROUND 13: Work double crochets and decrease 2 stitches evenly spaced = 6-6-6-6 (8-8-10) double crochets. ROUND 14: 1 double crochet in each double crochet. ROUND 15: Work double crochets together 2 and 2 on the whole round = 3-3-3-3 (4-4-5) double crochets. Cut the strand, tack it up and down through the remaining stitches, tighten and fasten well. SECOND EAR: Leave 2 chain stitches between the ears, work from the right side and start in the next chain stitch. Work the second ear in the same way as the first. EMBROIDERY: Use a left-over in colour grey, work 1 small chain stitch for each eye - see diagram B and photo. Use a left-over in colour grey, work 2 long flat stitches for the whiskers - see diagram A and photo; the stitches should be 2 cm long and cross in the middle. Work 1 short flat stitch over where the whiskers cross. Use a left-over in colour pink, work 4 small flat stitches for the nose - see diagram B and photo; the stitches start in the same stitch – position the stitches just above the small flat stitch on the whiskers. |
|||||||
Diagram explanations |
|||||||
|
|||||||
|
|||||||
|
|||||||
Have you finished this pattern?Tag your pictures with #dropspattern #bunnyearsslippers or submit them to the #dropsfan gallery. Do you need help with this pattern?You'll find 11 tutorial videos, a Comments/Questions area and more by visiting the pattern on garnstudio.com. © 1982-2025 DROPS Design A/S. We reserve all rights. This document, including all its sub-sections, has copyrights. Read more about what you can do with our patterns at the bottom of each pattern on our site. |
|||||||


With over 40 years in knitting and crochet design, DROPS Design offers one of the most extensive collections of free patterns on the internet - translated to 17 languages. As of today we count 314 catalogues and 11821 patterns translated into English (UK/cm). 11821
We work hard to bring you the best knitting and crochet have to offer, inspiration and advice as well as great quality yarns at incredible prices! Would you like to use our patterns for other than personal use? You can read what you are allowed to do in the Copyright text at the bottom of all our patterns. Happy crafting!
Post a comment to pattern DROPS 238-39
We would love to hear what you have to say about this pattern!
If you want to leave a question, please make sure you select the correct category in the form below, to speed up the answering process. Required fields are marked *.