
Popular categories
Looking for a yarn?


|
|||||||||||||||||||
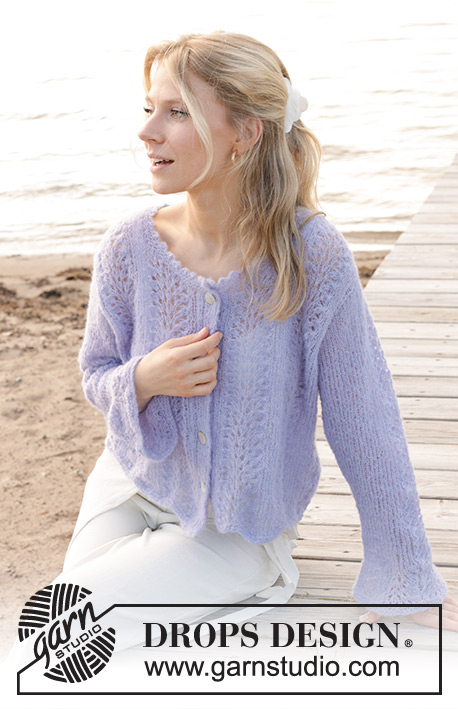
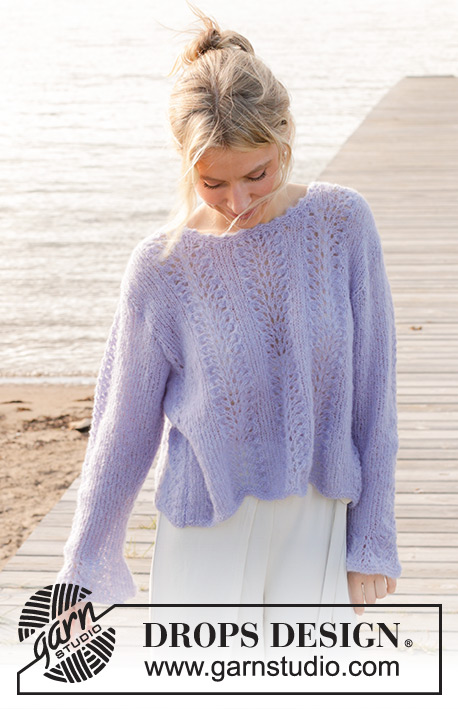
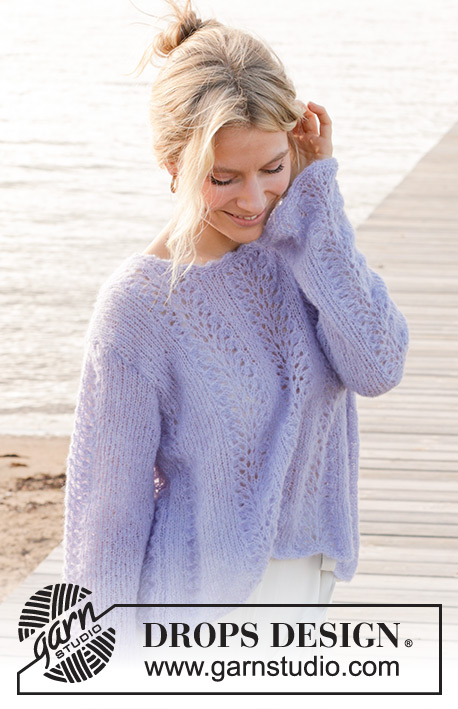
Trip to Provence |
|||||||||||||||||||
 |
 |
||||||||||||||||||
Knitted jumper in DROPS Brushed Alpaca Silk. Piece is knitted bottom up with wave pattern and trumpet sleeves. Size: S - XXXL
DROPS 241-29 |
|||||||||||||||||||
|
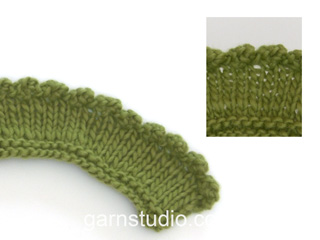
---------------------------------------------------------- EXPLANATION FOR THE PATTERN: ---------------------------------------------------------- GARTER STITCH (worked in the round): 1 ridge vertically = 2 rounds, i.e. knit 1 round and purl 1 round. GARTER STITCH (back and forth): Knit all rows. 1 ridge vertically = knit 2 rows. PATTERN: See diagrams A.1 to A.6. Diagrams show all rows in pattern seen from the right side. DECREASE TIP: Decrease 1 stitch on each side of marker thread as follows: Work until 3 stitches remain before marker thread, knit 2 together, knit 2 (marker thread is between these 2 stitches), slip 1 stitch knitwise, knit 1, pass slipped stitch over stitch worked (2 stitches decreased). ---------------------------------------------------------- START THE PIECE HERE: ---------------------------------------------------------- JUMPER - SHORT OVERVIEW OF THE PIECE: Work back piece and front piece back and forth on circular needle, bottom up. Work sleeves on a short circular needle/double pointed needles, top down - first work sleeve cap back and forth, then work the rest of sleeve in the round. Assemble garment as explained in pattern. Then work a small neck edge and cast off with picot. BACK PIECE: Cast on 103-111-117-129-139-149 stitches on circular needle size 5 mm with DROPS Brushed Alpaca Silk. Work 2 ridges in GARTER STITCH - read explanation above. Knit 1 row from right side while decreasing 8-8-8-10-10-10 stitches evenly = 95-103-109-119-129-139 stitches. Purl 1 row from wrong side with 1 stitch in garter stitch in each side. Work next row as follows from right side: S, M and L: 1 stitch in garter stitch, 5-6-6 stitches in stocking stitch, A.1, work 10-12-14 stitches in stocking stitch, * A.2, work 5-6-7 stitches in stocking stitch *, work from *-* 2 times in total, A.2, work 10-12-14 stitches in stocking stitch, A.3, work 5-6-6 stitches in stocking stitch, 1 stitch in garter stitch. XL, XXL and XXXL: 1 stitch in garter stitch, 9-11-13 stitches in stocking stitch, A.2, work 12-14-16 stitches in stocking stitch, * A.2, work 5-6-7 stitches in stocking stitch *, work from *-* 2 times in total, A.2, work 12-14-16 stitches in stocking stitch, A.2, work 9-11-13 stitches in stocking stitch, 1 stitch in garter stitch. Continue pattern back and forth like this. REMEMBER THE KNITTING TENSION! When piece measures 28-29-30-31-32-33 cm - measured from cast-on edge where the curve goes down (all length measurements are done from here), cast off for armholes at beginning of every row in each side as follows: Cast off 3 stitches 1-1-1-1-2-2 times, 2 stitches 2-3-3-4-4-6 times and 1 stitch 4-4-5-6-6-6 times = 73-77-81-85-89-91 stitches remain – NOTE: When decrease hits A.1/A.2/A.3 work the rest of repetition in stocking stitch. When piece measures 45-47-49-51-53-55 cm, cast off the middle 29-29-31-31-33-33 stitches for neck and finish each shoulder separately. NOTE! When decrease hits A.2 work the rest of repetition in stocking stitch. Then cast off 2 stitches for neck on next row from neck = 20-22-23-25-26-27 stitches remain for shoulder. When piece measures 46-48-50-52-54-56 cm, work in stocking stitch back and forth over all stitches. Cast off somewhat loosely when piece measures 48-50-52-54-56-58 cm. Work the other shoulder the same way. FRONT PIECE: Cast on the same number of stitches as back piece and work the same way as back piece until piece measures 42-44-45-47-48-50 cm - measured from where the cast on edge curves down. Now slip the middle 23-23-25-25-27-27 stitches on a thread for neck and finish each shoulder separately. Continue to cast off for neck at beginning of every row from neck as follows: Cast off 2 stitches 1 time and 1 stitch 3 times = 20-22-23-25-26-27 stitches. NOTE! When decrease hits A.2 work the rest of repetition in stocking stitch. When piece measures 46-48-50-52-54-56 cm, work in stocking stitch back and forth over all stitches. Cast off somewhat loosely when piece measures 48-50-52-54-56-58 cm. Work the other shoulder the same way. SLEEVES: Worked top down. Cast on somewhat loosely 23-25-25-25-27-27 stitches on circular needle size 5 mm with DROPS Brushed Alpaca Silk. Work first row as follows from right side: 5-6-6-6-7-7 stitches in stocking stitch, A.2, 5-6-6-6-7-7 stitches in stocking stitch. Continue pattern back and forth like this while at the same time casting on new stitches for sleeve cap at the end of every row in each side as follows (work the new stitches in stocking stitch): Cast on 3 stitches 1 time in each side, 2 stitches 3-3-3-4-4-4 times in each side, 1 stitch 2-3-2-2-2-4 times in each side, 2 stitches 3-3-3-3-4-4 times in each side and then 3 stitches 1-1-2-2-2-2 times in each side = 63-67-71-75-81-85 stitches. Piece measures approx. 9-10-10-11-12-14 cm from cast-on edge. Now put piece together on a short circular needle size 5 mm - work the rest of sleeve in the round as explained below. Insert 1 marker thread at the beginning of round, mid under sleeve. Continue in stocking stitch and A.2 over the middle 13 stitches. When piece measures 4-4-4-2-2-1 cm from where piece was put together, decrease 2 stitches mid under sleeve - read DECREASE TIP. Decrease like this every 4-3½-3-2½-2-2 cm 9-10-11-12-14-15 times in total = 45-47-49-51-53-55 stitches. When sleeve measures 47-47-47-44-44-44 cm from cast-on edge (at the top of sleeve cap), increase 12-12-12-14-14-14 stitches evenly (increase 6-6-6-7-7-7 stitches evenly on each side of A.2, and work A.2 as before) = 57-59-61-65-67-69 stitches. Work next round as follows: S, M and L: 2-3-4 stitches in stocking stitch, A.1, work A.2 3 times in total, A.3 work 2-3-4 stitches in stocking stitch. Continue pattern like this. When A.1 to A.3 has been worked 1 time vertically, work next round as follows: 2-3-4 stitches in stocking stitch, A.4, work A.5 3 times in total, A.6, work 2-3-4 stitches in stocking stitch. When A.4 to A.6 have been worked vertically, work the first 2 rounds in A.4b, A.5b and A.6b = 65-67-69 stitches. XL, XXL and XXXL: 0-1-2 stitches in stocking stitch, work A.2 5 times in total, 0-1-2 stitches in stocking stitch. Continue pattern like this. When A.2 has been worked 1 time vertically, work next round as follows: 0-1-2 stitches in stocking stitch, work A.5 5 times in total, 0-1-2 stitches in stocking stitch. When A.5 has been worked vertically, work A.5b 2 times in total vertically, then work the first 2 rounds in A.5b = 75-77-79 stitches. ALL SIZES: Work 2 ridges in the round over all stitches. Cast off somewhat loosely by knitting. Sleeve measures approx. 55 cm in all sizes - measured from cast-on edge at the top of sleeve cap. Work another sleeve the same way. ASSEMBLY: Sew the shoulder seams. Sew side seams inside 1 edge stitch. Sew in sleeves inside 1 edge stitch. NECK EDGE WITH PICOT: Begin at one shoulder seam, and pick up from right side approx. 78 to 88 stitches around the neck (including stitches on thread at the front) on a short circular needle size 4.5 mm. Purl 1 round, knit 1 round, purl 1 round, knit 1 round and purl 1 round. Cast off with picot as follows: Knit 1, * insert right needle between the first 2 stitches on left needle (i.e. between stitches on needle, not through stitches), make 1 yarn over on right needle, pull yarn over forward between the stitches and slip yarn over on to left needle *, work from *-* 3 times in total (= 3 new stitches on left needle), knit and cast off at the same time off 6 stitches (= 1st stitch on right needle + 3 yarn overs + 2 stitches). Now continue to work from *-* + cast off 6 stitches the same way along the entire cast-off until there are no stitches left to make a new picot. Cast off the remaining stitches, cut the yarn and pull yarn through remaining stitch. |
|||||||||||||||||||
Diagram explanations |
|||||||||||||||||||
|
|||||||||||||||||||

|
|||||||||||||||||||

|
|||||||||||||||||||
|
Have you made this or any other of our designs? Tag your pictures in social media with #dropsdesign so we can see them! Do you need help with this pattern?You'll find tutorial videos, a Comments/Questions area and more by visiting the pattern on garnstudio.com. © 1982-2024 DROPS Design A/S. We reserve all rights. This document, including all its sub-sections, has copyrights. Read more about what you can do with our patterns at the bottom of each pattern on our site. |
|||||||||||||||||||


With over 40 years in knitting and crochet design, DROPS Design offers one of the most extensive collections of free patterns on the internet - translated to 17 languages. As of today we count 304 catalogues and 11422 patterns - 11422 of which are translated into English (UK/cm).
We work hard to bring you the best knitting and crochet have to offer, inspiration and advice as well as great quality yarns at incredible prices! Would you like to use our patterns for other than personal use? You can read what you are allowed to do in the Copyright text at the bottom of all our patterns. Happy crafting!
Comments / Questions (20)
Hi, Ich stricke gerade das Rückenteil und das Muster sieht anders aus als auf dem Bild. Bri mir entstehen keine Löcher bei den Umschlägen. Wie muss ich das stricken? Müssen die Umschläge auf der Rückseite rechts gestrickt werden? Danke im Voraus :)
11.04.2024 - 17:48I don't understand how to do this: 1 stitch in garter stitch, 9-11-13 stitches in stockinette stitch, A.2, work 12-14-16 stitches in stockinette stitch, If I'm working on the same row, how do I change from garter stitch to stocking stitch? Could you please explain? Thank you for your help.
04.04.2024 - 21:47DROPS Design answered:
Dear Carol, It is best if you coupd put a stitch marker so you can see, where to change patterns. Then, usually from the right side, you knit the stitches that should be knitted with stockinett and garter, on the wrong side, you purl the stockinett stitches and knit the garter stitches. Happy Knitting!
05.04.2024 - 02:06Hei. E strikker Trip til provence, men e sliter med a lese hva mange masker skal strikkes samen i mønsterraport A.1 , A.2 og A3. Er de 4 samen på alle plasser??? Mvh Isey Jensdottir
24.01.2024 - 13:49DROPS Design answered:
Hei Isey. Diagrammene følger hverandre i høyden, altså A.1 strikkes over A.1, A.2 over A.2 og A.3 over A.3. Da vil de 4 maskene som strikkes sammen følge hverandre / være på samme sted oppover i høyden, og kastene i diagrammene vil også være over hverandre og skape et flott bølgemønster. Sett maskemarkører/merketråd mellom hvert diagram, da får du en bedre oversikt. mvh DROPS Design
05.02.2024 - 08:20Liebes Drops Team, warum muss ich soviel Maschen anschlagen, um dann gleich wieder nach 4 Reihen Krausrechts Maschen abzunehmen? Kann ich nicht gleich die entsprechenden Maschen aufnehmen, die nach der Abnahme gebraucht werden? Oder hängt es mit dem Muster zusammen? Entstehen dann keine Wellen? Vielen lieben Dank und einen schönende Tag.
28.12.2023 - 11:11DROPS Design answered:
Liebe Maren, die Maschenanzahl in der Breite hängt vom Muster, um die gleiche Breite zu behalten, muss mann nach der Krausrippen bzw vor dem Muster abnehmen. So sollte Ihre Maschenprobe richtig sein, dann werden die fertigen Maßen wie in der Maßskizze stimmen. Viel Spaß beim stricken!
02.01.2024 - 09:36Hei, kan man strikke bolen rundt i stedet for frem og tilbake? Ser ut som alt mønster strikkes fra retten uansett, så da burde det vel gå fint?
28.11.2023 - 20:04DROPS Design answered:
Hej Lise, ja det går helt fint :)
29.11.2023 - 11:48Hei! Olen vasenkätinen; voinko neuloa normaalisti ohjeen mukaan, vai pitääkö minun tehdä esim. kavennukset päinvastoin kuin ohjeessa sanotaan?
31.10.2023 - 10:09DROPS Design answered:
Hei, voit neuloa normaalisti ohjeen mukaan, mutta jos neulot vasemmalta oikealle sinun tulee neuloa piirrokset peilikuvina.
24.11.2023 - 17:29Ik ben het voorpand aan het breien. En loop gelijk tegen het sterretje aan. Wat betekent dit? Brei ik de steken vóór * herhalend over de pen? En begin ik dan de volgende pen A1 in de hoogte of verder met A2 en de zinnen erna?
28.09.2023 - 13:49DROPS Design answered:
Dag Faya,
Er staat een stukje tekst tussen twee sterretjes en daarna stat er dat je *-* een x aantal keren moet breien. Dat is dus het stukje dat tussen de 2 sterretjes stond en wat je dus 2 keer moet breien.
03.10.2023 - 06:44"Quand A.5 est terminé, tricoter 2 fois A.5b au total en hauteur, tricoter ensuite les 2 premiers tours de A.5b = 75-77-79 mailles." A5b est-il répéter sur la totalité des mailles pour la taille XL ? Comment faites-vous pour terminer avec 75 mailles après A5b en partant de 65 mailles au niveau de A5 ? Quand toi-ton ajouter 10 mailles ? Merci
03.09.2023 - 23:01DROPS Design answered:
Bonjour Katty, en XL on tricote 5 fois A.5 en largeur (5 x 13 = 65 mailles), et, au 1er rang de A.5, on augmente 2 mailles dans chaque A.5 (on diminue 2 x 2 mailles mais on fait 6 jetés), on a ainsi 15 mailles dans chaque A.5 x 5 fois = 75 mailles. Bon tricot!
04.09.2023 - 08:49Ik ben een trui aan het breien met jullie wol en patroon drops 241-29. Ben bij de mouw die van boven naar beneden wordt gebreid. Heb nu echter een kop van de mouw van 9 cm volgens patroon en moet nu rond gaan breien maar dan wordt de kop toch veel te klein voor het armsgat. Wat doe ik niet goed? Hoor graag even
22.06.2023 - 10:12DROPS Design answered:
Dag Regina,
Als je 9 cm in de hoogte hebt gebreid, dan kun je de mouw in de rondte breien. Heb je de mouwkop ook rondom gemeten en deze met het armsgat op de panden vergeleken?
25.06.2023 - 18:22Buenas tardes, me gustaría una explicación sobre cómo tejer en la vuelta de revés las 3 lazadas juntas ya que no se hacerlo. Podrían explicármelo? muchas gracias
16.06.2023 - 18:24DROPS Design answered:
Hola Carolina, las disminuciones se trabajan por el lado derecho. Puedes ver el siguiente vídeo sobre cómo trabajar 3 puntos juntos de derecho/ juntos de derecho retorcido: https://www.garnstudio.com/video.php?id=316&lang=es
17.06.2023 - 16:47