DROPS Air
DROPS Air
65% Alpaca, 28% Polyamide, 7% Wool
from 6.45 $ /50g
Get the yarn to make this pattern from 58.05$.

The yarn cost is calculated from the pattern’s smallest size and the yarn’s cheapest product type. Looking for an even better price? You might find it on the DROPS Deals!

DROPS SS24

Red Tape

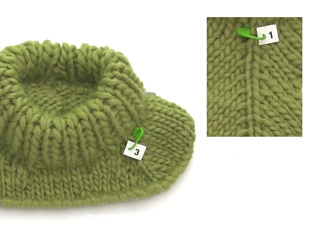
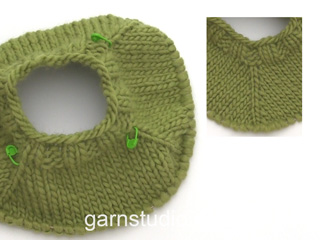
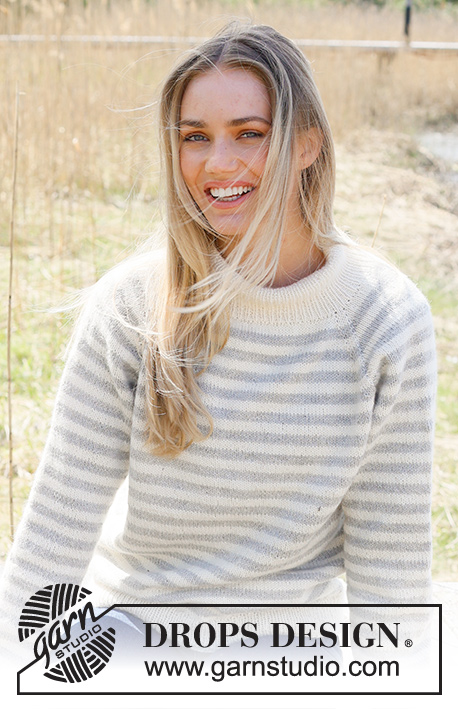
Knitted sweater in 1 strand DROPS Wish or 2 strands DROPS Air. The piece is worked top down with double neck, raglan and stripes. Sizes S - XXXL.

DROPS 236-22
DROPS Design: Pattern wi-050
Yarn group E or C + C
-------------------------------------------------------

SIZES:
S - M - L - XL - XXL – XXXL

Finished measurements:
Chest measurements: 100-108-114-126-136-148 cm = 39⅜"-42½"-45"-49½"-53½"-58⅜"
Full length: 52-54-56-58-60-62 cm = 20½"-21¼"-22"-22¾"-23⅝"-24⅜"
All measurements in charts are in cm.

MATERIALS:
DROPS WISH from Garnstudio (belongs to yarn group E)
400-450-500-550-600-650 g color 01, off white
50-50-100-100-100-100 g color 11, tabasco

Or use:
DROPS AIR from Garnstudio (belongs to yarn group C)
400-450-500-550-600-650 g color 01, off white
50-50-100-100-100-100 g color 13, orange

NEEDLES:
DROPS CIRCULAR NEEDLE SIZE 8 MM = US 11: Length 40 cm = 16" and 80 cm = 32".
DROPS CIRCULAR NEEDLE SIZE 6 MM = US 10: Length 40 cm = 16" and 80 cm = 32".
DROPS DOUBLE POINTED NEEDLES SIZE 8 MM = US 11.
DROPS DOUBLE POINTED NEEDLES SIZE 6 MM = US 10.
The technique MAGIC LOOP can be used – you then only need circular needle of 80 cm = 32" in each size.

KNITTING GAUGE:
11 stitches in width and 15 rows in height with stockinette stitch = 10 x 10 cm = 4" x 4" with 2 strands DROPS AIR .
NOTE: Needle size is only a guide. If you get too many stitches on 10 cm = 4", change to a larger needle size. If you get too few stitches on 10 cm = 4", change to a smaller needle size.

-------------------------------------------------------

Alternative Yarn – See how to change yarns here
Yarn Groups A to F – Use the same pattern and change the yarn here
Yarn usage using an alternative yarn – Use our yarn converter here

-------------------------------------------------------

DROPS Air
DROPS Air
65% Alpaca, 28% Polyamide, 7% Wool
from 6.45 $ /50g
Get the yarn to make this pattern from 58.05$.

The yarn cost is calculated from the pattern’s smallest size and the yarn’s cheapest product type. Looking for an even better price? You might find it on the DROPS Deals!

Pattern instructions

NOTE: This pattern is written in American English. All measurements in charts are in cm. For conversion from inches to cm - click here. There are different terms for crocheting in American and British English. If this pattern includes crochet, click for "crochet terms" here. For this pattern in British English, please click here.
-------------------------------------------------------

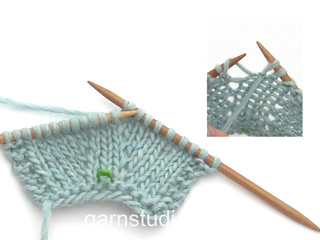
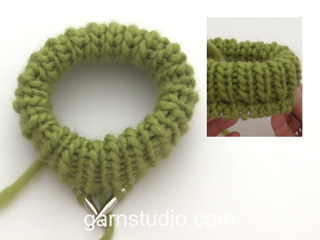
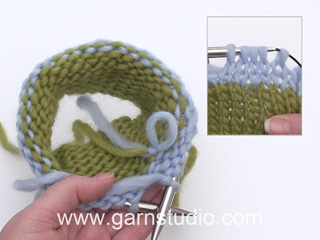
EXPLANATIONS FOR THE PATTERN:
-------------------------------------------------------

INCREASE TIP:
Increase 1 stitch by picking up the strand from the previous round and knitting it.

RAGLAN:
You increase differently on the body and sleeves.
All increases are before/after 3 stitches in stockinette stitch (marker-stitch is in the middle of these 3 stitches).
Increase for the body before markers 3 and 1 and after markers 2 and 4.
Increase for the sleeves after markers 3 and 1 and before markers 2 and 4.
Increase 1 stitch by making 1 yarn over.

When working back and forth work the yarn overs from the wrong side as follows:
BEFORE MARKER:
Work in the back loop of the yarn over (no hole).
AFTER MARKER:
Slip the yarn over off the left needle, then replace it the other way round (insert the left needle from the back when replacing it). Work the front loop of the yarn over. No hole.

When working in the round, work the yarn overs on the next round as follows:
BEFORE MARKER:
Slip the yarn over off the left needle, then replace it the other way round (insert the left needle from the back when replacing it). Work the front loop of the yarn over (the stitch twists to the right – no hole).
AFTER MARKER:
Work in the back loop of the yarn over (the stitch twists to the left – no hole).

STRIPES BODY:
* 4 rounds with color tabasco, 8 rounds with color off-white *, work from *-* a total of 2 times, then 4 rounds with color tabasco. Finish with color off-white.

STRIPES SLEEVES:
* 4 rounds with color tabasco, 8 rounds with color off-white *, work from *-* a total of 3 times, then 4 rounds with color tabasco. Finish with color off-white.

DECREASE TIP (for sleeves):
Decrease 1 stitch on either side of the marker as follows: Start 3 stitches before the marker, knit 2 together, knit 2 (marker sits between these 2 stitches), slip 1 stitch as if to knit, knit 1 and pass the slipped stitch over the knitted stitch.

-------------------------------------------------------

START THE PIECE HERE:

-------------------------------------------------------

SWEATER – SHORT OVERVIEW OF THE PIECE:
The neck and yoke are worked in the round with circular needle, from mid back and top down. The yoke is divided for body and sleeves and the body is continued in the round with circular needle. The sleeves are worked in the round with short circular needle/double pointed needles.

DOUBLE NECK:
Cast on 60-64-64-68-68-72 stitches with color off white DROPS Wish or 2 strands DROPS Air, using 2 short circular needles size 6 and 8 MM = US 11 held together. Remove the needle size 8 MM = US 11 (this gives you an elastic cast-on edge) keeping the stitches on needle size 6 MM = US 10. Work rib in the round (knit 1, purl 1) for 9 cm = 3½".
Fold the neck double to the inside and work 1 more round of rib, working every 2nd stitch together with its corresponding stitch on the cast-on edge.

SIZES S, M and L:
Insert 4 markers without working the stitches. They are used when increasing to raglan.
Count 8-8-8 stitches (half back-piece), insert marker-1 in the next stitch, count 13 stitches (sleeve), insert marker-2 in the next stitch, count 15-17-17 stitches (front piece), insert marker-3 in the next stitch, count 13 stitches (sleeve), insert marker-4 in the next stitch, there are 7-9-9 stitches left after the last marker (half back-piece). Cut the strand. Go to NECK-LINE.

SIZES XL, XXL and XXXL:
Knit 1 round and increase 4-8-8 stitches evenly spaced – read INCREASE TIP = 72-76-80 stitches. Insert 4 markers without working the stitches. They are used when increasing to raglan.
Count 10-10-12 stitches (half back-piece), insert marker-1 in the next stitch, count 15 stitches (sleeve), insert marker-2 in the next stitch, count 19-21-23 stitches (front piece), insert marker-3 in the next stitch, count 15 stitches (sleeve), insert marker-4 in the next stitch, there are 9-11-11 stitches left after the last marker (half back-piece). Cut the strand. Go to NECK-LINE.

NECK-LINE:
Change to circular needle size 8 MM = US 11. Work a neck-line of short rows AT THE SAME TIME as you increase to raglan as described below.
Start from the right side, 2 stitches before marker-stitch 3 (left front of neck when the garment is worn). Work stockinette stitch and increase to RAGLAN – read description above, until you have worked 2 stitches past marker-stitch 2 (right front of neck – 8 stitches increased to raglan).
Turn, tighten the strand and purl back to 5 stitches past marker-stitch 3.
Turn and knit to 5 stitches past marker-stitch 2 – remember to increase to raglan.
Turn, tighten the strand and purl back to 2 stitches past marker-stitch 3. Cut the strand.
REMEMBER THE KNITTING GAUGE!

YOKE:
= 76-80-80-88-92-96 stitches.
Start mid-back and continue with stockinette stitch in the round, increasing to raglan every 2nd round a total of 3-6-7-7-5-6 times (including the increases on the short rows) = 84-112-120-128-116-128 stitches. Continue to increase to raglan, but every 2nd increase, increase only on the body (4 stitches increased); i.e. increase on the body every 2nd round, on the sleeves every 4th round. Increase like this 12-10-10-12-16-16 times on the body (6-5-5-6-8-8 times on the sleeves).
A total of 15-16-17-19-21-22 times on the body and 9-11-12-13-13-14 times on the sleeves.

After the last increase, there are 156-172-180-200-212-224 stitches. Continue working without further increases until the yoke measures 21-23-25-26-28-30 cm = 8¼"-9"-9¾"-10¼"-11"-11¾" mid-front – measured after the neck.

Now divide for the body and sleeves as follows:
Work 25-26-27-31-33-36 stitches (half back piece), place the next 29-33-35-39-39-41 stitches on a thread for the sleeve, cast on 6-6-8-8-8-10 stitches (in side under sleeve), work 49-53-55-61-67-71 stitches (front piece), place the next 29-33-35-39-39-41 stitches on a thread for the sleeve, cast on 6-6-8-8-8-10 stitches (in side under sleeve), work the last 24-27-28-30-34-35 stitches (half back piece). The body and sleeves are finished separately. The piece is now measured from here!

BODY:
= 110-118-126-138-150-162 stitches. Work 1 round of stockinette stitch. Then work STRIPES BODY – read description above. When the stripes are finished, work with color off-white until the body measures 20 cm = 8" from the division.
Work 1 round in stockinette stitch and increase 16-18-18-20-22-24 stitches evenly spaced = 126-136-144-158-172-186 stitches.
Change to circular needle size 6 MM = US 10 and work rib (knit 1, purl 1) for 6 cm = 2⅜". Bind off with knit over knit and purl over purl. The sweater measures approx. 52-54-56-58-60-62 cm = 20½"-21¼"-22"-22¾"-23⅝"-24⅜" from the shoulder down.

SLEEVES:
Place the 29-33-35-39-39-41 stitches from the thread on the one side of the piece on short circular needle/double pointed needles size 8 MM = US 11 and knit up 1 stitch in each of the new stitches cast on under the sleeve = 35-39-43-47-47-51 stitches. Insert a marker in the middle of the new stitches under the sleeve.
Start at the marker and work 1 round of stockinette stitch. Then work STRIPES SLEEVES – read description above. When the stripes are finished continue with color off-white.
AT THE SAME TIME, when the sleeve measures 4-4-4-3-3-3, decrease 2 stitches under the sleeve – read DECREASE TIP. Decrease like this every 10-7-4-4-4-3 cm = 4"-2¾"-1½"-1½"-1½"-1⅛" a total of 3-4-6-7-6-8 times = 29-31-31-33-35-35 stitches. Continue working until the sleeve measures 31-29-28-29-28-26 cm = 12¼"-11⅜"-11"-11⅜"-11"-10¼" from the division. There is 12 cm = 4¾" left; try the sweater on and work to desired length.
Knit 1 round where you increase 9-9-11-9-9-11 stitches evenly spaced = 38-40-42-42-44-46 stitches. Change to double pointed needles size 6 MM = US 10 and work rib (knit 1, purl 1) for 12 cm = 4¾". Bind off with knit over knit and purl over purl. The sleeve measures approx. 43-41-40-41-40-38 cm = 17"-16⅛"-15¾"-16⅛"-15¾"-15" from the division.
Work the other sleeve in the same way.

Diagram

All measurements in charts are in cm.

diagram measurements

Each of our patterns has specific tutorial videos to help you.

Do you have a question? See a list of frequently asked questions (FAQ)

Knitting tension is what determines the final measurements of your work, and is usually measured per 10 x 10 cm. It is provided like so: number of stitches in width x number of rows in height - eg: 19 stitches x 26 rows = 10 x 10 cm.

The knitting tension is very individual; some people knit/crochet loosely while others work tightly. You adjust the knitting tension with the needle size, which is why the suggested needle size only serve as a guide! You need to adjust this (up or down) to ensure that YOUR knitting tension matches the knitting tension provided in the pattern. If you work with a different knitting tension than provided you will have a different yarn consumption, and your work will have different measurements than what the pattern suggests.

The knitting tension also determines which yarns can replace each other. As long as you achieve the same knitting tension you can replace one yarn with another.

See DROPS lesson: How to measure your tension/gauge

See DROPS video: How to make a gauge tension swatch

The required amount of yarn is provided in grams, eg: 450 g. To calculate how many balls you’ll need you first need to know how many grams are in 1 ball (25g, 50g or 100g). This information is available if you click on the individual yarn quality on our pages. Divide the amount required with the amount of each ball. For example, if each ball is 50g (the most common amount), the calculation will be as follows: 450 / 50 = 9 balls.

The important thing when changing from one yarn to another is that the knitting/crochet tension remains the same. This is so that the measurements of the finished piece will be the same as on the sketch provided. It is easier to achieve the same knitting tension using yarns from the same yarn group. It is also possible to work with multiple strands of a thinner yarn to achieve the knitting tension of a thicker one. Please try our yarn converter. We recommend you to always work a test swatch.

Please NOTE: when changing yarn the garment might have a different look and feel to the garment in the photo, due to individual properties and qualities of each yarn.

See DROPS lesson: Can I use a different yarn than the one mentioned in the pattern?

All our yarns are categorised into yarn groups (from A to F) according to thickness and knitting tension – group A contains the thinnest yarns and group F the thickest. This makes it easier for you to find alternative yarns to our patterns, should you wish to switch yarn. All yarns within the same group have a similar knitting tension and can easily replace each other. However, different yarn qualities have different structures and properties which will give the finished work a unique look and feel.

Click here for an overview of the yarns in each yarn group

At the top of all our patterns you’ll find a link to our yarn converter, which is a helpful tool should you wish to use a different yarn than suggested. By filling in the yarn quality you wish to replace, the amount (in your size) and number of strands, the converter will present good alternative yarns with the same knitting tension. Additionally it will tell you how much you’ll require in the new qualities and whether you’ll need to work with multiple strands. Most skeins are 50g (some are 25g or 100g).

If the pattern is worked with multiple colours, every colour will have to be converted separately. Similarly, if the pattern is worked with several strands of different yarns (for example 1 strand Alpaca and 1 strand Kid-Silk) you will have to find alternatives for each, individually.

Click here to see our yarn converter

Since different yarns have different qualities and textures we have chosen to keep the original yarn in our patterns. However, you can easily find options among our available qualities by using our yarn converter, or simply pick a yarn from the same yarn group.

It is possible that some retailers still have discontinued yarns in stock, or that someone has a few skeins at home that they would like to find patterns for.

The yarn converter will provide both alternative yarn as well as required amount in the new quality.

If you think it's hard to decide what size to make, it can be a good idea to measure a garment you own already and like the size of. Then you can pick the size by comparing those measures with the ones available in the pattern's size chart.

You'll find the size chart at the bottom of the pattern.

See DROPS lesson: How to read size chart

The needle size provided in the pattern serves only as a guide, the important thing is to follow the knitting tension. And since knitting tension is very individual, you will have to adjust the needle size to ensure that YOUR tension is the same as in the pattern – maybe you’ll have to adjust 1, or even 2 needle sizes, up or down to achieve the correct tension. For this, we recommend that you work test swatches.

Should you work with a different knitting tension than the one provided, the measurements of the finished garment might deviate from the measurement sketch.

See DROPS lesson: How to measure your tension/gauge

See DROPS video: How to make a gauge tension swatch

Working a garment top-down provides more flexibility and room for personal adjustment. For example it is easier to try the garment on while working, as well as making adjustments to length of yoke and shoulder caps.

The instructions are carefully explaining every step, in the correct order. Diagrams are adjusted to the knitting direction and are worked as usual.

The diagram depicts all rows/rounds, and every stitch seen from the right side. It is read from bottom to top, from right to left. 1 square = 1 stitch.

When working back and forth, every other row is worked from the right side and every other row is worked from the wrong side. When working from the wrong side, the diagram will have to be worked reversed: from left to right, knit stitches are purled, purl stitches are knit etc.

When working in the round every round is worked from the right side and the diagram are worked from right to left on all rounds.

See DROPS lesson: How to read knitting diagrams

The diagram depicts all rows/rounds, and every stitch seen from the right side. It is worked from bottom to top, from right to left.

When working back and forth every other row is worked from the right side: from right to left and every other row is worked from the wrong side: from left to right.

When working in the round, every row in the diagram are worked from the right side, from right to left.

When working a circular diagram you start in the middle and work your way outwards, counter clockwise, row by row.

The rows usually start with a given number of chain stitches (equivalent to the height of the following stitch), this will either be depicted in the diagram or explained in the pattern.

See DROPS lesson: How to read crochet diagrams

Instructions for working several diagrams after each other on the same row/round, will often be written like so: “work A.1, A.2, A.3 a total of 0-0-2-3-4 times". This means you work A.1 once, then A.2 is worked once, and A.3 is repeated (in width) the number of times provided for your size – in this case like so: S = 0 times, M = 0 times, L=2 times, XL= 3 times and XXL = 4 times.

The diagrams are worked as usual: begin with the first row in A.1, then work the first row in A.2 etc.

See DROPS lesson: How to read knitting diagrams

See DROPS lesson: How to read crochet diagrams

The total width of the garment (from wrist-to-wrist) will be larger in the larger sizes, despite the actual sleeves being shorter. The larger sizes have longer sleeve caps and wider shoulders, so there will be a good fit in all sizes.

The measurement sketch/schematic drawing provides information regarding the full length of the garment. If it’s a jumper or a jacket the length is measured from the highest point on the shoulder (usually closest to the neckline), and straight down to the bottom of the garment. It is NOT measured from the tip of shoulder. Similarly, the length of yoke is measured from the highest point on the shoulder and down to where yoke is split into body and sleeves.

See DROPS lesson: How to read a schematic drawing

Diagrams are often repeated on the round or in height. 1 repeat is the diagram the way it appears in the pattern. If it says to work 5 repeats of A.1 in the round, then you work A.1 a total of 5 times after/next to each other in the round. If it says to work 2 repeats of A.1 vertically/in height you work the entire diagram once, then begin again at the start and work the entire diagram one more time.

Chain stitches are slightly narrower than other stitches and to avoid working the cast-on edge too tight, we simply chain more stitches to begin with. The stitch count will be adjusted on the following row to fit the pattern and measurement sketch.

The rib edge is more elastic and will contract slightly compared to, for example, stocking stitch. By increasing before the rib edge, you avoid a visible difference in width between the rib edge and the rest of the body.

It’s very easy to cast off too tightly, and by making yarn overs while casting off (and simultaneously casting these off) you avoid a too tight cast off edge.

See DROPS video: How to bind off with yarn overs (yo)

To achieve an even increase (or decrease) you can increase on, for example: every 3rd and 4th row alternately, like so: work 2 rows and increase on the 3rd row, work 3 rows and increase on the 4th. Repeat this until the increase is complete.

See DROPS lesson: Increase or decrease 1 st on every 3rd and 4th row alternately

Should you prefer to work in the round instead of back and forth, you may of course adjust the pattern. You’ll need to add steeks mid-front (usually 5 stitches), and follow the instructions. When you would normally turn and work from the wrong side, simply work across the steek and continue in the round. At the end you’ll cut the piece open, pick up stitches to work bands, and cover the cut edges.

See DROPS video: How to knit steeks and cut open

Should you prefer to work back and forth instead of in the round, you may of course adjust the pattern so you work the pieces separately and then assemble them at the end. Divide the stitches for the body in 2, add 1 edge stitch in each side (for sewing) and work the front and back pieces separately.

See DROPS lesson: Can I adapt a pattern for circular needles into straight needles?

Pattern repeats can vary slightly in the different sizes, in order to get the correct proportions. If you’re not working the exact same size as the garment in the photo, yours might deviate slightly. This has been carefully developed and adjusted so that the complete impression of the garment is the same in all sizes.

Make sure to follow instructions and diagrams for your size!

If you have found a pattern you like which is available in women’s size it’s not very difficult to convert it to men’s size. The biggest difference will be the length of sleeves and body. Start working on the women size that you think would fit across the chest. The additional length will be worked right before you cast off for the armhole/sleeve cap. If the pattern is worked top-down you can add the length right after the armhole or before the first decrease on sleeve.

Regarding additional yarn amount, this will depend on how much length you add, but it is better with a skein too many than too few.

All yarns will have excess fibres (from production) that might come off as lint or shedding. Brushed yarns (ie hairier yarns) have more of these loose, excess fibres, causing more shedding.

Shedding also depends on what is worn under or over the garment, and whether this pulls at the yarn fibres. It’s therefore not possible to guarantee that there will be no shedding

Below are some tips on how to get the best result when working with hairier yarns:

1. When the garment is finished (before you wash it) shake it vigorously so the looser hairs come off. NOTE: do NOT use a lint roller, brush or any method that pulls at the yarn.

2. Place the garment in a plastic bag and put it in your freezer - the temperature will cause the fibres to become less attached to each other, and excess fibres will come off easier.

3. Leave in the freezer for a few hours before taking it out and shaking it again.

4. Wash the garment according to the instructions on the yarn label.

Pilling is a natural process that happens to even the most exclusive of fibers. It's a natural sign of wear and tear that is hard to avoid, and that is most visible in high friction areas of your garment like a sweater's arms and cuffs.

You can make your garment look as new by removing the pilling, using a fabric comb or a pill/lint remover.

Still can't find the answer you need? Then scroll down and leave your question so one of our experts can try to help you. This will be done normally within 5 to 10 working days.
In the meantime, you can read the questions and answers that others have left to this pattern or join the DROPS Workshop on Facebook to get help from fellow knitters/crocheters!

You might also like...

Red Tape

Alvringar, Poland

Red Tape

Anna, Poland

Red Tape

SoftStop, Sweden

Post a comment to pattern DROPS 236-22

We would love to hear what you have to say about this pattern!

If you want to leave a question, please make sure you select the correct category in the form below, to speed up the answering process. Required fields are marked *.

Comments / Questions (19)

country flag Veerle wrote:

Het minderen voor de mouwen in maat S, is dat dus op 4 cm, 14 cm en 24 cm? (Gemeten vanaf de eerste rij tricotsteek NA de pas)?

30.12.2023 - 20:07

DROPS Design answered:

Dag Veerle,

Ja, dat klopt helemaal!

01.01.2024 - 13:12

country flag Veerle wrote:

Ik brei de trui in maat S. Kan het zijn dat - NA het breien van de halslijn (verkorte toeren) er nog 6 steken van de dubbelgebreide kraag niet meegebreid werden in de verkorte toeren, en dat die pas bij het breien van de PAS voor het eerst verder gebreid worden ? Deze 6 steken bevinden zich aan de midden voorkant. Ik ben in elk geval geëindigd met 76 steken. Dank alvast voor het antwoord.

19.12.2023 - 09:24

country flag Nina Alfredsson wrote:

Hej! Jag undrar lite över markörerna. Det står att 1:a markören skall vara efter halva bakstycket,2:a efter ärm och 3:e efter framstycket. Sedan startas halsringningen vid 3:e markören och att det då är vänster sida om man ha tröjan på. Menar ni att man skall tänka sig att man ser tröjan på någon annan - då blir det vänster sida för mig. Om jag räknar rätt borde väl 3:e markören hamna på höger sida (innan hö ärm) om jag själv tänker att jag har tröjan på? /Nina

13.08.2023 - 18:25

country flag Anna wrote:

Hej! Nie rozumiem tej części:KARCZEK: = 76-80-80-88-92-96 oczek. Zaczynając na środku tyłu, dalej przerabiać na okrągło dżersejem, dodając na reglan w sumie 3-6-7-7-5-6 razy co 2 okrążenia (w tym dodawanie oczek w rzędach skróconych) = 84-112-120-128-116-128 oczek. Dlaczego po 3 krotnym dodaniu oczek nie mamy ich na końcu 76+3x8=100?

28.02.2023 - 16:52

DROPS Design answered:

Witaj Aniu, w najmniejszym rozmiarze jest 60 o. na dekolt. Następnie przerabiamy rzędy skrócone na dekolt, jednocześnie dodając oczka na reglan 2 razy (w każdym rzędzie przerabianym na prawo): 60+(8x2)=76 o. Karczek zaczynamy liczbą 76 o. „dalej przerabiać na okrągło dżersejem, dodając na reglan w sumie 3-6-7-7-5-6 razy co 2 okrążenia (w tym dodawanie oczek w rzędach skróconych) = 84 o.” > w rozmiarze S zostaje nam tylko 1 okrążenie z dodawaniem oczek (2 już wykonaliśmy w rzędach skróconych): 76+8=84 oczka. Pozdrawiamy!

01.03.2023 - 09:16

country flag Sylvie Lachance wrote:

Oui, j'ai acheté la laine Wish, et mon échantillon était parfait. Il m'a manqué de laine pour 3 rayures sur une manche. C'est quand même beaucoup...

26.01.2023 - 18:05

country flag Sylvie Lachance wrote:

J'ai acheté les quantités de laine recommandées, selon ce patron, pour la taille medium. Il m'a manqué 1 balle pour terminer les rayures. Dommage de payer à nouveau les frais d'envoi pour une seule balle... Pourriez-vous corriger l'info afin d'éviter à d'autres d'être déçus? Merci!

26.01.2023 - 16:39

DROPS Design answered:

Bonjour Mme Lachance, avez-vous tricoté en DROPS Wish? Aviez-vous bien le bon échantillon en largeur mais aussi en hauteur? soit 11 mailles x 15 rangs jersey = 10 x10 cm, une différence même légère peut jouer sur la quantité totale. Merci.

26.01.2023 - 16:48

country flag Sylvie Lachance wrote:

J'ai acheté les quantités de laine recommandées, selon ce patron, pour la taille medium. Il m'a manqué 1 balle pour terminer les rayures. Dommage de payer à nouveau les frais d'envoi pour une seule balle... Pourriez-vous corriger l'info afin d'éviter à d'autres d'être déçus? Merci!

26.01.2023 - 16:38

country flag Lila wrote:

Hallo zusammen :-) Habe ich es richtig verstanden, dass bei den verkürzten Reihen nur bei den Hinreihen zugenommen wird? Aber nicht bei den Rückreihen? Ich wollte außerdem lieber aus tiefer gestochenen Maschen zunehmen. Ändert das was an der Passform des Pullovers? Haut das hin? Ich würde mich sehr über Hilfe freuen ! Liebe Grüße

24.01.2023 - 15:28

DROPS Design answered:

Liebe Lila, für die Zunahmen, am besten versuchen Sie auf Ihrer Maschenprobe, so lange es Ihnen gefällt, dann ist es auch richtig - beachten Sie nur, daß Sie die richtigen Maschenanzahl zunehmen (je nach Wunsch) - aber dann sind die Raglanlinien verschieden als im Bild hier. Viel Spaßb eim stricken!

24.01.2023 - 16:51

country flag Lila wrote:

Hallo zusammen :-) Habe ich es richtig verstanden, dass bei den verkürzten Reihen nur bei den Hinreihen zugenommen wird? Aber nicht bei den Rückreihen? Ich wollte außerdem lieber aus tiefer gestochenen Maschen zunehmen. Ändert das was an der Passform des Pullovers? Haut das hin? Ich würde mich sehr über Hilfe freuen ! Liebe Grüße

24.01.2023 - 15:28

DROPS Design answered:

Liebe Lila, ja ganz genau, es wird nur bei den Hinreihen zugenommen, dh 16 Maschen werden insgesamt zugenommen wenn die verkürzten Reihen gestrickt sind. Viel Spaß beim stricken!

24.01.2023 - 16:48

country flag Lila wrote:

Wo sind die 6 Maschen des angeschlagenen Halsausschnittes bei Größe M (64 Maschen) hin? Bei der Verteilung der Maschenmarkierer IN den Maschen komme ich in der Beschreibung nur auf 58 Maschen bei Größe M. Anschlagen sollte ich beim Halsausschnitt aber 64? Ist hier ein Fehler in der Anleitung?

22.01.2023 - 15:00

DROPS Design answered:

Liebe Lila, die Markierungen werden in je einer Masche eingesetzt, so haben Sie: 8 M (1/2 Rückenteil), 1 M mit einem Markierer, 13 M (Ärmel), 1 M mit einem Markierer, 17 M (Vorderteil), 1 M mit einem Markierer, 13 M (Ärmel), 1 M mit einem Markierer, 9 M (1/2 Rückenteil) = 8+1+13+1+17+1+13+1+9= 64 Maschen. Viel Spaß beim stricken!

23.01.2023 - 09:45