
Popular categories
Looking for a yarn?


Comments / Questions (4)
![]() Steffi wrote:
Steffi wrote:
Vielen Dank für diese gut verständliche Anleitung. Das ist mein erstes 'richtiges' Strickwerk nach Anleitung (ich häkle sonst). Ich sitze gerade am zweiten Schuh für meinen Dreijährigen. Ich musste lediglich die Reihenzahl etwas erhöhen, weil meine Maschenproben in der Maschine stärker in der Höhe geschrumpft sind, als die Probe in der Anleitung.
05.04.2023 - 22:59
![]() Ramhofer Monika wrote:
Ramhofer Monika wrote:
Hallo, möchte gerne die Anleitung gerne noch mit Snow 50gr = 50m stricken brauche aber die Umrechnung mit der Maschenanzahl, könnten sie mir helfen?
15.12.2022 - 13:25DROPS Design answered:
Liebe Frau Ramhofer, leider können wir nicht jede Anleitung nach jeder Anfrage anpassen, Hier finden Sie alle unsere Anleitungen für Hausschuhen mit Snow; sicher finden Sie damit Inspiration. Viel Spaß beim stricken!
15.12.2022 - 14:18
![]() Anja wrote:
Anja wrote:
Die Anleitung ist aus meiner Sicht auch mit viel Strickerfahrung unstrickbar. Schade.
13.11.2022 - 08:52DROPS Design answered:
Liebe Anja, gerne können Sie Ihre Frage hier stellen, gerne werden wir Ihnen versuchen, Ihnen zu helfen. Viel Spaß beim stricken!
14.11.2022 - 10:39
![]() Frémont Daniele wrote:
Frémont Daniele wrote:
Comment commander un catalogue drops . merci
04.12.2021 - 09:08DROPS Design answered:
Bonjour Mme Frémont, nos modèles sont désormais uniquement disponibles sur notre site, où vous pouvez les imprimer directement. Bon tricot!
06.12.2021 - 09:20
|
|||||||
Christmas Steps#christmasstepsslippers |
|||||||
 |
 |
||||||
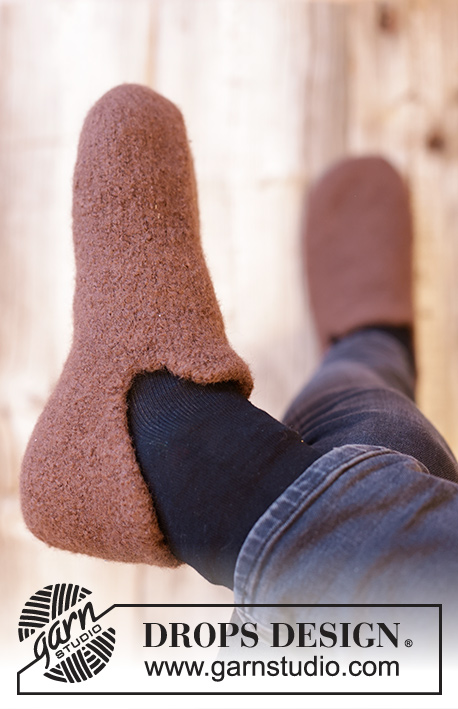
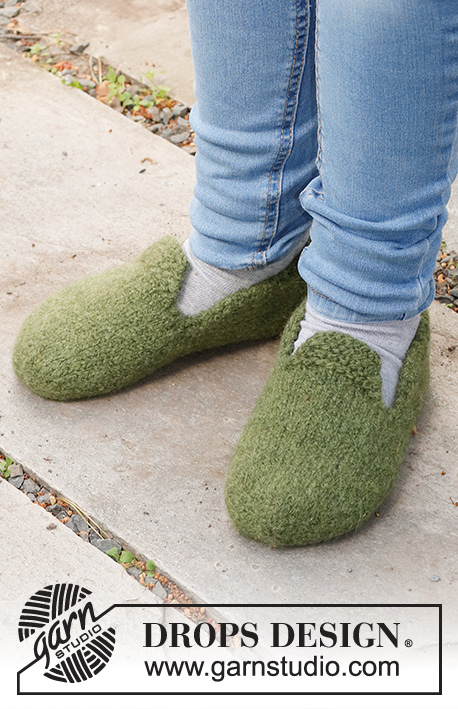
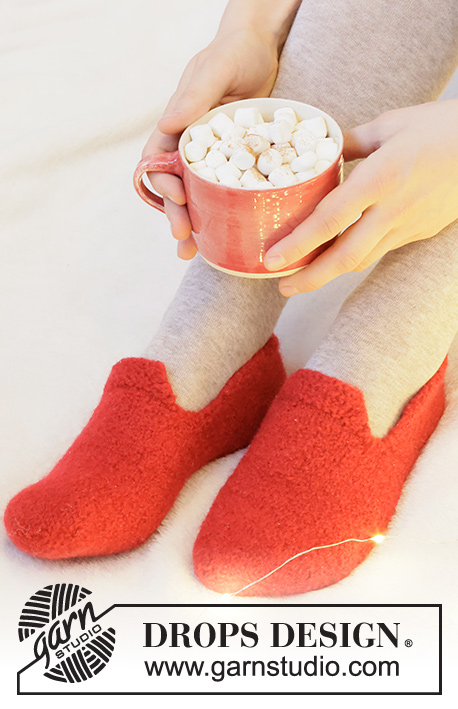
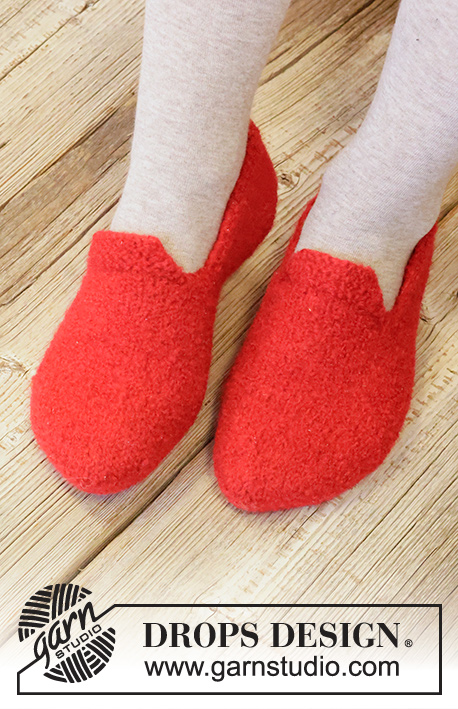
Knitted and felted slippers in DROPS Alaska for kids and adults. Size 26-46. Theme: Christmas.
DROPS Extra 0-1545 |
|||||||
|
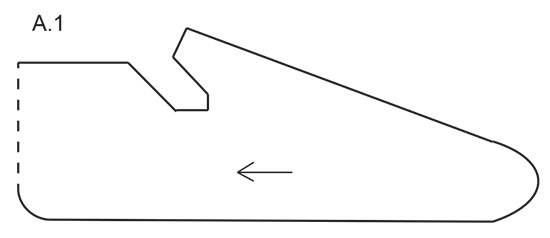
---------------------------------------------------------- EXPLANATION FOR THE PATTERN: ---------------------------------------------------------- GARTER STITCH (back and forth): Knit all rows. 1 ridge vertically = knit 2 rows. INCREASE TIP: Work 1 stitch past 1st marker, make 1 yarn over, work until 1 stitch remain before 2nd marker, make 1 yarn over, work 2 stitches (2nd marker is between these 2), make 1 yarn over, work until 1 stitch remains before 1st marker, make 1 yarn over and work 1 stitch = 4 stitches increased. On next round knit yarns over twisted to avoid holes. DIAGRAM: See diagram A.1 - the diagram shows how the knitting direction and where the slipper is sewn. ---------------------------------------------------------- START THE PIECE HERE: ---------------------------------------------------------- FELTED SLIPPERS – SHORT OVERVIEW OF THE PIECE: Work slippers from the toe. Work first in the round on double pointed needles, divide the piece at the instep and work back and forth on circular needle until finished measurements. Sew heel together mid back, and felt the piece in the washing machine. FELTED SLIPPER: Cast on 8 stitches on double pointed needles size 5.5 mm with DROPS Alaska in colour light olive or colour red. Knit 1 round. Insert 2 markers in the piece without working, insert 1st marker at the beginning of round and insert 2nd marker after 4 stitches - move the markers when working. Now work in stocking stitch in the round and increase 4 stitches on next round - read INCREASE TIP. Increase like this every round 6-6-7-7-8-9-10 times in total = 32-32-36-36-40-44-48 stitches on round. REMEMBER THE KNITTING TENSION! Work in stocking stitch until piece measures 6-7-8-10-12½-15½-18½ cm from cast-on edge. Knit 1 round and increase 0-2-0-2-2-2-2 stitches evenly over stitch between 1st and 2nd marker (i.e. From beginning of round and until 2nd marker) = 32-34-36-38-42-46-50 stitches. Work in stocking stitch until piece measures 12-12-13½-15-18-22-26 cm from cast-on edge. Knit 3-3-2-2-3-4-4, cast off 1 stitch, knit 8-10-12-14-14-14-16 and slip these stitches on a thread (= flap), cast off 1 stitch, knit 19-19-20-20-23-26-28 and knit over the first 3-3-2-2-3-4-4 stitches one more time = 22-22-22-22-26-30-32 stitches on needle. UNDER PIECE: Work in stocking stitch with 1 edge stitch in GARTER STITCH - read explanation above - in each side of piece. On next row from right side increase 1 stitch with 1 yarn over inside edge stitch in each side. On next row purl yarn over twisted to avoid holes Increase like this on every row from right side 5-5-6-6-7-6-7 times in total in each side = 32-32-34-34-40-42-46 stitches. Work back and forth in stocking stitch with 1 edge stitch in garter stitch in each side. When piece measures 21-22-25-28-30-34-38½ cm in total, and decrease in the middle of piece on next row from right side to make a rounded heel as follows: ROW 1 (= right side): Work 14-14-15-15-18-19-21 stitches, knit 2 together 2 times and work 14-14-15-15-18-19-21 stitches = 30-30-32-32-38-40-44 stitches. ROW 2 (= wrong side): Work as before from wrong side. ROW 3 (= right side): Work 13-13-14-14-17-18-20 stitches, knit 2 together 2 times and work 13-13-14-14-17-18-20 stitches = 28-28-30-30-36-38-42 stitches. ROW 4 (= wrong side): Work as before from wrong side. Cast off all stitches by knitting on next row. Piece measures 23-24-27-30-32-36-40½ cm in total from cast-on edge. FLAP: Slip the 8-10-12-14-14-14-16 stitches from thread back on double pointed needles size 5.5 mm. Work back and forth in garter stitch and decrease as follows on next row from right side: Knit the 2 outermost stitches in each side of piece together. Decrease like this every 4th row 2 times in total = 4-6-8-10-10-10-12 stitches. Knit 1 row from right side and cast off by knitting on next row from wrong side. Knit another slipper the same way. ASSEMBLY: Fold the piece so that cast-off edge on heel is edge to edge. See diagram A.1 that shows how the slipper is assembled. Sew together in outer loops of edge stitches to avoid a chunky seam. Baste a thread through the stitches from the cast on edge, tighten and fasten well. FELTING: Place the slippers in the washing machine with a detergent without enzymes and optical bleach. Wash at 40 degrees with normal spin but no pre-wash. After wash shape the slipper to the correct measurements while still, wet and leave to dry flat. Later wash as a normal wool garment. AFTER FELTING: If the piece is not felted enough and is too big: Wash the piece one more time in the washing machine while it is still wet add a terry towel that measures approx. 50 x 70 cm - NOTE: Do not use a short program. If the piece has been felted too much and is too small: While the piece is still wet stretch it to the correct measurements, if the piece is dry, make sure to soak it first. Remember: All subsequent washes are as a normal wool garment. |
|||||||
Diagram explanations |
|||||||
|
|||||||
|
|||||||
Have you finished this pattern?Tag your pictures with #dropspattern #christmasstepsslippers or submit them to the #dropsfan gallery. Do you need help with this pattern?You'll find 21 tutorial videos, a Comments/Questions area and more by visiting the pattern on garnstudio.com. © 1982-2025 DROPS Design A/S. We reserve all rights. This document, including all its sub-sections, has copyrights. Read more about what you can do with our patterns at the bottom of each pattern on our site. |
|||||||


With over 40 years in knitting and crochet design, DROPS Design offers one of the most extensive collections of free patterns on the internet - translated to 17 languages. As of today we count 314 catalogues and 11822 patterns translated into English (UK/cm).
We work hard to bring you the best knitting and crochet have to offer, inspiration and advice as well as great quality yarns at incredible prices! Would you like to use our patterns for other than personal use? You can read what you are allowed to do in the Copyright text at the bottom of all our patterns. Happy crafting!
Post a comment to pattern DROPS Extra 0-1545
We would love to hear what you have to say about this pattern!
If you want to leave a question, please make sure you select the correct category in the form below, to speed up the answering process. Required fields are marked *.