DROPS Sky
DROPS Sky
74% Alpaca, 18% Polyamide, 8% Wool
from 5.10 £ /50g
DROPS Kid-Silk
DROPS Kid-Silk
75% Mohair, 25% Silk
from 4.60 £ /25g
Get the yarn to make this pattern from 43.90£.

The yarn cost is calculated from the pattern’s smallest size and the yarn’s cheapest product type. Looking for an even better price? You might find it on the DROPS Deals!

DROPS SS24

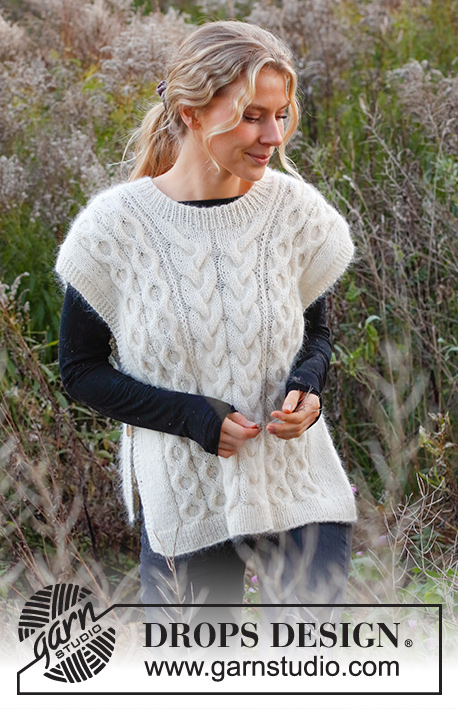
Frozen in Time Slipover

Knitted vest / slipover in DROPS Sky and DROPS Kid-Silk. Piece is knitted with cables and vents in the sides. Size: S - XXXL

DROPS 226-15
DROPS design: Pattern sk-137
Yarn group B and A
----------------------------------------------------------

SIZE:
S/M - L/XL - XXL/ XXXL

MATERIALS:
DROPS SKY from Garnstudio (belongs to yarn group B)
250-250-300 g colour 01, white
And use:
DROPS KID-SILK from Garnstudio (belongs to yarn group A)
100-125-125 g colour 01, off white

DROPS BUTTON, Marble NO 630: 4 pieces for all sizes

NEEDLES:
DROPS CIRCULAR NEEDLE SIZE 5.5 mm: Length: 80 cm
DROPS CIRCULAR NEEDLE SIZE 4 mm : Length 40 and 80 cm.
DROPS CABLE NEEDLE - for cables.
The technique MAGIC LOOP can be used on the neck edge – you then only need circular needle of 80 cm in each size.

KNITTING TENSION:
16 stitches in width and 20 rows vertically in stocking stitch and 1 strand of each quality = 10 x 10 cm.
Needle size is only a suggestion! If you have too many stitches on 10 cm switch to larger needles. If you have too few stitches on 10 cm switch to smaller needles.

-------------------------------------------------------

Alternative Yarn – See how to change yarns here
Yarn Groups A to F – Use the same pattern and change the yarn here
Yarn usage using an alternative yarn – Use our yarn converter here

-------------------------------------------------------

DROPS Sky
DROPS Sky
74% Alpaca, 18% Polyamide, 8% Wool
from 5.10 £ /50g
DROPS Kid-Silk
DROPS Kid-Silk
75% Mohair, 25% Silk
from 4.60 £ /25g
Get the yarn to make this pattern from 43.90£.

The yarn cost is calculated from the pattern’s smallest size and the yarn’s cheapest product type. Looking for an even better price? You might find it on the DROPS Deals!

Pattern instructions

NOTE: This pattern is written in British English. All measurements in charts are in cm. For conversion from cm to inches - click here. There are different terms for crocheting in British and American English. If this pattern includes crochet, click for "crochet terms" here. For this pattern in American English, please click here.
----------------------------------------------------------

EXPLANATION FOR THE PATTERN:

----------------------------------------------------------

GARTER STITCH (back and forth):
Knit all rows.
1 ridge vertically = knit 2 rows.

PATTERN:
See diagrams A.1 and A.2. Diagrams show all rows in pattern seen from the right side.

DECREASE TIP (evenly):
To calculate how to decrease evenly, use the total number of stitches on row (e.g. 129 stitches) minus edge stitches in garter stitch (10 stitches), and divide the remaining stitches by number of decreases to be done (e.g. 3) = 39.7.
In this example decrease by knitting approx. every 38th and 39th stitch together, and do not decrease of edge stitches in garter stitch.

----------------------------------------------------------

START THE PIECE HERE:

----------------------------------------------------------

VEST – SHORT SUMMARY OF PIECE:
Piece is worked back and forth in parts and sewn together on the shoulders. The vest is held together with buttons in the sides. Then pick up stitches for neck edge.

BACK PIECE:
Cast on 129-139-157 stitches on circular needle size 4 mm with 1 strand in each quality (= 2 strands).
Purl 1 row from wrong side.
Then work rib as follows: 5 stitches in GARTER STITCH - read explanation above - * knit 1/purl 1 *, repeat from *-* until 6 stitches remain, knit 1 and 5 stitches in garter stitch. When rib measures 5 cm, knit 1 row from right side while at the same time decreasing 3 stitches evenly - read DECREASE TIP = 126-136-154 stitches. Purl 1 row from wrong side with 5 stitches in garter stitch in each side.
Switch to circular needle size 5.5 mm.
Now work pattern as follows: 5 stitches in garter stitch, 9-14-23 stitches in stocking stitch, A.1 over the next 28 stitches (= 2 repetitions of 14 stitches), A.2 over the next 42 stitches, work the last 12 stitches in A.1, work A.1 over the next 14 stitches, purl 2, 9-14-23 stitches in stocking stitch, 5 stitches in garter stitch. Continue back and forth like this.
REMEMBER THE KNITTING TENSION!
When piece measures 31-33-35 cm, work ridges over the outermost 9-11-17 stitches in each side. When 2 ridges have been worked over the outermost 9-11-17 stitches in each side, cast off 4-6-12 stitches for armholes at the beginning of the next 2 rows = 118-124-130 stitches. Then work pattern as before over the middle 98 stitches, and work 5-8-11 stitches in stocking stitch inside 5 stitches in garter stitch towards each side. Work until piece measures approx. 56-60-64 cm. Now slip the middle 24 stitches on a stitch holder for neck and finish each shoulder separately. Continue with as many stitches of the pattern that will fit towards the neck and work knit over knit and purl over purl over stitches in cable in A.2. Then cast off 1 stitch on next row from the neck = 46-49-52 stitches. When piece measures 60-64-68 cm, knit 1 row from right side while at the same time decreasing 17-17-17 stitches evenly = 29-32-35 stitches. Cast off. Work the other shoulder the same way.

FRONT PIECE:
Cast on 129-139-157 stitches on circular needle size 4 mm with 1 strand in each quality (= 2 strands). Purl 1 row from wrong side.
Then work rib as follows: 5 stitches in GARTER STITCH - read explanation above - * knit 1/purl 1 *, repeat from *-* until 6 stitches remain, knit 1 and 5 stitches in garter stitch. When rib measures 5 cm, knit 1 row from right side while at the same time decreasing 3 stitches evenly - remember DECREASE TIP = 126-136-154 stitches.
Switch to circular needle size 5.5 mm.
Now work pattern as follows: 5 stitches in garter stitch, 9-14-23 stitches in stocking stitch, A.1 over the next 28 stitches (= 2 repetitions of 14 stitches), A.2 over the next 42 stitches, work the last 12 stitches in A.1, work A.1 over the next 14 stitches, purl 2, 9-14-23 stitches in stocking stitch, 5 stitches in garter stitch. Continue back and forth like this.
When piece measures 31-33-35 cm, work ridges over the outermost 9-11-17 stitches in each side. When 2 ridges have been worked over the outermost 9-11-17 stitches in each side, cast off 4-6-12 stitches for armholes at the beginning of the next 2 rows = 118-124-130 stitches. Then work pattern as before over the middle 98 stitches, and work 5-8-11 stitches in stocking stitch inside 5 stitches in garter stitch towards each side. Work until piece measures approx. 49-52-56 cm - to make the pattern at neck decrease the same as on picture, adjust so that A.2 has been worked vertically before continuing.
Now slip the middle 14 stitches on a stitch holder for neck and finish each shoulder separately. Continue with as many stitches of the pattern that will fit towards the neck and work knit over knit and purl over purl over stitches in cable in A.2. Then cast off stitches on every row from neck as follows: Cast off 3 stitches 1 time, 2 stitches 1 time and 1 stitch 1 time = 46-49-52 stitches. When piece measures 60-64-68 cm, knit 1 row from right side while at the same time decreasing 17-17-17 stitches evenly = 29-32-35 stitches. Cast off. Work the other shoulder the same way.

ASSEMBLY:
Sew shoulder seams inside cast-off edge. Make sure that to avoid a tight seam.
Sew vest together under sleeves in each side by sew on decorative buttons through the edges in garter stitch as follows:
Place edge in garter stitch on back piece over edge in garter stitch on front piece. Sew a button through both layers approx. 3 cm down from where stitches for armholes where cast off. Sew another button approx. 7 cm further down than first button. Repeat in the other side.

NECK EDGE:
Begin mid on top of one shoulder and pick up 76 to 84 stitches inside 1 edge stitch on a short circular needle size 4 mm and with 1 strand of each quality.
Work rib (= knit 1/purl 1) in the round for 3½ to 4 cm. Cast off stitches with knit over knit and purl over purl.

Diagram

symbols = knit from the right side, purl from the wrong side
symbols = purl from the right side, knit from the wrong side
symbols = slip 3 stitches on cable needle in front of piece, knit 3, knit 3 from cable needle
symbols = slip 3 stitches on cable needle behind piece, knit 3, knit 3 from cable needle
symbols = slip 5 stitches on cable needle in front of piece, knit 5, knit 5 from cable needle
symbols = slip 5 stitches on cable needle behind piece, knit 5, knit 5 from cable needle
symbols = knit 1 in stitch below this stitch (= English rib stitch)
diagram
diagram
diagram

Each of our patterns has specific tutorial videos to help you.

Do you have a question? See a list of frequently asked questions (FAQ)

Knitting tension is what determines the final measurements of your work, and is usually measured per 10 x 10 cm. It is provided like so: number of stitches in width x number of rows in height - eg: 19 stitches x 26 rows = 10 x 10 cm.

The knitting tension is very individual; some people knit/crochet loosely while others work tightly. You adjust the knitting tension with the needle size, which is why the suggested needle size is only meant as a guide! You need to adjust this (up or down) to ensure that YOUR knitting tension matches the knitting tension provided in the pattern. If you work with a different knitting tension than provided you will have a different yarn consumption, and your work will have different measurements than what the pattern suggests.

The knitting tension also determines which yarns can replace each other. As long as you achieve the same knitting tension you can replace one yarn with another.

See DROPS lesson: How to measure your tension/gauge

See DROPS video: How to make a gauge tension swatch

The required amount of yarn is provided in grams, eg: 450 g. To calculate how many balls you’ll need you first need to know how many grams are in 1 ball (25g, 50g or 100g). This information is available if you click on the individual yarn quality on our pages. Divide the amount required with the amount of each ball. For example, if each ball is 50g (the most common amount), the calculation will be as follows: 450 / 50 = 9 balls.

The important thing when changing from one yarn to another is that the knitting/crochet tension remains the same. This is so that the measurements of the finished piece will be the same as on the sketch provided. It is easier to achieve the same knitting tension using yarns from the same yarn group. It is also possible to work with multiple strands of a thinner yarn to achieve the knitting tension of a thicker one. Please try our yarn converter. We recommend you to always work a test swatch.

Please NOTE: when changing yarn the garment might have a different look and feel to the garment in the photo, due to individual properties and qualities of each yarn.

See DROPS lesson: Can I use a different yarn than the one mentioned in the pattern?

All our yarns are categorised into yarn groups (from A to F) according to thickness and knitting tension – group A contains the thinnest yarns and group F the thickest. This makes it easier for you to find alternative yarns to our patterns, should you wish to switch yarn. All yarns within the same group have a similar knitting tension and can easily replace each other. However, different yarn qualities have different structures and properties which will give the finished work a unique look and feel.

Click here for an overview of the yarns in each yarn group

At the top of all our patterns you’ll find a link to our yarn calculator, which is a helpful tool should you wish to use a different yarn than suggested. By filling in the yarn quality you wish to replace, the amount (in your size) and number of strands, the calculator will present good alternative yarns with the same knitting tension. Additionally it will tell you how much you’ll require in the new qualities and whether you’ll need to work with multiple strands. Most skeins are 50g (some are 25g or 100g).

If the pattern is worked with multiple colours, every colour will have to be calculated separately. Similarly, if the pattern is worked with several strands of different yarns (for example 1 strand Alpaca and 1 strand Kid-Silk) you will have to find alternatives for each, individually.

Click here to see our yarn calculator

Since different yarns have different qualities and textures we have chosen to keep the original yarn in our patterns. However, you can easily find options among our available qualities by using our yarn calculator, or simply pick a yarn from the same yarn group.

It is possible that some retailers still have discontinued yarns in stock, or that someone has a few skeins at home that they would like to find patterns for.

The yarn calculator will provide both alternative yarn as well as required amount in the new quality.

If you think it's hard to decide what size to make, it can be a good idea to measure a garment you own already and like the size of. Then you can pick the size by comparing those measures with the ones available in the pattern's size chart.

You'll find the size chart at the bottom of the pattern.

See DROPS lesson: How to read size chart

The needle size provided in the pattern serves only as a guide, the important thing is to follow the knitting tension. And since knitting tension is very individual, you will have to adjust the needle size to ensure that YOUR tension is the same as in the pattern – maybe you’ll have to adjust 1, or even 2 needle sizes, up or down to achieve the correct tension. For this, we recommend that you work test swatches.

Should you work with a different knitting tension than the one provided, the measurements of the finished garment might deviate from the measurement sketch.

See DROPS lesson: How to measure your tension/gauge

See DROPS video: How to make a tension/gauge swatch

Working a garment top-down provides more flexibility and room for personal adjustment. For example it is easier to try the garment on while working, as well as making adjustments to length of yoke and shoulder caps.

The instructions are carefully explaining every step, in the correct order. Diagrams are adjusted to the knitting direction and are worked as usual.

The diagram depicts all rows/rounds, and every stitch seen from the right side. It is read from bottom to top, from right to left. 1 square = 1 stitch.

When working back and forth, every other row is worked from the right side and every other row is worked from the wrong side. When working from the wrong side, the diagram will have to be worked reversed: from left to right, knit stitches are purled, purl stitches are knit etc.

When working in the round every round is worked from the right side and the diagram are worked from right to left on all rounds.

See DROPS lesson: How to read knitting diagrams

The diagram depicts all rows/rounds, and every stitch seen from the right side. It is worked from bottom to top, from right to left.

When working back and forth every other row is worked from the right side: from right to left and every other row is worked from the wrong side: from left to right.

When working in the round, every row in the diagram are worked from the right side, from right to left.

When working a circular diagram you start in the middle and work your way outwards, counter clockwise, row by row.

The rows usually start with a given number of chain stitches (equivalent to the height of the following stitch), this will either be depicted in the diagram or explained in the pattern.

See DROPS lesson: How to read crochet diagrams

Instructions for working several diagrams after each other on the same row/round, will often be written like so: “work A.1, A.2, A.3 a total of 0-0-2-3-4 times". This means you work A.1 once, then A.2 is worked once, and A.3 is repeated (in width) the number of times provided for your size – in this case like so: S = 0 times, M = 0 times, L=2 times, XL= 3 times and XXL = 4 times.

The diagrams are worked as usual: begin with the first row in A.1, then work the first row in A.2 etc.

See DROPS lesson: How to read knitting diagrams

See DROPS lesson: How to read crochet diagrams

The total width of the garment (from wrist-to-wrist) will be larger in the larger sizes, despite the actual sleeves being shorter. The larger sizes have longer sleeve caps and wider shoulders, so there will be a good fit in all sizes.

The measurement sketch/schematic drawing provides information regarding the full length of the garment. If it’s a jumper or a jacket the length is measured from the highest point on the shoulder closest to the neckline, and straight down to the bottom of the garment. It is NOT measured from the tip of shoulder. Similarly, the length of yoke is measured from the highest point on the shoulder and down to where yoke is split into body and sleeves.

On a jacket measures are never taken along bands, unless specifically stated. Always measure inside band stitches when measuring the length.

See DROPS lesson: How to read a schematic drawing

Diagrams are often repeated on the round or in height. 1 repeat is the diagram the way it appears in the pattern. If it says to work 5 repeats of A.1 in the round, then you work A.1 a total of 5 times after/next to each other in the round. If it says to work 2 repeats of A.1 vertically/in height you work the entire diagram once, then begin again at the start and work the entire diagram one more time.

Chain stitches are slightly narrower than other stitches and to avoid working the cast-on edge too tight, we simply chain more stitches to begin with. The stitch count will be adjusted on the following row to fit the pattern and measurement sketch.

The rib edge is more elastic and will contract slightly compared to, for example, stocking stitch. By increasing before the rib edge, you avoid a visible difference in width between the rib edge and the rest of the body.

It’s very easy to cast off too tightly, and by making yarn overs while casting off (and simultaneously casting these off) you avoid a too tight cast off edge.

See DROPS video: How to bind off with yarn overs (yo)

To achieve an even increase (or decrease) you can increase on, for example: every 3rd and 4th row alternately, like so: work 2 rows and increase on the 3rd row, work 3 rows and increase on the 4th. Repeat this until the increase is complete.

See DROPS lesson: Increase or decrease 1 st on every 3rd and 4th row alternately

Should you prefer to work in the round instead of back and forth, you may of course adjust the pattern. You’ll need to add steeks mid-front (usually 5 stitches), and follow the instructions. When you would normally turn and work from the wrong side, simply work across the steek and continue in the round. At the end you’ll cut the piece open, pick up stitches to work bands, and cover the cut edges.

See DROPS video: How to knit steeks and cut open

Should you prefer to work back and forth instead of in the round, you may of course adjust the pattern so you work the pieces separately and then assemble them at the end. Divide the stitches for the body in 2, add 1 edge stitch in each side (for sewing) and work the front and back pieces separately.

See DROPS lesson: Can I adapt a pattern for circular needles into straight needles?

Pattern repeats can vary slightly in the different sizes, in order to get the correct proportions. If you’re not working the exact same size as the garment in the photo, yours might deviate slightly. This has been carefully developed and adjusted so that the complete impression of the garment is the same in all sizes.

Make sure to follow instructions and diagrams for your size!

If you have found a pattern you like which is available in women’s size it’s not very difficult to convert it to men’s size. The biggest difference will be the length of sleeves and body. Start working on the women size that you think would fit across the chest. The additional length will be worked right before you cast off for the armhole/sleeve cap. If the pattern is worked top-down you can add the length right after the armhole or before the first decrease on sleeve.

Regarding additional yarn amount, this will depend on how much length you add, but it is better with a skein too many than too few.

All yarns will have excess fibres (from production) that might come off as lint or shedding. Brushed yarns (ie hairier yarns) have more of these loose, excess fibres, causing more shedding.

Shedding also depends on what is worn under or over the garment, and whether this pulls at the yarn fibres. It’s therefore not possible to guarantee that there will be no shedding

Below are some tips on how to get the best result when working with hairier yarns:

1. When the garment is finished (before you wash it) shake it vigorously so the looser hairs come off. NOTE: do NOT use a lint roller, brush or any method that pulls at the yarn.

2. Place the garment in a plastic bag and put it in your freezer - the temperature will cause the fibres to become less attached to each other, and excess fibres will come off easier.

3. Leave in the freezer for a few hours before taking it out and shaking it again.

4. Wash the garment according to the instructions on the yarn label.

Pilling is a natural process that happens to even the most exclusive of fibers. It's a natural sign of wear and tear that is hard to avoid, and that is most visible in high friction areas of your garment like a sweater's arms and cuffs.

You can make your garment look as new by removing the pilling, using a fabric comb or a pill/lint remover.

Still can't find the answer you need? Then scroll down and leave your question so one of our experts can try to help you. This will be done normally within 5 to 10 working days.
In the meantime, you can read the questions and answers that others have left to this pattern or join the DROPS Workshop on Facebook to get help from fellow knitters/crocheters!

You might also like...

Post a comment to pattern DROPS 226-15

We would love to hear what you have to say about this pattern!

If you want to leave a question, please make sure you select the correct category in the form below, to speed up the answering process. Required fields are marked *.

Comments / Questions (22)

country flag Rocío wrote:

El surco se refiere al punto inglés descrito en el patrón?

19.01.2022 - 05:14

DROPS Design answered:

Hola Rocío, 1 surco = trabajar 2 filas de derecho de ida y vuelta

23.01.2022 - 20:00

country flag Karin Nielsen wrote:

Jeg vil gerne strikke Frozen in time slipover, men hvilken betydning får det for det færdige resultat, hvis jeg udelader Kids Silk, eller erstatter det med et andet garn. Hvad vil du anbefale som tynd garn, hvis der skal 2 garner ind i arbejdet

31.12.2021 - 11:26

DROPS Design answered:

Hej Karin, du kan erstatte DROPS Kid Silk med feks DROPS Flora, Nord eller Alpaca fra garngruppe A. Prøv vores garnomregner, vælg Kid-Silk, vælg antal gram i din størrelse og vælg 1 tråd, så ser du hvilke alternativer som kommer op :)

05.01.2022 - 08:30

country flag Anna Lindgren wrote:

Hej! Jag vill inte ha luddig väst. Så om jag vill utesluta Kid silk och sticka med 1 tråd, vilket garn blir bäst? Måste ju stämma med stickfasthet.

25.12.2021 - 18:32

DROPS Design answered:

Hej Anna. Du kan välja ett annat garn från garngrupp A att sticka ihop med DROPS Sky, men se bara till att göra en provlapp först så att du får stickfastheten att stämma. Mvh DROPS Design

03.01.2022 - 12:29

country flag Ann-Karin wrote:

Hej! Mycket snygg modell! Jag vill sticka i en annan färg och ser att det finns många färger i Kid silk men inte så många som passar i Sky. Vilket annat garn kan jag kombinera med kid silk? Prövade med omvandlaren men tyckte det var svårt att hitta rätt då det handlar om 2 trådar, tacksam för svar.

27.11.2021 - 16:42

DROPS Design answered:

Hej Ann-Karin. Du kan byta ut DROPS Sky mot ett annat garn i garngrupp B, du hittar en översikt över våra garngrupper här. Se bara till att du får den stickfasthet som uppges i mönstret och att beräkna rätt garnåtgång. Mvh DROPS Design

29.11.2021 - 07:51

country flag Veerle wrote:

Als ik dit patroon wil breien met een enkele draad die 16 st. op 10 cm. is hoeveel heb ik dan nodig ?

22.11.2021 - 12:38

DROPS Design answered:

Dag Veerle,

Daarvoor kijk je naar de totale looplengte. Bijvoorbeeld door de looplengte van 1 bol DROPS Sky keer het aantal benodigde bollen te doen. Dit is de totale looplengte die je nodig hebt. Als je een ander garen kiest, deel je de looplengte van 1 bol van dat garen door de totale looplengte, om het aantal bollen te berekenen.

23.11.2021 - 10:36

country flag Kerstin Hasselgren wrote:

Jag förstår inte hur 154 maskor kan bli 75 cm vid stickfasthet 16 maskor per 10 cm (största storleken) Jag är medveten om att mönstret drar ihop men så mycket? En jättefin väst men det känns som det skulle bli ett tält.

21.11.2021 - 12:24

DROPS Design answered:

Hei Kerstin. Flettene trekke seg bra sammen. Nå hadde vi tilfelligvis "orginalen" her og jeg har målt vesten (denne er strikket i str. S). Midtpartien på vesten, men alle flettene (samme i alle str.) har et mål på ca 39 cm. 5 + 5 riller i sidene + 23 + 23 masker glattstrikk i hver side = 56 masker = ca 35 cm, 39 cm + 35 cm = 74 cm, stemmer ganske godt med de målene som er oppgitt i målskissen. mvh DROPS Ddesign

23.11.2021 - 13:06

country flag Michelle’s wrote:

There’s an odd number of stitches so should every other rib row begin with purl (after the 5 knit). If so you could maybe update the pattern as it’s not clear. I started all mine with a knit and have ended up with more of a moss stitch- which I’m on with - but as a relative beginner I didn’t know to start with purl until I googled. Thanks

20.11.2021 - 17:56

DROPS Design answered:

Dear Michelle, you are working a rib not moss stitch, so you need to work knit over knit and purl over purl. Happy knitting!

21.11.2021 - 19:59

country flag Jose wrote:

Hoi, als ik een ajour patroon brei op de rondbreinaald, kan ik dan gewoon doorbreien, of moet ik dan het hele werk keren om nog een toer averecht te breien? die averechte toer is voor rechte naalden beschreven, maar ik brei op de rondbreinaald. Alvast bedankt. Jose

19.11.2021 - 00:31

DROPS Design answered:

Dag Jose,

Nee, je kan een ajourpatroon gewoon door breien op de rondbreinaald. In het telpatroon zijn alle steken weergegeven en ook is aangegeven hoe je de steken op de goede dan wel op de verkeerde kant breit. Dus als je in de rondte breit, brei je de steken allemaal op de goede kant.

23.11.2021 - 12:41

country flag Cristina wrote:

È fantastico! Quando sarà disponibile il pattern? Gt

28.10.2021 - 11:52

country flag Susan wrote:

I love this when will the pattern be available?

21.10.2021 - 03:33