
Popular categories
Looking for a yarn?


|
|
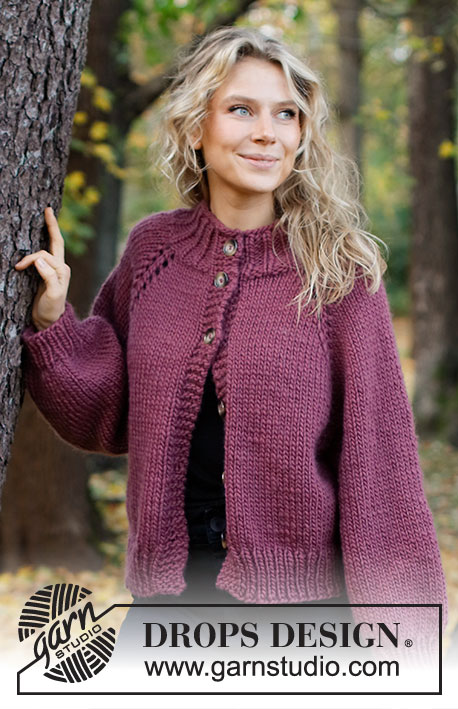
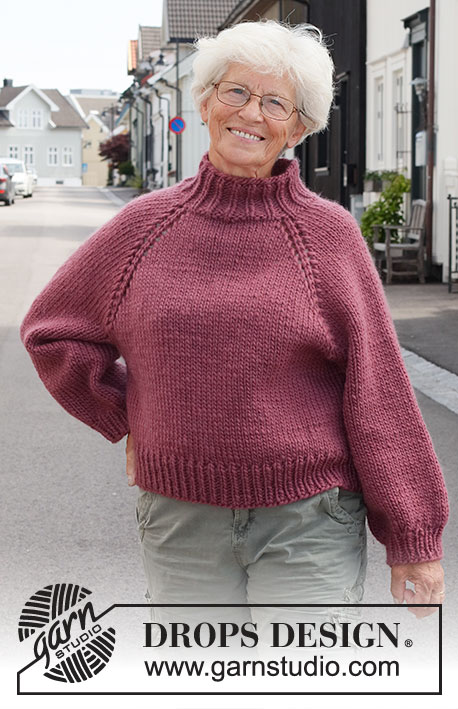
Crisp Cranberry |
|
 |
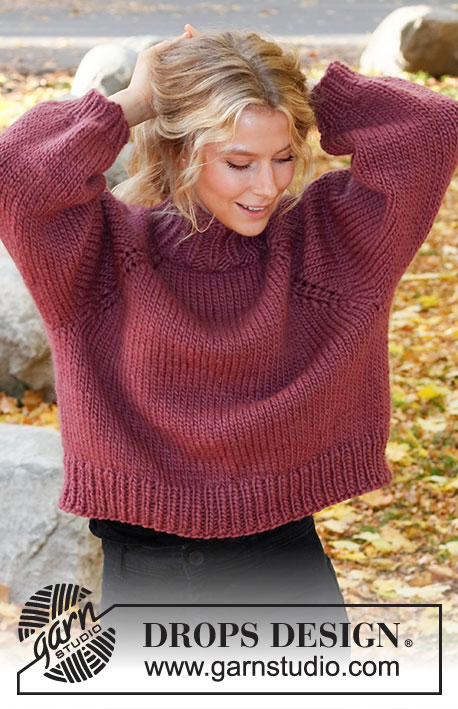 |
Knitted sweater in DROPS Snow. The piece is worked top down with raglan, balloon sleeves and broad, ribbed edging. Sizes XS - XXL.
DROPS 226-37 |
|
|
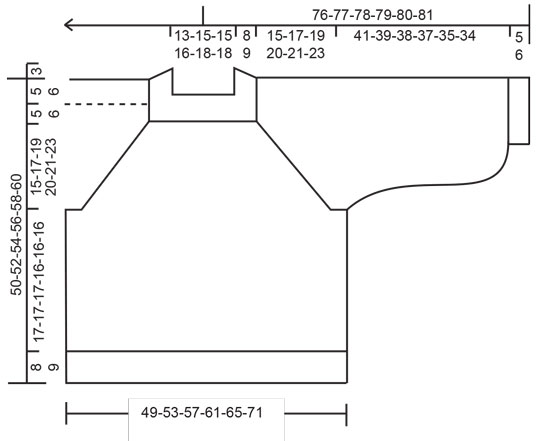
------------------------------------------------------- EXPLANATIONS FOR THE PATTERN: ------------------------------------------------------- INCREASE/DECREASE TIP (evenly spaced): To work out how to increase/decrease evenly, count the total number of stitches on needle (e.g. 60 stitches) and divide by the number of increases/decreases to be made (e.g. 6) = 10. In this example, increase by making 1 yarn over after each 10th stitch. On the next round knit the yarn overs twisted to avoid holes. When decreasing, knit together each 10th and 11th stitch. INCREASE TIP-1 (for neck): Increase 1 stitch at the end of a purled section by making 1 yarn over. On the next round purl the yarn overs twisted to avoid holes. NOTE: In sizes S, M, XL and XXL there is an odd number of purled sections – in these sizes it is necessary to increase in the 2 last purled sections at the end of the round the first time you increase. RAGLAN: Increase 1 stitch on each side of 1 stockinette stitch (raglan-stitch), in each transition between the front/back pieces and the sleeves (= 8 stitches increased on an increase-round). Increase 1 stitch by making 1 yarn over. On the next round knit the yarn overs to make holes. The new stitches are then worked in stockinette stitch. DECREASE TIP (for sleeves): Decrease as follows before the marker thread: Work until there are 3 stitches left before the marker thread, knit 2 together, 1 stockinette stitch (1 stitch decreased). Decrease as follows after the marker thread: 1 stockinette stitch, slip 1 stitch as if to knit, knit 1, pass the slipped stitch over the knitted stitch (= 1 stitch decreased). INCREASE TIP-2 (for sleeves): Increase as follows before the marker thread: Start 1 stitch before the marker thread, 1 yarn over, 1 stockinette stitch (= 1 stitch increased). Increase as follows after the marker thread: 1 stockinette stitch, 1 yarn over (= 1 stitch increased). On the next round knit the yarn overs twisted to avoid a hole. The new stitches are then worked in stockinette stitch. BINDING-OFF TIP: To avoid the bind-off edge being tight you can bind off with a larger size needle. If the edge is still tight, make 1 yarn over after approx. each 8th stitch at the same time as binding off; the yarn overs are bind off as normal stitches. ------------------------------------------------------- START THE PIECE HERE: ------------------------------------------------------- SWEATER – SHORT OVERVIEW OF THE PIECE: The neck and yoke are worked in the round with circular needle, top down from mid back. The yoke is divided for body and sleeves and the body continued in the round with circular needle. The sleeves are worked in the round with short circular needle/double pointed needles, top down. NECK: Cast on 42-45-45-48-51-51 stitches with short circular needle size 8 MM = US 11 and DROPS Snow. Knit 1 round. Then work rib in the round (knit 1, purl 2). When the rib measures 3 cm = 1⅛", insert 1 marker in the middle of the round (= mid-front) – the piece is measured from this marker! When the rib measures 4 cm = 1½", increase 7-8-8-8-9-9 stitches by increasing every other purl-2 section to purl-3 – read INCREASE TIP-1 = 49-53-53-56-60-60 stitches. When the rib measures 7-7-7-7-8-8 cm = 2¾"-2¾"-2¾"-2¾"-3⅛"-3⅛", increase the remaining purl-2 sections to purl-3 = 56-60-60-64-68-68 stitches. When the rib measures 8-8-8-8-9-9 cm = 3⅛"-3⅛"-3⅛"-3⅛"-3½"-3½", knit 1 round where you increase 2-6-6-6-6-6 stitches evenly spaced – read INCREASE/DECREASE TIP = 58-66-66-70-74-74 stitches. Now work the yoke as described below. YOKE: Change to circular needle size 9 MM = US 13. Insert 4 markers in the piece, without working the stitches. These markers are used when increasing to raglan. Count 10-12-12-12-13-13 stitches (= approx. ½ back piece), insert 1 marker in the next stitch (= raglan-stitch), count 8-8-8-10-10-10 stitches (= sleeve), insert 1 marker in the next stitch (= raglan-stitch) count 19-23-23-23-25-25 stitches (= front piece), insert 1 marker in the next stitch (= raglan-stitch), count 8-8-8-10-10-10 stitches (= sleeve), insert 1 marker in the next stitch (= raglan-stitch). There are 9-11-11-11-12-12 stitches left after the last raglan-stitch (= approx. ½ back piece). Work stockinette stitch in the round, AT THE SAME TIME on the first round increase to RAGLAN on each side of the 4 raglan-stitches – read description above. Increase to raglan every 2nd round a total of 10-11-13-14-14-16 times. REMEMBER THE KNITTING GAUGE! After the last increase to raglan there are 138-154-170-182-186-202 stitches on the needle. Continue working without further increases until the piece measures 20-22-24-25-27-29 cm = 8"-8¾"-9½"-9¾"-10⅝"-11⅜" from the marker on the neck. Now divide the piece for the body and sleeves on the next round as follows: Work the first 22-24-26-28-29-32 stitches (= approx. ½ back piece), place the next 26-30-34-36-36-38 stitches on a thread for the sleeve, cast on 6-6-6-6-8-8 new stitches (= in side under sleeve), work the next 43-47-51-55-57-63 stitches (= front piece), place the next 26-30-34-36-36-38 stitches on a thread for the sleeve, cast on 6-6-6-6-8-8 new stitches (= in side under sleeve), work the last 21-23-25-27-28-31 stitches (= approx. ½ back piece). Body and sleeves are finished separately. THE PIECE IS NOW MEASURED FROM HERE! BODY: = 98-106-114-122-130-142 stitches. Continue in the round with stockinette stitch until the piece measures 17-17-17-16-16-16 cm = 6¾"-6¾"-6¾"-6¼"-6¼"-6¼" from the division. There is approx. 8-8-8-9-9-9 cm = 3⅛"-3⅛"-3⅛"-3½"-3½"-3½" left to finished length; try the sweater on and work to desired length. Change to circular needle size 8 MM = US 11. Work rib (knit 1, purl 1) for 8-8-8-9-9-9 cm = 3⅛"-3⅛"-3⅛"-3½"-3½"-3½". Bind off with knit over knit and purl over purl – read BINDING-OFF TIP! The sweater measures approx. 50-52-54-56-58-60 cm = 19¾"-20½"-21¼"-22"-22¾"-23⅝" from the shoulder down. SLEEVES: Place the 26-30-34-36-36-38 stitches from the thread on the one side of the piece on double pointed needles/short circular needle size 9 MM = US 13 and knit up 1 stitch in each of the 6-6-6-6-8-8 stitches cast on under the sleeve = 32-36-40-42-44-46 stitches. Insert a marker thread in the middle of the 6-6-6-6-8-8 stitches under the sleeve. Allow the thread to follow your work onwards; it will be used when decreasing and increasing under the sleeve. Start the round at the marker thread and work stockinette stitch in the round. When the sleeve measures 3 cm = 1⅛" from the division, decrease 1 stitch before the marker thread – read DECREASE TIP. When the sleeve measures 6 cm = 2⅜" from the division, decrease 1 stitch after the marker thread. Repeat the decrease before the marker thread when the sleeve measures 9 cm = 3½" and after the thread when the sleeve measures 12 cm = 4¾" from the division = 28-32-36-38-40-42 stitches. When the sleeve measures 16 cm = 6¼" from the division, increase 1 stitch before the marker thread – read INCREASE TIP-2. Increase alternately before and after the thread every 2 cm = ¾" a total of 10-8-6-6-6-6 times = 38-40-42-44-46-48 stitches. Continue working until the sleeve measures 41-39-38-37-35-34 cm = 16⅛"-15¼"-15"-14½"-13¾"-13⅜" from the division (shorter measurements in larger sizes due to wider neck and longer yoke). There is approx. 5-5-5-6-6-6 cm = 2"-2"-2"-2⅜"-2⅜"-2⅜" left to finished length; try the sweater on and work to desired length. Knit 1 round where you decrease 12-12-12-12-14-14 stitches evenly spaced – remember the INCREASE/DECREASE TIP = 26-28-30-32-32-34 stitches. Change to double pointed needles size 8 MM = US 11 and work rib (knit 1, purl 1) for 5-5-5-6-6-6 cm = 2"-2"-2"-2⅜"-2⅜"-2⅜". Bind off with knit over knit and purl over purl – remember BINDING-OFF TIP! The sleeve measures approx. 46-44-43-43-41-40 cm = 18"-17¼"-17"-17"-16⅛"-15¾" from the division. Work the other sleeve in the same way. |
|
|
|
|
Have you made this or any other of our designs? Tag your pictures in social media with #dropsdesign so we can see them! Do you need help with this pattern?You'll find tutorial videos, a Comments/Questions area and more by visiting the pattern on garnstudio.com. © 1982-2024 DROPS Design A/S. We reserve all rights. This document, including all its sub-sections, has copyrights. Read more about what you can do with our patterns at the bottom of each pattern on our site. |
|


With over 40 years in knitting and crochet design, DROPS Design offers one of the most extensive collections of free patterns on the internet - translated to 17 languages. As of today we count 304 catalogs and 11422 patterns - 11417 of which are translated into English (US/in).
We work hard to bring you the best knitting and crochet have to offer, inspiration and advice as well as great quality yarns at incredible prices! Would you like to use our patterns for other than personal use? You can read what you are allowed to do in the Copyright text at the bottom of all our patterns. Happy crafting!
Comments / Questions (20)
DROPS Design answered: Buongiorno Francesca, ha seguito le istruzioni di lavaggio riportate sull'etichetta? Può provare a lavorare con Wish o Andes. Buon lavoro! Buongiorno Garnstudio, ma sulla vostra etichetta non ci sono le istruzioni di lavaggio….dove si trovano?
07.04.2024 - 08:13Buongiorno Garnstudio, ho fatto 2 maglie con il filato Drops Snow ed entrambe dopo il lavaggio si sono infeltrite, ristrette e quindi non più mettibili. Potreste consigliarmi per cortesia un altro tipo di filato simile ma che non si restringa dopo il lavaggio? Grazie e a presto. Francesca.
04.04.2024 - 13:51DROPS Design answered:
Buongiorno Francesca, ha seguito le istruzioni di lavaggio riportate sull'etichetta? Può provare a lavorare con Wish o Andes. Buon lavoro!
06.04.2024 - 09:34In the neck part, we add a marker after 3 cm rib to measure the piece from this point. It means that when the pattern says, "when the rib measures 4 cm ..." we should measure 4 cm rib from this marker and not the beginning, so the overall piece should be 7 cm, right? Thank you!
24.11.2023 - 22:19DROPS Design answered:
Dear Tannaz, yes, it should be 4cm from the marker, so it's 7cm in total. Happy knitting!
26.11.2023 - 19:26Hei, neulon suurinta kokoa ja täällä hämmentää kohta: "Jatka sileää neuletta ilman lisäyksiä, kunnes työn pituus pääntien reunuksen merkistä mitattuna on 20-22-24-25-27-29 cm." Eli siitäkö merkistä josta mainittiin näin: "Kun joustinneuleen pituus on 3 cm, kiinnitä 1 merkki kerroksen keskelle (= keskietu), työn mitat otetaan jatkossa tästä merkistä!". ja jos tuosta merkistä lasketaan niin kaulasta kainaloon tulisi vain noin 20cm? kovin naftilta tuntuu.
11.10.2023 - 04:59DROPS Design answered:
Hei, tämä mitta on oikea. Voit kuitenkin halutessasi neuloa muutaman senttimetrin lisää.
18.10.2023 - 16:52Je tricote ce modele en taille S; il y a un probleme quand il est indiqué de tricoter 17cm depuis la separation et apres les cotes et la mesure de l epaule jusq en bas 52CM ca ne correspond pas ..merci de votre reponse
08.07.2023 - 20:50DROPS Design answered:
Bonjour Anita, essayez votre pull pour voir si la longueur de l'emmanchure est correcte pour vous. Si c'est le cas, le bas du pull peut etre ajuste comme vous voulez. Bon tricot!
25.07.2023 - 15:57Je realise ce modele en taille S qui est tres mal expliqué! de plus arrivee a l empiecement une fois les marqueurs positionnés avec le nombre de mailles que vous indique on se retrouve pour les dos avec 15 mailles d un cote demi dos et 12 mailles de l autre second demi dos? pourqoi indiquez vous approximativement; tout doit etre calculé a la maille près; en tricot! merci de votre retour expilcatif
26.06.2023 - 17:31DROPS Design answered:
Bonjour Mme Beauvillain, les tours commencent approximativement au milieu dos car le nombre de mailles du dos est impair, on va avoir 12 m pour la 1ère partie (la fin dos) et 11 m pour la 2ème partie du dos (le début du dos, tricoté à la fin du tour). Si vous avez d'autres questions, n'hésitez surtout pas. Bon tricot!
27.06.2023 - 08:43Bom dia. Quantos novelos são necessários para fazer uma camisola do tamanho S e M? Obrigada
22.12.2022 - 16:57DROPS Design answered:
Bom dia! Para o tamanho S, são precisos 11 novelos do fio Snow. Para o tamanho M, são precisos 13 novelos do fio Snow. Boas Festas!
23.12.2022 - 09:34Ho una domanda sul modello Cripsy Cranberry(taglia M): per quanto rigiarda il collo le coste devono misurare 7 cm dall' inizio del collo o dal segnapunti?
30.05.2022 - 11:53DROPS Design answered:
Buonasera Benedetta, in quel punto la misura delle coste è presa dall'inizio del lavoro. Buon lavoro!
30.05.2022 - 16:11Dobrý den, nemohu u žádného návodu najít předpokládanou spotřebu příze na model. Mohla bych se zeptat, kde spotřebu najdu, abych si mohla příslušný počet klubek objednat? Děkuji předem za odpověď. Eliška
07.03.2022 - 10:37DROPS Design answered:
Dobrý den, Eliško! Spotřebu uvádíme vždy hned v hlavičce, u hlavní fotky modelu, společně s použitou přízí, velikostmi a dalšími potřebnými údaji. Pro tento konkrétní model je to : VELIKOSTI: XS - S - M - L - XL - XXL, MATERIÁL: DROPS SNOW firmy Garnstudio (spadá do skupiny přízí E) 550-650-700-750-850-900 g barva č. 91, víno. Spotřeba příze je uvedena ve stejném pořadí jako velikosti (XS = 550g, L = 750 g atd.) Hodně zdaru! Hana
17.03.2022 - 05:42When finishing the collar and adding the stitch markers, the division of the stitches does not match with the total stitches we have at the end of the collar. How many stitches should be reserved for front, end and each sleave? Thanks!
03.02.2022 - 09:33DROPS Design answered:
Dear Hanna, are you missing 4 stitches? Please note that the markers should be inserted in one stitch, and then you should get the correct number of stitches around. Happy knitting!
03.02.2022 - 14:05