
Popular categories
Looking for a yarn?


Comments / Questions (21)
![]() Maylis Delest wrote:
Maylis Delest wrote:
Bonjour Je n’arrive pas a démarrer le tricot. Je tricote du 5 ans. Si je suis l’échantillon il y a 17mailles pour 10cm 64 mailles /17 mailles cela fait environ 37 cm En tirant j’arrive à 42 cm mais la tête d’un enfant de 5 ans c’est 50cm Comment trouver les 8cm restant sachant qu’en plus on tricote en théorie avec des aiguilles 4mm …. Quelqu’un peut il m’aider ? Merci d’avance.
20.01.2025 - 16:37DROPS Design answered:
Bonjour Mme Delest, vos 64 mailles doivent se retrouver autour du cou et par conséquent ne doivent pas être plus larges que la tête; si votre rang de montage est trop serré, n'hésitez pas à utiliser une aiguille plus grosse / 2 aiguilles / 2 fils (ou autre technique) pour le montage puis tricotez les côtes - si votre tension est juste, l'enfant pourra y passer la tête facilement. Bon tricot!
21.01.2025 - 09:24
![]() Germana wrote:
Germana wrote:
Spiegazioni chiare e misure perfette!!! Grazie, con i vostri modelli anche senza grande esperienza si può fare un capo bellissimo.
24.11.2024 - 13:15
![]() Päivi Ilonen wrote:
Päivi Ilonen wrote:
Miten luodaan apulangan silmukoiden tilalle 6 silmukkaa?
25.10.2024 - 20:35DROPS Design answered:
Hei, katso esim. seuraava DROPS oppitunti sivuiltamme: Neulomisen perusteet: Silmukoiden luominen kerroksen loppuun.
29.10.2024 - 16:34
![]() Marjorie wrote:
Marjorie wrote:
Bonjour, je souhaite faire une réhausse de dos. Comment est ce qu il faut que je m'y prenne? Est ce qu il y a un autre modèle enfant avec les explications pour faire une réhausse? Merci de votre réponse. Cordialement
23.10.2024 - 20:58
![]() Marjorie wrote:
Marjorie wrote:
Bonjour, je souhaite faire une réhausse de dos. Comment est ce qu il faut que je m'y prenne? Est ce qu il y a un autre modèle enfant avec les explications pour faire une réhausse? Merci de votre réponse. Cordialement
23.10.2024 - 20:56DROPS Design answered:
Bonjour Marjorie, vous pouvez vous inspirer d'un modèle similaire avec rehausse (nous n'avons pas de mot-clé pour ce type de modèle, il vous faudra consulter les différents modèles de type pull empiècement arrondi de haut en bas, éventuellement pour adulte pour recalculer au prorata). Bon tricot!
24.10.2024 - 09:19
![]() THELIN wrote:
THELIN wrote:
Sur ce modèle et d'après mon échantillon, j'ai 84 mailles après les 12 d'augmentation. Je dois faire le diagramme A1, bon d'accord. Mais il manque un texte, car je me retrouve d'après vos indications avec 224 mailles, mais comment faire? Je suis bloquée dans un pull pour ma petite fille. Il doit être fini pour le 24 décembre! C'est la première fois que j'achète sur votre site, mais je suis un peu perdue... merci de m'aider.
06.12.2023 - 14:50DROPS Design answered:
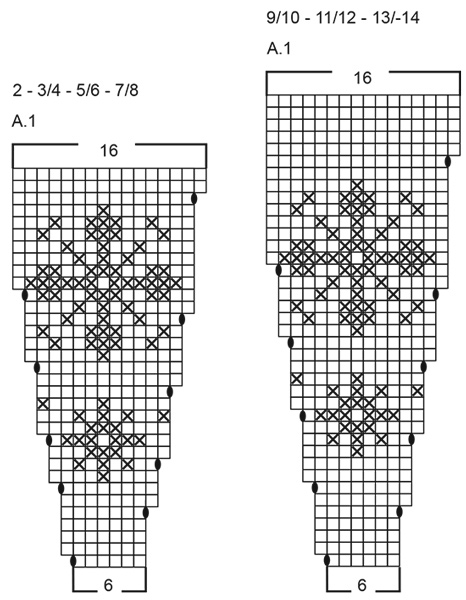
Bonjour Mme Thelin, vous tricotez la 5ème taille soit 9/10 ans, correct? Vous allez donc tricoter 14 fois A.1 tout le tour (14 x 6 mailles au 1er tour= 84 mailles), vous allez augmenter comme indiqué dans le diagramme (en faisant 1 jeté alternativement au début /à la fin de chaque A.1, jeté tricoté torse au tour suivant); Quand A.1 est terminé, vous avez 16 m dans chaque A.1 x 14 motifs = 224 mailles. Bon tricot!
06.12.2023 - 16:09
![]() Fabienne STASIAK wrote:
Fabienne STASIAK wrote:
Par quel fil puis je remplacer "drops air" Merci par avance
02.11.2023 - 18:03DROPS Design answered:
Bonjour Mme Stasiak, vous pouvez utiliser un autre fil du groupe de fils C ou bien 2 fils du groupe A tricotés ensemble, utilisez notre convertisseur pour voir toutes les alternatives possibles et les nouvelles quantités correspondantes. Bon tricot!
03.11.2023 - 06:26
![]() Rosemarie Zimmermann wrote:
Rosemarie Zimmermann wrote:
Eine schöne Anleitung für die Mütze "Merry Star" ! Ich nutze ausserdem gern die Videos, sie sind sehr informativ und erleichtern mir häufig die Handarbeit. Danke!
20.12.2022 - 23:33
![]() Teresa wrote:
Teresa wrote:
Gracias por su contestacion pero aun me quedan dudas. 1. El ancho total del cuello son 18 cm o 36 cm? 2. El ancho del cuerpo (espalda + delantero) son 44 o 88 cm? 3. Al salirme que tengo que montar más puntos, cómo los reparto en el diagrama A1 del dibujo. Gracias
07.12.2022 - 14:33DROPS Design answered:
Hola Teresa, puedes ver en el diagrama las medidas de la mitad del contorno de las diferentes partes del cuerpo. 18 cm es la mitad del cuello; el contorno del cuello es 36 cm. El contorno del cuerpo es 88 cm. Puedes aumentar el número de pts para montar, asegurándose de aumentar una cantidad de pts que sea múltiple de 6 (añadiendo 1 o más repeticiones de A.1). Puedes montar más puntos desde el cuello o puedes aumentar los puntos después de trabajar el cuello y al comenzar el canesú, para que el cuello no quede demasiado ancho.
11.12.2022 - 20:48
![]() Teresa wrote:
Teresa wrote:
En el modelo merry stars la medida del cuerpo para talla 13/14 es 88 cm (44x2) cierto? Es que si hago el calculo con la muestra que dicen de 18 puntos por 10 cm serian 82 cm para 148 puntos que quedan despues de separar las mangas. Tengo que adaptar mi muestra (22 puntos x 10 cm) y voy comprobando todos los calculos. No puedo hacerlo con agujas del 5 que sí me dan los 18 puntos pero queda el punto demasiado abierto. Gracias
05.12.2022 - 18:58DROPS Design answered:
Hola Teresa, tu tensión es algo más prieta que la utilizada en el patrón ( 17pts = 10cm), por lo que, si estás trabajando con el mismo hilo, vas a tener que cambiar los cálculos del patrón para alcanzar las medidas del diagrama. Puedes ver aquí cómo hacer los cálculos para el patrón: https://www.garnstudio.com/lesson.php?id=25&cid=23
06.12.2022 - 18:54
|
||||||||||
Merry Stars#merrystarssweater |
||||||||||
 |
 |
|||||||||
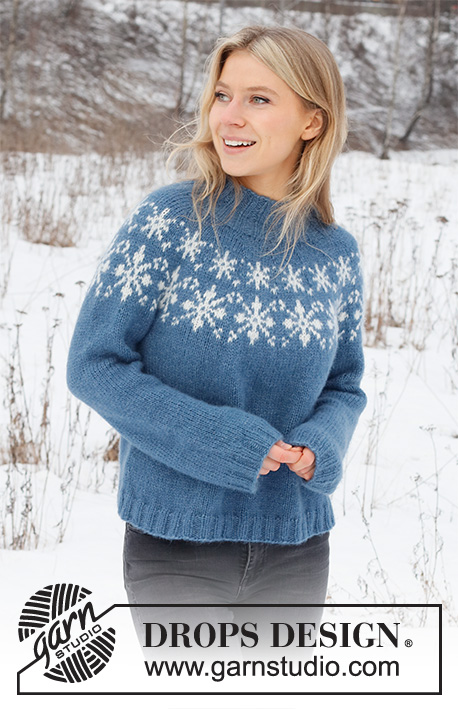
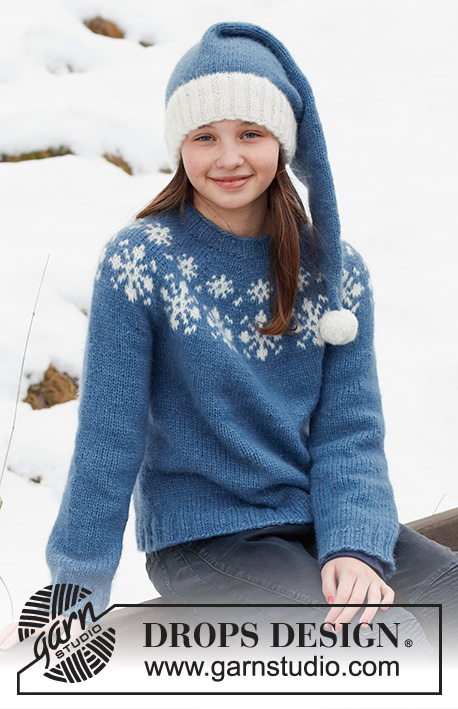
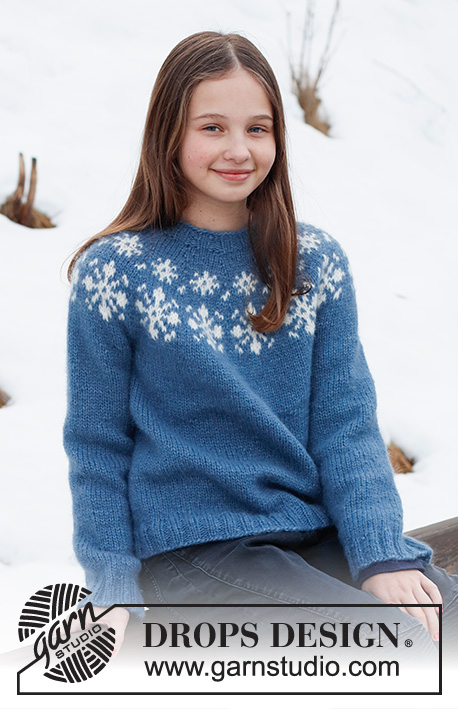
Knitted Christmas jumper and hat for children in DROPS Air. The jumper is worked top down with round yoke and snow-flake pattern. The hat is worked in the round, bottom up. Sizes 2 - 14 years. Theme: Christmas.
DROPS Children 41-4 |
||||||||||
|
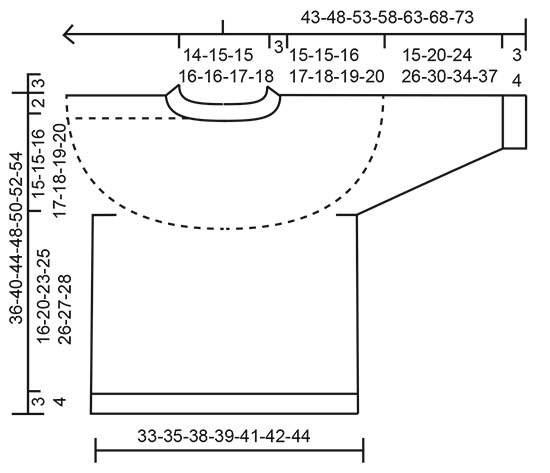
------------------------------------------------------- EXPLANATIONS FOR THE PATTERN: ------------------------------------------------------- INCREASE/DECREASE TIP (evenly spaced): To work out how to increase/decrease evenly, count the total number of stitches on needle (e.g. 60 stitches), and divide by the number of increases/decreases to be made (e.g. 6) = 10. In this example, increase by making 1 yarn over after each 10th stitch. On the next round knit the yarn overs twisted to avoid holes. When decreasing, knit together each 9th and 10th stitch. PATTERN: See diagram A.1. Choose the diagram for your size. The pattern is worked in stocking stitch. KNITTING TIP: To avoid the garment losing its elasticity when working pattern, it is important that the strands at the back are not tight. Use a larger size needle when working pattern if the piece becomes tight. DECREASE TIP-2 (for sleeves): Decrease 1 stitch on either side of the marker thread as follows: Work until there are 3 stitches left before the marker thread, knit 2 together, knit 2 (marker thread sits between these 2 stitches), slip 1 stitch as if to knit, knit 1 and pass the slipped stitch over the knitted stitch. DECREASE TIP-3 (for hat): Work until there are 2 stitches left before the marker, knit 2 together (= 1 stitch decreased). Repeat at each marker. CASTING-OFF TIP: To avoid the cast-off edge being tight you can cast off with a larger size needle. If the edge is still tight, make 1 yarn over after approx. each 4th stitch at the same time as casting off; the yarn overs are cast off as normal stitches. ------------------------------------------------------- START THE PIECE HERE: ------------------------------------------------------- JUMPER – SHORT OVERVIEW OF THE PIECE: The neck and yoke are worked in the round with circular needle, from mid back and top down. The yoke is divided for body and sleeves and the body is continued in the round with circular needle. The sleeves are worked with double pointed needles/short circular needle, top down. NECK: Cast on 60-64-64-68-68-72-76 stitches with double pointed needles/short circular needle size 4 mm and denim blue DROPS Air. Knit 1 round. Then work rib in the round (knit 2, purl 2) for 3 cm. Change to circular needle size 5 mm. YOKE: Insert 1 marker at the beginning of the round; the yoke is measured from this marker! Knit 1 round where you increase 6-8-14-10-16-12-14 stitches evenly spaced – read INCREASE/DECREASE TIP = 66-72-78-78-84-84-90 stitches. Now work according to diagram A.1 (= 11-12-13-13-14-14-15 repeats of 6 stitches). NOTE! Choose diagram for your size. Read KNITTING TIP! REMEMBER THE KNITTING TENSION! When A.1 is finished in height there are 176-192-208-208-224-224-240 stitches. Knit 1 round with denim blue where you decrease 4-8-12-8-12-4-8 stitches evenly spaced = 172-184-196-200-212-220-232 stitches. Continue with stocking stitch and denim blue until the yoke measures 15-15-16-17-18-19-20 cm from the marker. Now divide for the body and sleeves: Knit 25-27-29-30-32-33-34 (= half back piece), place the next 36-38-40-40-42-44-48 stitches on 1 thread, cast on 6 stitches (= in side under sleeve), knit 50-54-58-60-64-66-68 (= front piece), place the next 36-38-40-40-42-44-48 stitches on 1 thread, cast on 6 stitches (= in side under sleeve), knit the last 25-27-29-30-32-33-34 stitches (= half back piece). The body and sleeves are finished separately. THE PIECE IS NOW MEASURED FROM HERE! BODY: There are now 112-120-128-132-140-144-148 stitches on needle. Continue in the round with stocking stitch and denim blue for 16-20-23-25-26-27-28 cm (or to desired length; there is approx. 3-3-3-4-4-4-4 cm left to finished length). Change to circular needle size 4 mm. Work rib (knit 2, purl 2) for 3-3-3-4-4-4-4 cm. Loosely cast off with knit over knit and purl over purl – read CASTING-OFF TIP. Cut and fasten the strand. The jumper measures approx. 36-40-44-48-50-52-54 cm from the shoulder down. SLEEVES: Place the 36-38-40-40-42-44-48 stitches from the thread on the one side of the piece on double pointed needles/short circular needle size 5 mm and knit up 1 stitch in each of the 6 stitches cast on under the sleeve = 42-44-46-46-48-50-54 stitches. Insert a marker thread in the middle of the 6 stitches under the sleeve. Allow the thread to follow your work onwards; it will be used when decreasing under the sleeve. Start at the marker thread and work stocking stitch in the round, with denim blue, for 3 cm. Now decrease 2 stitches under the sleeve – read DECREASE TIP-2. Decrease like this every 3-5-6-7-8-9-10 cm a total of 4 times = 34-36-38-38-40-42-46 stitches. Continue working until the sleeve measures 15-20-24-26-30-34-37 cm from the division. There is approx. 3-3-3-4-4-4-4 cm left to finished length; try the jumper on and work to desired length. Knit 1 round where you increase 6-4-6-6-4-6-2 stitches evenly spaced = 40-40-44-44-44-48-48 stitches. Change to double pointed needles size 4 mm. Work rib (knit 2, purl 2) for 3-3-3-4-4-4-4 cm. Cast off with knit over knit and purl over purl – remember CASTING-OFF TIP! The sleeve measures approx. 18-23-27-30-34-38-41 cm from the division. Work the other sleeve in the same way. ------------------------------------------------------- HAT – SHORT OVERVIEW OF THE PIECE: The piece is worked with circular needle, in the round and bottom up. Change to double pointed needles when necessary, after decreasing stitches at the top. HAT: Cast on 96-100-104-108-112 stitches with circular needle size 3.5 mm and off-white DROPS Air. Purl 1 round. Then work rib in the round (knit 2, purl 2) for 4-5-5-6-6 cm. Change to circular needle size 4.5 mm and knit 1 round where you decrease 12-12-12-12-12 stitches evenly spaced – read INCREASE/DECREASE TIP = 84-88-92-96-100 stitches. Change to denim blue and continue with stocking stitch. REMEMBER THE KNITTING TENSION! When the piece measures 18-19-19-19-20 cm from the cast-on edge, decrease 0-4-2-0-4 stitches evenly spaced = 84-84-90-96-96 stitches. Insert 6 markers with 14-14-15-16-16 stitches between each one. On the next round decrease 1 stitch before each marker – read DECREASE TIP-2 (= 6 stitches decreased). Decrease like this every 2nd round a total of 2-2-2-3-3 times. Then every 6th-7th-7th-7th-7th round 10-10-11-11-11 times = 12 stitches. Work until the hat measures 50-52-54-56-58 cm, then knit all stitches together 2 and 2 = 6 stitches. Cut the strand and pull it through the remaining stitches, tighten and fasten well. POM-POM: Make a pom-pom of 5 cm in diameter with off-white. Sew it to the top of the hat. |
||||||||||
Diagram explanations |
||||||||||
|
||||||||||
|
||||||||||
|
||||||||||
Have you finished this pattern?Tag your pictures with #dropspattern #merrystarssweater or submit them to the #dropsfan gallery. Do you need help with this pattern?You'll find 30 tutorial videos, a Comments/Questions area and more by visiting the pattern on garnstudio.com. © 1982-2025 DROPS Design A/S. We reserve all rights. This document, including all its sub-sections, has copyrights. Read more about what you can do with our patterns at the bottom of each pattern on our site. |
||||||||||


With over 40 years in knitting and crochet design, DROPS Design offers one of the most extensive collections of free patterns on the internet - translated to 17 languages. As of today we count 314 catalogues and 11822 patterns translated into English (UK/cm).
We work hard to bring you the best knitting and crochet have to offer, inspiration and advice as well as great quality yarns at incredible prices! Would you like to use our patterns for other than personal use? You can read what you are allowed to do in the Copyright text at the bottom of all our patterns. Happy crafting!
Post a comment to pattern DROPS Children 41-4
We would love to hear what you have to say about this pattern!
If you want to leave a question, please make sure you select the correct category in the form below, to speed up the answering process. Required fields are marked *.